Table of Contents
Let's face it, the annual pumpkin carving ritual often goes one of two ways: you either end up with a masterpiece worthy of the neighborhood spotlight, or a lopsided, vaguely mournful gourd that looks like it's seen better days (which it has, before you got your hands on it). Freehand carving sounds fun until you're halfway through, covered in pulp, and wondering if duct tape can fix a collapsing nose. But what if there was a way to guarantee a genuinely cool result without the artistic stress? Enter the world of stencils.
Why Stencils Make Pumpkin Carving Easy (and Cool)
Why Stencils Make Pumpkin Carving Easy (and Cool)
Taking the Guesswork Out of Great Designs
Let's be honest, staring at a blank pumpkin with a sharp knife in hand can feel a bit daunting. Especially if your artistic talents peaked with stick figures. This is where stencils become your secret weapon. They provide a clear, defined path to follow, eliminating the guesswork and the dreaded "oops" moments that turn a grin into a grimace. You're not trying to sketch a perfect circle or a sharp point freehand; the stencil does the heavy lifting by outlining exactly where your carving tool needs to go. It dramatically lowers the skill floor needed to create something recognizable and, dare I say, impressive.
Think about it: you print a design, tape it on, poke holes along the lines, and then connect the dots with your saw. It's less about innate artistic talent and more about following instructions. This makes the whole process less stressful and way more accessible for everyone, from nervous first-timers to seasoned carvers looking for efficiency. Stencils transform the often-messy, unpredictable task of pumpkin carving into a more controlled and manageable project, increasing your chances of a successful outcome exponentially.
Unlocking Cooler, More Intricate Patterns
Beyond just making simple designs easier, stencils open up a whole new world of complexity and detail that would be incredibly difficult, if not impossible, to achieve freehand. Want a detailed portrait of a movie monster? A complex geometric pattern? A specific logo? Good luck sketching that accurately onto a curved, bumpy surface with a pencil. Stencils allow you to transfer intricate lines, fine details, and even shading guides directly onto the pumpkin.
This means you can move past the basic triangle eyes and jagged mouth (though those are classics for a reason!) and create genuinely cool, unique jack-o'-lanterns that stand out. You can tackle designs with varying levels of depth, cut out negative space to create striking silhouettes, or even incorporate areas where you just scrape the skin away instead of cutting through. Stencils provide the roadmap to these advanced techniques, making those "how did they do that?" pumpkins achievable for you.
Why use a stencil?
- Reduces errors and guesswork.
- Makes complex designs accessible.
- Saves time and frustration.
- Increases chance of a cool, clean result.
- Great for all skill levels.
Choosing the Right Pumpkin and Stencil Cool Easy Pumpkin Carving Ideas

Choosing the Right Pumpkin and Stencil Cool Easy Pumpkin Carving Ideas
Picking the Perfect Gourd for the Job
Alright, so you're sold on the stencil idea. Great choice. Now, before you even think about designs, you need a pumpkin that's up to the task. Don't just grab the first round orange thing you see. Look for one with a smooth, relatively flat surface. Bumps and deep ridges are the enemy of a clean stencil transfer. A nice, even surface makes it much easier to tape the stencil down without wrinkles or gaps, which means your lines will be crisp when you start poking holes. Also, check the bottom – you want it to sit stable without wobbling, especially if you plan to put a light inside.
Give it a tap. A good carving pumpkin should sound hollow. Avoid any with soft spots, bruises, or cuts, as these can rot quickly and mess up your design before Halloween even arrives. The stem should be firmly attached too; it's a sign of a healthy pumpkin. Think of it as picking your canvas – a solid, smooth surface is half the battle won before you even pick up a tool. Size matters too; a larger pumpkin gives you more space for intricate designs, while a smaller one is easier to handle for simpler patterns.
Matching Your Stencil to Your Skill (and Pumpkin)
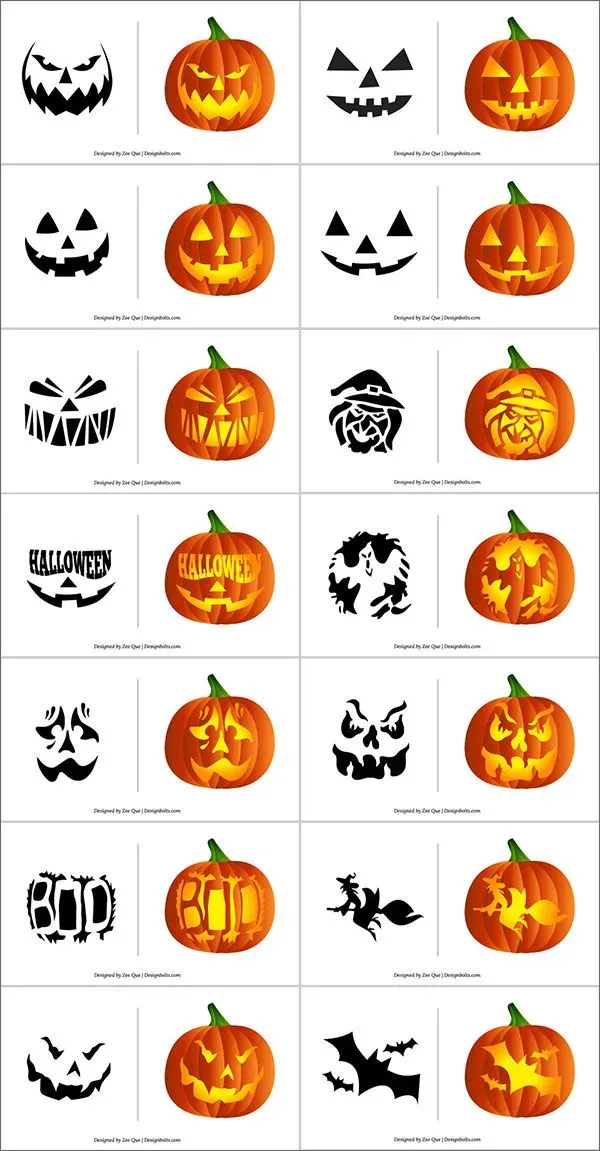
Now for the fun part: choosing your design. You've got endless options for stencil cool easy pumpkin carving ideas online. But here's the catch: don't pick a super complex, fine-detailed vampire bat if you've never carved before or if your pumpkin is on the smaller side. Be realistic about your comfort level and the size of your pumpkin. Start with something simpler – bold lines, larger shapes. There are tons of fantastic stencils designed specifically for beginners that still look awesome.
Consider what you want the final look to be. Do you want to cut all the way through for a glowing silhouette, or do you want to scrape away layers of skin for a shaded effect? Some stencils are better suited for one technique than the other. Read the stencil instructions or description if you can. A good rule of thumb is that if a design looks like it has a million tiny pieces or super thin lines, it's probably more challenging. Pick a few options you like and then think about which one best fits the pumpkin you chose and the amount of time and patience you have.
Pumpkin Feature | Why It Matters for Stencils |
|---|---|
Smooth Surface | Allows stencil to lie flat for accurate transfer. |
Firmness (no soft spots) | Ensures the pumpkin lasts and holds its shape during carving. |
Stable Base | Prevents wobbling while carving and displaying. |
Size | Larger allows for more detail; smaller is easier to handle. |
StepbyStep: Using Your Stencil for Easy Pumpkin Carving
StepbyStep: Using Your Stencil for Easy Pumpkin Carving
Transferring Your Design: The Crucial First Step
Alright, you've got your perfect pumpkin and your chosen stencil for some truly stencil cool easy pumpkin carving ideas. Now comes the slightly fiddly but absolutely essential part: getting that design onto the gourd. Print your stencil at the right size for your pumpkin. Cut closely around the design edges, leaving a small border. Now, tape it firmly to the smoothest part of your pumpkin. This is where that smooth surface you picked earlier pays off. Use plenty of tape, making sure the paper lies as flat as possible against the curve. Any wrinkles mean distorted lines, and distorted lines mean a wonky design. Once it's secure, grab your poking tool – a pumpkin poking tool, a thumbtack, or even a sharp pencil works. Start poking small, close-together holes along all the lines of your stencil. Think of it like creating a dotted outline on the pumpkin skin. Keep your pokes close enough that you can easily see the line when you remove the paper, but not so close they tear the paper or blur together. This dotted line is your carving guide.
Beyond the Basics: Lighting and Displaying Your Stencil Carved Pumpkin
Beyond the Basics: Lighting and Displaying Your Stencil Carved Pumpkin
Making Your Masterpiece Glow
you’ve successfully used your stencil cool easy pumpkin carving ideas to create something that doesn't immediately scream "carving fail." Now, the final act: making it shine. Shoving a cheap tea light inside is the classic move, sure, but let's be real, it's a fire hazard waiting to happen, and it usually just creates a weak, flickering glow that barely illuminates your hard work. For a safer and much brighter effect, consider battery-operated LED lights. They come in various colors and intensities. A single bright white LED can make clean cuts pop, while a color-changing one can add an eerie or festive vibe. You can also string small LED fairy lights inside for a more diffused, magical look, especially if your design has lots of smaller cutouts. Proper lighting is like the final polish on your artistic endeavor; it takes your stencil-guided creation from "okay" to "wow, someone actually put effort into that."
Your Stencil Success Story
So there you have it. Ditching the freehand guesswork for a solid stencil means you actually stand a chance of creating something recognizable, maybe even impressive. We've covered picking your canvas, transferring the blueprint, and making clean cuts. It’s not rocket science, just a method that actually works if you follow the steps. Now go grab a gourd, pick a pattern that isn't tragically ambitious for your first go, and get carving. The worst that happens is you learn something for next year, and the best? You might just end up with a jack-o'-lantern that doesn't look like it lost a fight with a raccoon.