Table of Contents
Halloween is creeping closer, and you know what that means: it's time to get your pumpkin carving game on! But who says you need to be a pro artist to create a spooky masterpiece? This year, let’s ditch the complex designs and embrace the wonderfully eerie world of simple pumpkin carving ideas scary. Forget about spending hours meticulously cutting intricate patterns. Instead, we’re diving into easy, yet terrifyingly fun, designs that anyone can pull off, even if you're more of a "stick figure" artist. We'll start with basic scary faces, using simple cuts to create maximum fright, then explore ways to elevate those basic designs for extra spookiness. We'll also make sure to include kid-friendly ideas that are easy enough for little hands, while still packing a creepy punch. Get ready to transform your pumpkin into a jack-o'-lantern that will be the envy of the neighborhood, all without breaking a sweat. So, grab your carving tools, and let's get carving!
Easy Scary Faces: Simple Cuts for Maximum Frights
Easy Scary Faces: Simple Cuts for Maximum Frights
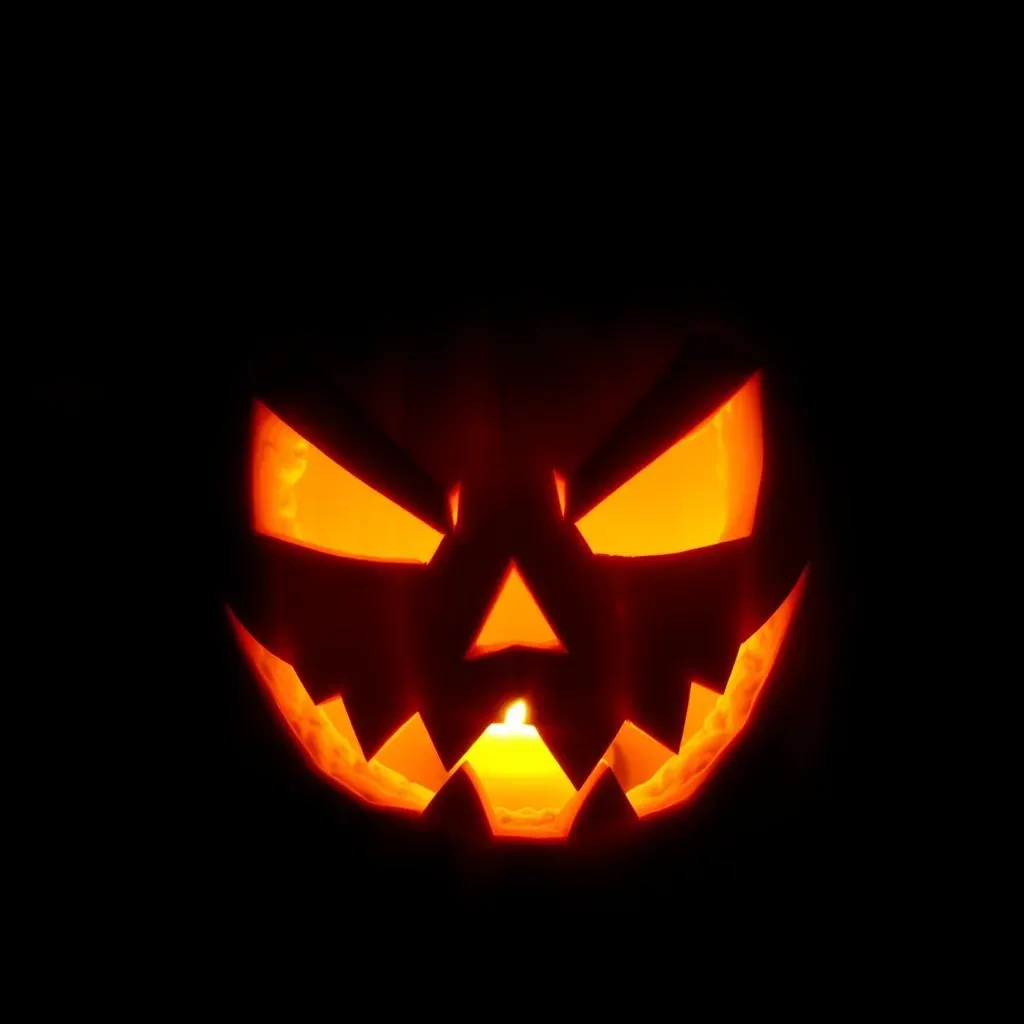
The Classic Triangle Eyes
Let's start with the basics, shall we? The classic scary face is all about those sharp, angular features. Think triangles! For the eyes, cut two simple triangles. They don't need to be perfect, in fact, the slightly wonkier they are, the scarier they look. It’s like the pumpkin is perpetually raising an eyebrow, which, let's be honest, is pretty unnerving. Don't worry about getting them perfectly symmetrical either, a little asymmetry adds to the creepy charm. Remember, we're going for "easy scary," not "perfection scary".
Next, the nose! A triangle works here too, or you can opt for a jagged, irregular shape. The goal is to make it look a bit menacing, like the pumpkin is about to sneeze something awful. Finally, the mouth. This is where you can really get creative. A simple jagged line works wonders, or you can go for a wide, toothy grin with pointy triangle teeth. No need for fancy curves or complicated shapes – simple cuts, maximum fright.
Feature | Shape | Tips |
|---|---|---|
Eyes | Triangles | Make them wonky for extra creepiness. |
Nose | Triangle or jagged | Don't worry about perfection. |
Mouth | Jagged line or triangle teeth | Keep it simple, but menacing. |
The Power of the Eyebrow
You know what adds an extra layer of spookiness? Eyebrows! Yes, those little curved lines above the eyes can turn your pumpkin from mildly unsettling to downright terrifying. Try adding a deep, angled cut above each eye, like your pumpkin is glaring at you with disapproval. Or, for a more surprised look, use curved lines that arch upwards. The beauty of simple eyebrows is that they are easy to carve, but they make a big impact.
Another trick is to use different sized triangles for the eyes. One big, and one smaller can give your pumpkin a sinister, asymmetrical look. It’s like it's winking at you, but in a totally creepy way. The mouth, too, can be tweaked. Instead of a straight line, try a zig-zag, or even a series of small triangles to make it look like it has tiny, sharp teeth. It’s all about playing with simple shapes to create the illusion of complexity. Don't be afraid to experiment, that's the fun of carving.
Adding Depth with Simple Shapes
Once you've mastered the basic triangle, you can start using other simple shapes to add depth to your scary face. For example, instead of just cutting out the shapes completely, try partially carving them. This means you cut into the pumpkin skin, but not all the way through. It creates a cool shadow effect, especially when you put a candle inside. Imagine your pumpkin having deep, dark circles under its eyes, or a sinister frown that casts a shadow. So spooky!
Also, consider using simple lines. A few strategically placed vertical lines can create the illusion of wrinkles or scars, making your pumpkin look like it’s been through a rough time. Horizontal lines can make the mouth look wider or more menacing. Remember, the key is simplicity. You don’t need to be a master carver to create a truly scary pumpkin. Just use those basic shapes, throw in a bit of creativity, and you'll have a jack-o'-lantern that's the talk of the neighborhood – for all the right (and scary) reasons.
Beyond the Basic: Elevating Simple Scary Carving Ideas

Beyond the Basic: Elevating Simple Scary Carving Ideas
The Magic of Stencils
so you've nailed the basic scary face, now what? Let's talk stencils. I know, I know, stencils sound like they're for the faint of heart, but trust me, they're a game changer. You don’t need to be an artist to use them; they're like a cheat code for cool designs. You can find tons of free stencils online, from spooky bats to creepy spiders, or even just patterns that add texture to your pumpkin. Print them out, tape them onto your pumpkin, and then just follow the lines. It’s like coloring, but with a knife! The best part? It makes complex patterns look super easy and adds a layer of sophistication to your scary pumpkin.
Think about using a stencil to create a silhouette of a haunted house or a graveyard scene. These details can make your pumpkin look like it's part of a scary story. Don't limit yourself to just one stencil either. Combine a few different designs for a truly unique and spooky effect. You could have bats flying around a haunted house, or spiders crawling all over a creepy face. It's all about layering to create depth and visual interest. Remember, even with stencils, you're still in control. You can tweak the designs, add your own little touches, and make it your own.
- Find free stencils online.
- Tape the stencil onto the pumpkin.
- Follow the lines with your carving tools.
- Combine multiple stencils for a unique look.
The Power of Light and Shadow
Let's talk about lighting because it can dramatically change how your pumpkin looks. A simple candle or tea light can do the job, but why not experiment? Try using different colored lights to give your jack-o'-lantern an eerie glow. Green or red lights can make your pumpkin look particularly sinister. Or, you can use multiple lights to create a flickering effect, like the pumpkin is possessed. The shadows that the light casts are just as important as the light itself. Play around with how the light hits the carved areas to create a more dramatic and spooky effect.
Think about carving different depths into the pumpkin. Some areas can be cut all the way through, letting the light shine brightly, while others are just partially carved, creating a softer glow. This contrast in light and shadow can make your pumpkin look more three-dimensional and much more interesting. For example, you could carve a ghostly figure with a fully carved head and a partially carved body, making it look like it's fading into the darkness. It’s all about using the light to your advantage to create a truly spooky atmosphere.
Lighting Technique | Effect |
|---|---|
Colored Lights | Eerie and sinister glow |
Multiple Lights | Flickering, possessed effect |
Varying Depths | Creates contrast and 3D look |
Adding Texture and Dimension
you've got your stencils, you've mastered the lighting, but what about texture? Think about adding some dimension to your pumpkin by using different tools. Instead of just using a knife, try using a small spoon or a melon baller to create textured surfaces. You could create small bumps or grooves to make your pumpkin look like it has scales or warts. It’s like giving your pumpkin a skin condition, but in a good way. Also, consider using a toothpick or skewer to poke tiny holes for added texture. These small details can make a big difference and give your pumpkin a more organic, creepy look.
Don't be afraid to experiment with different carving tools. A small saw can create jagged edges, while a chisel can be used to create deeper, more dramatic cuts. It’s all about using different techniques to create a variety of textures and depths. Think about adding some 3D elements to your pumpkin, like small pieces of pumpkin that stick out. These could be teeth, horns, or even just small bumps. The possibilities are endless. Remember, the goal is to make your pumpkin look as unique and spooky as possible. So, get creative and have fun with it. You might be surprised at what you can come up with.
KidFriendly Frights: Simple Scary Pumpkin Ideas for All Ages

KidFriendly Frights: Simple Scary Pumpkin Ideas for All Ages
Friendly Ghosts and Ghouls
Alright, let's talk about keeping it spooky but not *too* spooky for the little ones. Forget about the gory details, and let’s focus on friendly ghosts and ghouls! Instead of sharp teeth, how about using round shapes for the eyes and mouth? Think of a cute, surprised ghost with wide, circular eyes and a simple "O" for a mouth. You can even add little ghost arms by carving small, wavy lines on either side. These designs are super easy for kids to do, and they’re not too scary, just a little bit silly and fun. It’s all about keeping it lighthearted, while still embracing the Halloween spirit.
Another great idea is to create a friendly monster face. Instead of pointy teeth, use rounded triangles or even squares. Add some goofy eyebrows and maybe some silly horns made from small, rounded shapes. The key is to use simple, recognizable shapes that kids can easily cut out. You can also use cookie cutters to trace shapes onto the pumpkin, making it even easier for little hands. The goal is to make it a fun and engaging activity for everyone, without any scary nightmares afterwards.
Character | Shapes | Tips |
|---|---|---|
Friendly Ghost | Circles and wavy lines | Keep it simple and cute. |
Silly Monster | Rounded triangles and squares | Use cookie cutters for easy shapes. |
Pumpkin Faces: Silly and Spooky
Let's face it, sometimes the best scary is just plain silly. Encourage the kids to come up with their own funny faces for their pumpkins. Think about big, goofy grins, crossed eyes, or even a buck-toothed smile. It's all about letting their imaginations run wild. Use simple shapes to create these silly features, and don't worry about making them perfect. The more wonky and off-kilter they are, the funnier they’ll look. You can also add silly accessories like a carved-out tongue or a big, round nose.
Another great idea is to turn your pumpkin into a silly character. Think about adding goofy ears, a silly hat, or even some funny hair made out of yarn or felt. These extra details can make your pumpkin stand out and give it a unique personality. The goal is to make it a fun and creative activity for kids that encourages them to think outside the box. It's about making the pumpkin carving process more about fun than fright. Remember, Halloween is all about having a good time, and that includes making your pumpkin as silly as possible.
No-Carve Options for Little Hands
Now, let’s be real, carving can be tricky for little hands. So, what about no-carve options? There are tons of ways to decorate your pumpkin without using a knife. Think about using paint, markers, stickers, or even glitter to create spooky designs. You can paint a ghostly face, draw a funny monster, or even create a sparkly spiderweb. The possibilities are endless. No-carve options are a great way for younger kids to participate in the fun, without any risk of getting hurt.
Another fun idea is to use craft supplies to create 3D elements on your pumpkin. Think about using googly eyes, pipe cleaners, felt, or even buttons to create a textured and unique look. You could use pipe cleaners to create spider legs, felt to create a funny hat, or googly eyes to make your pumpkin look extra silly. The best part about no-carve options is that they’re super easy, safe, and they encourage creativity. Plus, it’s a great way to use up all those leftover craft supplies. So, don't be afraid to ditch the knife and get crafty. It's all about making Halloween fun and accessible for everyone.
Wrapping Up Your Spooky Carving Adventure
So, there you have it – a collection of simple yet spine-chilling pumpkin carving ideas that will make your Halloween decorations stand out. Remember, you don't need to be an artist to create something amazing. The key is to embrace the fun and let your creativity flow, even if it's a little bit wonky. Whether you went for the classic scary face or experimented with some more elevated designs, the most important thing is that you had a blast doing it. Now, go forth and illuminate your porch with your wonderfully spooky creations, and have a frightfully fun Halloween!