Table of Contents
Halloween is creeping closer, and you're probably thinking about pumpkins. But the thought of scooping out pumpkin guts and wielding a carving knife might send shivers down your spine for all the wrong reasons. Fear not, fellow Halloween enthusiasts! We're diving headfirst into the world of scary no carve pumpkin decorating ideas that are just as spooky, but way less messy. Forget the carving chaos and say hello to a world of paint, glue, and a whole lot of imagination.
Get Spooktacular: Easy Scary No Carve Pumpkin Ideas
Get Spooktacular: Easy Scary No Carve Pumpkin Ideas
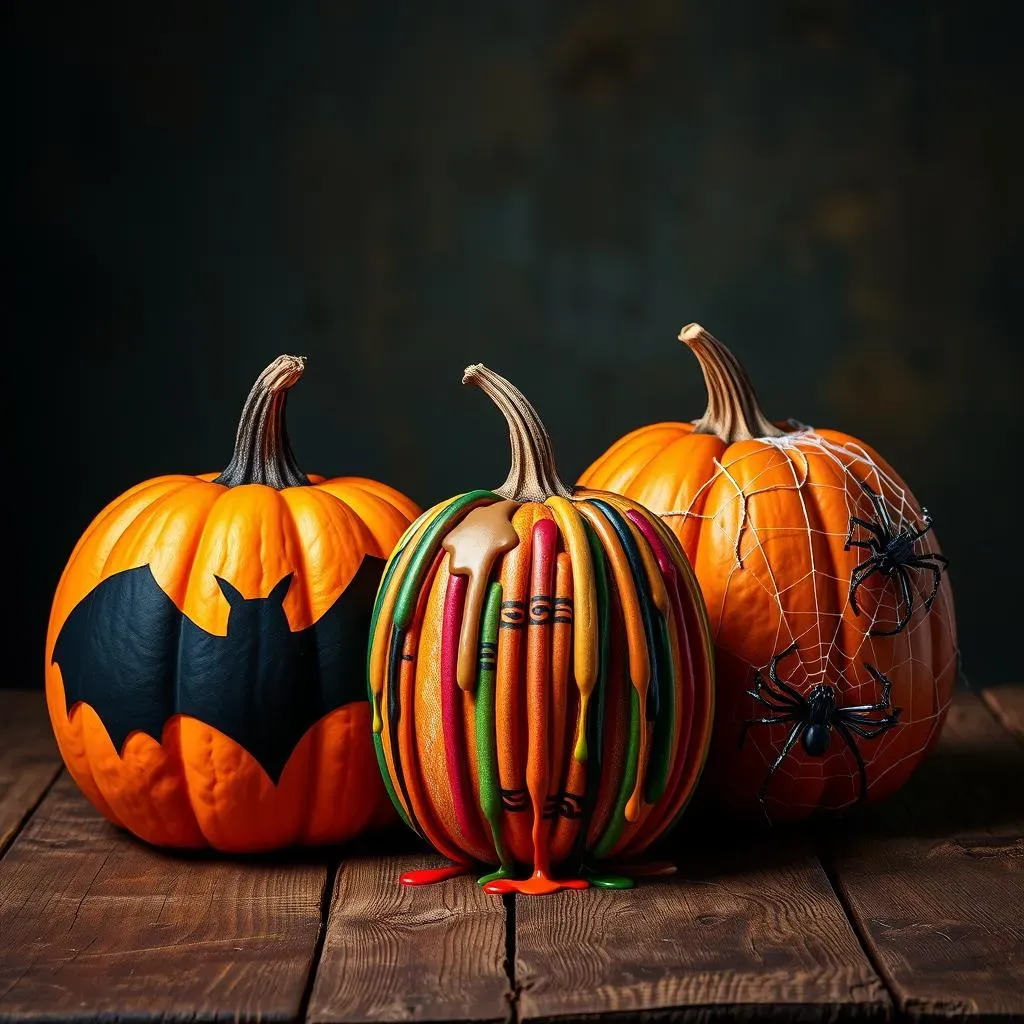
Spooky Silhouettes
Let's kick things off with silhouettes. They're super easy and look incredibly effective. Think bats, creepy trees, or a haunted house against a full moon. All you need is some black acrylic paint, a sponge brush, and maybe a stencil if you're not confident in your freehand skills. Just paint your pumpkin a base color – orange, white, or even a spooky gray – let it dry completely, and then sponge or stencil on your silhouette. Boom! Instant fright.
Want to take it up a notch? Add some glitter to the silhouette for an eerie shimmer in the moonlight. Or, use glow-in-the-dark paint for a silhouette that pops even when the lights are off. Trust me, kids and adults alike will be impressed by the simplicity and spookiness of this design.
Melted Crayon Mayhem
this one's a bit more involved, but the results are seriously cool. You'll need a bunch of crayons (think Halloween colors like black, red, purple, and orange), a hot glue gun, and a hairdryer. Glue the crayons around the stem of your pumpkin, pointing downwards. Then, using the hairdryer on a low setting, melt the crayons so they drip down the sides. The effect is like a creepy, colorful waterfall of wax.
This project is great because each pumpkin will be unique depending on how the crayons melt. Experiment with different color combinations and crayon placements to create your own signature spooky look. Just be careful when using the hot glue gun and hairdryer, and make sure to do this in a well-ventilated area.
- Safety First: Supervise children closely when using hot glue and hairdryers.
- Color Combos: Experiment with different crayon colors for unique effects.
- Ventilation: Ensure good airflow when melting crayons.
Spider Invasion
Arachnophobes, look away! Or, embrace your fears and create a seriously creepy spider-themed pumpkin. Paint your pumpkin black or dark gray. Then, use a glue gun to attach plastic spiders of various sizes all over the surface. You can even add some fake spiderwebs for an extra dose of spookiness.
To make the spiders look even more realistic, consider painting them with glow-in-the-dark paint or adding some red glitter to their eyes. You can also create a spiderweb effect using white glue and then sprinkling glitter over it. This is a relatively quick and easy project that's guaranteed to give your guests the heebie-jeebies.
Material | Purpose |
|---|---|
Black Paint | Base color for a spooky vibe |
Plastic Spiders | Main decorative element |
Glue Gun | Securing spiders and webs |
Fake Spiderwebs | Adding extra spookiness |
Painting Your Way to a Frightful Masterpiece: No Carve Pumpkin Designs

Painting Your Way to a Frightful Masterpiece: No Carve Pumpkin Designs
Classic Horror Movie Monsters
Let's get iconic! Think Dracula, Frankenstein's monster, or the Mummy. These are always a hit, and they're surprisingly easy to paint. Start with a base coat of white or pale green for Frankenstein, gray for Dracula, or tan for the Mummy. Then, use acrylic paints to add the details. Don't worry about being perfect – the more exaggerated, the better!
For Frankenstein, focus on the stitches, bolts, and that signature flat head. Dracula needs sharp teeth, piercing eyes, and a widow's peak. And the Mummy? Just wrap the pumpkin in white paint, leaving some gaps for a creepy, decaying effect. You can even add some fake gauze for extra texture. These classic monsters are sure to bring a touch of old-school horror to your doorstep.
Creepy Clown Faces
If you want to send chills down spines, nothing beats a creepy clown. Skip the friendly circus clown and go straight for Pennywise territory. Start with a white base, then use black and red paint to create exaggerated features like wide, menacing grins, dark, hollow eyes, and wild, colorful hair. Don't be afraid to get creative with the makeup – the more disturbing, the better.
To really amp up the creep factor, consider adding some red paint dripping from the corners of the mouth or around the eyes. You can also use a thin brush to create fine lines and wrinkles, giving the clown a more aged and sinister look. Just remember, the goal is to make people uncomfortable, so embrace the weird and unsettling.
- Exaggerate Features: Make the eyes, mouth, and hair extra wild.
- Dripping Paint: Add red paint drips for a horrifying effect.
- Dark Palette: Stick to black, red, and gray for a sinister look.
Scary Skull Designs
Skulls are a Halloween staple, and they're surprisingly versatile when it comes to pumpkin painting. You can go for a classic sugar skull design with vibrant colors and intricate patterns, or opt for a more realistic and bone-chilling skull with shadows and cracks. Start with a white or light gray base, then use black paint to create the eye sockets, nose cavity, and teeth.
For a sugar skull, use bright colors like pink, blue, yellow, and green to add floral patterns and other decorative elements. If you're going for a realistic skull, focus on shading and highlighting to create depth and dimension. You can also add some cracks and weathering effects to make the skull look old and decayed. Whether you choose a colorful or a spooky skull, this design is sure to be a hit.
Design | Description |
|---|---|
Sugar Skull | Vibrant colors, floral patterns, intricate details. |
Realistic Skull | Shadows, cracks, bone-like texture, aged appearance. |
Beyond Paint: Unique Materials for Scary No Carve Pumpkins
Beyond Paint: Unique Materials for Scary No Carve Pumpkins
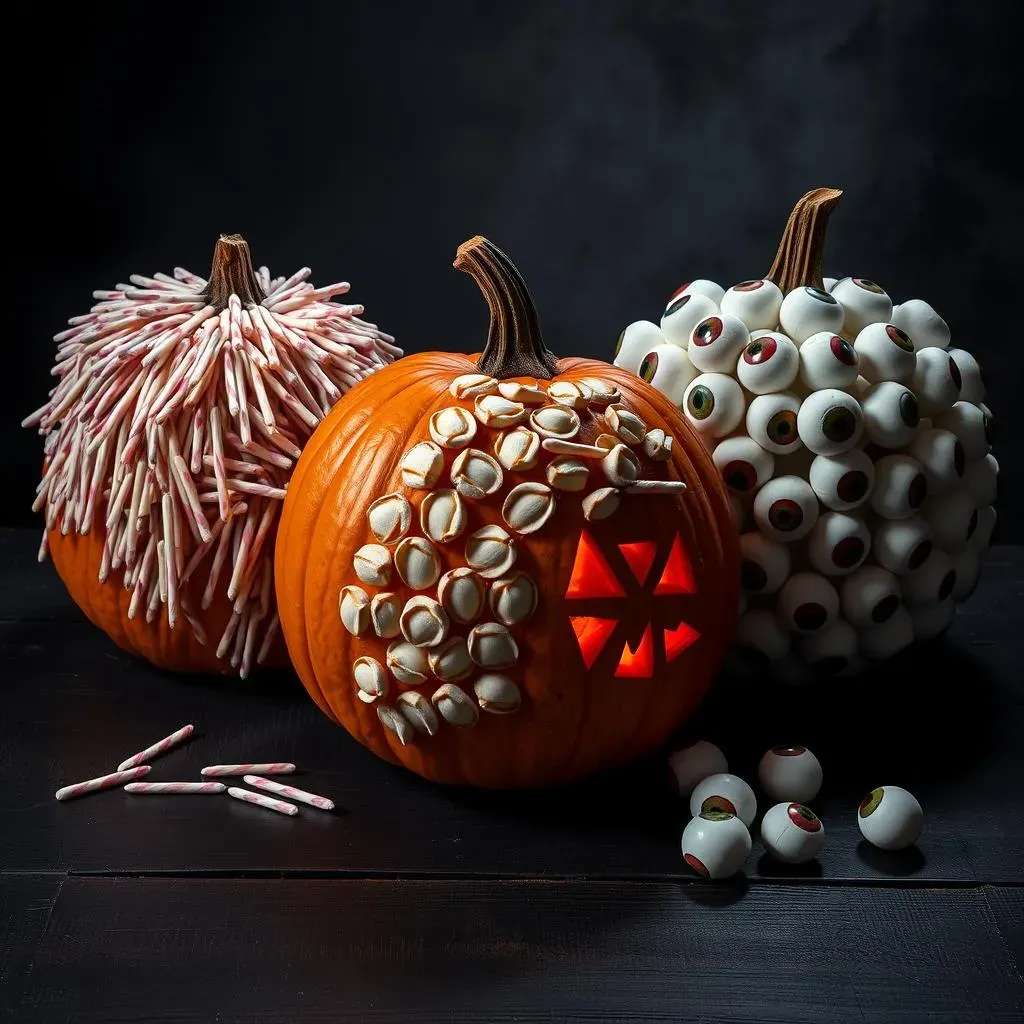
Creepy Crawly Q-Tips
Who knew cotton swabs could be so sinister? For a truly unique and unsettling pumpkin, grab a bunch of Q-tips and some hot glue. Paint your pumpkin a dark, ominous color like black or deep purple. Then, cut the Q-tips in half and glue them onto the pumpkin, densely packed together, to create a maggot-like texture. You can arrange them in swirling patterns or just cover the entire surface for maximum creepiness.
To enhance the effect, consider adding some brown or black paint to the tips of the Q-tips to simulate dirt or decay. You can also strategically place a few plastic insects among the Q-tips for an extra dose of revulsion. This is a surprisingly effective and budget-friendly way to create a truly disturbing pumpkin.
Seashell Specters
Bring the beach to your Halloween display with seashell-covered pumpkins that are both elegant and eerie. Gather a variety of seashells in different shapes and sizes. Paint your pumpkin a dark color, such as navy blue or charcoal gray, to provide a contrasting backdrop. Then, use a strong adhesive like hot glue or epoxy to attach the seashells to the pumpkin in intricate patterns.
You can create swirling designs, geometric shapes, or even spell out spooky words like "BOO" or "Beware." For an extra touch of spookiness, consider painting some of the seashells with glow-in-the-dark paint or adding some black glitter. The combination of the natural texture of the shells and the eerie glow will create a truly mesmerizing and unsettling effect.
- Shell Variety: Use different shapes and sizes for visual interest.
- Strong Adhesive: Ensure the shells are securely attached.
- Glow-in-the-Dark: Add an eerie glow for nighttime spookiness.
Ping Pong Eyeballs
Nothing says "scary" quite like a pumpkin covered in eyeballs. This is a simple but highly effective way to create a truly unsettling Halloween decoration. All you need are some ping pong balls, black and red markers, and a hot glue gun. Draw irises and pupils on the ping pong balls using the markers, and then add some red veins for extra creepiness.
Glue the eyeballs all over the pumpkin, spacing them randomly for a chaotic and unnerving effect. You can also add some fake blood or gore around the eyeballs for an extra touch of horror. This is a great project for kids and adults alike, and it's guaranteed to make your pumpkin the most talked-about decoration on the block.
Material | Purpose |
|---|---|
Ping Pong Balls | Base for the eyeballs |
Markers | Creating the iris, pupil, and veins |
Glue Gun | Attaching the eyeballs to the pumpkin |
Fake Blood (Optional) | Adding extra gore and horror |
Character Creations: From Disney Villains to Storybook Horrors on Your No Carve Pumpkin
Character Creations: From Disney Villains to Storybook Horrors on Your No Carve Pumpkin
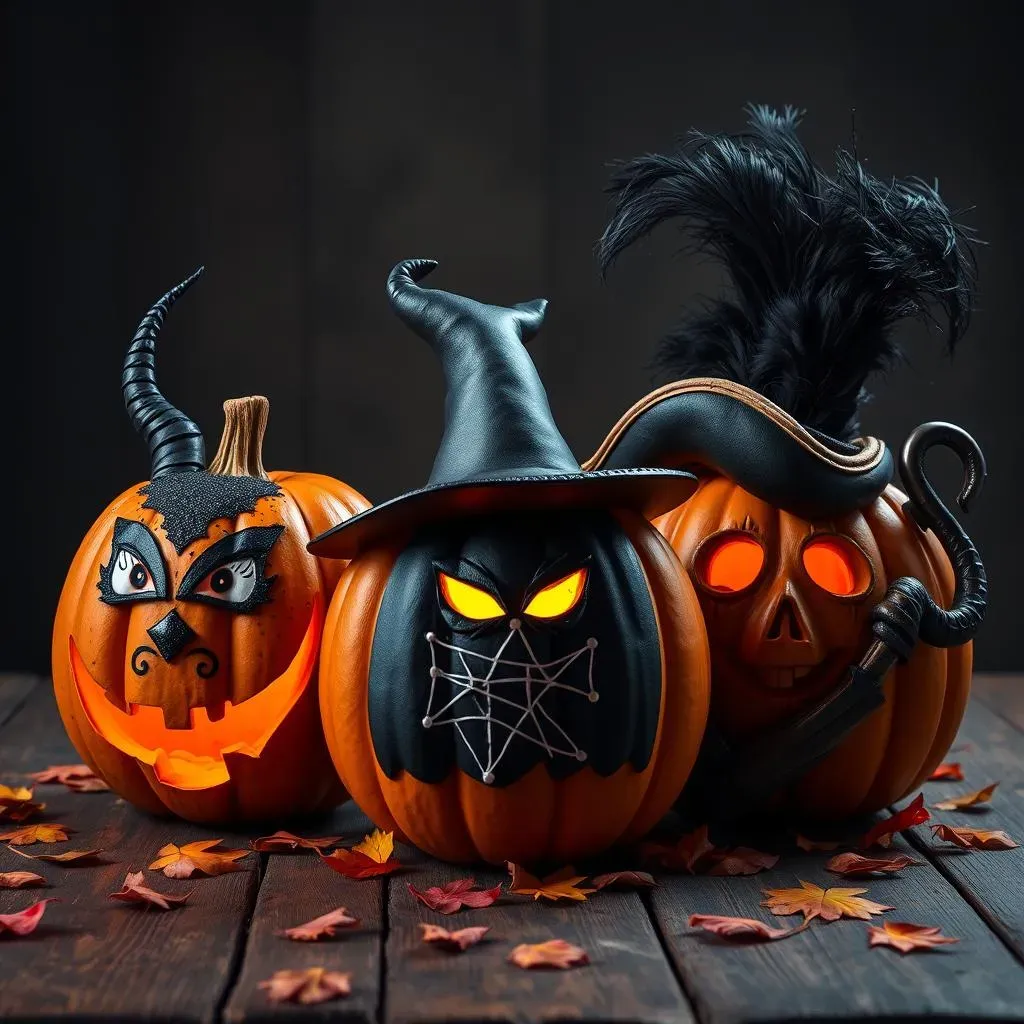
Maleficent's Menacing Gaze
Let's start with a classic Disney villain: Maleficent. Her iconic horns and piercing green eyes make her a perfect subject for a scary no-carve pumpkin. Start by painting your pumpkin black or deep purple. Then, use craft foam or cardboard to create her signature horns. Attach them to the top of the pumpkin with hot glue. For her eyes, you can either paint them directly onto the pumpkin or use glow-in-the-dark paint for an extra eerie effect. Don't forget her sharp cheekbones and sinister smile! A little black glitter can add a touch of dark glamour to this villainous masterpiece.
To truly capture Maleficent's essence, pay attention to the details. Use a fine-tipped brush to create her arched eyebrows and defined lips. You can also add some green or purple shading around her eyes to enhance her menacing gaze. This pumpkin is sure to cast a spell on anyone who sees it!
The Wicked Witch's Grimy Green
Another iconic villain perfect for a pumpkin makeover is the Wicked Witch of the West. Embrace her grimy green skin and pointy hat for a truly terrifying creation. Paint your pumpkin a sickly shade of green, using different tones to create texture and depth. Then, craft a pointy hat from black felt or cardboard and attach it to the top of the pumpkin. Don't forget her wart-covered nose and crooked smile!
To add an extra touch of spookiness, consider adding some fake cobwebs or plastic spiders to the witch's hat or around the base of the pumpkin. You can also use glow-in-the-dark paint to highlight her eyes and nose, making her glow ominously in the dark. This wicked witch pumpkin is sure to scare away any unwanted visitors!
- Green Skin Tones: Mix different shades for a realistic effect.
- Pointy Hat: Use felt or cardboard for a classic witch look.
- Spooky Accents: Add cobwebs, spiders, or glow-in-the-dark paint.
Captain Hook's Crooked Grin
Ahoy, mateys! Let's not forget about Captain Hook, the dastardly pirate from Neverland. This no-carve pumpkin is all about capturing his villainous swagger and iconic features. Paint your pumpkin a tan or light brown color. Then, use craft foam or cardboard to create his signature hook and attach it to the side of the pumpkin. Don't forget his feathered hat and menacing mustache!
To really bring Captain Hook to life, focus on his facial expressions. Use black paint to create his arched eyebrows and crooked grin. You can also add a patch over one eye for an extra touch of pirate flair. This pumpkin is sure to make a statement and show off your love for classic Disney villains.
Feature | Material |
|---|---|
Hook | Craft foam or cardboard |
Hat | Felt or cardboard with feathers |
Mustache | Black yarn or felt |
Eye Patch | Black felt or fabric |
ContestWorthy Creations: Standout Scary No Carve Pumpkin Decorating Ideas

ContestWorthy Creations: Standout Scary No Carve Pumpkin Decorating Ideas
The Diorama of Doom
so you want to win that pumpkin decorating contest? You gotta think BIG. Forget just decorating the pumpkin itself – create a whole scene! Think of it like a mini horror movie set. Start with a large pumpkin as your centerpiece. Then, use smaller pumpkins, gourds, and other materials to build a diorama around it. Maybe it's a graveyard scene with the large pumpkin as a haunted mausoleum, complete with tombstones made from cardboard and ghostly figures crafted from cheesecloth.
Or perhaps it's a creepy forest with the pumpkin as a gnarled, ancient tree, surrounded by twisted branches and glowing eyes peering out from the shadows. The key is to create depth and atmosphere. Use lighting effects like battery-operated tea lights or blacklights to enhance the spookiness. This is where your creativity can really shine!
The Interactive Horror Show
Want to really wow the judges? Make your pumpkin interactive! Incorporate elements that move, make noise, or even respond to touch. Imagine a pumpkin with a hidden sensor that triggers a scary sound effect when someone gets too close. Or a pumpkin with a crank that makes a zombie arm pop out. You could even create a miniature haunted house inside the pumpkin, with tiny figures moving through the rooms.
The possibilities are endless! Just be sure to keep safety in mind when incorporating moving parts and electronics. This is a great way to showcase your technical skills and create a truly unforgettable pumpkin that will leave the competition trembling in fear (and admiration).
Element | Description |
|---|---|
Motion Sensor | Triggers sound effects or movement |
Crank Mechanism | Animates a part of the design |
Miniature Scene | Creates a detailed world inside the pumpkin |
Final Frights: Mastering Scary No Carve Pumpkin Decorating
So, there you have it! A treasure trove of scary no carve pumpkin decorating ideas to unleash your inner ghoul and create some truly frightful masterpieces. From simple painted designs to elaborate character creations using unexpected materials, the possibilities are endless. Remember, the key is to have fun and let your imagination run wild. Whether you're a seasoned Halloween decorator or a first-time pumpkin artist, these no-carve techniques offer a safe, mess-free, and incredibly creative way to celebrate the spooky season. Now go forth, decorate, and prepare for a Halloween filled with screams of delight (and maybe a few of genuine terror)!