Table of Contents
Alright, let's be honest. You've seen the same tired triangle eyes and jagged grins on porches year after year. They're fine, I guess, if "mildly amused" is the vibe you're going for. But you're here because you want more. You want the neighbors to jump, the trick-or-treaters to hesitate, and maybe even scare yourself a little when you walk past your own front door at night. You're ready to ditch the cutesy and dive headfirst into the genuinely unsettling. This isn't about carving a friendly face; it's about crafting a nightmare in gourd form.
Tools and Techniques for Terrifying Textures

Tools and Techniques for Terrifying Textures
Starting with the Right Gear
Look, if you're trying to carve a truly disturbing face with that flimsy little saw that came with the grocery store kit, you're already losing. Creating genuinely scary carving pumpkin ideas requires more than just basic tools. You need precision, control, and the ability to get into tight spots. Think of it like surgery, but on a gourd. A good quality pumpkin carving kit is a start, but you'll quickly find its limitations when you want to add fine wrinkles around a ghoulish eye or scrape away layers for diseased-looking skin. Sharp tools are paramount. Dull tools slip, they cause accidents, and they make your terrifying texture look like a toddler went at it with a spoon.
Beyond the Basic Saw and Scraper
To achieve those truly terrifying textures that elevate your scary carving pumpkin ideas, you need to expand your toolkit. Wood carving tools, especially V-gouges and U-gouges, are fantastic for scooping out material and creating depth for scars, veins, or rotting flesh effects. Linoleum cutters, the kind used for printmaking, are surprisingly effective for fine details and scraping thin layers off the pumpkin's surface, revealing the lighter flesh underneath for contrast. Even common household items can be repurposed. A melon baller can scoop out perfect little decaying pockmarks, and a sturdy metal spoon is great for thinning walls or smoothing areas.
- Small serrated saws
- Detail knives (X-Acto or craft knives work well)
- V-gouges and U-gouges
- Linoleum cutters
- Melon baller
- Heavy-duty spoon
- Drill with various bits (for holes and patterns)
- Clay sculpting tools (for smoothing and shaping)
Creating Convincing Ghoulish Surfaces
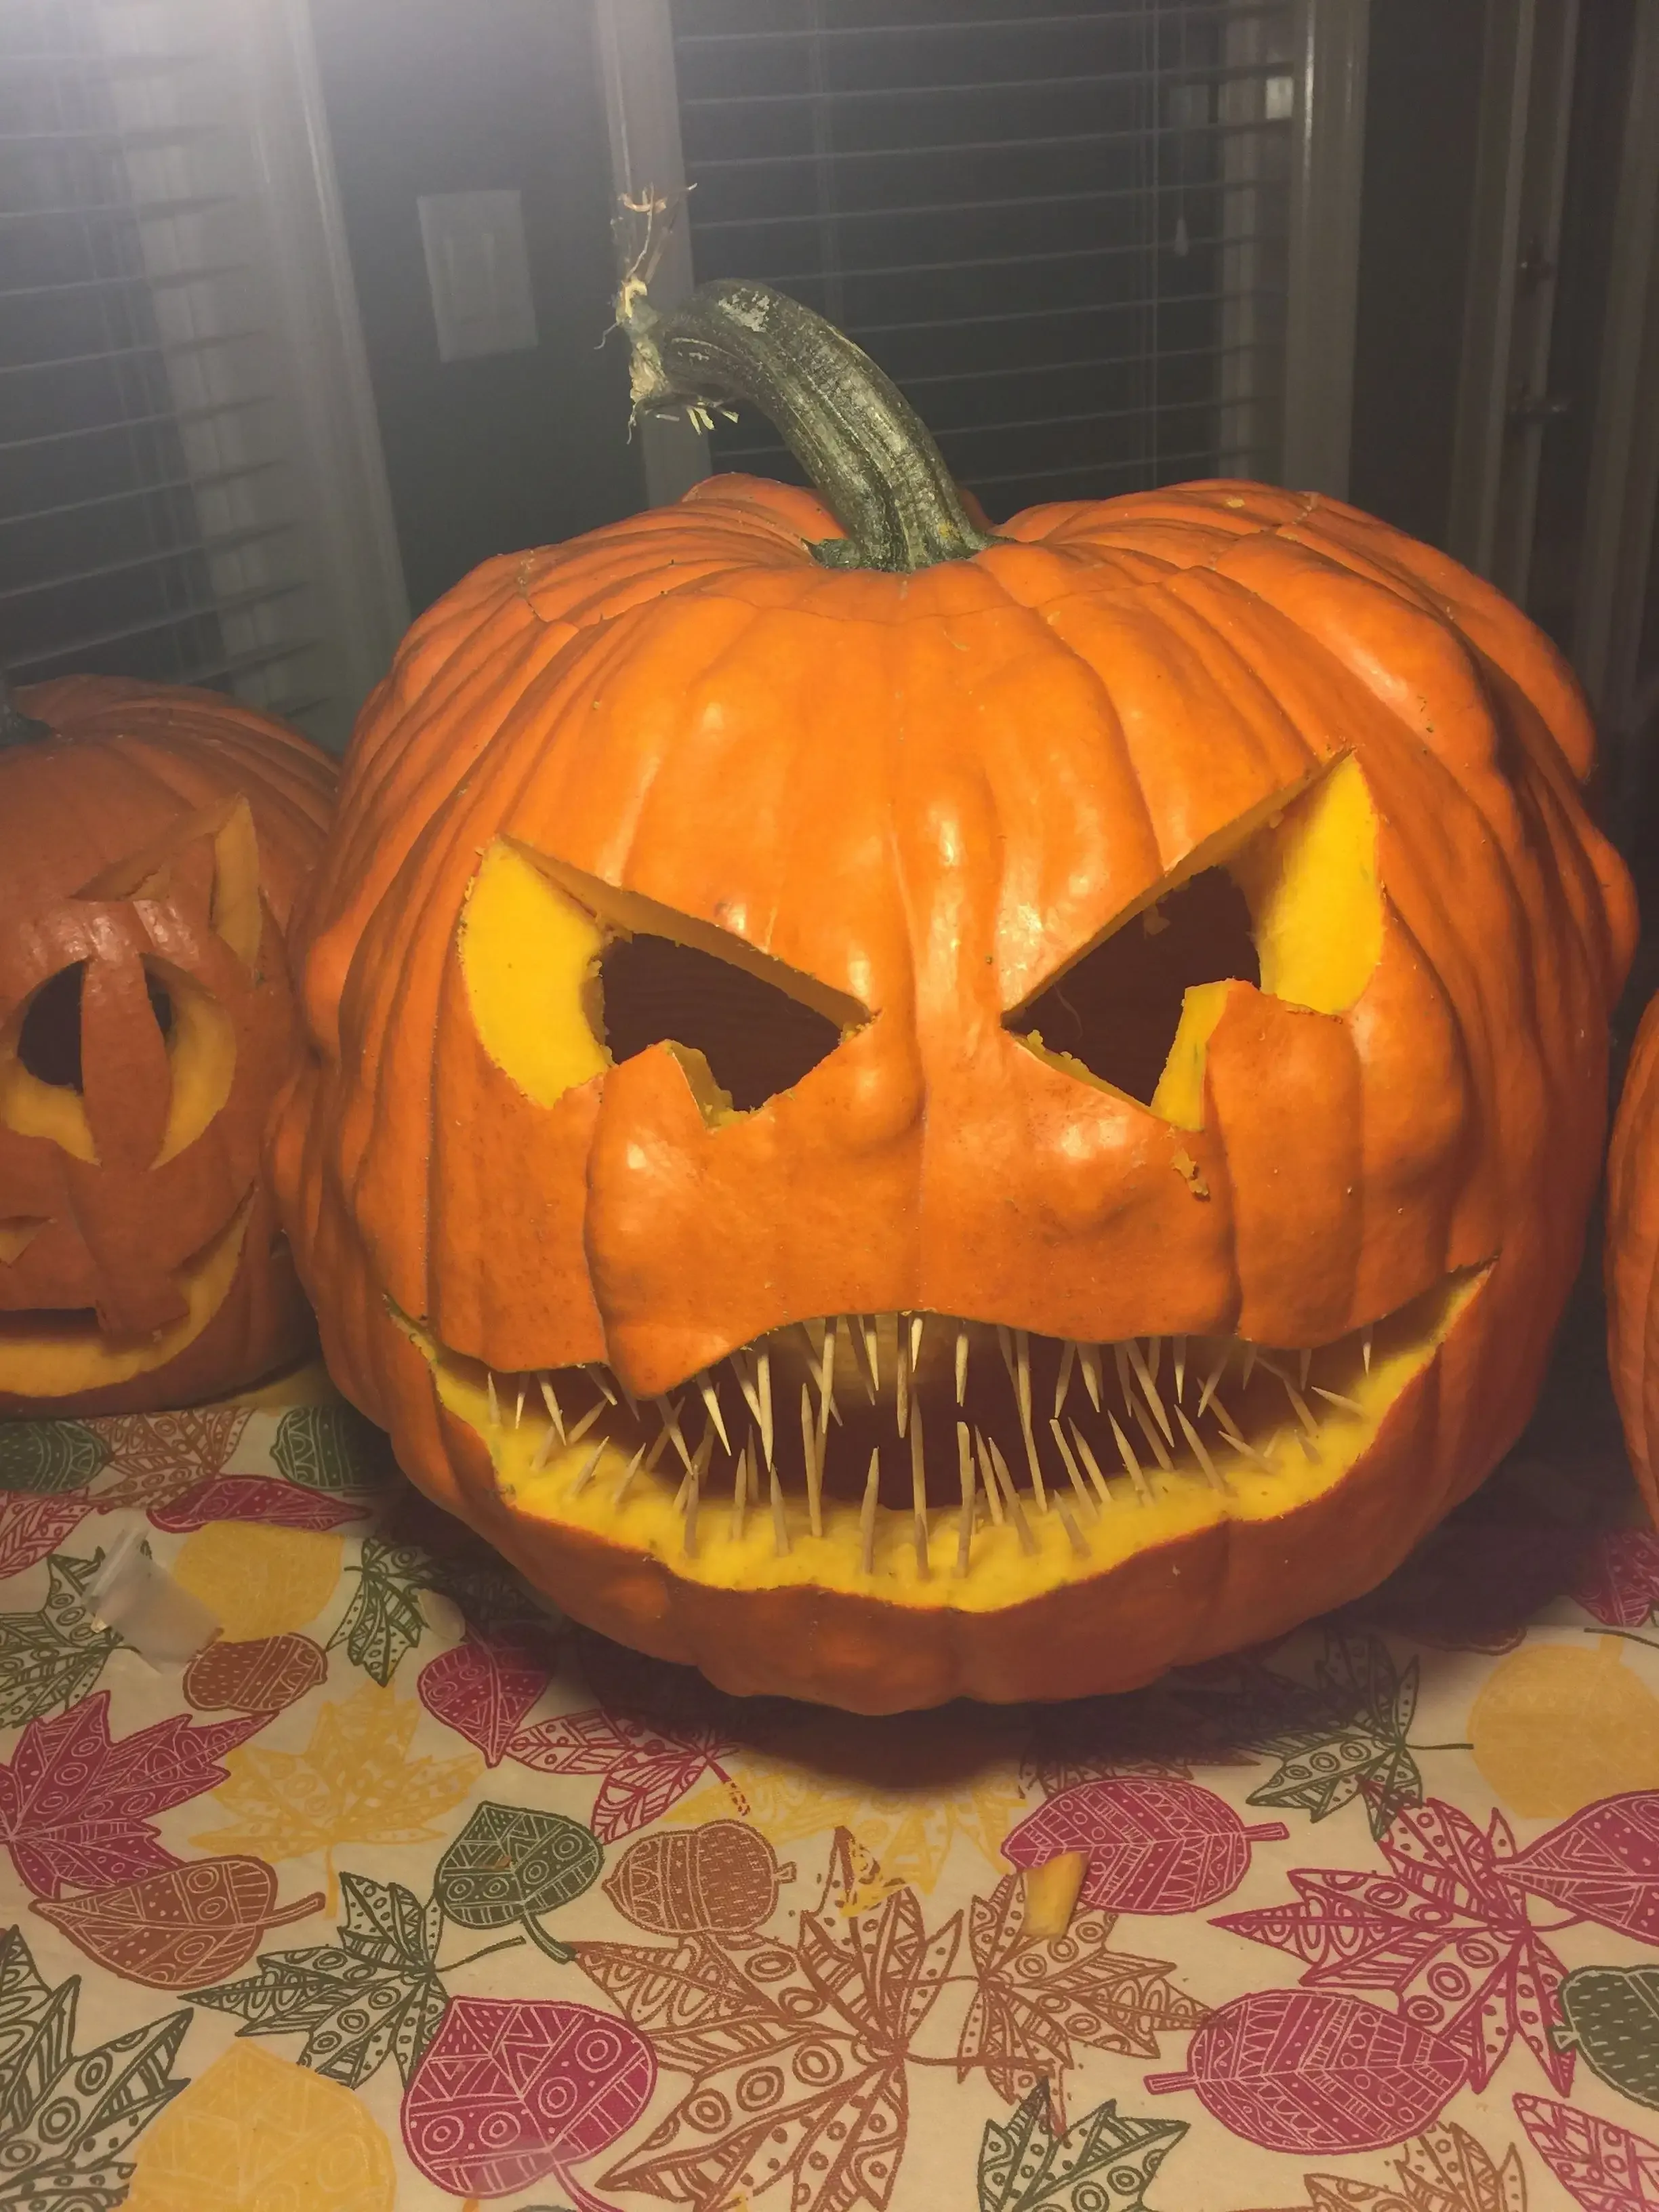
Now that you have the gear, let's talk technique for those scary carving pumpkin ideas. Texture is everything. A smooth, clean carve looks unnatural. Think about what makes something scary – decay, wrinkles, uneven surfaces, exposed tissue. Use your gouges to create deep furrows for wrinkles or scars. Scrape away the skin in uneven patches to simulate rot or peeling flesh. A drill with a small bit can create unsettling patterns of holes, like insect infestations or disease. Don't be afraid to be messy; perfection is the enemy of horror when it comes to pumpkin texture. Experiment with layering – carving deep in some areas and just scraping the surface in others creates visual interest and makes the texture feel more organic and disturbing.
Classic Monsters: TriedandTrue Scary Carving Pumpkin Ideas

Classic Monsters: TriedandTrue Scary Carving Pumpkin Ideas
Embracing the Icons of Horror
Sometimes, you don't need to reinvent the wheel to be terrifying. The classics are classic for a reason. When you're brainstorming scary carving pumpkin ideas, think about the creatures that have haunted nightmares for decades. A vampire with dripping fangs, a snarling werewolf mid-transformation, or the vacant, soulless eyes of a zombie horde. These figures are instantly recognizable and tap into primal fears. The key isn't just carving their silhouette, but capturing their essence. For Dracula, it's the sharp angles, the slicked-back hair shape, and those prominent, terrifying teeth. For a werewolf, it's the ragged fur texture (achieved with scraping and gouging) and the vicious snarl.
Bringing the Undead and Supernatural to Life (or Un-Life)
Let's get specific with those scary carving pumpkin ideas. A good zombie doesn't just have holes; it has *decay*. Use those linoleum cutters to flake away layers of pumpkin skin, creating patches of exposed, rotting flesh. Drill small, uneven holes to simulate bug-eaten tissue. For a ghostly figure, focus on thin, wispy lines and negative space, carving away large sections to make the light shine through in an ethereal, unsettling way. Frankstein's monster is all about the harsh lines, the stitches (carved or even drawn on with permanent marker before carving), and that iconic flat-top head shape. Don't forget the neck bolts – you can use actual bolts pushed into the pumpkin!
Which classic monster truly embodies Halloween fear for you?
- Vampire
- Werewolf
- Zombie
- Frankenstein's Monster
- Ghost
- Mummy
Beyond the Basics: Unique Scary Carving Pumpkin Ideas
Beyond the Basics: Unique Scary Carving Pumpkin Ideas
Brainstorming Unconventional Horrors
so you've mastered the classic monster mash. Good for you. Now, let's talk about stepping off the well-trodden path of scary carving pumpkin ideas. The truly memorable pumpkins are the ones that make people pause and think, "What in the actual heck is that?" This means moving beyond pop culture icons and tapping into more abstract or psychological fears. Think about things that are inherently unsettling: swarms, eyes, mouths where they shouldn't be, distorted human forms, or even just patterns that feel *wrong*. Grab a sketchbook and just start doodling disturbing concepts. Don't censor yourself. The weirder, the better. Sometimes the most terrifying things are the ones you can't quite name.
Bringing Abstract Fears to Gourd Form
Translating those abstract horrors into scary carving pumpkin ideas takes some thought. Instead of a single face, what about a pumpkin covered in dozens of tiny, mismatched eyes? Or one that looks like it's being consumed by some internal, geometric horror? Consider textures that aren't organic – maybe a pumpkin that looks like it's made of rusty metal, achieved through scraping and staining techniques. A pumpkin that appears to be screaming, with the mouth a gaping, ragged hole, can be incredibly effective. Or perhaps focus on negative space to create the illusion of something missing, something that was *there* but is now gone, leaving an unsettling void. Think less "creature" and more "condition" or "event."
What makes a pumpkin uniquely terrifying?
- Distorted human anatomy
- Swarming patterns (insects, eyes, mouths)
- Non-organic textures (rust, metal, decay)
- Illusion of internal struggle or consumption
- Use of negative space for unsettling voids
- Abstract, hard-to-define horrors
Adding Gore and Realism to Scary Carving Pumpkin Ideas
Adding Gore and Realism to Scary Carving Pumpkin Ideas
Making Your Gourd Guts Look Real
Alright, let's talk about the messy bits. Taking your scary carving pumpkin ideas from just "carved" to "viscerally disturbing" means leaning into realism, specifically the kind that makes people feel a little queasy. This isn't about neat edges anymore; it's about simulating decay, exposed tissue, and maybe a bit of the sticky stuff. Think about texture variation. A smooth surface next to a ragged, torn edge is far more unsettling than uniform carving. You can use the fibrous insides of the pumpkin itself. Don't just scoop it all out neatly. Leave some strands hanging, or even pull them through carved openings to look like sinew or veins. Food coloring, especially red and brown, can simulate dried blood or grime when applied carefully (or messily) around edges and in crevices. Gelatin or clear glue mixed with red food coloring can create a convincing dripping effect that hardens slightly, adding a layer of fresh horror. It’s about layering effects, making people wonder if it’s *just* a pumpkin.
What materials can elevate pumpkin gore?
- Pumpkin guts (fibers and seeds)
- Red and brown food coloring
- Clear glue or gelatin
- Corn syrup (for a fresh blood look)
- Coconut flakes (for a moldy texture)
Lighting and Displaying Your Monstrous Creations
Lighting and Displaying Your Monstrous Creations
Why Lighting is the Secret Sauce of Scary
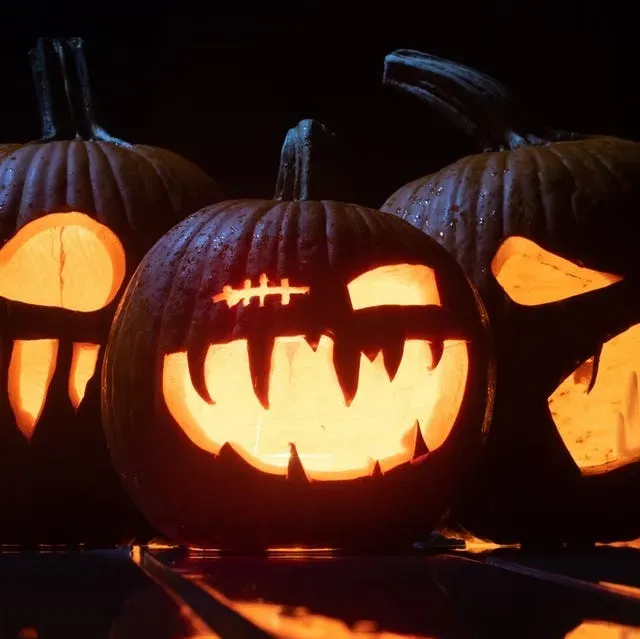
you've put in the work. You've gouged, scraped, and potentially added some questionable food coloring to create the stuff of nightmares with your scary carving pumpkin ideas. But honestly, all that effort is wasted if you just stick a dim little tea light inside and plop it on your porch step. Lighting isn't just about making the pumpkin visible; it's about enhancing the horror. Strategic lighting can deepen shadows, highlight terrifying textures you worked so hard on, and make the whole thing look infinitely more menacing. Think horror movies – it's rarely the monster in broad daylight that scares you; it's the one lurking in the shadows, partially obscured. Your pumpkin needs that same treatment.
Choosing the Right Light Source for Maximum Creepiness
Forget wax candles unless you're going for that classic, flickering, fire-hazard vibe. For consistent, effective scares, you need reliable light. LED lights are your best friend here. They don't get hot (so no cooked pumpkin smell) and come in various colors. A simple white or warm white LED can work, but a flickering LED gives a spooky, unstable feel. For something truly sinister, try a green or purple LED inside – it casts an unnatural, sickly glow that makes any carved face look instantly more evil. You can get strings of small LEDs to wrap inside larger pumpkins or single, brighter ones for smaller carvings. Battery-operated options are best for placement flexibility. Consider directing the light too; shining it up from the base can create long, distorted shadows that make features look more pronounced and terrifying.
Best Lighting Options for Scary Pumpkins:
- Flickering LED candle
- Battery-operated LED string lights (white, green, or purple)
- Small, bright LED puck lights
- Colored floodlights aimed at the pumpkin
Placement is Everything: Setting the Scene for Scares
Where you put your terrifying creation is almost as important as the carving itself. Don't just line them up like bowling pins. Think about creating a scene. Place a particularly gruesome pumpkin near a doorway, where it's one of the first things people see. Set one back in the shadows under a bush, so it's partially hidden until someone gets closer. Grouping pumpkins of different sizes and scariness levels can create a creepy tableau. Combine them with other elements – fake spiderwebs (the wispy kind, not the thick, cottony stuff), scattered fake leaves, or even some strategically placed sound effects (subtle, eerie noises work better than loud jump scares). Aim the light source from below or the side to cast dramatic, spooky shadows upwards or across the face. The goal is to integrate your scary carving pumpkin ideas into the overall spooky atmosphere of your yard or porch, making them part of a larger, unsettling picture.
Your Reign of Terror (Until November 1st)
So there you have it. You've got the tools, the techniques, and a head full of genuinely disturbing ideas for your pumpkins. This isn't about winning a popularity contest; it's about making a statement. A statement that says, "Yes, I enjoy unsettling things, and yes, I put entirely too much effort into this seasonal display." Your porch is no longer just a porch; it's a temporary, terrifying art installation. Just remember, come November 1st, these horrifying creations turn back into... well, slightly more rotten pumpkins. Enjoy the screams while they last.