Table of Contents
Let's be honest. Halloween rolls around, and the thought of carving a pumpkin sounds fun until you're elbow-deep in guts, struggling to make a basic triangle look less like a sad dent. Freehand carving? For most of us, that leads to abstract art nobody asked for, or worse, a trip to the emergency room. If your past jack-o'-lanterns look less like spooky masterpieces and more like they lost a fight with a blunt spoon, you're not alone. But what if there was a way to get those crisp lines and cool designs without needing an art degree or surgical precision? Enter real simple pumpkin carving stencils. These aren't just for kids; they're the secret weapon for anyone who wants impressive results without the usual frustration. This guide will walk you through ditching the freehand fear and embracing the stencil life. We’ll cover getting your pumpkin ready, the straightforward steps to use a stencil effectively, where to snag the best real simple pumpkin carving stencils, and some insider tips to make your carving experience smooth and successful. Get ready to actually enjoy turning that orange orb into a neighborhood showstopper.
Why Use Real Simple Pumpkin Carving Stencils?

Why Use Real Simple Pumpkin Carving Stencils?
So, you’re looking at that big, round gourd, thinking about the Halloween masterpiece you *want* to create, and then you remember last year's attempt. Yeah, the one that ended up looking like a melted alien. That’s exactly why you should consider real simple pumpkin carving stencils. They take the guesswork out of the equation. Instead of squinting at a picture on your phone and trying to translate it to a curved, slippery surface with a flimsy saw, you get a clear guide. This means less frustration, fewer accidental slips (saving fingers and designs), and a much higher chance your finished product actually resembles what you intended. Seriously, it’s the difference between sketching freehand when you can barely draw a stick figure and tracing a professional design. For anyone who values their time, their sanity, and a good-looking jack-o'-lantern, understanding why use real simple pumpkin carving stencils becomes pretty obvious – they just make it easier and better.
Prepping Your Pumpkin for Real Simple Stencils
Prepping Your Pumpkin for Real Simple Stencils
Choosing and Cleaning Your Canvas
Alright, first things first. You can't slap real simple pumpkin carving stencils onto just any old gourd you find in the patch. You want a pumpkin that's firm, without any soft spots or bruises. A smooth surface is your friend here; bumps and ridges make applying the stencil a real pain. Look for one that sits relatively flat so it won't roll away while you're working. Once you've got your prime candidate, the real fun begins: gutting it. Cut a lid off the top, or better yet, cut a hole out of the *bottom*. Trust me on this one. It makes placing the pumpkin over a light much easier later and keeps the top looking clean. Scoop out ALL the seeds and stringy bits. Get in there with a sturdy spoon or a dedicated pumpkin scooper. Scrape the inside walls until they're smooth and about an inch thick. Too thin, and your pumpkin gets floppy; too thick, and carving is a workout.
Smoothing the Surface for Stencil Success
Now that your pumpkin is clean inside, let's focus on the outside where those real simple pumpkin carving stencils will go. Give the exterior a good wipe down with a damp cloth to get rid of any dirt. Make sure it's dry before you move on. If your pumpkin has a particularly waxy finish, a little bit of rubbing alcohol on a cloth can help, but test a small area first. The goal is a clean, dry surface so your stencil adhesive or tape actually sticks. A well-prepped pumpkin is half the battle won when you're using any kind of stencil, simple or complex. Skipping this step is like trying to paint on a greasy wall – it just won't end well, and you'll spend more time fighting the process than actually carving.
Quick Pumpkin Prep Checklist:
- Select a firm, blemish-free pumpkin.
- Choose one with a relatively smooth surface.
- Cut the lid from the bottom for stability.
- Thoroughly scoop out all guts and seeds.
- Scrape the inside walls to about one inch thick.
- Clean and dry the exterior surface.
- Ensure the surface is free of dirt or excessive wax.
StepbyStep: Using Real Simple Pumpkin Carving Stencils

StepbyStep: Using Real Simple Pumpkin Carving Stencils
Transferring Your Design with Precision
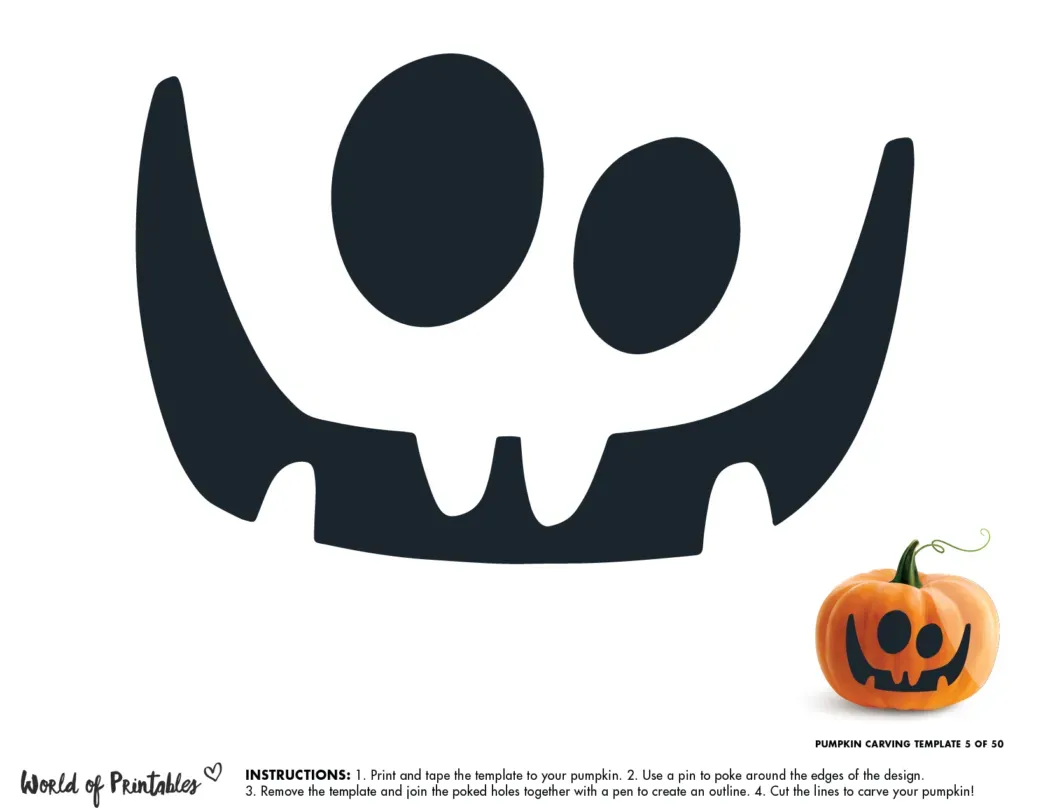
you've got your perfectly prepped pumpkin and your chosen real simple pumpkin carving stencils printed out. Now comes the crucial step of getting that design onto the curved surface. Don't just eyeball it. Cut out the stencil, leaving some paper around the edges. Position it where you want it on the smoothest part of your pumpkin. Tape is your best friend here – lots of small pieces of masking tape or painter's tape work wonders for molding the flat paper to the round shape. Make tiny snips around the edges of the stencil paper if needed to help it lay flat without wrinkles. Once it's secure, you need to transfer the pattern. The easiest way? A pointy tool, like a thumbtack, a push pin, or even a sharp pencil tip. Poke small, close-together holes along ALL the lines of the stencil design. Think of it like connecting the dots later. Don't rush this; the more precise your holes, the clearer your carving guide will be. When you're done poking every single line, carefully peel off the paper stencil. You should see a dotted outline of your design on the pumpkin's surface.
Carving Along the Dotted Lines
Now for the carving itself, guided by those lovely dot patterns left by your real simple pumpkin carving stencils. Grab your carving tools. The small, serrated saws from those cheap kits actually work pretty well for following lines, but a dedicated pumpkin carving kit with different blade sizes is even better. Start with the smallest, most intricate areas first. It's easier to work from the inside out. Use a gentle back-and-forth sawing motion along the dotted lines. Keep the blade perpendicular to the pumpkin surface unless the stencil indicates otherwise (some designs involve scraping, not cutting all the way through). Don't try to saw through thick sections all at once. Work your way around each shape, connecting the dots with your saw. Once you've cut all the way around a piece you want removed, gently push it out from the inside of the pumpkin. If it's stubborn, carefully saw any spots you might have missed. Take your time, follow the lines, and remember the stencil did the hard part of the design for you.
Essential Carving Tools:
- Printed real simple pumpkin carving stencils
- Masking tape or painter's tape
- Push pin, thumbtack, or sharp pencil
- Small, serrated pumpkin carving saw (from a kit)
- Optional: Various sized carving blades
- Bowl for discarded pieces
- Gloves (if you hate pumpkin guts)
Where to Find and Choose Real Simple Pumpkin Carving Stencils
Where to Find and Choose Real Simple Pumpkin Carving Stencils
Finding Your Perfect Pattern
so you're sold on the idea of using real simple pumpkin carving stencils, but where do you actually get them? You're not limited to those cheesy, often basic ones in the dollar store kits, though those can be a starting point. The internet is a goldmine. A quick search for "real simple pumpkin carving stencils free printable" will yield countless websites, blogs, and crafting forums offering everything from classic spooky faces to pop culture icons. Many craft stores also sell stencil books or individual sheets during the Halloween season. Think about the complexity you're comfortable with; "real simple" means different things to different people. Some stencils are just a few big shapes, perfect for beginners or carving with kids, while others might have more intricate details that still follow a clear line but require a steadier hand and finer tools. Don't just grab the first one you see; browse a bit and find a design that actually excites you and matches the vibe you want for your jack-o'-lantern.
Where to Look for Stencils:
- Free printable websites and blogs
- Craft stores (seasonal sections)
- Pumpkin carving kit manufacturers' sites
- Pinterest and other idea-sharing platforms
- Halloween-themed websites
Expert Tips for Carving with Real Simple Pumpkin Carving Stencils
Expert Tips for Carving with Real Simple Pumpkin Carving Stencils
Keeping Your Edges Clean and Crisp
Even with real simple pumpkin carving stencils guiding your hand, getting those perfect, clean edges can be tricky. The pumpkin flesh is dense and can tear if you're not careful. After you've poked your dots and started sawing, don't yank pieces out. Gently push them from the inside. If a piece is still attached, find where you missed sawing and carefully finish the cut. A small, sharp craft knife (like an X-Acto) can be your secret weapon for tidying up edges after the main carving is done, especially in tight corners or curves dictated by the real simple pumpkin carving stencils. Just be extra careful with those sharp blades. Think of it as detailing work after the main construction. It makes a huge difference in how polished your final jack-o'-lantern looks.
Making Your Masterpiece Last Longer
You spent all that time picking the perfect pumpkin, meticulously applying those real simple pumpkin carving stencils, and carefully carving. The last thing you want is for your creation to shrivel up and get moldy after just a couple of days. Air exposure is the enemy. Once carved, the pumpkin starts to dry out and break down. To slow the inevitable decay, you can rub petroleum jelly or vegetable oil on all the cut surfaces. This seals in moisture. Another trick is to give your carved pumpkin a bath in cold water, maybe with a splash of bleach, for a few hours every couple of days if it's looking sad. Let it dry before putting your light source back in. This won't make it last forever, but it buys you some extra time to show off your stencil-guided skills before it becomes compost.
Pumpkin Longevity Hacks:
- Apply petroleum jelly or vegetable oil to cut edges.
- Submerge the carved pumpkin in cold water periodically.
- Consider using a bleach solution in the water bath (check for colorfastness first).
- Keep the pumpkin in a cool, shaded spot when not on display.
- Use an LED light instead of a real candle to reduce internal heat.
Beyond the Basic Cut-Out
Using real simple pumpkin carving stencils doesn't mean you're limited to just cutting holes all the way through. Many stencils, even the simple ones, can be adapted for scraping techniques. Instead of cutting completely through the pumpkin wall, you just scrape away the top layer of skin and a bit of the flesh underneath. This creates a translucent effect where light shines through, adding depth and dimension to your design. It's a fantastic way to add details like shading or texture without the risk of structural collapse that comes with too many full cut-outs. Experiment with how deep you scrape – a shallow scrape lets more light through than a deeper one. This technique, often guided by specific real simple pumpkin carving stencils designed for it, elevates your pumpkin game beyond the standard toothy grin.
Carving Success, Minus the Tears
So there you have it. Ditching the freehand struggle for real simple pumpkin carving stencils isn't admitting defeat; it's choosing a smarter path to a cooler jack-o'-lantern. You've got the lowdown on prepping your canvas, the no-nonsense steps for transferring and carving, and ideas on where to find designs that actually work. With a bit of patience and the right stencil, you can skip the usual carving chaos and end up with something that looks like you actually knew what you were doing. Go forth and carve a pumpkin that doesn't look like it was attacked by a squirrel with a butter knife.