Table of Contents
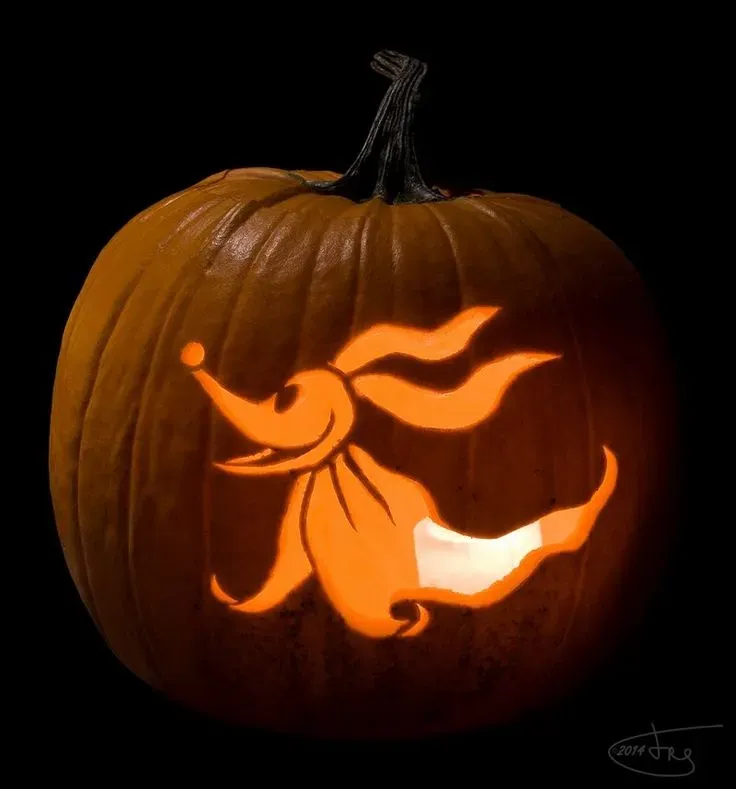
Alright, Halloween is just around the corner, and you've got a pumpkin staring at you, practically begging for a spooky makeover. Forget the standard jack-o'-lantern grin. This year, how about bringing a beloved ghostly companion to life? We're talking about Zero, the loyal, glow-nosed spectral dog from Tim Burton's The Nightmare Before Christmas.
Why Zero? Picking Your Nightmare Before Christmas Pumpkin Carving Idea

Why Zero? Picking Your Nightmare Before Christmas Pumpkin Carving Idea
More Than Just a Ghost: Why Zero Stands Out
Let's be real, there are a million pumpkin carving ideas out there. Skeletons, witches, generic spooky faces – they've all had their moment. But if you want something instantly recognizable, something with character that screams "Halloween but make it charmingly spooky," Zero is your guy. He's not just a sheet with eyeholes. He's got that floppy ear, the spectral tail, and, of course, the glowing jack-o'-lantern nose. Choosing Zero for yourpumpkin carving ideas zeromeans you're tapping into a whole vibe, a blend of spooky and sweet that few other characters pull off. It's a conversation starter, a nod to a classic, and frankly, a lot more interesting than another fanged grin.
Finding the Perfect Gourd for Your Ghostly Companion
Not all pumpkins are created equal when you're planningpumpkin carving ideas zero. You need a pumpkin that can handle the design. Look for one with a relatively smooth surface, especially where Zero's face and body will go. Bumps and deep ridges make carving intricate details a nightmare, and while Zero's design isn't overly complex, you still want a clean canvas. Stability is key; pick a pumpkin with a flat bottom so it doesn't roll away while you're working or, worse, when it's on display. And consider the size – Zero isn't exactly imposing, so a medium-sized pumpkin often works best, allowing his features to be distinct without being stretched or squished.
- Look for a smooth surface.
- Ensure it has a stable, flat base.
- Choose a size that fits your desired Zero scale.
- Check for soft spots or bruises – they rot faster.
Zero's Simplicity is Your Friend
One of the best things about tacklingpumpkin carving ideas zerois that his core design is surprisingly forgiving. You're dealing with simple shapes: circles for eyes, a basic outline for his body, and a distinct nose. You don't need to be Michelangelo with a carving tool. This makes Zero an excellent choice for beginners or anyone who's short on time but still wants a cool, custom pumpkin. It's about capturing his essence – that floating, slightly melancholic, loyal dog look. Focus on those key elements, and you'll have a recognizable Zero in no time, proving you don't need complex patterns for high impact.
Tooling Up: What You Actually Need to Carve Your Zero Pumpkin
Tooling Up: What You Actually Need to Carve Your Zero Pumpkin
Starting Simple: The Essentials You Probably Own
so you've got your perfect pumpkin, ready for some Zero magic. Now, what do you actually need to turn it into a ghostly pup? The good news is, for simplepumpkin carving ideas zerostyle, you don't need a professional carving kit with a dozen different tools. You probably have the basics lying around your kitchen or junk drawer. A sturdy spoon or scoop is crucial for gutting the pumpkin – getting all that stringy mess and seeds out is the first, and often messiest, step. You'll definitely need a sharp knife. A basic kitchen paring knife works fine for cutting the lid. For the actual carving of Zero's features, a smaller, more controlled blade is better. Think an Exacto knife or a craft knife if you have one, or even just a small, sharp utility knife.
Beyond the Basics: Tools That Make Life Easier
While you can absolutely get by with just a knife, a few extra tools can make the process smoother, especially for capturing Zero's distinct shape. A pumpkin carving kit, the kind you find at the grocery store around Halloween, often comes with small saws and scoops designed specifically for pumpkins. These mini-saws are great for cutting out shapes without the risk of the blade getting stuck or cracking the pumpkin. Another handy item is a poker or a tracing tool. You can use a push pin, a sharp pencil, or a dedicated tracing wheel to transfer your Zero design onto the pumpkin's surface by poking holes along the lines. This gives you a guide before you start cutting. And don't underestimate the power of a good, sturdy marker – a dry-erase marker is even better if you mess up and need to wipe it off!
- Pumpkin carving saw (small, serrated)
- Pumpkin scoop or sturdy metal spoon
- Tracing tool (push pin, sharp pencil, or tracing wheel)
- Dry-erase marker
- Small detail knife (Exacto or craft knife)
Don't Forget the Cleanup and Safety Gear
Carving a pumpkin, especially one destined to be Zero, involves guts, seeds, and sharp objects. So, safety and cleanup are non-negotiable. Have plenty of paper towels or old rags on hand – pumpkin goo gets everywhere. A large bowl for the guts is helpful, and another for the seeds if you plan on roasting them (which you totally should, zero waste!). Safety-wise, always cut away from yourself. If you're using an Exacto knife or small blade for details, take it slow and steady. Maybe put on some gloves if you're prone to nicks, or if the pumpkin skin irritates you. Having a trash bag nearby means you can toss scraps immediately and keep your workspace from becoming a sticky, seed-covered disaster zone. A clean space makes focusing on yourpumpkin carving ideas zeromuch easier.
Getting the Ghost Right: Transferring Your Zero Design for Pumpkin Carving
Getting the Ghost Right: Transferring Your Zero Design for Pumpkin Carving
Getting the Ghost Right: Transferring Your Zero Design for Pumpkin Carving
you've got the pumpkin, you've got the tools, and you're ready to give this gourd a spectral makeover. But how do you get Zero's floppy ear and sweet face onto that round, orange canvas? You aren't going to freehand this unless you have an art degree and zero fear of messing up. The easiest way to tackle yourpumpkin carving ideas zerodesign is to use a template or draw it on first. You can find Zero outlines online – just search for "Zero pumpkin stencil" or "Zero line art." Print it out to fit your pumpkin size. Tape the printout onto the smoothest part of your pumpkin where you want Zero's face and body to be. Now, grab that tracing tool – a push pin, a sharp pencil, or even a thumbtack works perfectly. Poke small holes closely together along the lines of the design. Don't space them too far apart, or you'll lose the shape when you remove the paper. Think of it like connecting the dots, but for carving. Once you've poked all the lines, gently peel off the paper. You'll have a dotted outline on your pumpkin, ready for the next step.
The Carving: Bringing Your Zero Pumpkin Carving Idea to Life

The Carving: Bringing Your Zero Pumpkin Carving Idea to Life
Cutting Along the Dotted Lines (Carefully!)
you've got your pumpkin prepped, gutted, and the Zero outline is staring back at you in a series of little pinpricks. This is where the real work begins, and honestly, where things can go sideways if you rush. Grab your small carving saw or detail knife. The goal now is to connect those dots, cutting along the lines you traced. Don't try to ram the tool through the pumpkin in one go. Use a gentle sawing motion with the small pumpkin saw, or a careful, controlled push with a sharp craft knife. Always cut away from yourself – seriously, nobody wants a trip to the ER because of a pumpkin ghost. Take your time, especially around curves like Zero's floppy ear or the loop of his spectral tail. Patience is key here. Think of it less like carving and more like delicate surgery on an orange patient.
Shallow Cuts vs. Cutting Through: Zero's Features
Not every line you traced needs to be a hole cut straight through the pumpkin wall. For somepumpkin carving ideas zerorequires a bit more nuance. Zero's eyes, for instance, might look better if you just scrape away the top layer of skin instead of cutting all the way through. This technique, often called 'shadow carving' or 'scraping,' removes the orange skin to reveal the lighter flesh underneath, creating a glowing effect when lit from within, but without creating a hole. His body outline can be cut through, allowing light to shine out and define his shape. His iconic jack-o'-lantern nose, however, definitely needs to be cut all the way through so that signature glow can really pop. Decide which parts you want to glow brightly (cut through) and which you want to have a softer, internal light (scrape). This variation adds depth to your Zero carving.
Feature | Technique | Tool Suggestion |
|---|---|---|
Body Outline | Cut all the way through | Small carving saw |
Eyes | Scrape skin layer | Detail knife or scraping tool |
Mouth | Cut all the way through or scrape | Small carving saw or detail knife |
Nose (Jack-o'-lantern) | Cut all the way through | Small carving saw or detail knife |
Ear/Tail Details | Cut all the way through or scrape | Detail knife |
Cleaning Up and Perfecting Your Ghostly Pal
As you cut or scrape, you'll inevitably create little bits of pumpkin rind and flesh. Keep your workspace tidy by brushing these away regularly. A small, stiff brush or even a dry paper towel works well. Once the main cutting and scraping are done, step back and look at your Zero. Are the lines clean? Do the scraped areas look smooth? This is the time for refinement. Use your detail knife to carefully trim any ragged edges or thin out areas you want to glow brighter. If you accidentally cut a bit too far, don't panic. You can sometimes use a toothpick to hold a small piece in place, or just embrace the imperfection – Zero is a ghost, after all, a few ethereal edges won't hurt. The goal is a recognizable, charming Zero, a standout among otherpumpkin carving ideas zeroattempts you might see around the neighborhood.
Lighting Up Zero: Displaying Your Nightmare Before Christmas Creation
Lighting Up Zero: Displaying Your Nightmare Before Christmas Creation
Making Your Ghostly Pal Shine
You've done the hard work. Your Zero pumpkin is carved, scraped, and looking suitably spectral. Now, how do you make him truly come alive in the dark? Lighting is key to making yourpumpkin carving ideas zeroeffort pay off. Forget traditional candles, honestly. They're a fire hazard, they blacken the inside of your pumpkin, and they flicker too much to give Zero that steady, ethereal glow. Battery-operated LED lights are the way to go. They come in various colors – a cool white or even a slightly bluish tint can enhance Zero's ghostly appearance. You can find small LED puck lights that sit neatly at the bottom, or strings of fairy lights that you can arrange inside for more even illumination. Pop the light source inside, put the lid back on (or leave it off if you cut the top rim), and step back to admire your glowing spectral dog. Place him somewhere he can be seen, maybe on your porch steps or in a window, letting his little jack-o'-lantern nose guide the way for trick-or-treaters.
- Use battery-operated LED lights (safer and cleaner).
- Choose white or cool-toned LEDs for a ghostly effect.
- Consider LED puck lights or fairy light strings.
- Place the light source for even illumination.
- Display Zero where his glow can be appreciated.
Your Zero Pumpkin, Ready for Haunting
So there you have it. Your pumpkin, hopefully sporting a recognizable, if slightly wobbly, Zero. Maybe it's not museum-quality, and that's perfectly okay. You took a gourd, some basic tools, and a bit of patience (or maybe just stubbornness) and turned it into something inspired by a classic. Stick a light in there, watch that ghostly shape appear in the dark, and feel a small sense of accomplishment. It's ready to float alongside Jack, or at least sit on your porch looking pretty spectral.