Table of Contents
Halloween is creeping closer, and what better way to celebrate than with a spectacularly spooky jack-o'-lantern? If you're ready to ditch the generic ghost face and embrace your inner enchantress, you've come to the right place. This curated collection of pumpkin carving ideas witch will guide you through a cauldron's worth of inspiration, from classic pointy-hatted figures to wickedly creative designs that'll make your neighbors green with envy.
Unleash Your Inner Witch: Finding the Perfect Pumpkin Carving Stencil
Unleash Your Inner Witch: Finding the Perfect Pumpkin Carving Stencil
The Allure of the Witchy Jack-o'-Lantern
so you're ready to conjure up a witch-themed jack-o'-lantern, awesome! But where do you even start? The beauty of a witch design is its versatility. Are you picturing a classic silhouette with a tall, pointy hat and a hooked nose? Or maybe something a little more modern, like a glamorous green-skinned sorceress casting a spell? The possibilities are endless, and that's where finding the right stencil comes in. Think of it as your magical blueprint for pumpkin perfection.
Before diving headfirst into the stencil search, take a sec to consider your skill level. Are you a pumpkin carving ninja, ready for intricate details and complex patterns? Or are you more of a "basic shapes and minimal effort" kind of carver? No shame in either game! Knowing your limits will help you narrow down your stencil choices and avoid a frustrating pumpkin carving meltdown. Trust me, a simple, well-executed design always looks better than a complicated one that ends up looking like a mangled mess.
Where to Find Your Spellbinding Stencil
Alright, let's talk treasure hunting! The internet is overflowing with free pumpkin carving stencils, and a good chunk of them are witch-themed. Sites like Pinterest (as we've seen!), Stoneykins, and even some craft blogs offer printable patterns in various styles and skill levels. Just a quick Google search for "free witch pumpkin carving stencils" will unearth a mountain of options. Pro-tip: when browsing, pay attention to the stencil's complexity and whether it suits your carving abilities. Also, double-check the print quality – a blurry stencil will only lead to frustration.
Don't underestimate the power of a good old-fashioned craft store either! Many stores sell stencil books or individual patterns, which can be a great option if you prefer a physical copy. Plus, you might stumble upon other cool carving tools or decorative embellishments while you're there. And hey, supporting local businesses is always a good thing, right? Whether you choose to scour the web or browse the aisles, remember to have fun with the search! Finding the perfect stencil is the first step toward creating a truly magical jack-o'-lantern.
Stencil Source | Pros | Cons |
|---|---|---|
Free Online Stencils | Wide variety, free to use | Quality can vary, may require printing |
Craft Store Stencils | Physical copy, often higher quality | May cost money, limited selection |
DIY Stencils | Completely custom, allows for creativity | Requires drawing skills, can be time-consuming |
Classic Witch Designs: Free Pumpkin Carving Patterns

Classic Witch Designs: Free Pumpkin Carving Patterns
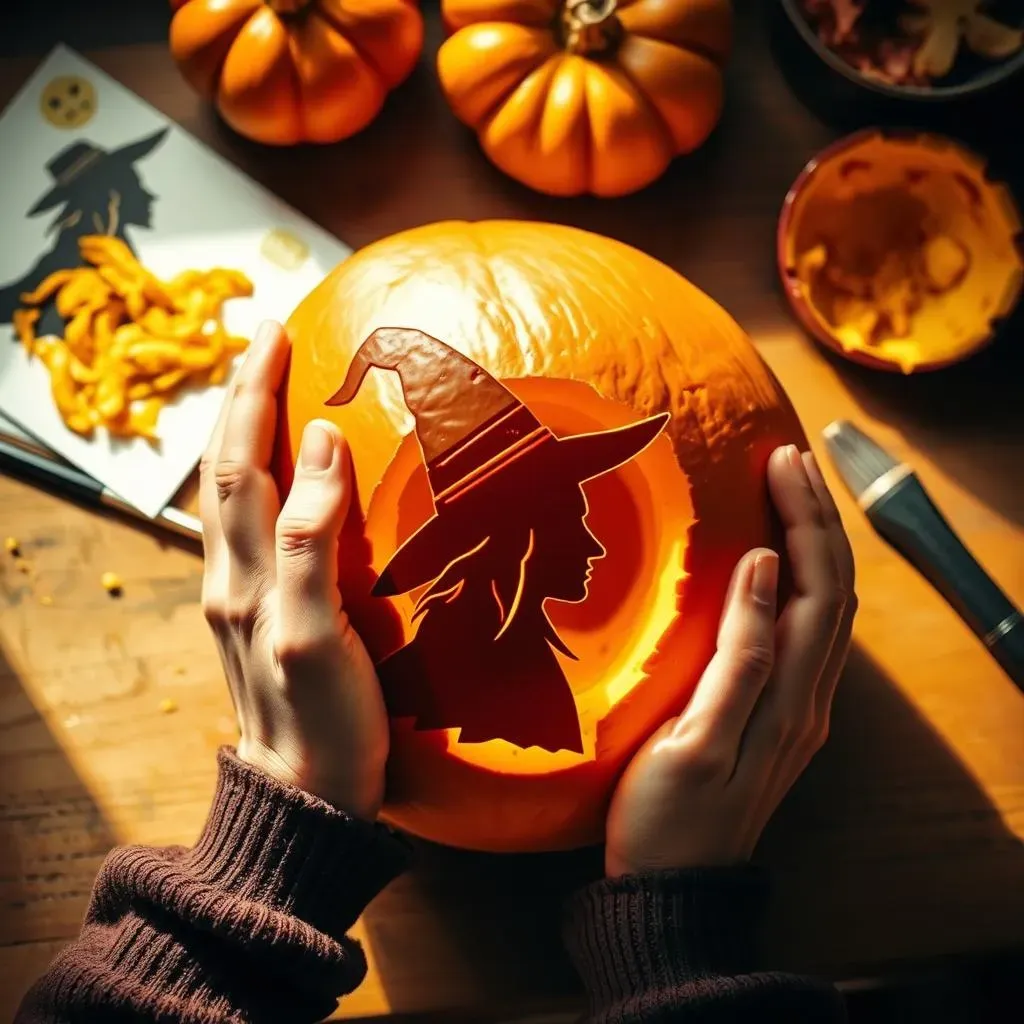
The Iconic Silhouette: Pointy Hats and Broomsticks
When you think "witch," what image pops into your head? For most of us, it's the classic silhouette: a pointy hat, a hooked nose, maybe a broomstick for good measure. These iconic elements are instantly recognizable and translate beautifully into pumpkin carving patterns. The simplicity of the design makes it perfect for beginners, and you can easily customize it to add your own personal flair. Think about adding a crooked smile, a mischievous eye, or even a warty chin to give your witch some character. Don't be afraid to experiment and make it your own!
Want to take your classic witch silhouette to the next level? Consider adding some background elements to create a more dynamic scene. A crescent moon, a scattering of stars, or even a spooky old tree can add depth and dimension to your design. You can also play with different carving techniques to create texture and visual interest. Try using a small gouge to create subtle shadows or a serrated knife to add a jagged edge to the witch's hat. The possibilities are endless, so let your imagination run wild!
Also, remember that classic doesn't have to mean boring. You can put a modern spin on the traditional witch silhouette by adding some unexpected details or using a non-traditional color palette. Instead of a plain black silhouette, try using a gradient of oranges and yellows to create a glowing effect. Or, add some glitter or sequins to the witch's hat for a touch of sparkle. The key is to have fun and let your creativity shine. After all, Halloween is all about embracing the spooky and the spectacular!
Free Printable Patterns: Your Gateway to Witchy Carving
so you're sold on the classic witch design, but where do you find a free, printable pattern? Luckily, the internet is bursting with options. Many websites offer a variety of witch-themed stencils that you can download and print for free. Some popular sources include Pinterest, family-focused websites, and crafting blogs. When searching for patterns, be sure to use specific keywords like "free witch pumpkin carving stencil," "classic witch pattern," or "Halloween pumpkin template." This will help you narrow down your search and find exactly what you're looking for.
Once you've found a stencil you like, be sure to print it at the correct size for your pumpkin. Most stencils will include instructions on how to resize the pattern to fit your gourd. It's also a good idea to print the stencil on a thicker paper stock, like cardstock, to make it easier to transfer to the pumpkin. Alternatively, you can try tracing the pattern onto parchment paper or freezer paper, which can be easily taped to the pumpkin's surface. Whichever method you choose, make sure the stencil is securely attached to the pumpkin before you start carving. This will help prevent the pattern from shifting and ensure a clean, precise design.
Level Up: Adding Details to Your Classic Witch
So, you've got your classic witch silhouette carved, and it looks great! But if you're feeling ambitious, why not take it to the next level by adding some extra details? One easy way to add depth and dimension is to use different carving techniques. Instead of simply cutting all the way through the pumpkin, try creating some shallow cuts to add shading and texture. For example, you could use a small gouge to create subtle wrinkles on the witch's face or a serrated knife to add a jagged edge to her hat. These small details can make a big difference in the overall look of your jack-o'-lantern.
Another way to enhance your classic witch design is to add some decorative elements. Consider gluing on some googly eyes, attaching some faux hair, or even adding a miniature broomstick made from twigs. You can also use paint, glitter, or sequins to add some sparkle and shine. Just be sure to use craft supplies that are safe for outdoor use and won't be damaged by the elements. With a little creativity and some simple embellishments, you can transform your classic witch jack-o'-lantern into a truly unique and eye-catching masterpiece.
Detailing Idea | Materials Needed | Skill Level |
|---|---|---|
Shading with Gouges | Small gouge tool | Intermediate |
Adding Googly Eyes | Googly eyes, glue | Beginner |
Glitter Accents | Glitter, glue | Beginner |
Miniature Broomstick | Twigs, string | Intermediate |
Beyond the Basic Witch: Creative Pumpkin Carving Ideas

Beyond the Basic Witch: Creative Pumpkin Carving Ideas
Modern Witch Makeovers: Ditching the Stereotype
Forget the green skin and warty nose! Let's reimagine the witch for the 21st century. Think of powerful sorceresses, mystical healers, and wise women of the woods. How can you translate that into a pumpkin carving? Maybe a flowing-haired enchantress with intricate Celtic knotwork, or a nature-loving witch surrounded by woodland creatures. The key is to move beyond the tired old tropes and embrace a more modern, empowering image of the witch.
Consider incorporating elements from different cultures and mythologies. A Día de los Muertos-inspired sugar skull witch? A celestial sorceress adorned with stars and constellations? The possibilities are as endless as your imagination! Don't be afraid to research different traditions and blend them together to create something truly unique and meaningful. Remember, the best pumpkin carvings tell a story, so think about the narrative you want to convey with your modern witch design.
Witchy Symbols and Spells: Carving Beyond the Face
Who says your witch pumpkin has to have a face at all? Instead of focusing on facial features, why not carve witchy symbols and spells into your gourd? Think pentagrams, crescent moons, runes, and sigils. These symbols are not only visually striking but also carry deep meaning and significance. Do a little research to find symbols that resonate with you and incorporate them into your design. You can even create your own custom sigils to represent your personal intentions and desires.
Another cool idea is to carve a spell or incantation into your pumpkin. Choose a simple phrase that embodies the spirit of Halloween, such as "trick or treat," "blessed be," or "sweet dreams." You can carve the words directly into the pumpkin or create a stylized design using lettering and symbols. For an extra touch of magic, try illuminating the carved words with a flickering LED candle or a string of fairy lights. This will create a mesmerizing effect that's sure to enchant your guests.
Wicked Accessories: Hats, Brooms, and Beyond
Take your witch pumpkin to the next level by adding some wicked accessories! A pointy hat is a classic choice, but don't feel limited to the traditional cone shape. Try a wide-brimmed hat, a feathered hat, or even a top hat for a more steampunk-inspired look. You can create the hat out of cardboard, felt, or even paper mache. Attach it to the top of your pumpkin using glue or skewers.
A broomstick is another essential witch accessory. Gather some twigs from your yard and tie them together with twine to create a miniature broom. You can also add some embellishments, such as ribbons, beads, or feathers, to make it extra special. If you're feeling ambitious, try carving a broomstick directly into the pumpkin. This will require some advanced carving skills, but the results will be well worth the effort. Other fun accessories to consider include cauldrons, spellbooks, and familiars (like black cats or owls). Get creative and let your imagination run wild!
Accessory | Materials | Instructions |
|---|---|---|
Pointy Hat | Cardboard, felt, glue | Cut and shape cardboard/felt into a cone, glue together. |
Miniature Broom | Twigs, twine | Gather twigs, tie together with twine. |
Cauldron | Small bowl, black paint | Paint the bowl black, let dry. |
Tools and Techniques for Flawless Witch Pumpkin Carving
Tools and Techniques for Flawless Witch Pumpkin Carving
Gathering Your Arsenal: Essential Carving Tools
Alright, aspiring pumpkin Picasso, let's talk tools! You can't carve a masterpiece with a butter knife (trust me, I've tried). Investing in a proper pumpkin carving kit will make your life infinitely easier and your witchy designs much sharper. Look for a kit that includes a variety of saws, gouges, and scrapers. A small, serrated saw is perfect for cutting out larger shapes, while a detail knife will allow you to create intricate lines and curves. Gouges are great for adding texture and dimension, and a scraper will help you thin out the pumpkin walls for a brighter glow.
Beyond the basic kit, there are a few other tools that can come in handy. A sturdy spoon or scoop is essential for removing the pumpkin guts. A drill can be used to create small holes for adding details or attaching accessories. And don't forget a good light source! A headlamp or a bright desk lamp will help you see what you're doing, especially when working on intricate designs. With the right tools at your disposal, you'll be well-equipped to tackle any witch pumpkin carving challenge.
Tool | Purpose | Why You Need It |
|---|---|---|
Serrated Saw | Cutting large shapes | Makes clean, precise cuts |
Detail Knife | Intricate lines and curves | Allows for fine details |
Gouges | Adding texture and dimension | Creates depth and visual interest |
Scraper | Thinning pumpkin walls | Increases brightness |
Mastering the Craft: Carving Techniques for Success
Now that you've got your tools, let's talk technique! The first step is to transfer your stencil to the pumpkin. You can do this by taping the stencil to the pumpkin and using a tracing wheel or a pin to create small perforations along the lines. Alternatively, you can use carbon paper to transfer the design. Once the stencil is transferred, it's time to start carving. Begin by cutting out the larger shapes, working your way towards the smaller details. Always cut away from yourself to avoid accidents. And remember, it's better to make small, controlled cuts than to try to force the knife through the pumpkin.
As you carve, be sure to clean out the pumpkin guts and seeds from the inside. This will not only make it easier to see what you're doing but also prevent the pumpkin from rotting prematurely. You can also use a damp cloth to wipe away any pumpkin residue from the surface of the carving. For intricate designs, consider using a technique called "shaving." This involves using a gouge or a detail knife to remove thin layers of pumpkin skin, creating a subtle shading effect. With practice and patience, you'll be able to master these techniques and create truly stunning witch pumpkin carvings.
Showcase: Inspiring WitchThemed Carved Pumpkins

Showcase: Inspiring WitchThemed Carved Pumpkins
Classic Witch Silhouette Masterpieces
Let's kick things off with some seriously stunning takes on the classic witch silhouette. I'm talking pointy hats, broomsticks, and maybe even a mischievous black cat lurking nearby. What makes these carvings stand out is the attention to detail. Clean, crisp lines, expertly shaded areas, and a real sense of character in the witch's expression. Some even incorporate backlighting to create an eerie glow that really brings the design to life. It's proof that sometimes, the simplest ideas, when executed perfectly, can be the most impactful.
One example that always sticks in my mind is a carving I saw online last year. It was a simple silhouette of a witch flying across a full moon, but the carver had used different depths to create a sense of perspective. The moon was brightly lit, while the witch was more shadowed, creating a really dramatic effect. It was so simple, yet so effective!
Modern Witch Magic: Creativity Unleashed
Now, let's dive into some seriously creative interpretations of the witch theme. These carvings ditch the traditional stereotypes and embrace a more modern, empowering vision of the witch. I'm talking intricate Celtic knotwork, celestial sorceresses adorned with stars, and nature-loving witches surrounded by woodland creatures. These artists aren't afraid to push boundaries and experiment with different styles and techniques. The result is a collection of truly unique and breathtaking jack-o'-lanterns.
I remember seeing one carving that featured a witch with flowing, Medusa-like hair made entirely of snakes. It was so bold and unexpected, and the level of detail was incredible. The artist had even incorporated LED lights to make the snakes' eyes glow red. It was definitely a showstopper!
Inspiration Element | Description | Example |
|---|---|---|
Celtic Knotwork | Intricate, interwoven patterns | Witch's hair or clothing |
Celestial Motifs | Stars, moons, constellations | Adorning a witch's robe |
Woodland Creatures | Owls, ravens, foxes | Surrounding a nature-loving witch |
Beyond the Carve: Painting, Embellishments, and More
Who says you have to stick to traditional carving? These inspiring examples go beyond the basic cut-out design and incorporate painting, embellishments, and other creative techniques to create truly stunning works of art. Think glitter, sequins, faux fur, and even miniature accessories like hats and brooms. These artists aren't afraid to get messy and experiment with different materials to bring their witchy visions to life.
One of my favorite examples is a pumpkin that was painted to look like a vintage apothecary jar filled with bubbling potions. The artist had used glow-in-the-dark paint to create a spooky effect, and they had even added tiny labels with names like "Dragon's Breath" and "Witch's Brew." It was such a clever and creative idea, and it really showcased the artist's imagination.
Cast a Spell with Your Carved Creation
So, whether you opt for a classic silhouette or a modern, artistic interpretation, remember that the most important ingredient is your own creativity. With a little inspiration and a steady hand, you can transform an ordinary pumpkin into a bewitching masterpiece that will enchant trick-or-treaters and add a touch of magic to your Halloween night. Now go forth and carve, and may your jack-o'-lanterns burn brightly all season long!