Table of Contents
October is here, and that means it's pumpkin season! Beyond the pumpkin spice lattes and fall foliage, it's time to grab a gourd and get carving. If you're looking for fresh inspiration this year, you've come to the right place. We're diving deep into the world of pumpkin carving ideas videos, offering everything from beginner-friendly tutorials to advanced techniques that will seriously impress your neighbors. Whether you're a seasoned pro with a Dremel or a newbie armed with a plastic knife, there's a project here for you. We'll cover essential tools, safety tips, and even explore the world of pumpkin painting for those who prefer to skip the carving altogether. Plus, we'll share secrets for keeping your jack-o'-lantern looking its best for as long as possible. Get ready to transform your pumpkin into a spooky, silly, or stunning work of art!
Essential Tools and Safety Tips for Pumpkin Carving

Essential Tools and Safety Tips for Pumpkin Carving
Gather Your Gear: The Pumpkin Carving Toolkit
Alright, future pumpkin Picasso, before we even think about scooping out those stringy guts, let's talk tools. You wouldn't try to paint the Mona Lisa with a house brush, right? Same goes for pumpkin carving. While a basic kitchen knife can work in a pinch, investing in a proper carving kit will make your life infinitely easier (and safer!). Look for kits that include a variety of saws – small, medium, and large – for different levels of detail. A scoop is essential for gutting, and a poker tool is perfect for transferring stencils.
But hey, don't feel like you need to break the bank. Many affordable kits offer great value. The key is to find tools that feel comfortable in your hand and are sharp enough to do the job without requiring Herculean force. Trust me, your wrists will thank you later.
Safety First, Carving Second: Avoiding ER Trips
real talk: pumpkin carving can be surprisingly dangerous. Those knives are sharp, pumpkins are slippery, and enthusiasm can sometimes outweigh common sense. That's why safety is paramount. First and foremost, kids should always be supervised by an adult. And when I say supervised, I don't mean "glancing over while scrolling through Instagram." I mean actively involved, guiding their hands and ensuring they're using the tools properly.
Beyond supervision, consider investing in some carving gloves. These provide extra grip and protection against accidental slips. And always, always carve on a stable surface with plenty of light. A wobbly table and dim lighting are a recipe for disaster. Finally, if you're using power tools (like a Dremel), wear safety glasses to protect your eyes from flying debris.
Beyond the Basics: Pro Tips for Safe and Successful Carving
So, you've got your tools, you've got your safety gear, now what? Here are a few extra tips to ensure a smooth and successful carving experience. First, consider using a stencil. This is especially helpful for beginners or for complex designs. You can find tons of free stencils online, or even create your own. Simply tape the stencil to your pumpkin and use a poker tool to transfer the design.
Next, don't be afraid to experiment with different carving techniques. Instead of just cutting all the way through the pumpkin, try shaving away layers of the skin to create different shades and textures. This can add a whole new level of depth and dimension to your design. And finally, remember to take breaks! Carving can be surprisingly tiring, so don't push yourself too hard. Step away from the pumpkin every now and then to stretch, relax, and admire your progress.
Tool | Purpose | Safety Tip |
|---|---|---|
Carving Saw | Cutting intricate designs | Use short, controlled strokes |
Scoop | Removing pumpkin guts | Hold pumpkin firmly while scooping |
Poker Tool | Transferring stencils | Poke gently to avoid damaging the pumpkin |
Easy Pumpkin Carving Ideas Videos for Beginners
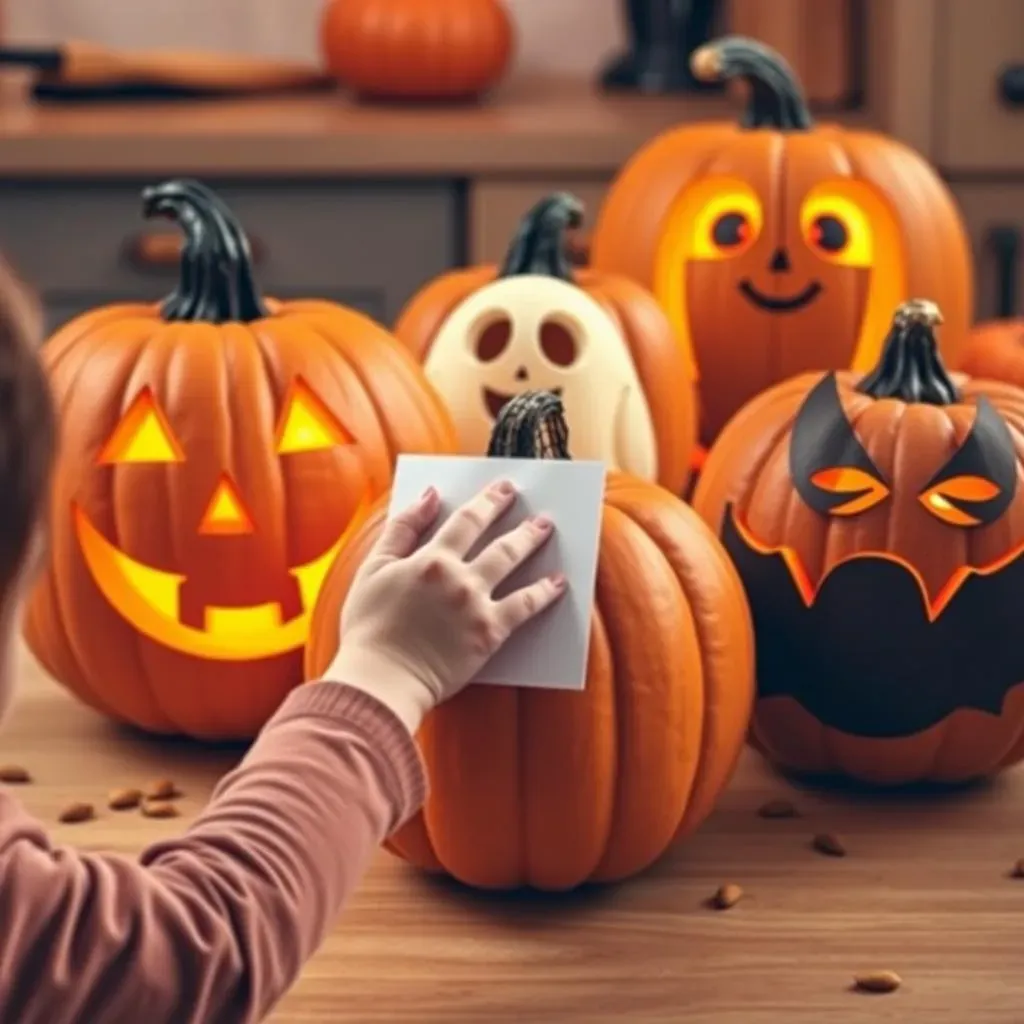
Easy Pumpkin Carving Ideas Videos for Beginners
so you're ready to carve, but maybe the thought of tackling a super intricate design is a bit intimidating? No sweat! There are tons of easy pumpkin carving ideas videos for beginners out there that will guide you through the process step-by-step. Think simple shapes – circles, triangles, and squares – arranged into classic jack-o'-lantern faces. Or how about a friendly ghost, a goofy cat, or a bat silhouette? The beauty of these designs is that they're quick, easy, and require minimal carving skills. Plus, they're perfect for kids to help with (under close supervision, of course!). Check out YouTube for channels like "Pumpkin Carving 101" or "Easy Halloween Crafts" for visual tutorials that break down each step.
Advanced Pumpkin Carving Ideas Videos: StepbyStep Guides
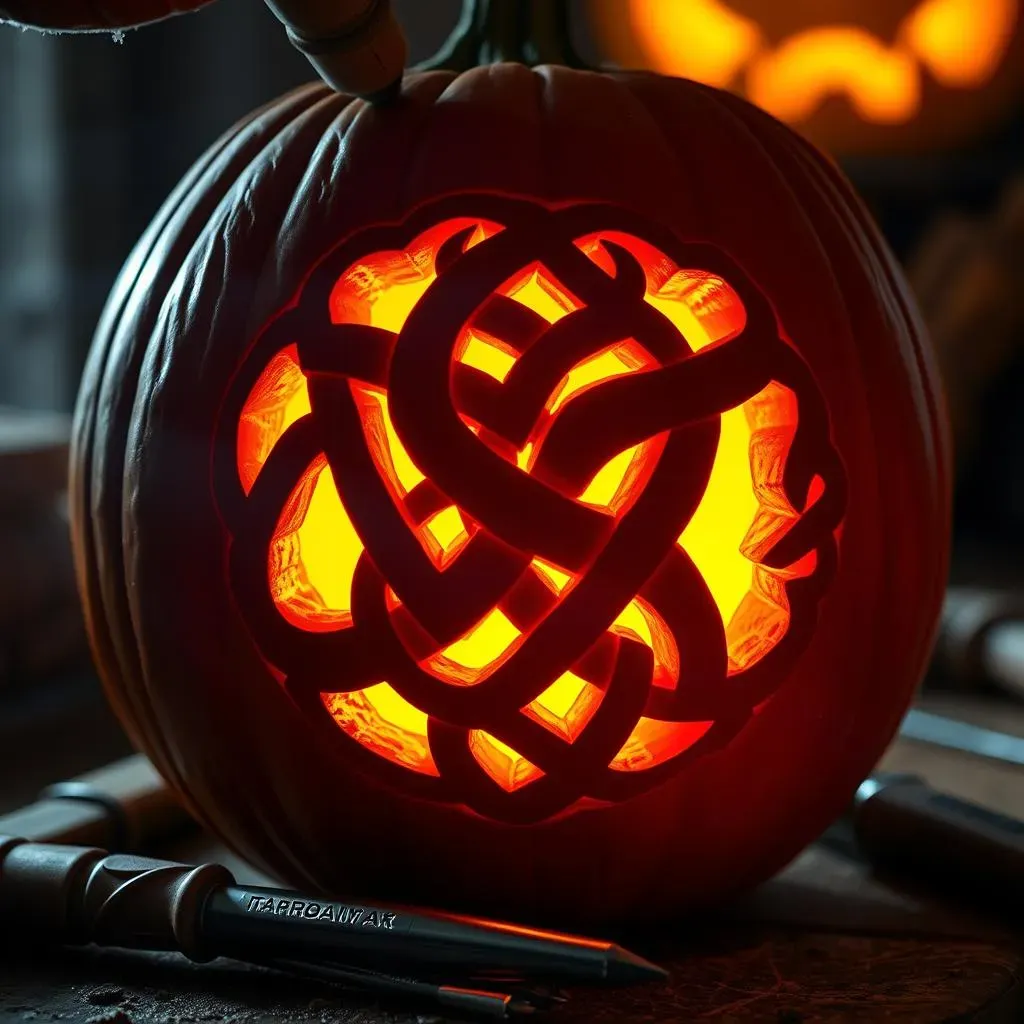
Advanced Pumpkin Carving Ideas Videos: StepbyStep Guides
Level Up Your Carving Game
Ready to ditch the basic triangle eyes and take your pumpkin artistry to the next level? Then it's time to explore advanced pumpkin carving ideas videos: step-by-step guides. These tutorials delve into intricate designs, shading techniques, and the use of specialized tools like wood carving gouges and rotary tools. Think portraits of your favorite movie monsters, elaborate Celtic knots, or even 3D sculpted pumpkins that seem to leap off the surface. It might sound intimidating, but with the right guidance, even complex designs become manageable.
The key is to find videos that break down the process into clear, easy-to-follow steps. Look for tutorials that show close-ups of the carving techniques, explain the reasoning behind each cut, and offer tips for troubleshooting common problems. Channels like " carving master " and "Pumpkin Sculptor" offer a wealth of advanced tutorials, ranging from beginner-friendly introductions to complex, multi-day projects. Remember, Rome wasn't built in a day, and neither is a masterpiece pumpkin. Start with a simpler advanced design and gradually work your way up to more challenging projects.
Tools and Techniques for the Pro Pumpkin Carver
Once you're ready to tackle advanced designs, it's time to upgrade your toolkit. While a basic carving kit will get you started, serious pumpkin artists often invest in specialized tools like wood carving gouges, which allow for precise shaping and detailing. Rotary tools, like Dremels, are also invaluable for creating smooth lines, intricate patterns, and textured surfaces. If you are using power tools, please be safe and cautious and wear safety glasses to protect your eyes from flying debris.
Beyond the tools themselves, mastering advanced carving techniques is essential. This includes learning how to create different shades and textures by varying the depth of your cuts, how to use stencils effectively for complex designs, and how to properly light your finished pumpkin to showcase its details. Many advanced tutorials will also cover techniques for preserving your pumpkin, such as using petroleum jelly or acrylic sealant to prevent it from drying out and rotting too quickly.
Technique | Description | Benefit |
|---|---|---|
Shading | Varying the depth of cuts to create light and shadow | Adds depth and realism to designs |
Undercutting | Carving underneath the surface to create a 3D effect | Makes designs appear to pop out |
Stippling | Using small, controlled pokes to create texture | Adds a unique, artistic touch |
Creative Pumpkin Painting and Decorating Ideas (No Carving Needed!)
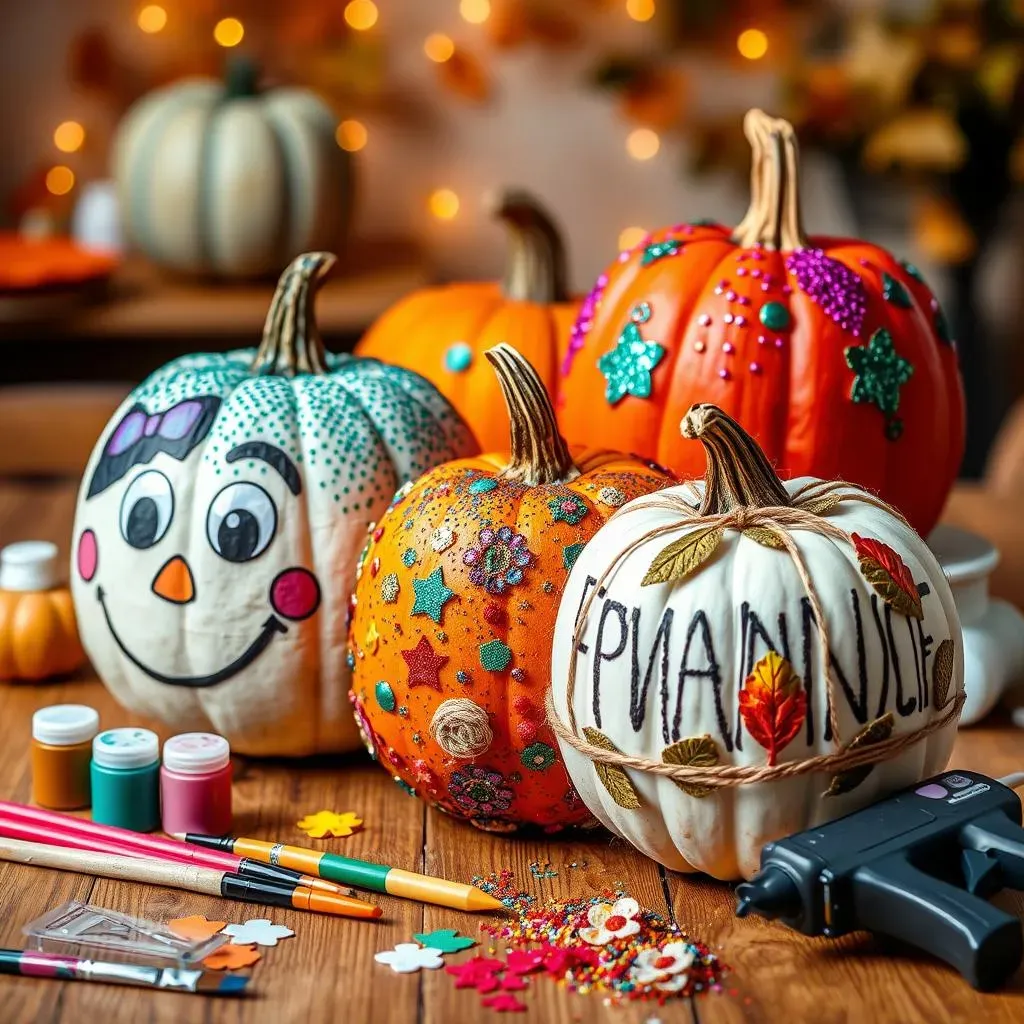
Creative Pumpkin Painting and Decorating Ideas (No Carving Needed!)
Paint Your Pumpkin: A Canvas of Possibilities
Alright, so maybe you're not into the whole carving thing. Maybe you're worried about sharp objects and little fingers, or maybe you just want a pumpkin that lasts longer than a week without turning into a moldy mess. Whatever your reason, creative pumpkin painting and decorating ideas (no carving needed!) are here to save the day! Painting pumpkins opens up a whole new world of artistic possibilities, from simple geometric designs to intricate floral patterns to recreations of your favorite characters. Plus, it's a fantastic activity for all ages, requiring minimal setup and cleanup.
The key to a successful painted pumpkin is choosing the right paint. Acrylic paints are a great option, as they're durable, water-resistant, and come in a wide range of colors. You can also use craft paint, chalk paint, or even spray paint, depending on the look you're going for. Just be sure to use a primer first to help the paint adhere to the pumpkin's surface. And don't forget the brushes! A variety of brush sizes will allow you to create both broad strokes and fine details.
Beyond Paint: Embellishments and Add-ons
But painting is just the beginning! Once you've got your base coat down, you can add all sorts of embellishments to your pumpkin to create a truly unique masterpiece. Think glitter, sequins, googly eyes, felt shapes, yarn, buttons, beads – the possibilities are endless! Hot glue is your friend here, allowing you to attach just about anything to the pumpkin's surface.
For a more natural look, consider using leaves, twigs, and berries gathered from your backyard. Or how about wrapping your pumpkin in twine or burlap for a rustic, farmhouse-chic vibe? You can even use stencils and sponges to create textured patterns or add a touch of metallic paint for a glamorous effect. The only limit is your imagination!
Theme It Up: Inspiration for Your No-Carve Pumpkin
Stuck for ideas? Here are a few themes to get your creative juices flowing. For a kid-friendly option, try painting your pumpkin to look like a favorite cartoon character, a cute animal, or a silly monster. You could even let your kids decorate their own mini pumpkins with stickers, markers, and pipe cleaners.
For a more sophisticated look, consider painting your pumpkin with a geometric pattern, a floral design, or an abstract art piece. Metallic paint, glitter, and sequins can add a touch of glamour, while natural elements like leaves and twigs can create a rustic, organic feel. And don't forget about Halloween themes! A spooky spiderweb, a creepy skull, or a ghostly silhouette can all be easily painted onto a pumpkin.
Theme | Description | Materials |
|---|---|---|
Cartoon Character | Paint a pumpkin to look like a favorite cartoon character | Acrylic paints, brushes, googly eyes |
Geometric Pattern | Create a modern design with geometric shapes | Acrylic paints, stencils, tape |
Rustic Farmhouse | Wrap a pumpkin in twine or burlap and add natural elements | Twine, burlap, leaves, twigs, hot glue |
Preserving Your Pumpkin Masterpiece: Tips and Tricks
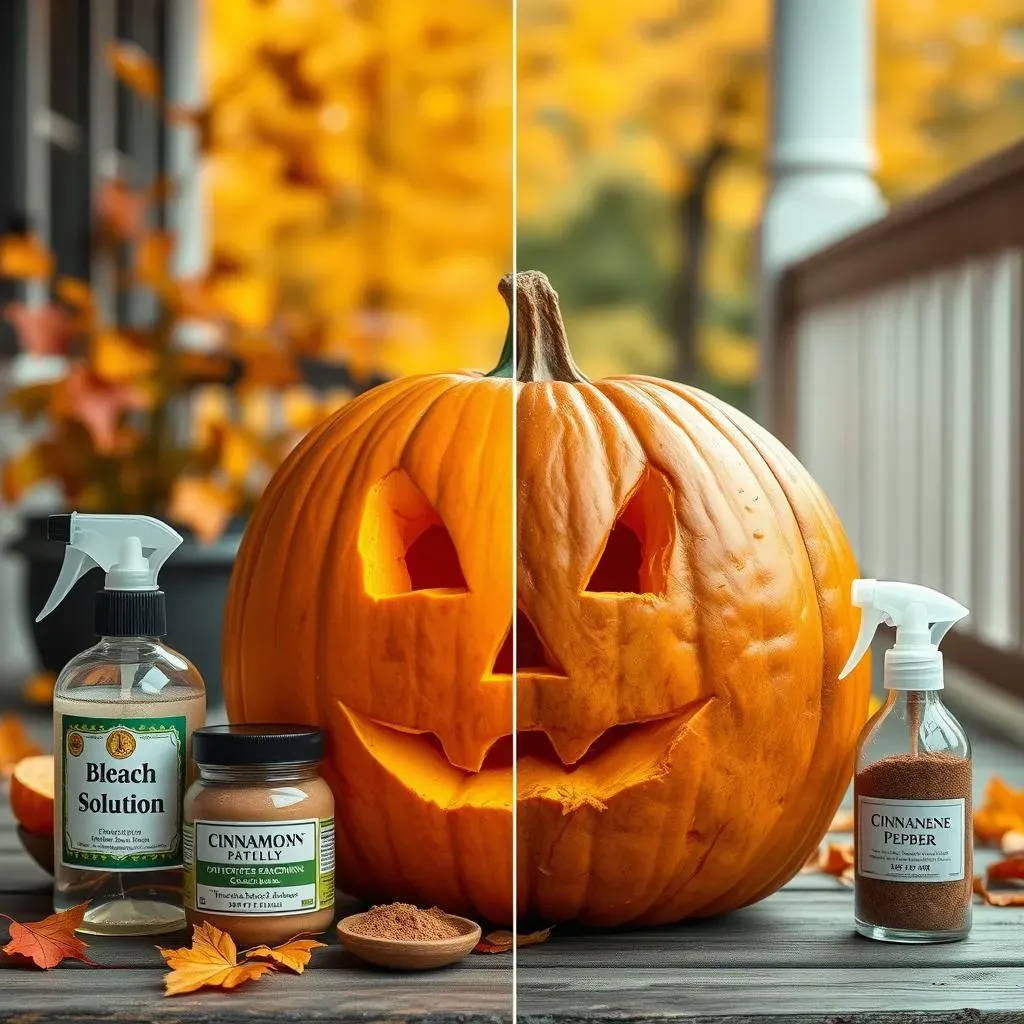
Preserving Your Pumpkin Masterpiece: Tips and Tricks
Fighting the Rot: Keeping Your Pumpkin Fresh
Alright, you've poured your heart and soul into creating the perfect jack-o'-lantern, but now the clock is ticking. Pumpkins, sadly, are not known for their longevity. They're basically giant, moist sponges just begging to decompose. But fear not! There are several tips and tricks you can use to extend the life of your pumpkin masterpiece and keep it looking fresh for as long as possible. The key is to combat the three main enemies of pumpkin preservation: dehydration, mold, and pests.
First, let's talk about dehydration. Once you carve a pumpkin, it starts to lose moisture, causing it to shrivel and sag. To combat this, you need to rehydrate it regularly. One popular method is to soak your pumpkin in a bleach solution (1 tablespoon of bleach per gallon of water) for a few hours. This will not only rehydrate the pumpkin but also kill any mold spores that may be present. After soaking, pat the pumpkin dry and coat the cut surfaces with petroleum jelly or vegetable oil to seal in moisture. You can also spray the pumpkin with an anti-transpirant spray, which is designed to reduce water loss in plants.
Mold is another major threat to carved pumpkins. To prevent mold growth, keep your pumpkin clean and dry. Remove any debris or moisture that accumulates inside the pumpkin, and avoid placing it in direct sunlight or warm temperatures, as this will accelerate mold growth. You can also sprinkle cinnamon or pumpkin pie spice inside the pumpkin, as these spices have antifungal properties. And if you notice any signs of mold, clean the affected area with a bleach solution.
Finally, you need to protect your pumpkin from pests like squirrels, rodents, and insects. These critters love to nibble on pumpkins, and they can quickly ruin your hard work. To deter pests, try spraying your pumpkin with a mixture of water and cayenne pepper. The spicy scent will keep most animals away. You can also place your pumpkin on a raised platform or wrap it in chicken wire to protect it from ground-dwelling pests.
Preservation Method | Description | Frequency |
|---|---|---|
Bleach Soak | Soak pumpkin in bleach solution to kill mold and rehydrate | Every 2-3 days |
Petroleum Jelly | Coat cut surfaces with petroleum jelly to seal in moisture | After each soak |
Cayenne Pepper Spray | Spray pumpkin with cayenne pepper to deter pests | As needed |
Happy Carving!
So, there you have it – a treasure trove of pumpkin carving ideas videos to spark your creativity this Halloween. Whether you decide to keep it simple with a classic jack-o'-lantern face, try your hand at a more intricate design, or opt for a no-carve painted masterpiece, the most important thing is to have fun and enjoy the process. Grab your tools, gather your friends and family, and get ready to create some unforgettable pumpkin art. And don't forget to share your creations with us – we can't wait to see what you come up with!