Table of Contents
Tired of the same old triangle eyes and jagged smiles? If you're looking to truly impress this Halloween, exploring pumpkin carving ideas realistic is the path forward. Forget the basic jack-o'-lantern; we're talking about pumpkins that look less like a kid's drawing and more like actual art. Getting a pumpkin to look realistic might seem daunting, maybe even impossible if you've only ever used a flimsy kitchen knife and a scoop. It takes a bit more patience and a different approach, but the results are absolutely worth the extra effort. A well-carved realistic pumpkin can stop people in their tracks and become the centerpiece of your spooky decor.
Why Go Realistic with Pumpkin Carving?

Why Go Realistic with Pumpkin Carving?
Stand Out from the Patch
Let's be honest, how many basic jack-o'-lanterns do you see every October? About a million, right? They're fine, they serve a purpose, but they don't exactly scream "masterpiece." Exploring pumpkin carving ideas realistic is about elevating your game. It’s the difference between drawing a stick figure and sketching a portrait. When you put a realistic carved pumpkin on your porch, people stop. They look closer. They might even ask, "How in the heck did you do that?" It cuts through the visual clutter of the season and makes your effort truly noticeable. It's about creating something memorable, something that shows you put in more than five minutes with a cheap plastic saw.
Embrace the Challenge, Reap the Rewards
Nobody said realistic pumpkin carving was going to be as easy as scooping out guts and hacking some holes. It requires patience, a steady hand, and a willingness to learn some actual techniques beyond brute force. But that difficulty is precisely part of the appeal. Tackling something challenging and pulling it off feels good. It’s a tangible skill you develop, not just a seasonal chore. The satisfaction of seeing a detailed face or an animal emerge from a simple gourd is immense. It's a different kind of fun than the quick and dirty carvings; it's a rewarding craft.
- Make your display unforgettable.
- Develop new artistic skills.
- Earn serious bragging rights.
- Experience deeper creative satisfaction.
More Than Just Decoration: It's Art
Thinking about why go realistic with pumpkin carving? Because it transforms a temporary decoration into a temporary work of art. Instead of just adding a spooky light source, you're creating a sculptural piece. You're playing with light and shadow in a more sophisticated way, defining contours and expressions. It pushes you to look at the pumpkin differently, not just as a canvas, but as a three-dimensional medium. It’s a fantastic way to practice sculpting or portraiture skills, even if your medium is destined for the compost heap eventually. It's about the process and the impressive result, however fleeting.
Essential Tools and Techniques for Realistic Pumpkin Carving

Essential Tools and Techniques for Realistic Pumpkin Carving
Beyond the Kitchen Drawer: Gear Up for Realism
You're not going to get realistic detail with the flimsy plastic saw that came with the grocery store kit. Seriously, throw that thing out. Achieving realistic pumpkin carving requires tools designed for control and precision. Think clay sculpting tools, wood carving chisels, and linoleum cutters. You'll need various sizes and shapes – loop tools for scooping and shaping contours, ribbon tools for refining surfaces, and small, sharp V-gauges and U-gauges for carving lines and details like hair or wrinkles. A good quality swivel knife is also crucial for outlining shapes cleanly. Don't forget a sharp utility knife for initial cuts and maybe a Dremel tool with various bits for smoothing and adding texture, though that's getting fancy. Proper lighting is non-negotiable; you need to see exactly what you're doing, especially when working with subtle shading.
Layering and Shading: It's Not Just Cutting Holes
Realistic carving isn't about cutting all the way through the pumpkin wall. Much of the magic happens by carving *into* the wall at different depths. This technique, often called "relief carving" or "shading," allows light to pass through varying thicknesses of the pumpkin flesh, creating gradients and depth. A thin layer lets a lot of light through, appearing bright, while a thicker layer blocks more light, appearing darker. You build up forms by carefully scraping away layers. Start with your lightest areas first, removing more material, and gradually work towards the darker areas, removing less. This requires a delicate touch and patience; you can always remove more material, but you can't put it back. Practice on a scrap piece first to see how different depths affect the light.
Tool Type | Primary Use | Why It Helps Realism |
|---|---|---|
Clay Loop Tools | Scooping, shaping contours | Creates smooth curves and removes material efficiently for shaping |
Wood Carving Chisels (small) | Refining details, flat areas | Provides control for cleaning up surfaces and defining edges |
V-Gauges/U-Gauges | Carving lines, textures | Essential for intricate details like hair, fur, or fine lines |
Swivel Knife | Outlining, fine cuts | Allows for smooth, controlled cuts around detailed shapes |
Detailed Pumpkin Carving Ideas Realistic: Faces, Animals, and More
Detailed Pumpkin Carving Ideas Realistic: Faces, Animals, and More
Carving Lifelike Faces into Gourds
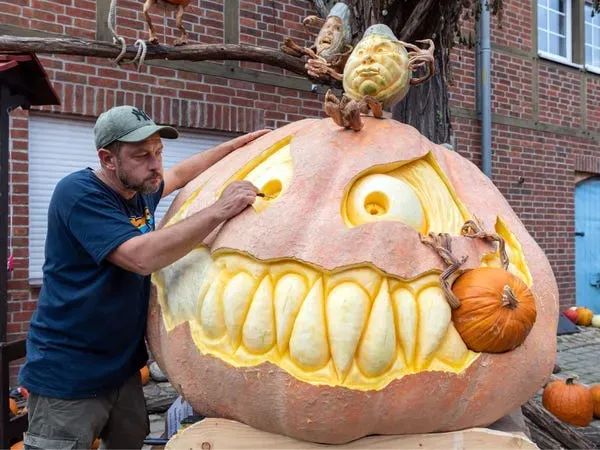
When you tackle pumpkin carving ideas realistic, especially faces, you're essentially becoming a temporary sculptor of ephemeral organic matter. The goal isn't just to make a hole for an eye; it's to sculpt the eyelid, the brow bone, the slight puffiness underneath. Start with a good reference photo – trying to invent a realistic face is much harder. Transfer your basic outline, then begin removing layers. The deepest cuts (where light shines brightest) might define the pupils or the highlights on lips. Mid-depth cuts sculpt the cheeks, forehead, and nose. Subtle scraping defines wrinkles, pores (if you're feeling ambitious), and skin texture. Think about how light falls on a face; you're recreating those light and shadow patterns with varying thicknesses of pumpkin wall. Getting the expression right is key, and that often comes down to the subtle curves around the mouth and eyes.
- Focus on facial structure: cheekbones, brow ridge, jawline.
- Use layered carving for subtle shading and contours.
- Pay close attention to the eyes – they sell the realism.
- Study your reference photo constantly.
Bringing Beasts to Life in Pumpkin
Moving beyond human faces, realistic pumpkin carving ideas realistic often include animals. Think about the textures involved: the sleek coat of a panther, the ruffled feathers of an owl, the intricate scales of a snake. Each requires a different approach. For fur, you'll use small gauges and loop tools to create short, varied strokes that mimic the direction and length of the hair. It's tedious but effective. Feathers are about layering and overlap, using flat chisels and swivel knives to define individual plumes. Scales need sharp, precise cuts and careful removal of material to create the overlapping effect. Getting the anatomy right is crucial; a wonky ear or misplaced eye instantly breaks the illusion. It helps to sketch the musculature or bone structure onto the pumpkin first, even if you don't carve it all.
Animal Feature | Carving Focus | Key Technique |
|---|---|---|
Eyes | Shape, depth, pupil definition | Layered carving, precise small tools |
Fur/Hair | Direction, length, texture variation | Short strokes, varied gauge depths |
Feathers | Overlap, individual shape | Layering, clean cuts with chisels/knife |
Scales | Pattern, overlap, sheen | Precise cuts, careful material removal |
Beyond Faces and Fur: Expanding Your Realistic Repertoire
Realistic pumpkin carving ideas realistic aren't limited to just faces and animals. You can carve landscapes, still life objects, or even architectural details. Imagine a crumbling stone wall carved into a pumpkin, or a pile of autumn leaves. The principles remain the same: using varying depths to control light and shadow, employing precise tools for detail, and working from a clear reference. For objects, focus on the material texture – how would light hit worn leather versus polished metal? For landscapes, consider perspective and depth, using darker areas for foreground elements and lighter areas for the background. Don't be afraid to experiment with different pumpkin shapes; a tall, skinny pumpkin might lend itself to a tree trunk or a portrait, while a wide, squat one could become a sprawling landscape or a coiled snake. The key is to see the pumpkin not just as a Halloween decoration, but as raw material waiting to be transformed.
Troubleshooting Common Issues in Realistic Pumpkin Carving

Troubleshooting Common Issues in Realistic Pumpkin Carving
When Your Carving Goes Sideways (Literally)
so you've got your fancy tools and a grand vision for some epic pumpkin carving ideas realistic, but things aren't always smooth sailing. You might find your tool slips, taking a chunk out of a nostril you spent an hour sculpting, or you accidentally go too deep in one spot, creating a glaringly bright patch where you wanted subtle shadow. It happens to everyone. The key is not to panic. Sometimes you can blend a mistake in, turning a slip into a wrinkle or scar. Other times, you might have to adjust your design on the fly. The biggest enemy is often impatience; rushing leads to errors. Also, pumpkins are organic, meaning they start to break down. Those delicate edges can wilt, and mold can appear faster than you'd like, especially in humid conditions. Keeping the pumpkin cool and misting it lightly can help, but accept that your masterpiece has a limited shelf life.
- Tool slips: Try to incorporate into the design or carefully smooth the area.
- Accidental deep cuts: This spot will be brighter; can you adjust surrounding areas or the lighting?
- Wilted details: Mist the pumpkin lightly with water.
- Mold growth: Wipe gently with a bleach/water solution (use sparingly!).
- Pumpkin cracking: Keep moisture levels consistent; sudden temperature changes can cause cracks.
Showcasing Your Realistic Pumpkin Carving Masterpiece
Showcasing Your Realistic Pumpkin Carving Masterpiece
Lighting is Everything for Realistic Carvings
So you've poured hours into your pumpkin carving ideas realistic, meticulously scraping and shaping until a face or creature emerges. Great. Now, don't ruin it by sticking a cheap, flickering LED tea light inside and calling it a day. For realistic carvings, especially those relying on layered depth for shading, how you light it is critical. Traditional through-cuts look fine with a simple light source, but your subtle gradients and textures need something that highlights the variations in wall thickness. Experiment with different types of lights. A single, bright LED placed near the back can push light through the thin areas, while keeping thicker areas dark. Multiple smaller lights can create more complex effects. Consider the direction of the light source relative to the carving; just like sculpting, light from different angles changes how the form is perceived. Play around in a dark room before committing your final setup. The right lighting makes the difference between "oh, that's neat" and "holy cow, how did you do that?"
Where to Put Your Pumpkin for Maximum Impact
You didn't spend all that time on intricate pumpkin carving ideas realistic just for them to sit in a corner where nobody sees them properly. Placement matters. Think of it like displaying any piece of art. You want it at a height where people can appreciate the detail, not down by their ankles. A sturdy pedestal or a prominent spot on a porch railing works well. Consider the background; a busy or cluttered background can detract from the carving itself. A simple, dark backdrop often works best, especially at night, making the lit carving pop. Also, think about the viewing angle. If your piece is meant to be seen from the front, ensure it's positioned accordingly. If it has details all around, perhaps a rotating stand (if you're feeling extra) or a central location where people can walk around it is better. Don't just plop it on the doorstep; stage it.
- Place at eye level or slightly below for faces.
- Use a simple, dark background to make the carving stand out.
- Consider the primary viewing angle when positioning.
- Ensure stability so it doesn't take a tumble.
- Protect it from direct rain or enthusiastic squirrels.
Preserving Your Art and Capturing It Forever
The sad truth about showcasing your realistic pumpkin carving masterpiece is that it won't last forever. It's organic, it's dying. You can extend its life a bit by keeping it cool, misting it lightly with water daily, and wiping down any mold spots with a dilute bleach solution (seriously, just a little bleach). Some folks swear by petroleum jelly on the cut edges, though results vary. The best way to make your effort last is to capture it with good photos or video. Take pictures in different lighting conditions – daylight, dusk, and fully lit in the dark. Get close-ups of the details. A good photograph can immortalize your temporary sculpture long after it's become compost. Documenting your work is part of the process, especially when the medium is so fleeting. Don't let your hard work fade away without a proper record.
Your Realistic Carving Journey Ends... Or Just Begins
So, you've navigated the world of precision tools, tackled shading techniques, and pondered the intricacies of carving a truly realistic portrait or creature. Moving beyond the simple cutout requires patience and a willingness to refine your approach, but the difference between a standard jack-o'-lantern and a detailed, lifelike carving is undeniable. It's about adding depth and character, turning a gourd into something that genuinely captures attention. Don't expect perfection on your first try, or even your fifth. The real trick is practice and understanding that sometimes, less is more, and sometimes, a tiny detail makes all the difference. Take what you've learned, pick a design that excites you, and get carving. The most impressive pumpkins out there didn't carve themselves.