Table of Contents
Alright, let's talk pumpkins. Every year, the same tired faces grin from doorsteps. You want something with a bit more... character. Something that whispers secrets instead of just screaming "Boo!" If you're ready to ditch the basic triangle eyes and jagged grins, we're diving into the world of pumpkin carving ideas raven. Why a raven? Because nothing says spooky, mysterious, and just a touch literary like Edgar Allan Poe's favorite feathered friend perched ominously on your porch.
Why Raven Pumpkin Carving Ideas Are Perfect for Halloween
Why Raven Pumpkin Carving Ideas Are Perfect for Halloween
Let's be honest, jack-o'-lanterns can get a bit... predictable. You see the same toothy grins and goofy faces year after year. But Halloween should feel a little unsettling, right? That's where raven pumpkin carving ideas swoop in. A raven isn't cute. It's intelligent, often associated with mystery, folklore, and yes, death. Think of the shift from a grinning pumpkin to one with the silhouette of a watchful bird. It adds an instant layer of gothic atmosphere, a touch of the macabre that feels far more appropriate for a holiday rooted in spooky tales and things that go bump in the night than, say, a carved cartoon character.
Choosing Your Raven: Simple Stencils vs. Complex Designs
Choosing Your Raven: Simple Stencils vs. Complex Designs
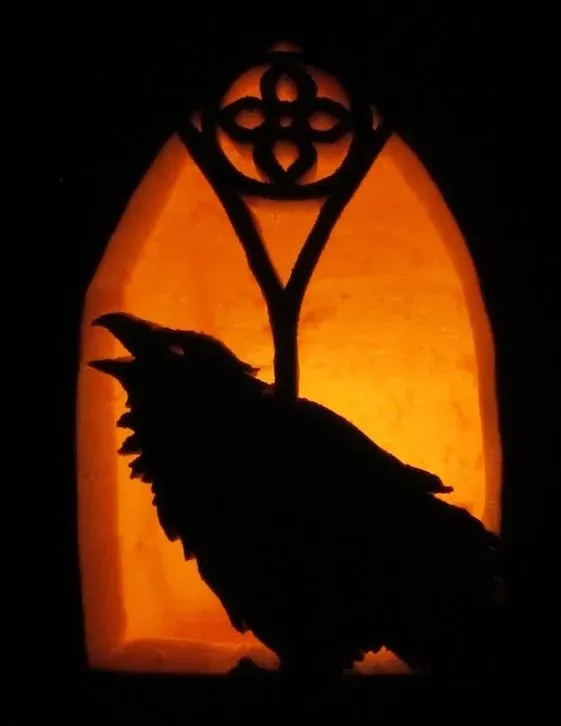
Starting Simple: Silhouette Ravens for Everyone
so you're sold on the raven idea but maybe you haven't carved anything more complicated than a lopsided smile since third grade. No sweat. This is where simple stencils for your pumpkin carving ideas raven come in clutch. Think basic silhouette: a clean outline of a raven perched or in flight. These are fantastic for beginners. You just tape the pattern on, poke holes along the lines, and connect the dots with a basic carving saw. It's less about intricate detail and more about creating that stark, recognizable shape against the glowing interior. You get the spooky vibe without the risk of carving off a finger or having your raven look more like a startled pigeon. It's a solid win for visual impact with minimal stress.
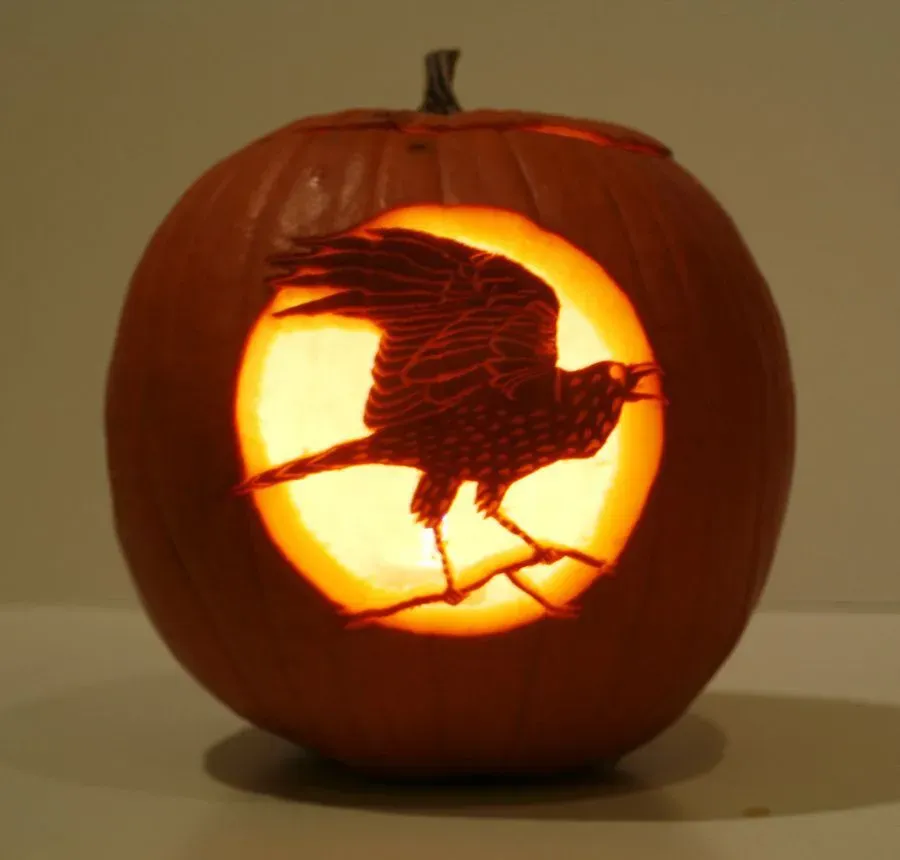
Going Detailed: Intricate Featherwork and Piercing Eyes
Now, if you fancy yourself a bit of a pumpkin Picasso, or you just enjoy a good challenge, you can dive into more complex raven designs. This means moving beyond simple cut-outs into techniques like scraping away the pumpkin skin to create different shades and textures. Imagine carving individual feathers, adding texture to wings, or carefully etching a sharp, intelligent eye. These designs require specific tools – small detail knives, linoleum cutters, maybe even a Dremel if you're feeling brave and own safety goggles. It takes more time, patience, and a steady hand, but the payoff is a truly stunning piece of gourd art that looks less like a jack-o'-lantern and more like a carved sculpture.
- Simple Stencils: Quick, beginner-friendly, high contrast silhouette.
- Complex Designs: Detailed, requires more tools/skill, allows for shading and texture.
- Choose based on your carving experience and available time.
Carving Your Raven: Tools, Techniques, and Troubleshooting
Carving Your Raven: Tools, Techniques, and Troubleshooting
Gathering Your Carving Arsenal
you've picked your raven design for your pumpkin carving ideas raven. Now comes the part where you actually get your hands messy. First, let's talk tools. Ditch the flimsy little saw that came with that cheap kit from the grocery store. Seriously, it's more likely to break your pumpkin (or your spirit) than carve anything cleanly. You need a decent set. A small, sharp carving saw is essential for cutting through the pumpkin rind. Look for one with fine teeth. Detail knives are crucial for scraping and intricate work, especially if you're doing anything beyond a basic silhouette. A scoop for gutting the pumpkin is a must – save your hands the trauma. Some people swear by linoleum cutters for removing skin without cutting all the way through, creating cool shaded effects. And for the truly ambitious, a Dremel with various bits can make quick work of detail, but practice on scrap first unless you want your raven to look like it went ten rounds with a badger.
Mastering Basic Carving Cuts
Carving isn't just hacking away. There's a technique involved. For simple cut-through designs, always start your cut from the inside edge of your pattern line and angle the blade slightly inwards. This way, when you pop the piece out, the edge on the pumpkin face is clean and defined, not beveled outwards. Keep your saw perpendicular to the pumpkin surface for straight lines. For curves, take it slow, making small, deliberate strokes. Don't try to muscle your way through; let the saw do the work. If you're doing scraping, use light pressure and build up the depth gradually. Practice on the back of the pumpkin first to get a feel for how deep you need to go to remove just the skin or a bit more flesh for shading.
Tool | Primary Use | Pro Tip |
|---|---|---|
Small Carving Saw | Cutting through rind | Keep blade clean for smooth cuts. |
Detail Knives | Scraping, fine lines | Keep them sharp! Dull knives slip. |
Pumpkin Scoop | Removing guts and seeds | Get one with a serrated edge for faster scraping. |
Dealing with Common Carving Catastrophes
Things can go wrong. It happens. Maybe you accidentally cut through a section you meant to leave, or a delicate piece breaks off. Don't panic (immediately). For small breaks, toothpicks can be your best friend. Use them to reattach pieces from the inside. Push the toothpick into the broken piece, then into the main pumpkin body. For larger breaks, sometimes you just have to adjust your design on the fly. Maybe that delicate feather becomes a battle scar. If your pumpkin starts to look a bit... deflated after carving, a light misting of water inside can help keep it hydrated. And if the worst happens and your raven pumpkin carving ideas end up looking more like a tragic crow roadkill incident, well, there's always next year. Or you can just turn that side to the wall and pretend it didn't happen.
Lighting Up Your Raven Pumpkin Carving Masterpiece

Lighting Up Your Raven Pumpkin Carving Masterpiece
Choosing the Right Glow for Your Gothic Bird
You've spent time perfecting your raven pumpkin carving ideas, carefully scraping or cutting away the gourd's flesh to reveal your spooky design. Now comes the crucial final step: illumination. This isn't just about making it visible; it's about setting the mood. A poorly lit raven looks sad and flat. A well-lit one casts eerie shadows and makes your design pop. Forget that single, flickering tea light you used in grade school. We need something that does justice to your hard work.
Beyond the Candle: Exploring Modern Options
While a real candle has that classic flicker, it's also a fire hazard, especially with curious trick-or-treaters or a gust of wind. Battery-powered LED lights are your friend here. They come in various colors – a cool white or a slightly blueish light can give your raven a ghostly, ethereal glow. Some even have flickering effects that mimic a real flame without the risk. You can use multiple small LEDs placed strategically inside to highlight specific parts of your raven, like its eye or the texture of its feathers. Think about the direction of the light; shining it from below can create dramatic, upward shadows that make your raven look even more menacing.
- White LED: Clean, modern look.
- Blue LED: Eerie, ghostly atmosphere.
- Flickering LED: Mimics candle without fire risk.
- Multiple small lights: Highlight details and create dynamic shadows.
Strategic Placement for Maximum Spook Factor
Where you put the light source matters just as much as what kind you use. For simple silhouette raven pumpkin carving ideas, a single bright light in the center works fine to illuminate the entire cut-out. But for more detailed carvings with scraped areas for shading, you need to be smarter. Place lights closer to the front of the pumpkin to make the scraped details stand out. If your raven has distinct eyes, try positioning a small light directly behind them to make them glow intensely. Experiment before the big night. Put the light in, turn off the room lights, and see how your raven looks. Adjust the light position until you get the effect you want. Sometimes, simply tilting the pumpkin slightly can change how the light hits the carving and enhance the dramatic effect.
Your Raven Takes Flight (Or Just Sits There Looking Spooky)
So there you have it. You've wrestled with a gourd, maybe lost a bit of skin, and hopefully, emerged with a pumpkin featuring a decidedly uncheerful bird. These raven pumpkin carving ideas aren't about winning a contest; they're about adding a touch of genuine, old-school Halloween creepiness to your doorstep. It's a break from the cutesy stuff, a nod to the darker side of the season. Light it up tonight, step back, and appreciate the slightly ominous glow emanating from your creation. It's a conversation starter, certainly more interesting than asking if someone wants another fun-sized candy bar.