Table of Contents
Halloween is just around the corner, and what better way to celebrate than with a perfectly carved pumpkin? Forget the messy guesswork – this year, we're diving deep into the world of pumpkin carving ideas on paper. Whether you're a seasoned pro or a first-time carver, paper stencils and templates are your secret weapon for achieving impressive designs without the frustration. This article is your ultimate guide to mastering the art of pumpkin carving with paper. We'll start with how to find the perfect stencils, from free online resources to DIY design tips. Then, we'll explore easy designs ideal for beginners, ensuring a fun and successful carving experience. Feeling ambitious? We've got advanced techniques using paper templates to create intricate and eye-catching masterpieces. Finally, we'll venture beyond traditional carving, showcasing creative paper-based crafts to decorate your pumpkins in unique and spooky ways. So, grab your carving tools and get ready to transform your pumpkins into works of art!
Finding the Perfect Pumpkin Carving Stencils on Paper

Finding the Perfect Pumpkin Carving Stencils on Paper
The Quest for Free Stencils Online
Alright, so you're on the hunt for awesome pumpkin carving stencils, and the internet is your playground! But where do you even start? I always recommend kicking things off with a good old Google search. Type in "free pumpkin carving stencils," and BOOM – you'll be flooded with options. Websites like Pumpkin Lady and DLTK's Crafts are goldmines for free, printable stencils. They've got everything from classic spooky faces to cartoon characters, so there's something for everyone. Just remember to check the site's terms of use before downloading and printing – most are totally cool for personal use, but it's always good to double-check!
Don't underestimate Pinterest either! It is a visual treasure trove. Search "pumpkin carving patterns," and you'll discover countless images that you can adapt into stencils. The beauty of Pinterest is that it often leads you to smaller blogs and creative sites you might not find otherwise. Plus, you can create a board to save all your favorite ideas for future Halloweens.
DIY Stencil Creation: Unleash Your Inner Artist
Want to take things up a notch? Creating your own stencils is seriously rewarding. Grab a piece of paper (printer paper works great), and start sketching! Think about what kind of vibe you're going for – scary, silly, cute? Once you have a design you love, refine it with a marker. Bold lines will make it easier to carve later. If drawing isn't your thing, no sweat! You can print out an image you found online and trace it onto a thicker piece of paper to create a more durable stencil.
For a more tech-savvy approach, try using photo editing software like GIMP (it's free!) to create a stencil from a photograph. Convert the image to black and white, adjust the contrast to create clear lines, and then print it out. This is an awesome way to personalize your pumpkin with a portrait of your pet or a favorite character. The possibilities are endless!
Stencil Type | Pros | Cons |
|---|---|---|
Free Online Stencils | Easy to find, wide variety, free! | Quality can vary, might be overused |
DIY Drawn Stencils | Completely unique, personalized | Requires drawing skills, can be time-consuming |
Photo-Based Stencils | Highly personalized, great for portraits | Requires photo editing skills, can be tricky to carve |
Transferring Your Stencil to the Pumpkin Like a Pro
you've got your stencil – now what? The key is to transfer it to the pumpkin smoothly. First, clean and dry the area where you'll be carving. Then, tape the stencil securely to the pumpkin. You want it to stay put while you work! Next, use a poking tool (an awl, a thick needle, or even a ballpoint pen) to poke holes along the stencil lines. The closer the holes, the more accurate your carving will be. Think of it like creating a connect-the-dots picture on your pumpkin.
Once you've traced the entire design, remove the paper stencil. You should now have a dotted outline on your pumpkin. If the dots are faint, go over them with a marker to make them more visible. Now you're ready to grab your carving tools and bring your design to life! Remember to take your time and follow the dotted lines carefully for the best results.
Easy Pumpkin Carving Ideas on Paper for Beginners
Easy Pumpkin Carving Ideas on Paper for Beginners
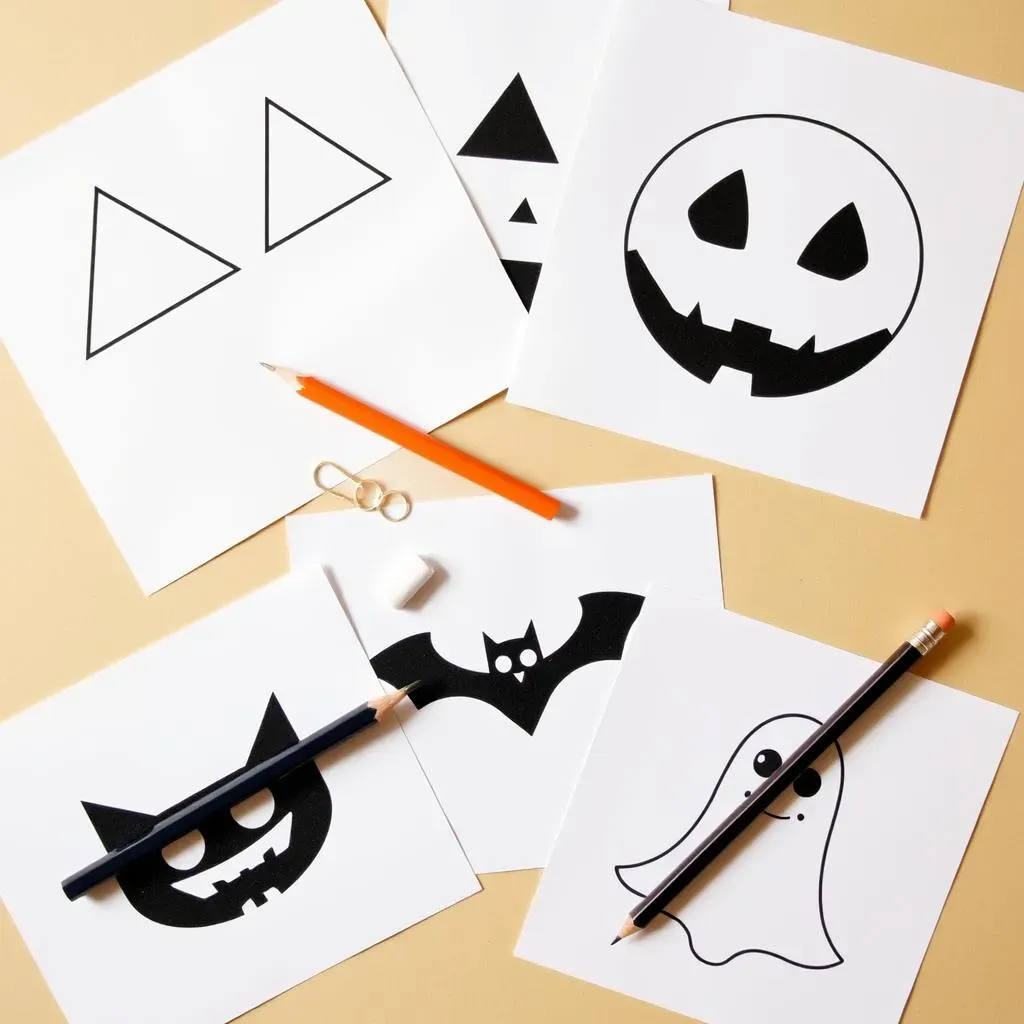
Simple Shapes: The Gateway to Pumpkin Art
so you're new to this whole pumpkin carving thing? No worries! Let's start with the basics: simple shapes. Think circles, triangles, and squares. These are super easy to draw on paper and transfer to your pumpkin. A classic jack-o'-lantern face with triangle eyes, a square nose, and a toothy grin is always a winner. The key is to keep the lines clean and bold on your paper stencil. This makes it easier to see when you're poking holes and carving.
Don't underestimate the power of simplicity! Sometimes, less is more. A single, large circle for an eye or a few evenly spaced triangles can create a surprisingly spooky effect. Plus, these simple shapes are great for practicing your carving skills without getting overwhelmed. Remember, it's all about having fun, so don't put too much pressure on yourself to create a masterpiece right away.
Basic Silhouettes: Spooky Without the Fuss
Want something a little more interesting than basic shapes? Try silhouettes! A silhouette is just the outline of an object or character, filled in with black. Think of a spooky cat, a bat in flight, or a simple ghost. These are easy to draw or print out from the internet. When creating your stencil, make sure the silhouette is bold and clear. You want a solid outline that's easy to trace and carve.
Silhouettes are fantastic because they're instantly recognizable and can create a dramatic effect. Plus, they're relatively easy to carve since you're just following a single outline. A pro tip: use a smaller carving tool for more intricate details, like the tips of a bat's wings or the curve of a cat's back. And remember, safety first! Always carve away from yourself and keep your fingers out of the path of the blade.
Design Idea | Difficulty | Supplies Needed |
|---|---|---|
Triangle-Eyed Jack-o'-Lantern | Easy | Paper, pencil, poking tool, carving tools |
Simple Ghost Silhouette | Easy | Paper, pencil, poking tool, carving tools |
Bat Silhouette | Easy | Paper, pencil, poking tool, carving tools, smaller carving tool |
Kid-Friendly Stencils: Get the Whole Family Involved
Pumpkin carving is a great family activity, so why not get the kids involved? Look for stencils with large, simple shapes that are easy for little hands to carve. Think friendly monsters, goofy faces, or even their favorite cartoon characters. You can find tons of kid-friendly stencils online, or let them draw their own designs on paper. Just make sure to supervise them closely and provide age-appropriate carving tools.
For younger kids, consider using paint or markers instead of carving. They can decorate their pumpkins with colorful designs without any sharp tools involved. You can also use cookie cutters to create fun shapes on paper stencils. Trace around the cookie cutter, poke holes along the outline, and then let the kids carve out the shape. It's a safe and fun way to get them involved in the Halloween festivities!
Advanced Pumpkin Carving Designs and Techniques Using Paper Templates
Advanced Pumpkin Carving Designs and Techniques Using Paper Templates
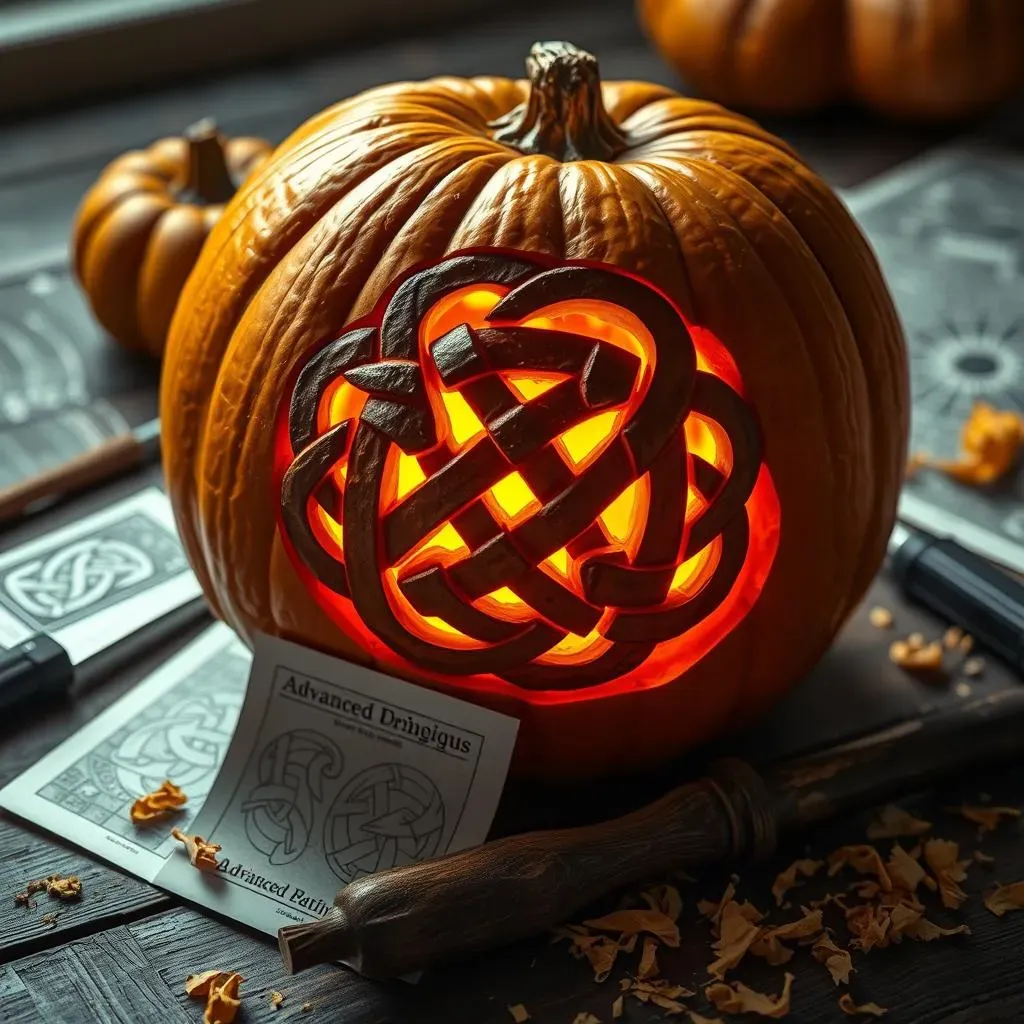
Stepping Up Your Stencil Game: Intricate Designs
Alright, so you've mastered the basics, and you're ready to dive into some seriously impressive pumpkin carving. This is where advanced pumpkin carving designs and techniques using paper templates come into play. Forget simple shapes – we're talking about intricate patterns, detailed portraits, and mind-blowing scenes that will make your neighbors do a double-take. The key to success here is all in the preparation and precision. Start by finding high-quality stencils online or creating your own using advanced photo editing software. Think Celtic knots, Day of the Dead sugar skulls, or even a detailed rendering of your favorite movie character. The more complex the design, the more patience and attention to detail you'll need.
The Art of Shading: Creating Depth and Dimension
One of the hallmarks of advanced pumpkin carving is the use of shading to create depth and dimension. This involves carving the pumpkin at different depths to allow varying amounts of light to shine through. To achieve this effect, you'll need a set of specialized carving tools, including gouges and loops of various sizes. Start by transferring your stencil to the pumpkin as usual. Then, instead of carving all the way through the pumpkin skin, use your tools to carefully shave away layers of the pumpkin flesh. The shallower the carving, the more light will be blocked, creating a darker area. By varying the depth of your cuts, you can create a stunningly realistic shaded effect.
A pro tip: practice your shading techniques on a scrap piece of pumpkin before you start working on your final design. This will give you a feel for how the different tools work and how much pressure to apply. Also, consider using a light source inside the pumpkin while you're carving to see how the shading is progressing. It's like painting with light!
Technique | Description | Tools Needed |
|---|---|---|
Shallow Carving | Removing a thin layer of pumpkin flesh to create a shaded effect. | Gouges, loops, shading tools |
Deep Carving | Carving all the way through the pumpkin skin to create a bright, defined area. | Saws, knives, detail carving tools |
Overlapping | Layering different carving depths to create complex shading and texture. | Full set of carving tools |
Multi-Pumpkin Displays: Taking It to the Next Level
Want to really wow your neighbors? Consider creating a multi-pumpkin display! This involves carving several pumpkins with related designs and arranging them together to create a larger scene or tell a story. For example, you could carve a series of pumpkins with different phases of the moon, or create a spooky graveyard scene with multiple pumpkins as tombstones. The possibilities are endless!
When planning your multi-pumpkin display, think about the overall composition and how the different pumpkins will interact with each other. Use paper templates to create a cohesive design that flows seamlessly from one pumpkin to the next. And don't be afraid to get creative with lighting and props to enhance the effect. A well-executed multi-pumpkin display is sure to be the talk of the neighborhood!
Creative Pumpkin Decorating Beyond Carving: PaperBased Crafts
Creative Pumpkin Decorating Beyond Carving: PaperBased Crafts
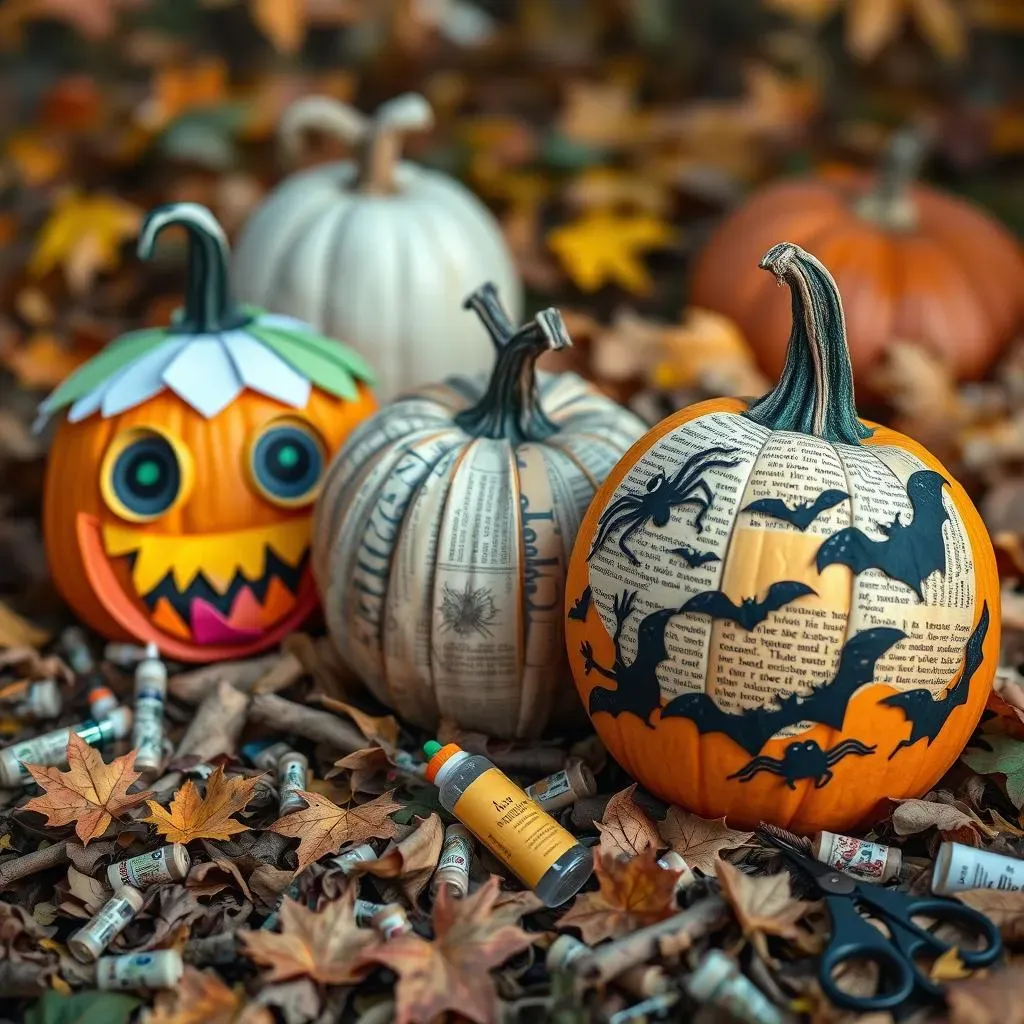
Paper Mache Magic: Sculpting with Pulp
Alright, let's ditch the knives for a bit and get our hands messy in a different way! Paper mache is an awesome alternative to carving, especially if you're looking for a kid-friendly activity or want to create some seriously unique pumpkin decorations. You can build up layers of paper mache pulp to add features to your pumpkin, like a goofy nose, bulging eyes, or even a whole monster face. The best part? Once the paper mache dries, you can paint it any color you want! Think vibrant oranges, spooky greens, or even metallic golds for a touch of glam.
To make paper mache pulp, simply tear newspaper into small strips and soak them in a mixture of water and glue (white glue works great). Once the paper is soft and mushy, you can start applying it to your pumpkin. Build up the layers gradually, allowing each layer to dry before adding the next. This will prevent the paper mache from cracking or warping. And don't be afraid to get creative with your sculpting! Use your fingers, spoons, or even popsicle sticks to shape the pulp into your desired design.
Decoupage Dreams: Paper Patterns and Prints
Looking for a more refined and elegant way to decorate your pumpkin? Decoupage is your answer! This technique involves gluing paper cutouts onto a surface, creating a beautiful and intricate design. You can use anything from patterned scrapbook paper to vintage book pages to create a unique decoupage pumpkin. The key is to choose papers that complement each other and create a visually appealing composition.
To decoupage your pumpkin, start by cutting out your desired paper shapes. Then, apply a thin layer of decoupage glue (Mod Podge is a popular choice) to the back of each cutout and carefully press it onto the pumpkin. Smooth out any wrinkles or bubbles with your fingers or a soft cloth. Once all the cutouts are in place, apply a final layer of decoupage glue over the entire surface to seal and protect the design. Let it dry completely, and you'll have a stunning decoupage pumpkin that's sure to impress!
Craft | Materials | Instructions |
|---|---|---|
Paper Mache Pumpkin | Newspaper, glue, water, paint, pumpkin | Tear newspaper, soak in glue mixture, apply to pumpkin, let dry, paint. |
Decoupage Pumpkin | Patterned paper, decoupage glue, scissors, pumpkin | Cut out paper shapes, glue to pumpkin, seal with glue, let dry. |
Paper Cut-Out Silhouettes: Elegant and Ethereal
For a touch of spooky elegance, try decorating your pumpkin with paper cut-out silhouettes. This involves creating intricate paper cutouts and attaching them to the pumpkin's surface. You can create silhouettes of bats, spiders, ghosts, or any other Halloween-themed design. The contrast between the dark paper and the bright pumpkin creates a striking and ethereal effect.
To create your paper cut-out silhouettes, start by drawing your design on a piece of paper. Then, carefully cut out the design using a craft knife or scissors. For more intricate designs, you may want to use a cutting machine like a Cricut or Silhouette. Once you have your paper cutouts, attach them to the pumpkin using glue dots or double-sided tape. You can also use small pins to secure the cutouts in place. Arrange the silhouettes in a visually appealing pattern, and you'll have a stunning paper cut-out pumpkin that's perfect for Halloween!
Conclusion: Paper-Perfect Pumpkins and Beyond
From simple smiles to intricate scenes, exploring pumpkin carving ideas on paper opens up a world of creative possibilities. By using stencils and templates, anyone can achieve impressive results, regardless of their carving experience. And remember, the fun doesn't stop with carving! Embrace paper-based crafts to add unique and personalized touches to your pumpkins, making them truly stand out. So, this Halloween, ditch the carving-block and unleash your inner artist with the help of paper. Happy carving, and may your pumpkins shine bright!