Table of Contents
Tired of the same old spooky faces staring back from your porch? Skeletons are fine, ghosts are classic, but maybe this year you crave something that makes a splash. Forget the haunted house clichés for a moment. Let’s talk about trading cobwebs for coral reefs and black cats for friendly (or not-so-friendly) sea creatures.
Why Dive into Ocean Pumpkin Carving Ideas?
Why Dive into Ocean Pumpkin Carving Ideas?
Escape the Haunted House Rut
Look, I get it. Skeletons and ghosts are Halloween staples. You see them on every porch, in every store window. There's a certain comfort in tradition, but sometimes, tradition feels less like comfort and more like a creative dead end. How many ways can you really carve a convincing frowny face or a jagged tooth grin before it all starts to blur together?
Choosing pumpkin carving ideas ocean breaks you out of that predictable loop. It’s unexpected. When trick-or-treaters or neighbors walk by, they'll do a double-take. Instead of another ghoulish grin, they might see a vibrant coral reef scene or a shark fin slicing through a painted wave. It shows you thought outside the coffin, so to speak. It’s a fresh, visually interesting theme that stands out from the crowd of predictable spooks.
A Wealth of Visual Inspiration
The ocean isn't just one thing. It's a vast, diverse environment teeming with life and dramatic landscapes. This provides an almost overwhelming amount of inspiration for your pumpkin canvas. You're not limited to just one character or symbol. You have an entire ecosystem at your disposal.
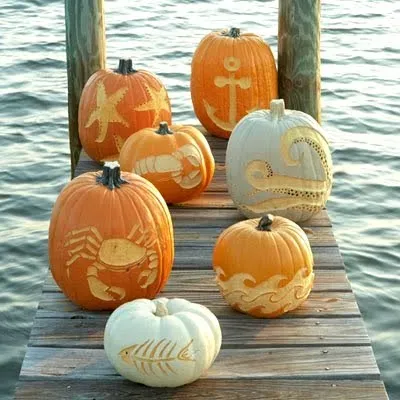
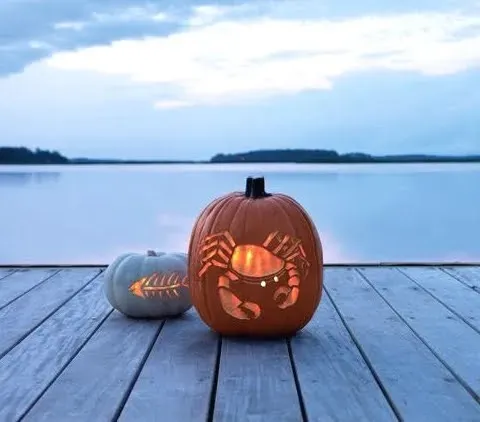
Think about it. You could go cute with whimsical fish or friendly octopuses. You could go dramatic with shipwrecks or deep-sea creatures with glowing eyes. There's room for abstract wave patterns, realistic marine life portraits, or even humorous scenes like a crab wearing a tiny pumpkin hat. This theme offers a spectrum of difficulty levels and moods, making it accessible whether you want a simple carve or a complex, multi-layered masterpiece.
What kind of ocean vibe are you aiming for?
- Cute and colorful? (Think clownfish, starfish)
- Mysterious and deep? (Think anglerfish, submarines)
- Powerful and dramatic? (Think sharks, stormy waves)
- Relaxing and serene? (Think gentle waves, sandy bottoms)
Simple Waves and Underwater Scenes: Easy Pumpkin Carving Ideas Ocean
Simple Waves and Underwater Scenes: Easy Pumpkin Carving Ideas Ocean
Making Waves Without Getting Wet
Alright, so maybe you’re not ready to tackle a full-blown kraken just yet. That’s fine. We all start somewhere, and honestly, sometimes the simplest designs hit the hardest. When you're dipping your toes into pumpkin carving ideas ocean, start with the water itself. Simple waves are your best friend here. Think classic surf curls or gentle ripples.
You don't need fancy tools. A basic carving kit or even just a sharp linoleum cutter works wonders for etching lines into the pumpkin's surface. You can make thick, bold waves by carving deep, or create a more delicate effect with shallow scrapes that just remove the skin. Vary the size and shape of your waves across the pumpkin for a dynamic look. It’s surprisingly effective and doesn’t require a degree in marine biology or advanced carving skills.
Easy Underwater Shapes and Textures
Once you've got the water sorted, let's add some basic underwater elements. These are shapes that are instantly recognizable and forgiving if your lines aren't perfectly straight. Bubbles are a no-brainer – just carve circles of varying sizes. You can arrange them rising from the bottom or scattered across the scene. Simple seaweed or kelp fronds are also straightforward; think long, wavy strips. You can carve these as outlines or remove sections for a silhouette effect.
Consider adding texture too. Small dots or tiny scraped lines can represent sand or gravel at the bottom. You’re building a scene here, piece by simple piece. These basic shapes, when combined with your wave pattern, immediately tell the viewer they're looking at an underwater world, even without a single fish in sight. It’s about suggesting the environment with minimal effort.
What easy shapes can you add to your ocean scene?
- Circles for bubbles
- Wavy lines for seaweed or kelp
- Scraped areas for sand or texture
- Simple star shapes for starfish
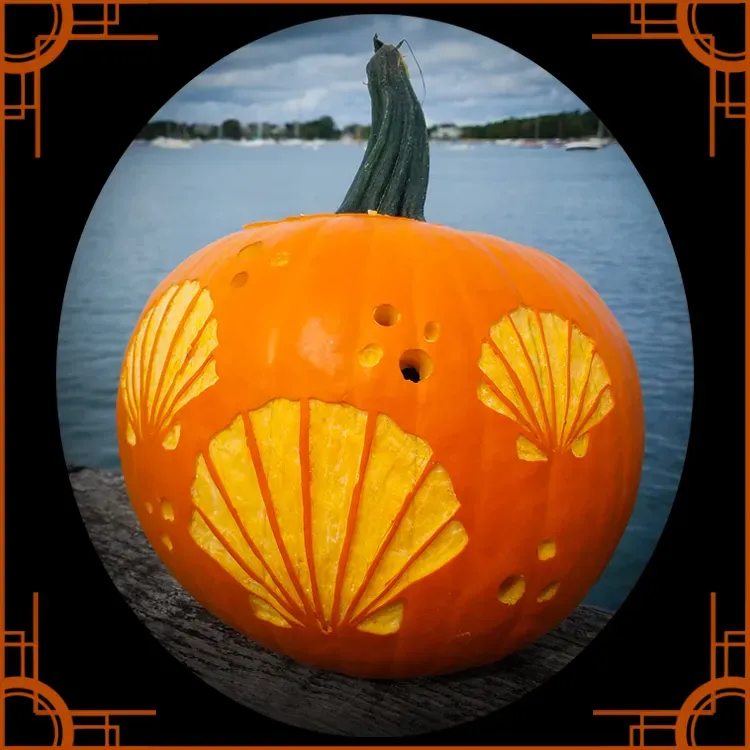
- Basic crescent shapes for small shells
Bringing Sea Creatures to Life: Detailed Pumpkin Carving Ideas Ocean
Bringing Sea Creatures to Life: Detailed Pumpkin Carving Ideas Ocean
Picking Your Aquatic Star and Getting it On the Gourd
you’ve mastered the basic wave. You’ve got some passable bubbles. Now you want something with a bit more character, something that stares back (ideally without judgment). Bringing sea creatures to life means stepping up your game from simple outlines to more defined forms. You need to pick a creature that fits your skill level and the pumpkin's shape.
Think about what kind of detail you want to capture. A shark fin is relatively easy, but carving a realistic shark head with rows of teeth? That takes patience. A jellyfish is mostly flowing lines, while a crab requires attention to joints and claws. Once you’ve chosen your marine muse, get the design onto the pumpkin. Print out a template, freehand it with a marker, or use transfer paper. Don't just draw a stick figure fish; find a good reference image. Look at the actual shape of the creature, where its eyes are, the texture of its skin or scales. This isn't just about cutting holes; it's about creating an image.
Carving Scales, Fins, and Fearsome Teeth
This is where the real work happens. You're not just cutting through the pumpkin wall anymore. You're working with the different layers of the pumpkin flesh. This is crucial for adding detail without making everything look flat. For scales on a fish or shark skin texture, try scraping away just the orange skin in patterns rather than cutting all the way through. This leaves the lighter flesh underneath exposed and creates contrast.
Fins and tails can be carved by outlining and then carefully removing the background pumpkin around them. For teeth – especially on a shark or a scary anglerfish – you can cut jagged triangles or use small, sharp tools to shape individual points. Eyes are key; they can be simple circles cut out, or you can leave the eye area intact and scrape away the skin to create a lighter circle, perhaps adding a smaller dark pupil by just piercing the skin. Experiment with how deep you cut or scrape; varying depths create shadows and highlights that make the creature pop.
What tools are your friends for detailed sea creature carving?
- Small saw-like carving tools (from a kit)
- Linoleum cutters (various sizes for scraping lines)
- Clay sculpting tools (great for shaping and smoothing)
- Exacto knife or craft knife (for fine details and sharp points)
- A good scoop (to thin the walls evenly where you plan detailed scraping)
Adding Depth and Making Them Look Alive (or Undead)
Making your creature look dimensional is the difference between a flat cutout and something that feels like it's swimming towards you. Think about layering. You could carve a large whale shape by removing the background, then carve smaller fish *on* the whale shape by just scraping the surface. This creates a sense of perspective.
Partial cuts are also your friend. Instead of cutting a fin completely out, cut around it but leave small attachment points. This allows the light to shine through the gaps, highlighting the shape, but keeps the structure intact. You can also use shading by scraping away the skin in gradients – lighter where you want light to hit, darker where there would be shadows. For instance, scrape lightly on the top of a fish's back and more heavily underneath to suggest roundness. It takes practice, but focusing on these techniques brings your pumpkin carving ideas ocean creatures from flat shapes to fascinating forms.
Epic Underwater Worlds: Advanced Pumpkin Carving Ideas Ocean
Epic Underwater Worlds: Advanced Pumpkin Carving Ideas Ocean
Planning Your Deep-Sea Masterpiece
Alright, if you've aced the basic waves and brought a few sea creatures to life, you might be feeling ambitious. You're ready to tackle an entire ecosystem on one pumpkin. This isn't just carving a single shark; this is designing a whole scene. Think about composition. Where is the light coming from? What's in the foreground, and what recedes into the background? Are you depicting a calm coral garden, a chaotic shipwreck, or the terrifying abyss?
Sketching is non-negotiable at this level. Don't just wing it. Map out where your kelp forests will twist, where fish will dart, and where your main focal point will be – maybe a kraken tentacle or a diver exploring ruins. Consider using multiple pumpkins to create a larger narrative if one gourd feels too limiting. You're essentially creating a diorama, but instead of glue and plastic figures, you're using knives and pumpkin flesh. It requires foresight and a clear vision before you make the first cut.
Layering Techniques for Depth and Drama
Creating an "epic" underwater world means going beyond simple cutouts. You need to create layers and depth to make the scene feel immersive. This is where backlighting becomes crucial, and you need to control how much light shines through different areas. Carve some elements, like distant fish or background coral, by only scraping away the skin or thinning the wall slightly. For foreground elements, like a prominent rock formation or a curious turtle, you might carve deeper or even cut some sections completely out.
Think about forced perspective. Carve smaller elements higher up on the pumpkin to make them seem further away, and larger elements lower down to bring them forward. Use varied textures – smooth areas for open water, rough scraping for rocks or barnacles. You can even use different tools to create distinct marks, like a V-gouge for sharp edges or a U-gouge for rounded shapes. It's about building up the scene piece by piece, controlling light and shadow to give your pumpkin carving ideas ocean the illusion of depth.
Advanced Techniques to Master:
- Partial carving and scraping for varied light transmission
- Layering elements for foreground and background
- Using different tools for varied textures and lines
- Designing for specific backlighting effects
- Considering the pumpkin's curvature in your design
Beyond the Knife: Painting and Decorating Ocean Pumpkins
Beyond the Knife: Painting and Decorating Ocean Pumpkins
Adding Color and Detail with Paint
Let's be honest, carving can only do so much. You're working with the limitations of light shining through an orange gourd. If you want vibrant coral, distinct fish patterns, or murky deep-sea blues, paint is your best friend. It lets you add layers of color and detail that are impossible with just a knife. Think of paint as the underwater equivalent of adding texture and shading to a drawing.
You can use paint to enhance your carving – maybe outlining a carved shark or adding iridescence to fish scales. Or, you can skip carving altogether and use paint as the primary method for your pumpkin carving ideas ocean theme. This is great for younger kids or if you just prefer painting to wrestling with sharp tools. Acrylic paints work well on pumpkins. They dry quickly and are opaque enough to cover the orange surface. Don't be afraid to mix colors to get those specific ocean hues – from bright tropical fish colors to the deep, dark blues of the abyss.
Painting Techniques for Aquatic Effects
Achieving realistic or even stylized ocean effects with paint requires a few tricks. For water textures, try dry brushing shades of blue and green over a base coat. This creates a layered, watery look. Sponging different colors can simulate coral or rough underwater terrain. Want bubbles? Dab white paint circles with a small brush or the end of a pencil.
For depicting fish or other creatures, start with a base color and then add details with finer brushes. Think about highlights and shadows to give them form. A little white dot in a painted eye can make a fish look surprisingly alive. You can also use washes – diluted paint – to create subtle color transitions or suggest murky water. Don't forget the stem! Painting it brown or green can make it look like a piece of kelp or a rocky outcrop.
Painting Supplies for Ocean Pumpkins:
- Acrylic paints (blues, greens, whites, browns, assorted colors for fish/coral)
- Various brush sizes (large for base coats, small for details)
- Sponges (for texture)
- Palette for mixing colors
- Water cup for rinsing brushes
- Newspaper or drop cloth to protect your workspace
Going Beyond the Surface: Adding Embellishments
Your pumpkin carving ideas ocean doesn't have to stop with just carving and paint. You can add three-dimensional elements to really make your underwater scene pop. Hot glue is your friend here. Attach real or fake seashells, starfish, or even small plastic fish. You could glue on twine to look like fishing net or rope from a shipwreck. Small pebbles or sand glued to the base can simulate the ocean floor.
Think about things like googly eyes for a comical touch on painted fish, or maybe use iridescent glitter to give a mermaid tail or fish scales a shimmering effect. Just remember that anything you attach needs to be secure, especially if the pumpkin will be outside. These little additions can take a well-painted or carved pumpkin and elevate it into a truly memorable piece of ocean-themed art. It’s about adding those final touches that bring the whole concept together.
Making Waves with Your Ocean Pumpkin
So there you have it. We've navigated from simple wave patterns to complex underwater scenes, proving that your Halloween pumpkin doesn't have to be just another grinning face. Dipping your toes into pumpkin carving ideas ocean offers a refreshing change of pace, whether you opt for a minimalist starfish or an entire coral reef ecosystem. It might take a bit more effort than hacking out a couple of triangles, but the result is often far more interesting. Plus, it gives you a great excuse to hum sea shanties while you work. Get carving, see what watery wonders you can conjure, and maybe make your neighbors a little jealous of your unique, non-spooky, slightly damp-looking masterpiece.