Table of Contents
Alright, Halloween's closing in, and you've got the pumpkins lined up. Standard toothy grin? Been there, done that. Maybe you're looking for something a bit different this year, something with a touch of cosmic creepiness. That's where exploring some fresh pumpkin carving ideas moon themes comes in. Forget the basic triangle eyes; let's aim for something that actually looks good when the porch light hits it. Carving a moon into your pumpkin adds an instant touch of eerie atmosphere, perfect for those crisp autumn nights. It’s more versatile than you might think, too – from simple crescent shapes that glow hauntingly to intricate scenes with bats silhouetted against a full lunar disc. You don't need to be an artist, just willing to try something beyond the usual. We'll walk through why the moon is a solid choice, how to approach different designs, from easy outlines to more complex celestial bodies, and even how to make that carved moon really pop after dark. Ready to give your porch a little lunar magic? Let's get cutting.
Why Go for Moon Pumpkin Carving Ideas?
Why Go for Moon Pumpkin Carving Ideas?
Breaking the Mold with Celestial Charm
Let's be honest, how many carved pumpkins have you seen with the same old jagged smile and pointy eyes? Probably a lot. They're fine, classic even, but they don't exactly turn heads. If you're tired of blending in with every other porch on the block, diving into pumpkin carving ideas moon themes offers a refreshing change. A moon design, whether a simple crescent or a detailed full moon, instantly elevates your pumpkin game. It’s got a natural spooky vibe without resorting to cartoonish monsters. Think atmospheric, a bit mysterious, maybe even a little elegant depending on how you carve it. It sets a different tone, one that feels a bit more mature and visually striking than the standard jack-o'-lantern.
Versatility Beyond Just a Circle
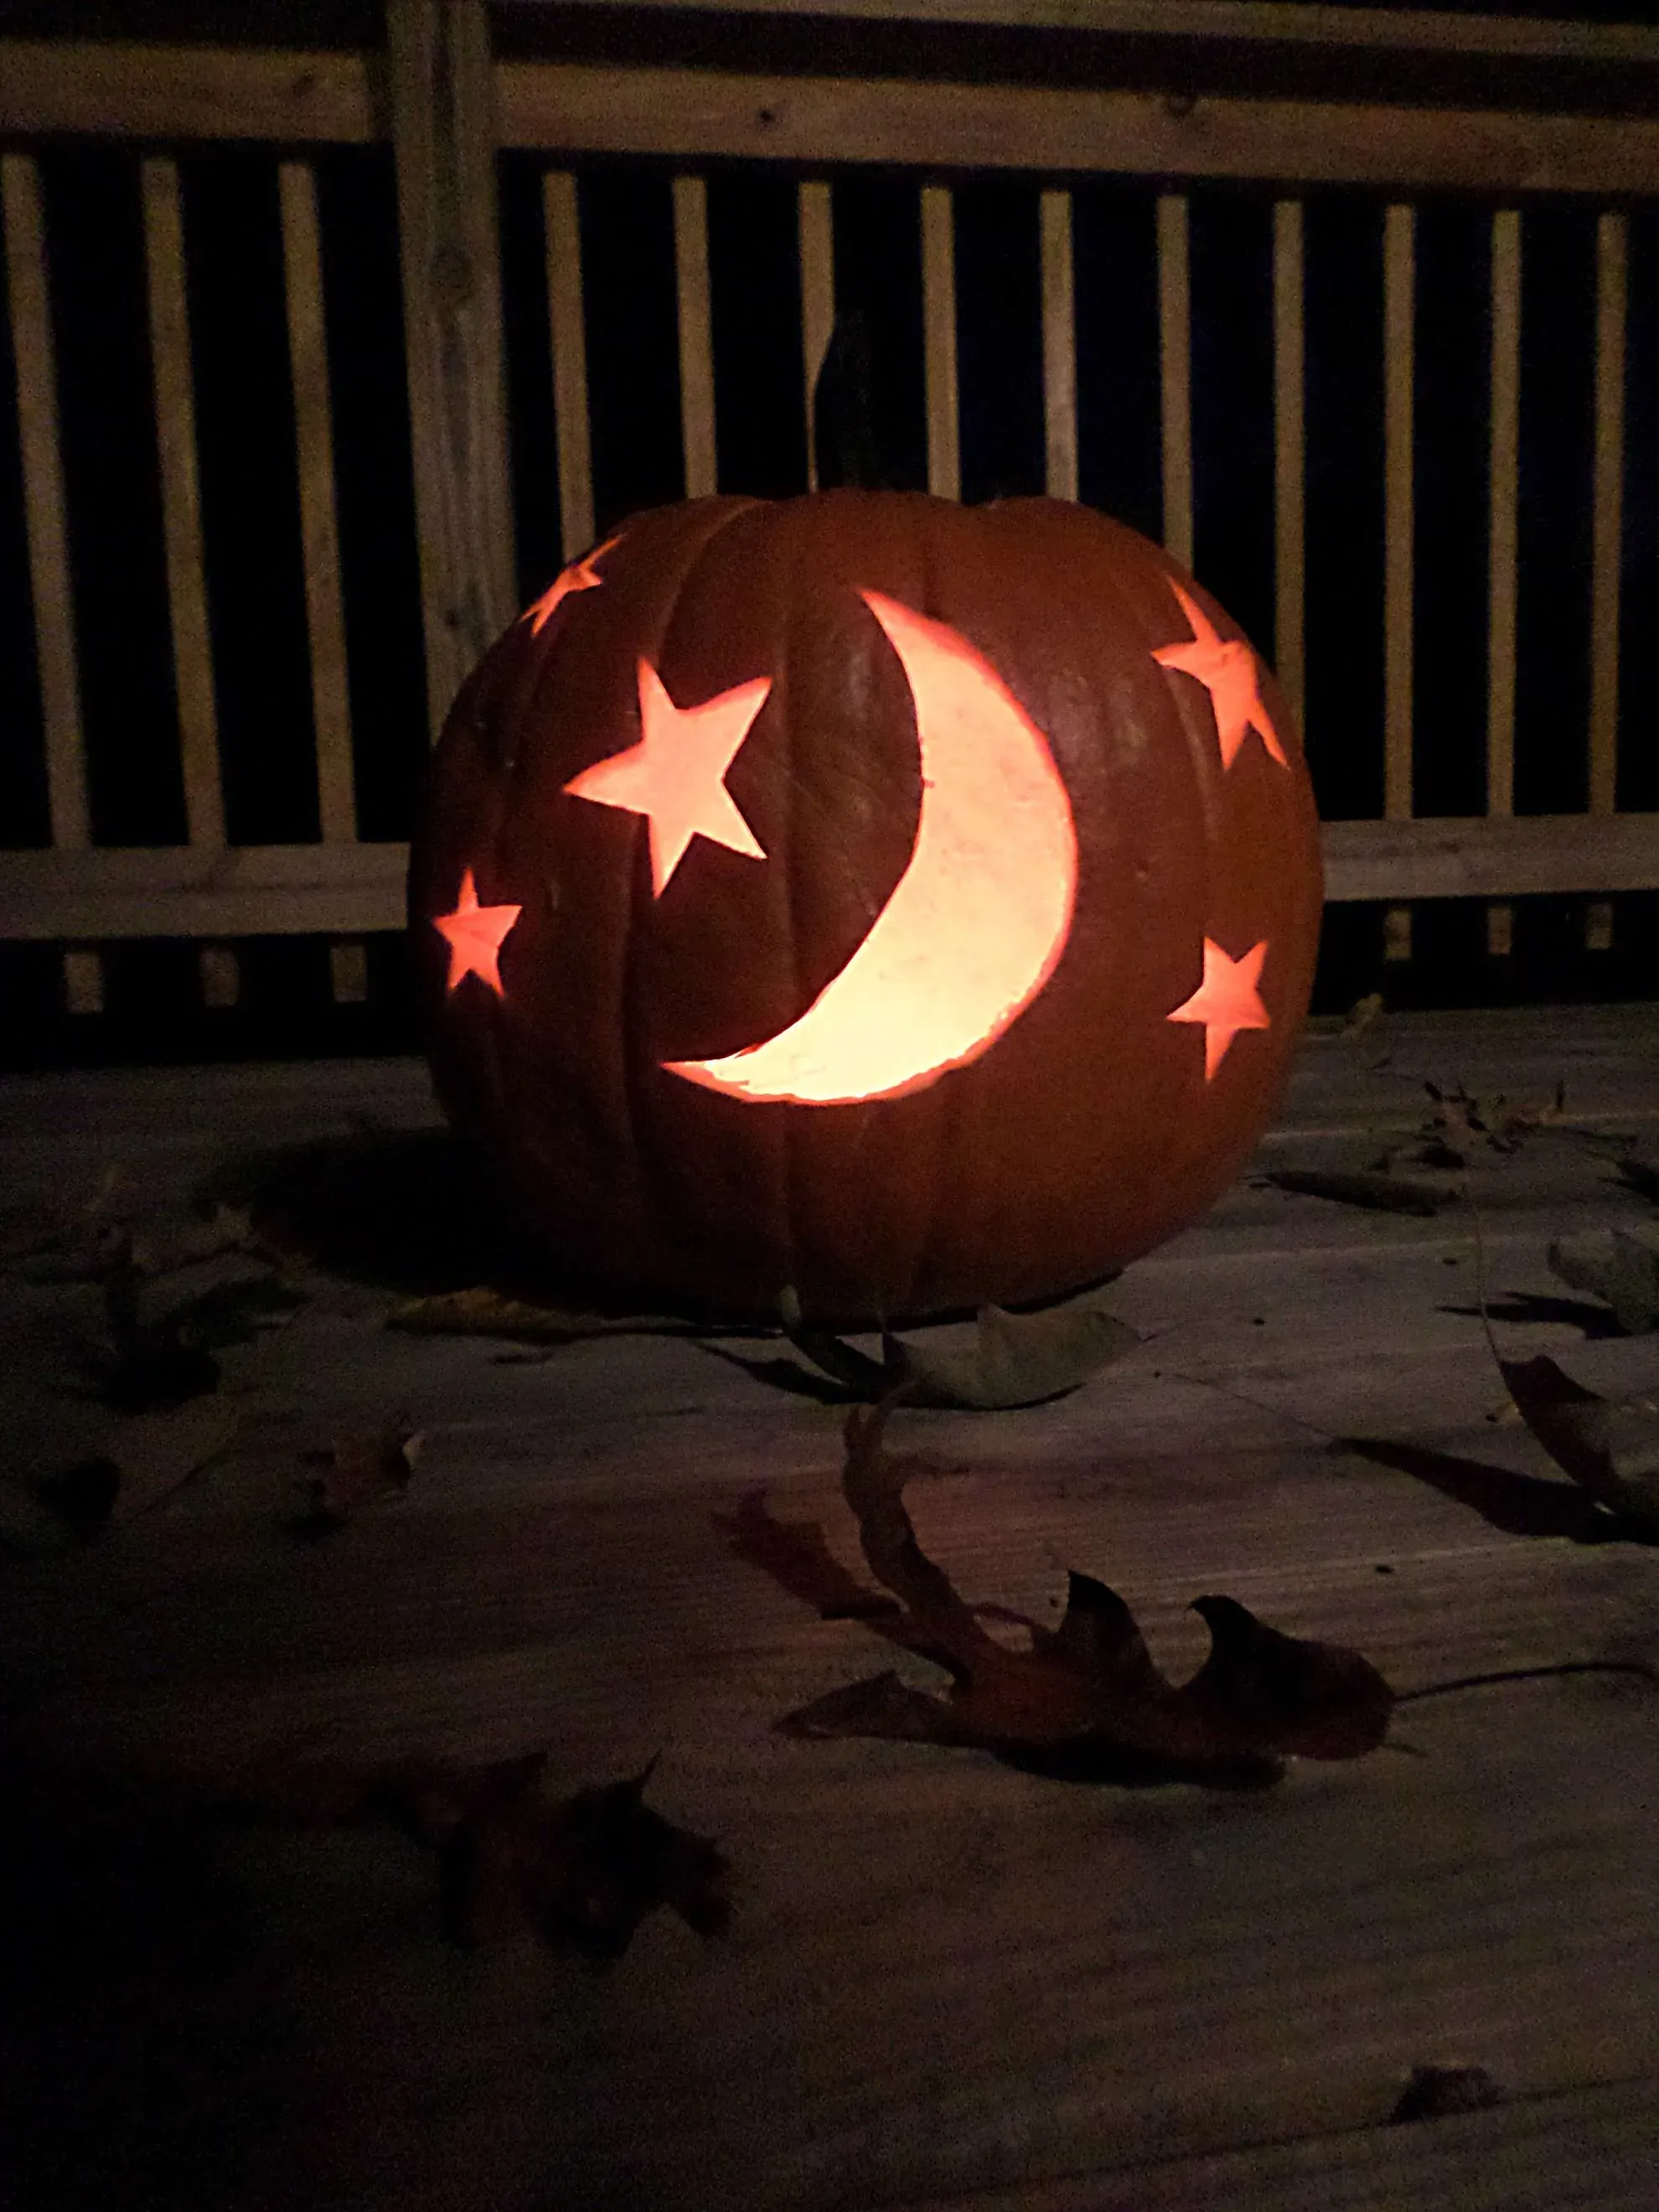
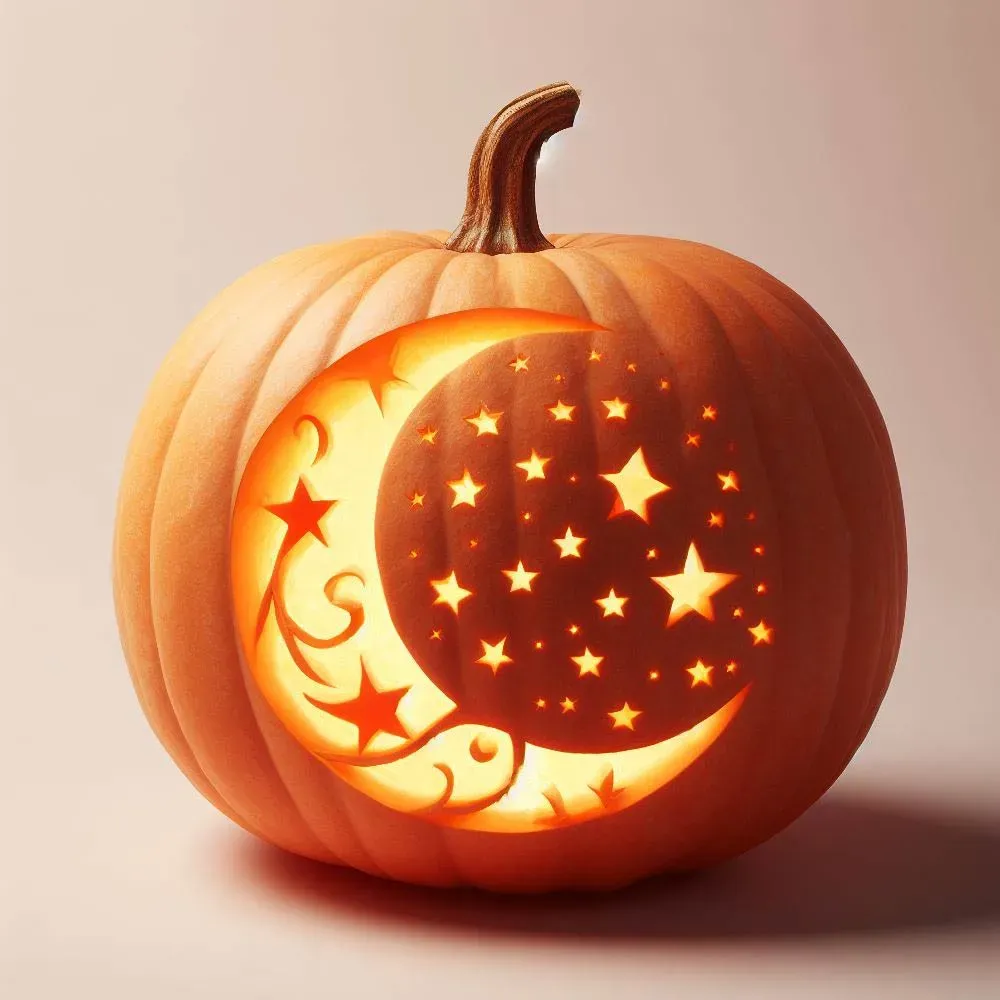
When you think about pumpkin carving ideas moon designs, it's not just one thing. The moon has phases, right? You can carve a slim, spooky crescent, perfect for a minimalist look that still feels Halloweeny. Or maybe you want a half-moon, casting long shadows. And then there's the grand full moon, a large canvas for texture, craters, or even silhouettes. This variety means you can match the complexity to your skill level and the size of your pumpkin. A small sugar pumpkin might be perfect for a sharp crescent, while a big carving pumpkin can handle a detailed lunar surface. It’s a theme that scales, which is pretty handy when you're staring down a pile of gourds of various sizes.
- Crescent Moon: Minimalist, easy, high impact glow.
- Half Moon: Good balance, allows for some detail.
- Full Moon: Maximum canvas for intricate work or silhouettes.
- Waxing/Waning Moon: Can create interesting asymmetrical designs.
The Unmatched Visual Impact at Night
The whole point of carving a pumpkin, really, is how it looks when it's lit up after dark. And let me tell you, a well-executed moon carving just works. A carved moon, especially if you thin the rind in some areas rather than cutting all the way through, creates a soft, ethereal glow. It's not just a light source; it becomes a centerpiece. Imagine a full moon design with some textured craters – when lit, those thinner areas pulse with light while the thicker parts remain darker, adding depth. It feels less like a decoration and more like a piece of seasonal art. That's the real payoff with pumpkin carving ideas moon style – the way it transforms from a simple shape in daylight to a glowing, atmospheric feature at night.
Simple Shapes: Classic Pumpkin Carving Ideas Moon
Simple Shapes: Classic Pumpkin Carving Ideas Moon
Starting Point: The Classic Crescent
maybe you're not ready to tackle a lunar landscape with craters just yet. Totally fine. When we talk about Simple Shapes: Classic Pumpkin Carving Ideas Moon, the crescent is your best friend. It's iconic, relatively easy to pull off, and still looks fantastic when lit up. Think of it like the beginner's guide to celestial gourds. You don't need fancy tools, just a basic carving kit and a steady hand. The key here is getting a nice, smooth curve. Draw it out first with a marker – maybe freehand, or use a bowl or plate edge for a perfect arc. Then, decide how thick you want the crescent to be. Cutting too thin can make it fragile, too thick and it might not glow as well. Find that sweet spot.
Getting the shape right is the main goal with this simple approach. Don't overthink it. You're aiming for a clean cutout that reads instantly as a moon. I remember my first attempt; I made the points of the crescent way too sharp, and they snapped off the moment I tried to scoop out the guts. Learn from my mistakes: keep the curves gentle, and maybe leave a little extra material at the tips for stability. It’s less about intricate detail and more about bold form. This is your foundation for more complex designs later.
What's the easiest way to get a clean crescent shape?
Beyond the Basic Cutout
While a simple cutout is great, you can add a little extra visual interest without making it complicated. Instead of cutting all the way through, try scraping or thinning the rind in certain areas. For a crescent, you could thin the outer edge slightly more than the inner curve. This creates a subtle gradient when lit, making the moon look a bit more dimensional. It's still a simple shape, but this technique adds depth and makes the light play nicely. It's like giving your simple moon a little whisper of texture.
Another simple variation is the partial moon. Imagine the moon half-covered by shadow. You can achieve this by carving a crescent and leaving a larger, uncarved section next to it, or even just carving a half-circle. These variations on the simple shape still fall under the "easy to carve" category but offer a slightly different look. They suggest phases, adding a narrative touch without needing complex techniques. Sometimes, less really is more, especially when you're carving pumpkins after a long day.
- Use a template or stencil for accuracy.
- Start with a small carving tool for fine lines.
- Consider thinning the rind instead of cutting through for a softer glow.
- Don't rush; smooth cuts look best.
Adding Celestial Details to Your Moon Pumpkin
Adding Celestial Details to Your Moon Pumpkin
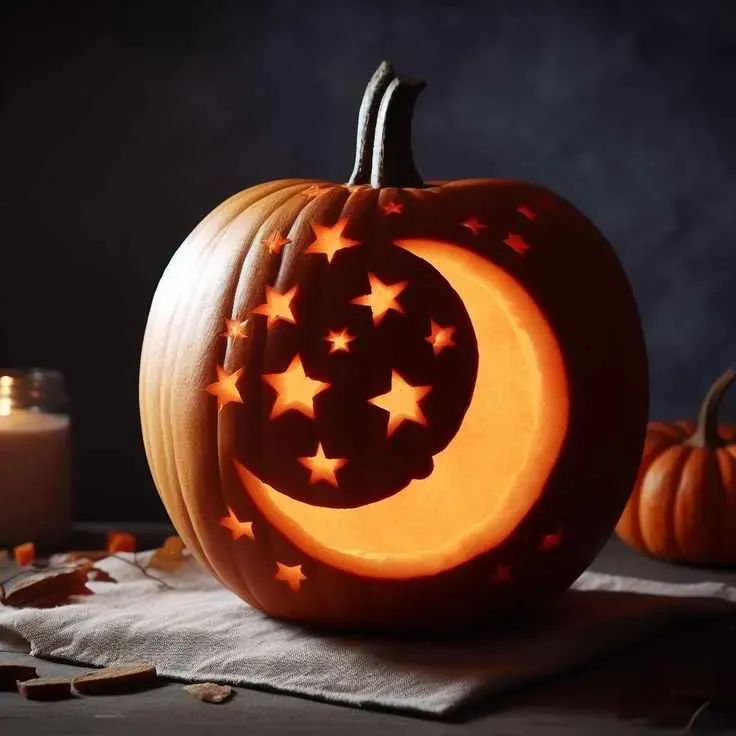
Giving Your Moon Some Texture (Craters and More)
you've got your basic moon shape carved out – maybe a crescent, maybe a full circle. Looks decent, right? But to really make it pop, especially when lit, you need to add some texture. This is where you start moving beyond the simple cutout and into something more visually interesting. Think about the moon's surface – it's not smooth like a billiard ball. It's covered in craters, lines, and subtle variations. You can replicate this on your pumpkin using various tools without cutting all the way through. Try a linoleum cutter, a Dremel tool with a carving bit (carefully!), or even just the scraping tool from your pumpkin kit. Vary the depth of your scraping to create highlights and shadows. Thinner areas will glow brighter, thicker areas will stay darker, giving that illusion of craters and uneven terrain. It takes a bit of practice, but the difference in the final lit effect is huge. It turns a flat shape into something with perceived depth.
Bringing in the Neighbors (Stars, Clouds, and Planets)
Your moon doesn't have to exist in a vacuum. The space around it is ripe for adding more celestial flair. Think about adding stars scattered around the moon. You don't need to carve full star shapes; often, simply drilling holes of various sizes works perfectly. Smaller holes look like distant pinprick stars, larger ones appear brighter. You can even arrange them to form simple constellations if you're feeling ambitious. Another cool idea is adding some wispy clouds partially obscuring the moon. These can be carved by scraping the rind, creating a semi-transparent effect when lit. Or maybe a distant planet, a smaller circle carved or scraped nearby. These extra elements build a little scene around your central moon, making the whole design more dynamic and telling a bit of a story. It's like setting the stage for your lunar star.
- Use drill bits for clean star holes.
- Scrape rind for cloud effects.
- Keep additional elements proportional to the moon.
- Experiment with dot patterns for star clusters.
Silhouettes Against the Lunar Disc
Here's where you can get really dramatic. Instead of carving *out* the moon shape, you can carve *around* shapes that you want to appear silhouetted against a large, glowing full moon. Think bats flying, a witch on a broomstick, a spooky tree branch, or even a haunted house outline positioned so it looks like it's sitting on the moon's surface. You carve the background (the moon area) by thinning or cutting, while leaving the foreground elements intact. When you light the pumpkin, the moon glows brightly, and your chosen shapes appear as dark silhouettes against it. This technique requires careful planning and often a larger pumpkin to give you enough space to work. It creates a high-contrast, striking image that's instantly eye-catching, especially from a distance at night. It’s a classic horror movie poster effect, brought to life on a pumpkin.
Creating Spooky Scenes: Advanced Pumpkin Carving Ideas Moon
Creating Spooky Scenes: Advanced Pumpkin Carving Ideas Moon
Combining the Moon with Classic Horror Tropes
so you've mastered the basic moon. Now it's time to kick it up a notch and really lean into the spooky. Advanced pumpkin carving ideas moon often involve integrating the lunar element into a larger scene. Think beyond just the moon itself. How about a gnarled tree silhouetted against a massive, pockmarked full moon? Or maybe a vampire bat with wings spread wide, flying right in front of a glowing crescent? This is where you start telling a story with your pumpkin. It requires a bit more planning, maybe sketching out the full scene beforehand. You're not just carving a shape; you're creating a miniature landscape of terror. It’s about composition – where you place the moon in relation to other elements like haunted houses, creepy fences, or even gravestones. The moon becomes the backdrop, the atmospheric lighting for your tiny horror show. It takes patience, sure, but the result is way more impactful than just another happy face.
Techniques for Detailed Lunar Landscapes and Scenes
Moving into advanced pumpkin carving ideas moon scenes means getting comfortable with varying depths and negative space. For a truly detailed lunar surface, you’re not just carving craters; you’re scraping and thinning the rind to create subtle variations in light and shadow. This requires smaller, more precise tools – think clay sculpting tools, X-Acto knives, or even specialized pumpkin carving kits with different tips. For complex scenes, you might use a transfer method to get your design onto the pumpkin accurately before you start cutting or scraping. Layering is also key; carving some elements completely through while others are only scraped allows for different levels of brightness when lit. Imagine a foreground element, like a creepy hand reaching up, carved deeply, while the full moon behind it is thinly scraped for a soft glow. It's about controlling the light and using it to define your spooky narrative.
- Plan your scene carefully before cutting.
- Use transfer paper to get complex designs onto the pumpkin.
- Invest in a good set of small, sharp carving tools.
- Practice scraping techniques on a test piece first.
- Consider backlighting elements differently for depth.
Making Your Moon Pumpkin Shine: Lighting Tips
Making Your Moon Pumpkin Shine: Lighting Tips
Choosing Your Light Source
You've spent the time carving that perfect celestial body onto your pumpkin, whether it's a simple crescent or a detailed lunar landscape. Now comes the crucial step: making it glow. The light source you choose makes a huge difference in how your pumpkin looks after dark. Forget those cheap tea lights that flicker out in five minutes or worse, pose a fire risk. We’re talking reliable illumination here. Standard battery-operated LED lights are a solid choice. They stay cool, last a long time, and you can get them in various brightness levels. Look for warm white LEDs if you want a classic, inviting glow, or maybe a cooler white if you're going for a starker, more alien moon look. Don't just grab the first pack you see; think about the effect you want.
Positioning for Maximum Impact
Just sticking a light inside isn't enough. How you position the light source can drastically change how your pumpkin carving ideas moon design appears. If you have a simple cutout moon, placing the light centrally will illuminate the whole shape evenly. But if you've done any scraping or thinning of the rind to create texture or depth, you need to be more strategic. Try positioning the light closer to the back of the pumpkin, angled towards the carved area. This can help highlight those varying rind thicknesses, making scraped areas brighter and thicker parts darker, really bringing out the texture. Experiment a bit before Halloween night – put the light in and turn off the room lights to see how it looks from different angles. Sometimes a slight tilt or moving the light higher or lower inside the pumpkin makes all the difference.
- Use battery-operated LEDs for safety and longevity.
- Consider the LED color temperature (warm vs. cool white).
- For detailed carvings, angle the light source to highlight texture.
- Test different light positions in the dark.
- Multiple smaller lights can sometimes offer more even coverage than one large one.
Experimenting with Light Effects
Beyond just picking a light and sticking it in, you can play with different effects to enhance your moon. Some battery lights offer a gentle flicker option, which can add a slightly spooky, atmospheric feel to a carved moon, mimicking a distant, wavering light. If you've carved a scene with silhouettes against the moon, consider using a brighter light directly behind the moon area to make the silhouettes really pop against the intense glow. For larger pumpkins with intricate designs, you might even consider using more than one light source inside to ensure even illumination across the whole carving. Don't be afraid to try different things – maybe wrap some fairy lights around the inside walls, or use a directional spotlight if your design warrants it. The goal is to make that moon look as magical and eerie as possible when the sun goes down.
Finishing Up Your Moonlit Masterpiece
So, you've explored the possibilities, from simple crescent cuts to maybe even tackling a detailed lunar surface or a scene with shadowy figures against the glow. Choosing pumpkin carving ideas moon themes offers a solid way to step up your Halloween decor without needing a fine arts degree. It provides a different vibe than the standard jack-o'-lantern grin – a bit more atmosphere, a touch more mystery. Whether your final product is a perfectly rendered full moon or a slightly lopsided crescent, the real win is trying something new and adding a unique touch to your spooky setup. Get it lit, put it out, and see how that moon glow holds up against the autumn night. It's just a carved pumpkin, sure, but sometimes the simple, effective ideas are the best ones.