Table of Contents
Alright, Halloween's coming. You've got the pumpkin, maybe a carving kit gathering dust since last year. But let's be honest, another triangle-eyed, gap-toothed grin feels a bit... basic, right? You want something that screams spooky season but also shows you've got taste. Something that nods to a classic that's somehow both creepy and heartwarming. That's where great pumpkin carving ideas Jack Nightmare Before Christmas come into play. Forget the standard jack-o'-lantern. We're talking about bringing the residents of Halloween Town right to your doorstep.
Getting Started with Nightmare Before Christmas Pumpkin Carving

Getting Started with Nightmare Before Christmas Pumpkin Carving
Picking Your Perfect Pumpkin for Halloween Town
So, you've decided to ditch the basic triangle eyes and go full Halloween Town. Good choice. But before you channel your inner Jack Skellington, you need the right canvas. Don't just grab the first orange orb you see. Look for a pumpkin that's firm all around, no soft spots or bruises. A flat bottom is your friend; it won't roll away while you're trying to carve Zero's floppy ear. Consider the size based on your design. A complex Jack face might need a bigger surface, while a simple ghost might work on something smaller. Think about the shape too – some pumpkins just naturally look more like a character's head than others. Getting Started with Nightmare Before Christmas Pumpkin Carving really does start with the right gourd.
Tools of the Trade and Gutting the Beast
you've got your pumpkin. Now, about the tools. You can use those cheap carving kits, but honestly, they're often more frustrating than helpful. A small, sharp serrated knife works well for the top lid. For the detailed work, invest in some proper pumpkin carving tools or even linoleum cutting tools. They give you more control. And don't forget a sturdy scoop – an ice cream scoop works wonders – for getting all that stringy mess and seeds out. Speaking of which, time for the messy part. Cut a lid from the bottom, not the top. This keeps the top looking cleaner and makes it easier to place the pumpkin over a light source. Scoop out everything until the inside is smooth. A thinner wall (around an inch) is easier to carve, but don't go too thin or it'll collapse.
Here's a quick list of things you'll actually need:
- A sturdy pumpkin
- Sharp serrated knife (for the lid)
- Pumpkin carving tools (small saws, detail knives)
- Scoop (ice cream scoop recommended)
- Bowl for guts and seeds
- Paper towels for cleanup
- A template or stencil (if you're not freehanding)
- Tape (if using a stencil)
- Push pin or transfer tool
- Light source (LED is safest)
Classic Jack Skellington Pumpkin Carving Ideas
Classic Jack Skellington Pumpkin Carving Ideas
Classic Jack Skellington Pumpkin Carving Ideas
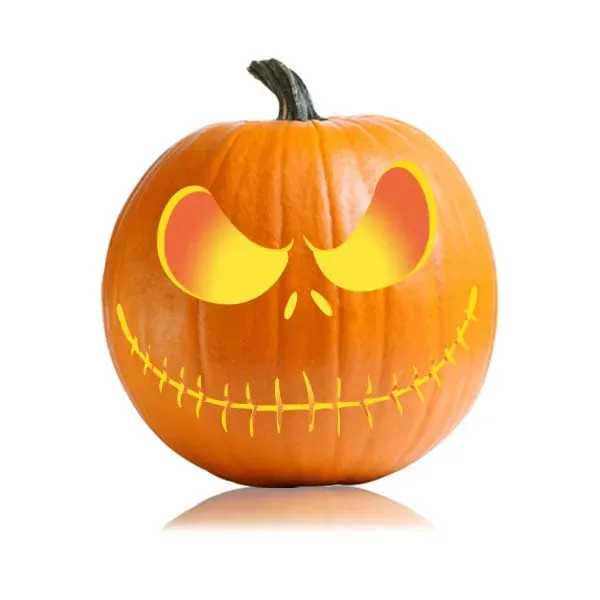
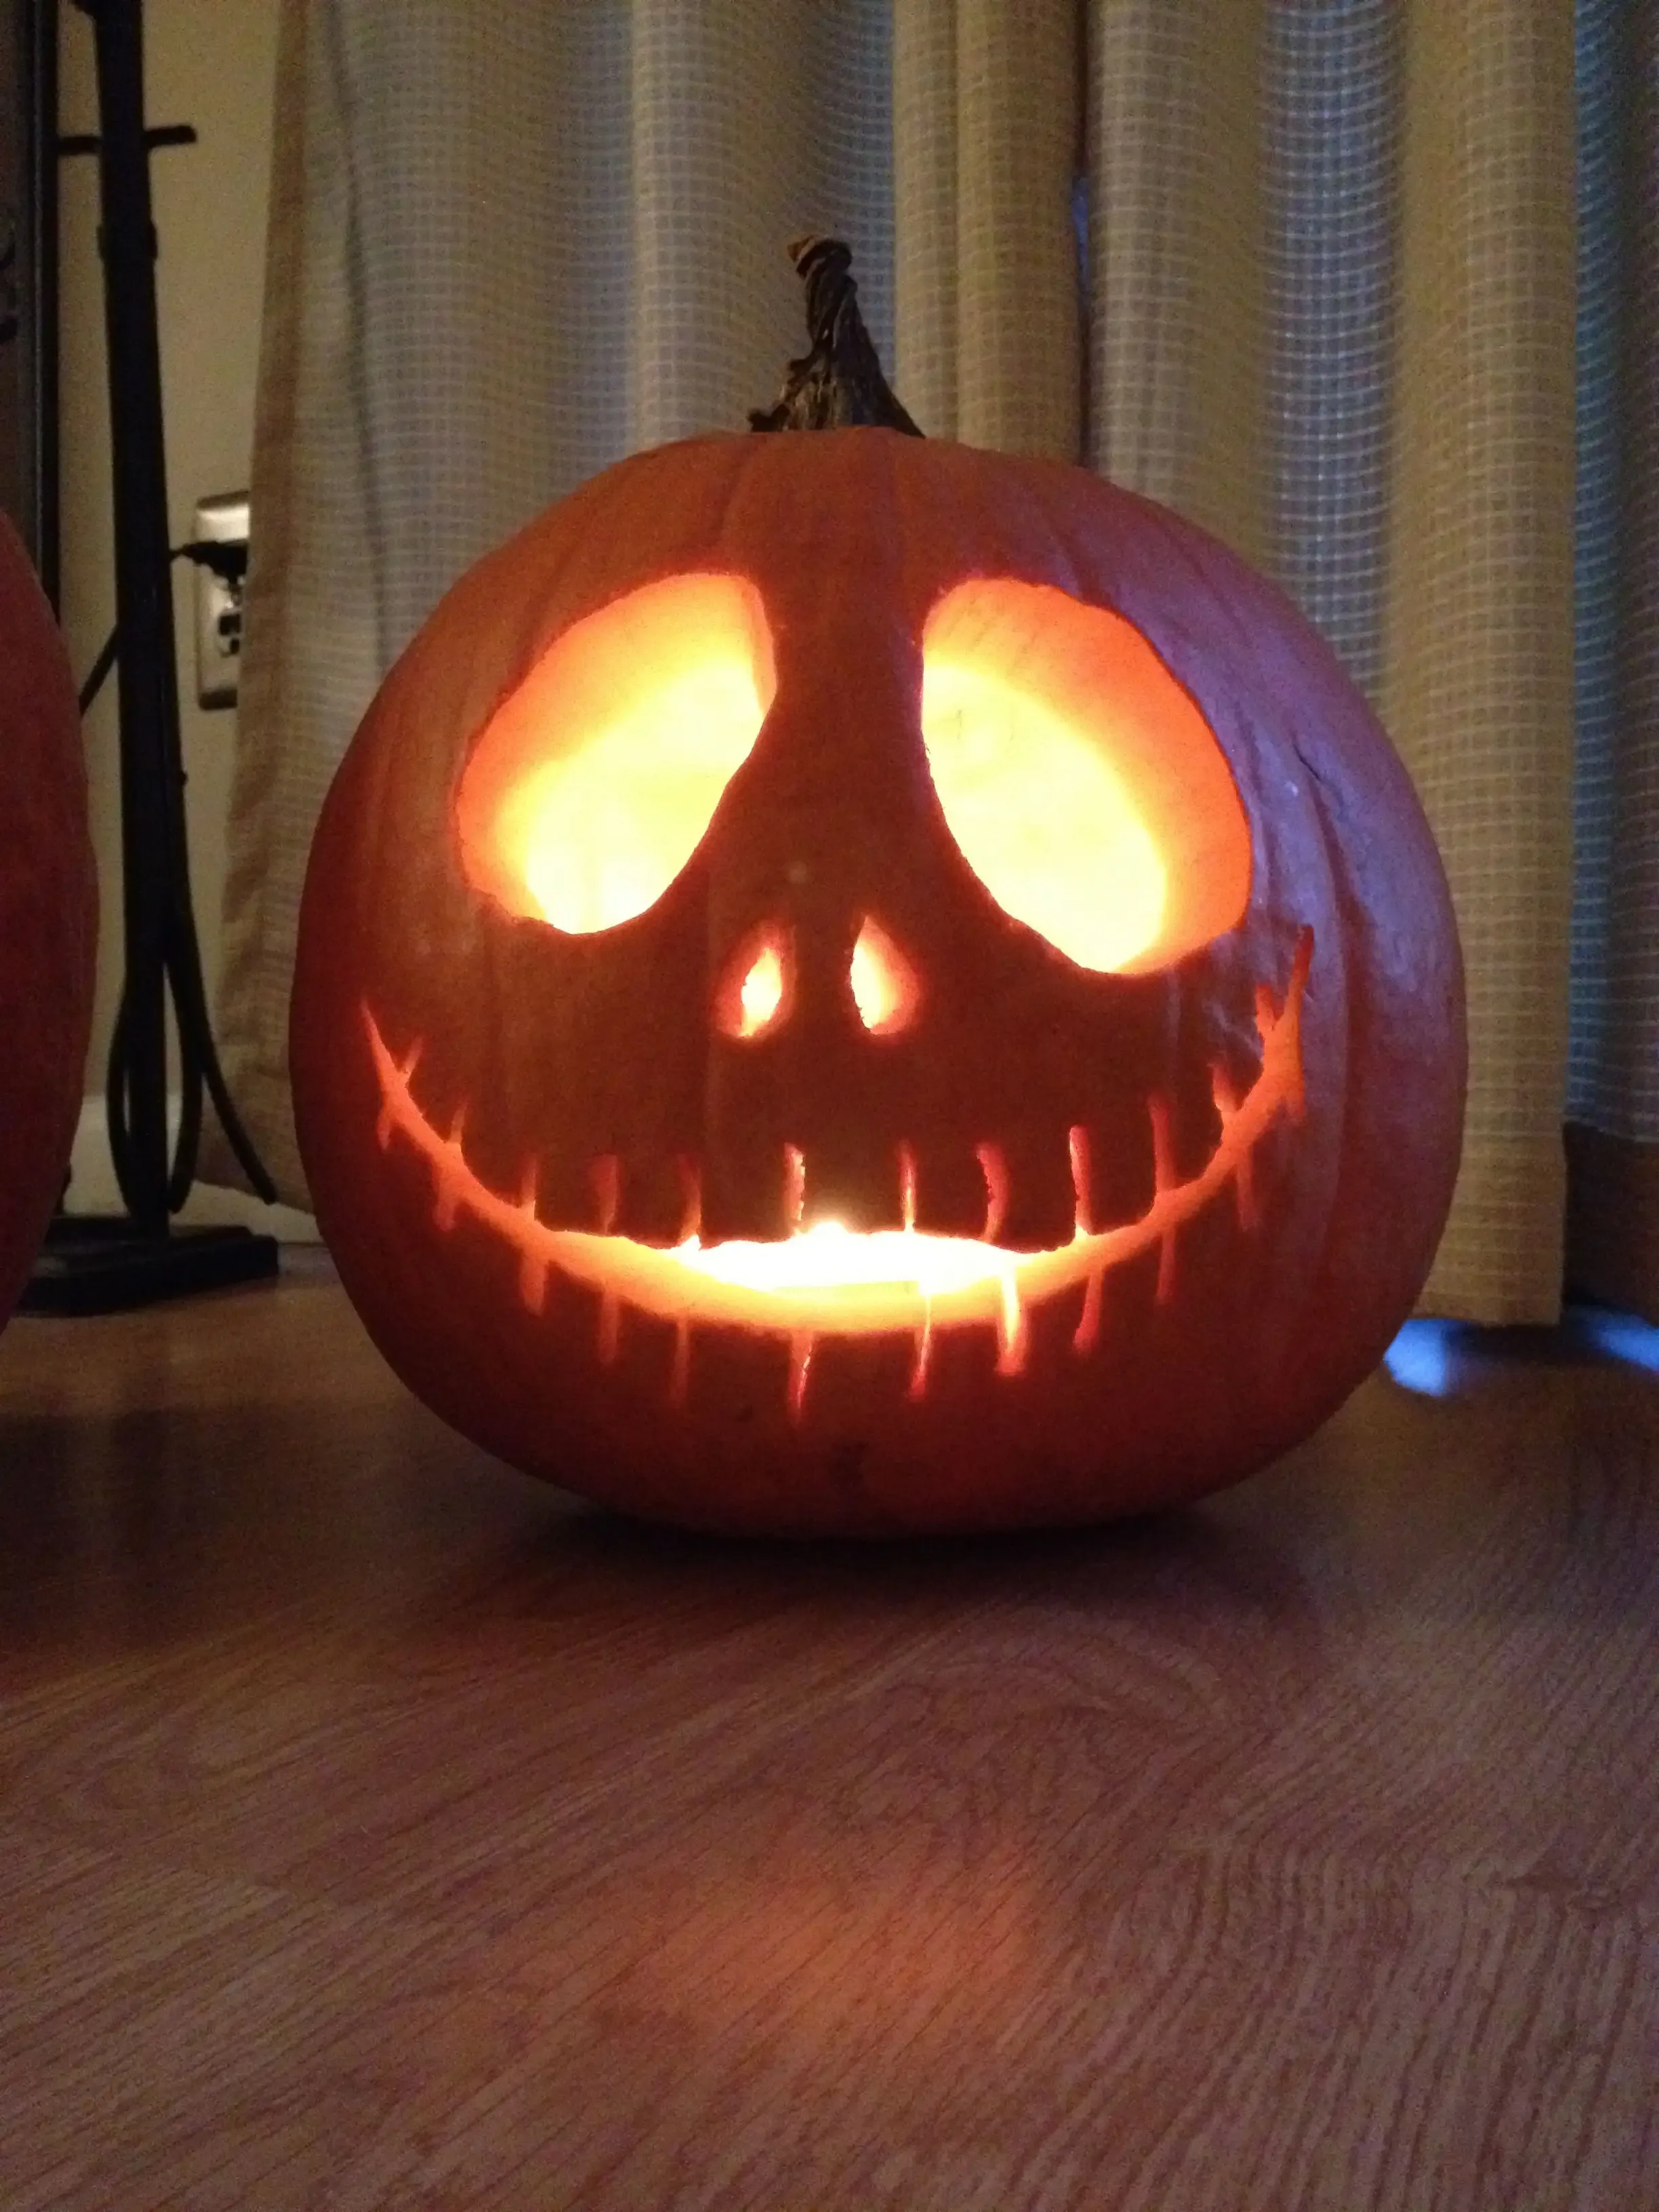
Alright, let's get to the main event: the Pumpkin King himself. When people think of pumpkin carving ideas Jack Nightmare Before Christmas, they're usually picturing that iconic skeletal grin. It's a classic for a reason. Jack's face is all sharp angles and expressive emptiness. You've got the large, slightly almond-shaped eyes, the narrow nose slits, and of course, that long, stitched smile. Getting the spacing right is key here. Too wide, and he looks goofy; too narrow, and he looks less like Jack, more like a sad ghost. You can go simple with just the carved-out features, or add some depth by scraping away layers of pumpkin skin to create shading around the eyes or cheeks. It's a straightforward design, but nailing that particular blend of spooky charm and gaunt cheer takes a steady hand and a good reference photo.
Beyond Jack: Other Nightmare Before Christmas Pumpkin Carving Ideas
Beyond Jack: Other Nightmare Before Christmas Pumpkin Carving Ideas
Carving Sally's Stitched Charm
Jack's cool, but Halloween Town has more residents than just the Pumpkin King. If you're looking for pumpkin carving ideas beyond just the main guy, Sally is a fantastic choice. Her patchwork design offers a different kind of challenge. Instead of carving out large areas, you're often working with lines – the stitches that hold her together. You can carve these lines partially, just scraping the surface, or go all the way through for a more graphic look. Her eyes are large and expressive, and her signature red hair can be suggested by carving or scraping the top of the pumpkin. It's a design that allows for a lot of texture work, making it visually interesting even before you light it up. It's less about negative space and more about drawing with your carving tools.
Bringing Oogie Boogie's Burlap Dread to Life
Feeling a bit villainous? Oogie Boogie presents a unique opportunity for pumpkin carving ideas Jack Nightmare Before Christmas fans might overlook. He's essentially a sack of bugs, right? Translating that burlap texture to a pumpkin can be done by strategically scraping the surface. You don't carve him out like a traditional face. Instead, you're creating the illusion of texture and form. His menacing grin and those creepy, squinting eyes are the key features to nail. You can even carve small holes within the scraped areas to represent the bugs trying to get out. It's a design that requires patience and a willingness to experiment with depth rather than just cutting through. Definitely not a beginner's project, but incredibly rewarding if you pull it off.
Thinking about which character suits your skill level?
- Jack Skellington: Classic, good for intermediate carvers.
- Sally: Focus on lines and texture, good for intermediate to advanced.
- Oogie Boogie: Texture scraping and detail work, definitely advanced.
- Zero: Simple ghost shape, great for beginners.
- Lock, Shock, Barrel: Distinctive masks, good for intermediate.
From Ghosts to Ghouls: Other Noteworthy Carvings
Don't stop at the main trio. There are plenty of other characters offering interesting pumpkin carving ideas. Zero, Jack's loyal ghost dog with the glowing nose, is surprisingly simple. A basic ghost shape, maybe a floppy ear, and a circular hole for his nose that you can light up separately. Easy, effective, and instantly recognizable. Then there are the mischievous trick-or-treaters, Lock, Shock, and Barrel. Their distinct masks offer bold shapes and expressions to carve. You could even do three smaller pumpkins for them. Each character brings a different vibe and a different carving challenge, expanding your pumpkin patch beyond just Jack's grin. It's about finding the character that speaks to you and your carving ambition.
Tips and Tricks for Your Pumpkin Carving Ideas Jack Nightmare Before Christmas
Tips and Tricks for Your Pumpkin Carving Ideas Jack Nightmare Before Christmas
Plan Your Attack Before You Cut
so you've got your pumpkin and your tools. Don't just dive in. Seriously. Planning is half the battle when it comes to successful pumpkin carving ideas Jack Nightmare Before Christmas style. If you're using a stencil – highly recommended, by the way, unless you're some kind of pumpkin carving savant – tape it securely to the cleanest, flattest part of your pumpkin. Use a push pin or a tracing tool to transfer the design onto the pumpkin's skin. Don't rush this part. Every dot matters, especially for detailed designs like Jack's smile or Sally's stitches. If you're freehanding, sketch your design lightly with a pencil first. Stand back, look at it. Does it look right? Is it centered? A little time spent planning here saves a lot of frustration later when you've accidentally carved off Jack's nose.
Carve Smart, Not Hard
Now for the carving itself. Use those smaller, sharper tools for the detail work. Don't try to brute force it with a big kitchen knife. Always cut away from yourself, obviously. For intricate parts, like the spaces between Jack's teeth or the lines on Sally's face, work slowly. Small, controlled cuts are better than one big hack. If you're doing areas where you scrape the skin instead of cutting all the way through (like Oogie Boogie's texture or shading), use a linoleum cutter or a specialized scraping tool. Experiment on the back of the pumpkin first to see how much pressure you need. It's easy to accidentally go too deep and punch a hole where you didn't intend to. And keep your tools clean; pumpkin guts are surprisingly sticky and will gunk things up fast.
Common carving mistakes to avoid:
- Trying to carve with dull tools.
- Cutting the lid from the top (makes lighting harder).
- Not scraping the inside walls thin enough.
- Rushing the transfer of the stencil.
- Trying overly complex designs as a beginner.
- Throwing away the seeds immediately (roast 'em!).
Light It Up and Make It Last
You've done the hard part. Now make it shine. Traditional candles are a fire hazard, especially if you have trick-or-treaters around. LED lights are the way to go. They're bright, safe, and last a lot longer. You can get simple battery-powered tea lights or even color-changing ones if you want to get fancy. To keep your masterpiece from shriveling up too fast, you can rub petroleum jelly on the cut edges to seal in moisture. Some people swear by spraying the inside with a bleach solution (like one tablespoon of bleach to a quart of water) to kill mold, but honestly, pumpkins are organic; they're going to break down eventually. Just enjoy it while it lasts, and maybe take some good photos on the first night.
Showing Off Your Nightmare Before Christmas Masterpiece
Showing Off Your Nightmare Before Christmas Masterpiece
Showcasing Your Spooky Creation
You've put in the work. You've wrestled with pumpkin guts, dodged the carving knife a few times, and somehow translated a beloved stop-motion classic onto an organic canvas. Now, don't just leave it on the porch and hope for the best. Showing Off Your Nightmare Before Christmas Masterpiece requires a little strategy. Place it somewhere visible, maybe near the front door or on a prominent step. Make sure the lighting inside is doing its job – a flickering LED can add some extra creepiness. Consider the backdrop; does it look better against a dark wall or surrounded by fake cobwebs? Take some decent photos before the inevitable happens (pumpkins don't last forever, folks). Share them online. Brag a little. You earned it after tackling those intricate pumpkin carving ideas Jack Nightmare Before Christmas threw at you.
Your Nightmare Before Christmas Pumpkin, Ready for Halloween Town
So there you have it. You've navigated the guts and seeds, wrestled with a stencil, and hopefully, brought a piece of Halloween Town to life on your porch. Whether it's Jack's unmistakable grin, Sally's delicate features, or something a bit more... lumpy and burlap-like, you've moved beyond the basic. These pumpkin carving ideas Jack Nightmare Before Christmas style aren't just decorations; they're a nod to a film that gets Halloween right. They might not sing or dance, but they'll definitely make your place stand out when the trick-or-treaters arrive. Now, go light that candle and admire your work. Just try not to scare yourself.