Table of Contents
October rolls around, the air gets crisp, and suddenly everyone expects you to transform a lumpy gourd into a spooky masterpiece. Freehand carving? For most of us, that ends up looking less like a grinning ghoul and more like a sad, toothless creature that vaguely resembles a pumpkin after a run-in with a badger. If you've ever stared at a blank pumpkin with a carving knife, feeling the dread creep in, you're not alone. This year, let's skip the artistic panic and embrace the simple path to pumpkin perfection. We're talking about usingpumpkin carving ideas easy templates. Forget wobbly lines and unintentional abstract art. These templates are your secret weapon for creating impressive, clean designs without needing an art degree or the steady hand of a brain surgeon. In this guide, we’ll explore why templates are a carving game-changer, how to find the best ones, and the simple steps to transfer that killer design onto your pumpkin. Get ready to carve a pumpkin that actually looks like you intended, maybe even one that makes your neighbors a little jealous.
Skip the Struggle: Why Use Pumpkin Carving Ideas Easy Templates?
Skip the Struggle: Why Use Pumpkin Carving Ideas Easy Templates?
Tired of the Freehand Fail?
Let's be real. You buy a pumpkin, grab a cheap carving kit, and picture yourself creating a masterpiece. Ten minutes in, you're staring at jagged edges, uneven eyes, and a drooping mouth that looks less spooky and more like it needs dental work. The dream of a perfect jack-o'-lantern quickly devolves into a desperate attempt to salvage something, anything, that doesn't look like a four-year-old attacked it with a spoon. Freehand carving sounds romantic, but it often results in frustration and pumpkins destined for the compost pile before Halloween even arrives. This is precisely wherepumpkin carving ideas easy templatesbecome your best friend.
Accuracy Without the Art School Price Tag
Using a template takes the guesswork out of the equation. You don't need to sketch, erase, and re-sketch directly onto the curved, slick surface of a pumpkin, hoping your lines stay straight and symmetrical. A template provides a clear, defined path for your carving tool. It's like having a cheat sheet for creativity. You simply transfer the design, grab your saw tool, and follow the lines. The result? Clean cuts, recognizable shapes, and a finished product that actually resembles the cool design you picked out. It saves time, it saves sanity, and it dramatically reduces the chance of accidentally slicing off a crucial piece you needed for a nose.
- Avoid uneven lines and wobbly shapes.
- Get consistent results, even with complex designs.
- Save significant time compared to freehand drawing and carving.
- Reduce the risk of carving mistakes that ruin the design.
- Make carving accessible for all skill levels.
Unlock Cooler Designs
Maybe you've seen those intricate pumpkin carvings online and thought, "Yeah, right, like I could ever do that." Guess what? A good chunk of those impressive pumpkins started with a template. Templates aren't just for basic triangles and simple grins. You can find designs for pop culture characters, elaborate spooky scenes, detailed animals, and complex patterns. Trying to freehand a detailed spiderweb or a specific movie monster face is a recipe for disaster for most folks. With a template, these ambitious designs become achievable projects. It allows you to push your carving skills further and create pumpkins that genuinely stand out on your porch.
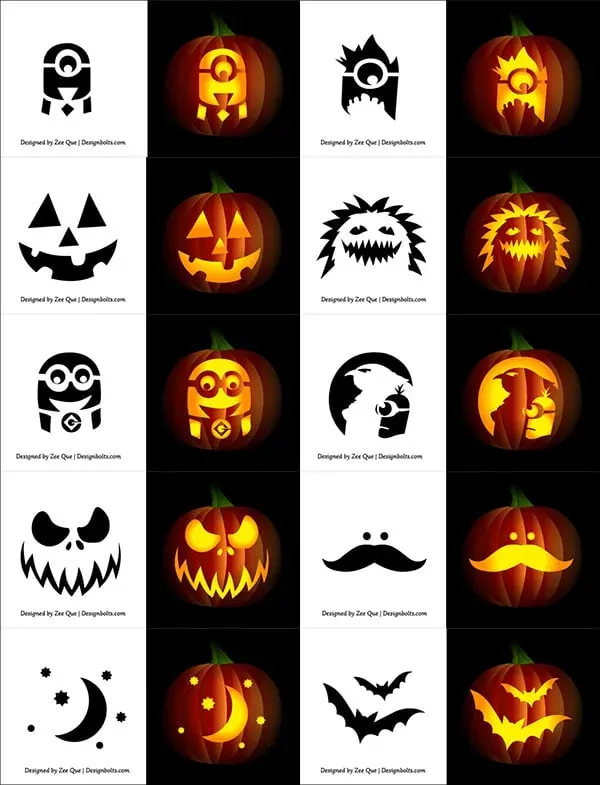
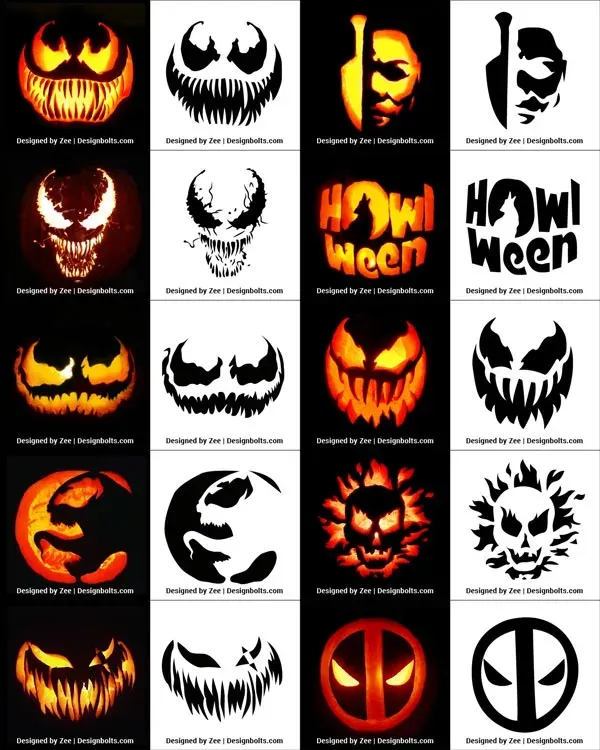
Finding Your Perfect Pumpkin Carving Ideas Easy Templates

Finding Your Perfect Pumpkin Carving Ideas Easy Templates
Where to Look First (Freebies!)
Alright, so you're sold on the template idea. Now, where do you actually find these magical guides? The internet is your absolute best friend here, especially if you're on a budget (and who isn't?). A quick search for "pumpkin carving ideas easy templatesfree" will unleash a flood of options. Craft blogs, parenting websites, even some big brand sites put out free printable templates every year. Think classic spooky stuff like bats, spiders, simple ghosts, or friendly jack-o'-lantern faces. They're usually straightforward, designed for standard pumpkin sizes, and perfect for getting your feet wet without spending a dime. Just click, download the PDF, print it out, and you're halfway there.
Paid Options: When You Want Something Specific
While free templates are great, they can be a bit generic. If you have a specific character in mind – maybe your kid is obsessed with a certain superhero, or you want a truly intricate, creepy design – you might need to look at paid options. Sites like Etsy are goldmines for unique, artist-designed templates. You can find everything from detailed movie monsters to famous portraits (yes, you can carve Mona Lisa on a pumpkin if you dare). These often cost a few bucks, but you're paying for originality and complexity that you won't find in the freebie bins. Plus, supporting independent artists is pretty cool.
Comparing Template Sources: Free vs. Paid
Source Type | Pros | Cons |
|---|---|---|
Free Websites/Blogs | Wide variety, no cost, easy to find | Often basic designs, can be lower quality prints |
Paid Marketplaces (e.g., Etsy) | Unique and complex designs, support artists, higher quality | Costs money, overwhelming selection sometimes |
Considering Complexity: Easy vs. "Easy"
a word of caution when looking forpumpkin carving ideas easy templates. "Easy" is subjective. A template might be labeled easy, but if it has super thin lines, tiny details, or requires intricate scraping instead of just cutting through, it might be more frustrating than fun for a beginner. Look closely at the design before you commit. Simple shapes, thicker lines, and designs that primarily involve cutting through the pumpkin wall are genuinely easy. Anything with lots of small holes, shading, or delicate points? Maybe save that for your third or fourth pumpkin of the season, or when you've upgraded your carving tools. Start simple to build confidence.
Putting Template Pumpkin Carving Ideas to Work: A Simple HowTo
Putting Template Pumpkin Carving Ideas to Work: A Simple HowTo
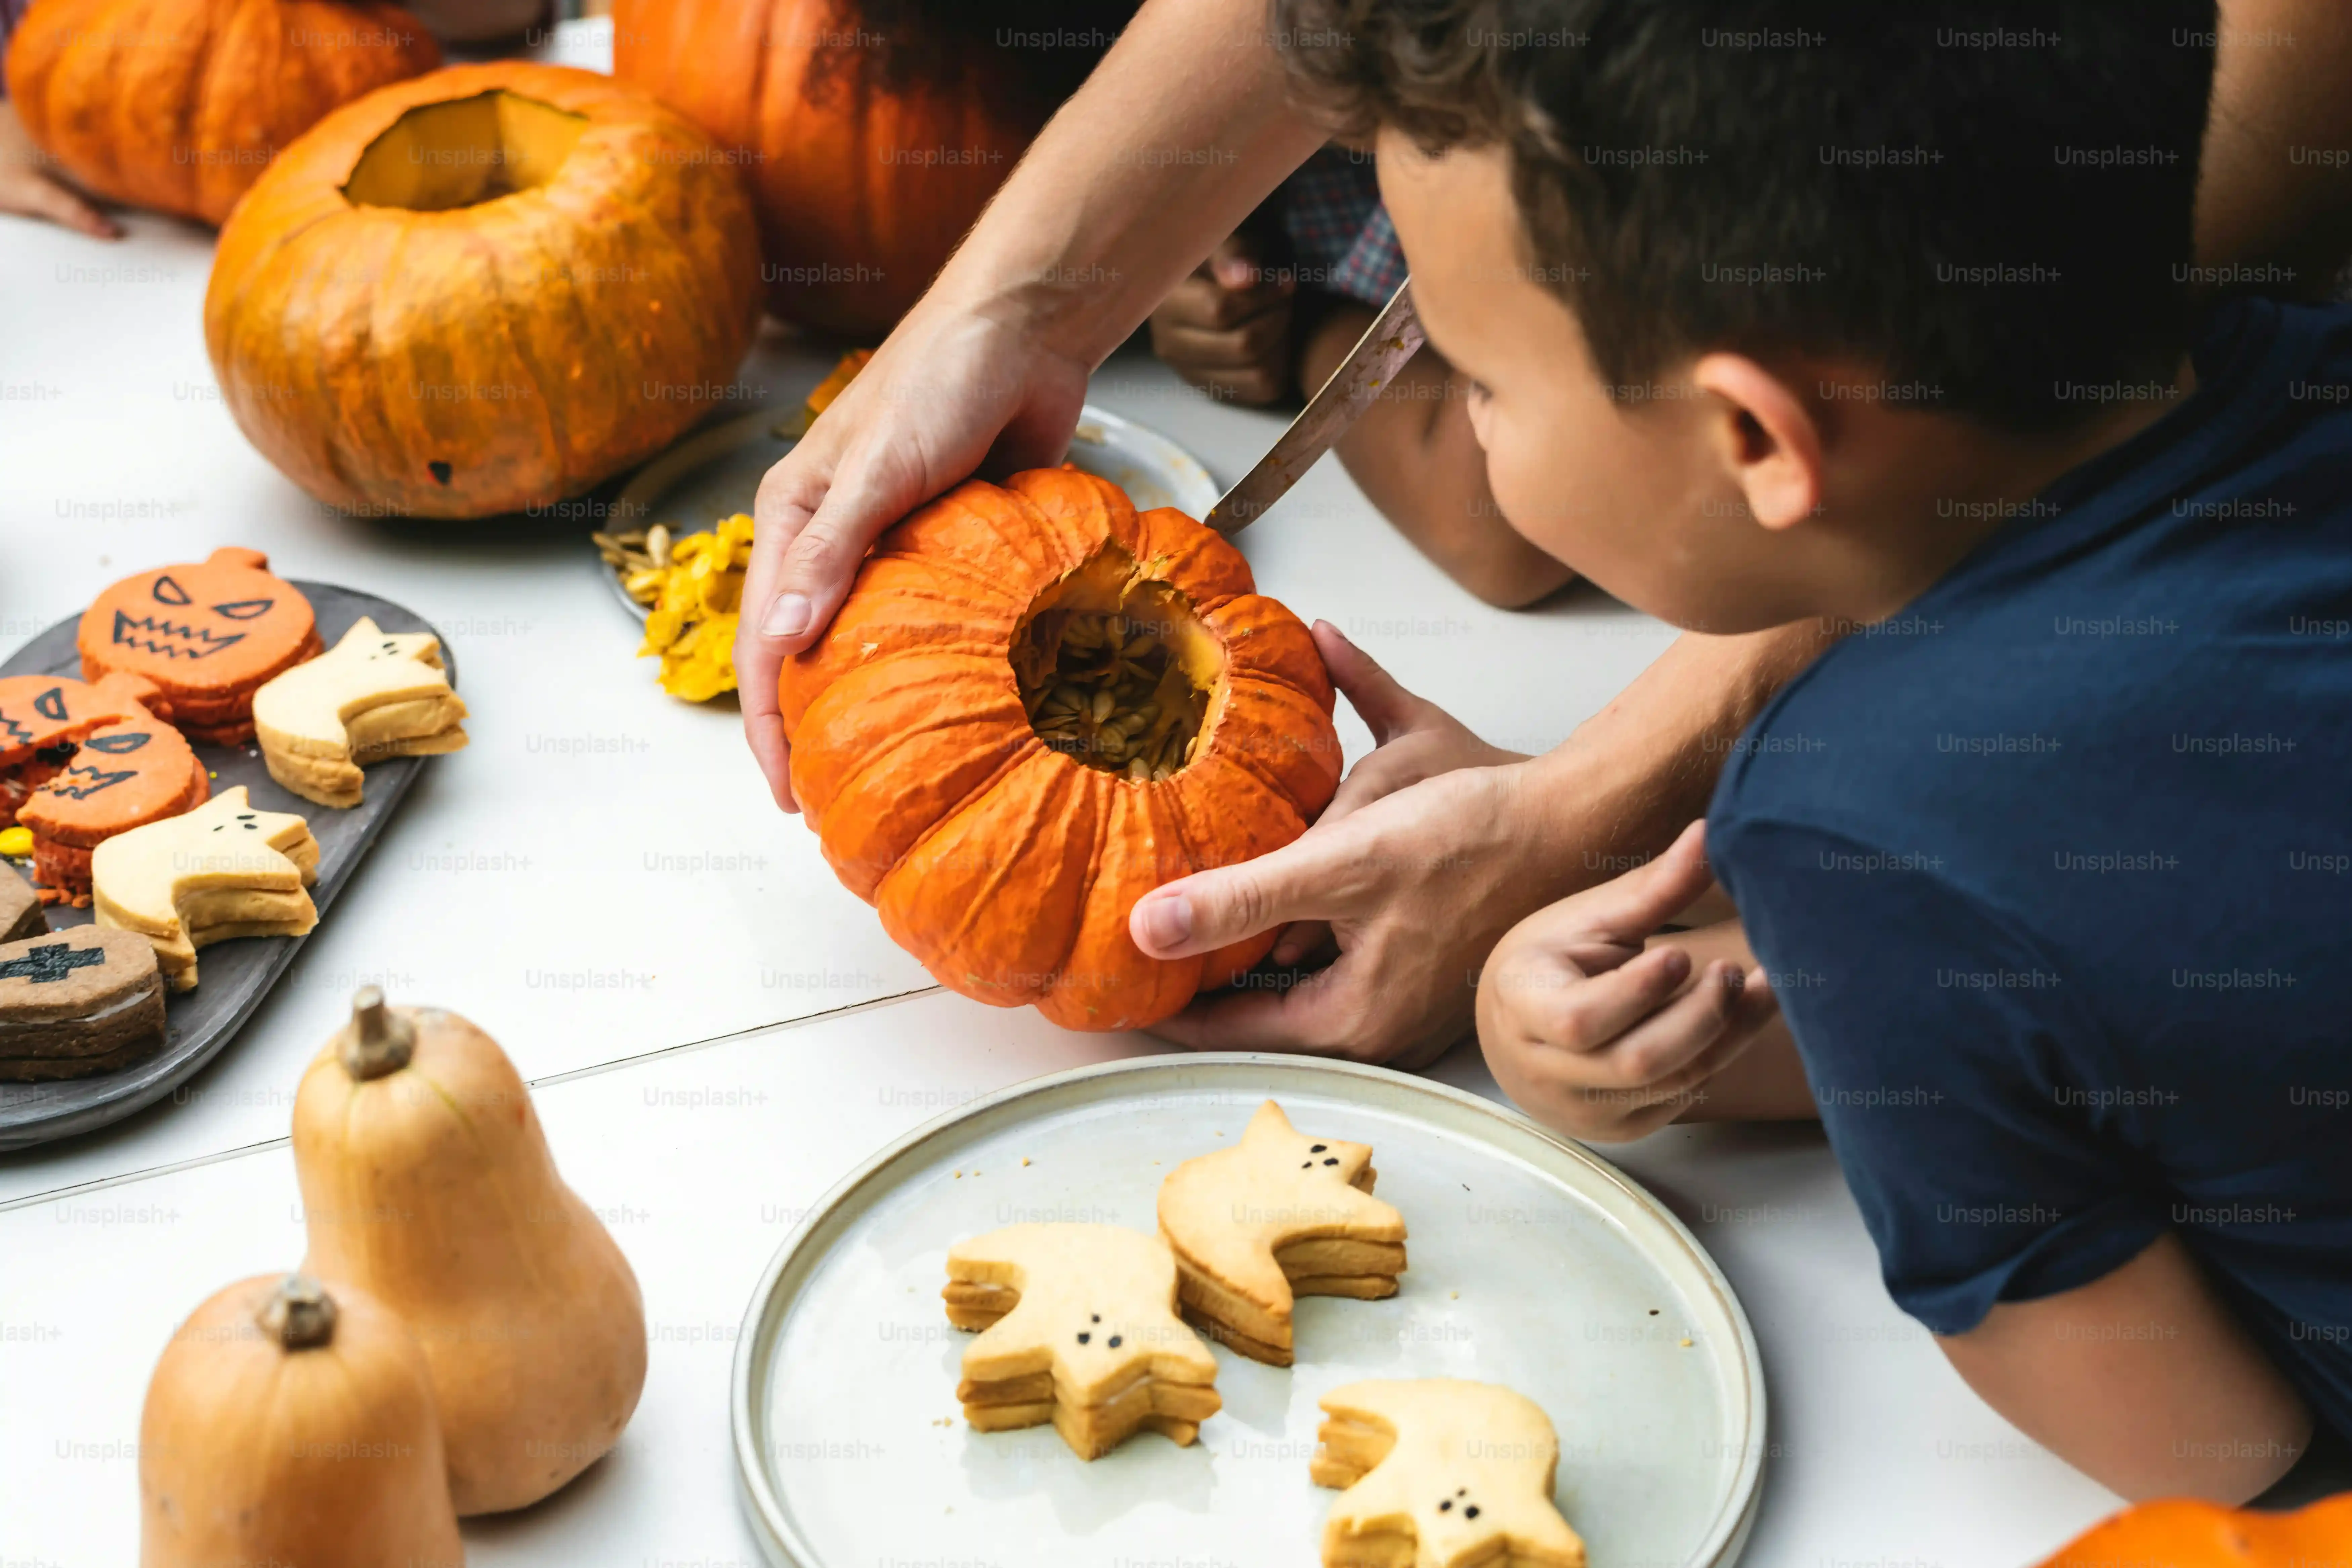
Transferring Your Design: The Sticky Situation (Literally)
Alright, you've picked your perfect template from the myriad ofpumpkin carving ideas easy templatesavailable online or in print. Now comes the critical step: getting that flat piece of paper onto a round, often bumpy, orange surface. Don't just tape the corners and hope for the best; that's like trying to wallpaper a basketball. The goal is to get the template as flush and wrinkle-free against the pumpkin as possible. A little masking tape goes a long way, applied strategically along the edges and even tearing the paper template slightly in spots to help it conform to the curve. Some folks swear by spray adhesive, but be warned, that can get messy. The old-school method of using push pins works surprisingly well, letting you adjust and stretch the paper as needed before you start tracing.
Beyond the Basic: Elevating Your Template Carving
Beyond the Basic: Elevating Your Template Carving
Adding Dimension and Detail
so you've mastered getting thosepumpkin carving ideas easy templatesonto the pumpkin and following the lines. That's step one to avoiding the freehand disaster. But let's be honest, sometimes just cutting through the pumpkin wall can look a little... flat. Like a paper doll stuck to an orange ball. To really make your design pop, you need to think beyond just the hole. This is where you start playing with depth and texture. Instead of cutting all the way through every line, consider scraping away just the top layer of skin in certain areas. This creates a translucent effect that glows differently when lit from within. You can also vary the depth of your cuts – maybe thicker around the main outline and thinner for internal details. It adds visual interest and makes your template design look way more sophisticated than just a simple cutout.
- Scrape the skin instead of cutting through for a glowing effect.
- Vary cut depth for highlights and shadows.
- Use small detail tools for texture within scraped areas.
- Consider backlighting specific parts of the design.
Common Problems (and Fixes) for Template Carvers
Common Problems (and Fixes) for Template Carvers
The Template Won't Stick (Or It Wrinkles)
You've got your fantastic template, the perfect pumpkin, and a roll of tape. You slap the paper on, and it immediately buckles and wrinkles like a prune left in the sun. This is arguably the most common frustration when usingpumpkin carving ideas easy templates. A flat piece of paper simply doesn't want to conform smoothly to a curved surface. Trying to trace or carve over wrinkles leads to distorted lines and a messy final product. You can't just brute force it; the paper will tear, or the design will shift.
The fix here is less about tape quantity and more about strategic placement and, frankly, a little sacrifice of the paper itself. Start by taping the top edge securely. Then, work your way down, gently smoothing the paper and applying tape as you go. For areas with significant curve, make small cuts or snips into the template paper's edge, allowing those sections to overlap slightly. Think of it like tailoring the paper to fit the pumpkin's form. Push pins are also your friend; they hold the paper taut and let you adjust tension. Don't be afraid to use a bunch of them, especially on larger or more complex templates.
Breaking Fragile Pieces or Getting Stuck
You’re cruising along, following the template lines perfectly, feeling like a carving pro. Then, *snap*. A thin piece breaks off, or your saw tool gets hopelessly jammed in a tight corner. Template designs, especially the cooler, more intricate ones, often have delicate sections or sharp angles that are surprisingly difficult to navigate with a small saw. It's a quick trip from triumph to despair when a key part of your design goes rogue.
This usually happens because you're rushing, using the wrong tool, or trying to force the cut. Slow down. Use the smallest saw tool you have for tight turns and delicate areas. Don't saw back and forth aggressively; use a gentle, steady motion, letting the tool do the work. For really thin bridges or points, consider carving them slightly thicker than the template suggests initially, then carefully trimming them down if needed after the main design is cut. If a piece feels weak while you're carving nearby, support it with your other hand.
Common Carving Issues & Quick Solutions
Problem | Why it Happens | How to Fix (or Prevent) |
|---|---|---|
Jagged, rough edges | Dull tools, sawing too fast, forcing cuts | Use sharp tools, saw slowly and steadily, clean edges with a small knife after cutting |
Design looks crooked | Template wasn't applied straight or smoothed properly | Spend more time applying the template flat, use pins for adjustment |
Piece falls inward unexpectedly | Didn't cut all the way through, or connecting points were too thin | Ensure cuts go completely through, make connecting points slightly thicker if design allows |
The Design Doesn't Glow Right
You finish carving, pop a candle or LED light inside, and step back to admire your work based on your chosenpumpkin carving ideas easy templates. Instead of a dramatic, spooky glow, you get a weak, uneven light source that barely shows off your hard work. The details you painstakingly carved are lost in shadow, or the light is just... underwhelming. This isn't a carving error, exactly, but a post-carving problem that diminishes the impact of your template-guided creation.
The issue is often the light source itself or the thickness of the pumpkin wall. A small tea light might not be powerful enough for a large pumpkin or a complex design. Consider using brighter LED lights, or even a small string of battery-operated lights for a more even glow. Also, the pumpkin wall thickness varies. If the walls are very thick, the light struggles to shine through, even in cut areas. After carving, you can carefully scrape away some of the flesh on the inside of the pumpkin behind the design. This thins the wall, allowing more light to pass through and making your template design pop beautifully.
Carve Smarter, Not Harder
So, there you have it. Usingpumpkin carving ideas easy templatesisn't cheating; it's just practical. It turns a potentially frustrating task into something manageable, even enjoyable. You get a clean design, a cool-looking pumpkin for your porch, and you avoid the existential dread of trying to freehand a spooky face that ends up looking like a melted potato. Grab a template, find a decent pumpkin, and give it a shot. The results are usually far better than whatever abstract horror you might conjure up otherwise.