Table of Contents
Alright, let's talk pumpkins. That big, orange squash that shows up everywhere come fall. You see 'em on porches, in stores, basically taunting you to turn them into something festive. Maybe you've tried carving before and ended up with a lopsided mess that looked less like a spooky face and more like it lost a fight with a badger. Or maybe you're just starting out and feel a bit overwhelmed by all the intricate designs out there. Forget the terrifying monsters and gore for a minute. This year, we're leaning into the charm. We're talking about pumpkin carving ideas cute enough to make your neighbors smile instead of scream. Think friendly critters, simple patterns, and designs that don't require an engineering degree or a week off work. We'll cover the basics – picking the right pumpkin, the tools you actually need, and how to keep your creation from collapsing into a sad, moldy puddle before Halloween even arrives. Stick around, and you might just find your new favorite way to decorate for the season with some genuinely adorable pumpkin carving ideas.
Getting Ready: Tools & Picking the Perfect Pumpkin
Getting Ready: Tools & Picking the Perfect Pumpkin
Gathering Your Pumpkin Carving Arsenal
first things first, you need the right gear. Forget that flimsy little saw that comes in the dollar store kit. It's basically useless. You want a proper pumpkin carving kit. These usually come with a serrated knife for cutting the top and larger shapes, smaller detail tools for finer work, and maybe a scoop for getting the guts out. Trust me, a good scoop makes a world of difference. You'll also want a marker to draw your design and maybe some masking tape if you're using a stencil. Don't overcomplicate it, but having the right tools makes the whole process way smoother and less frustrating.
Selecting Your Canvas: How to Pick a Prime Pumpkin
Now, the pumpkin itself. Don't just grab the first orange thing you see. Look for one that's firm all over, no soft spots or bruises. Give it a little tap; it should sound hollow. You want a smooth surface if you're doing detailed carving, but a little character is fine too, especially for those cute pumpkin carving ideas we're aiming for. Check the stem – it should be firm and firmly attached. That's a sign of a healthy pumpkin. Size-wise, a medium to large one gives you more room to work, but smaller ones can be adorable too. Think about your design before you pick your pumpkin.
Here are a few things to look for:
- Firmness: No soft spots or mushy bits.
- Sound: Should sound hollow when tapped.
- Skin: Smooth is usually better for detail, but character is okay.
- Stem: Should be firm and attached.
- Shape: Consider your design – round or oval works well.
Prep Work: Cleaning and Prepping Your Pumpkin
Got your pumpkin? Great. Now comes the messy part – getting the insides out. Cut a lid around the stem, usually at an angle so it doesn't fall in. Then, grab your scoop and get to work. Scrape out all the seeds and stringy bits. Get it as clean as you can inside; this helps it last longer. Some people like to thin the walls a bit where they're going to carve, but for simple, cute pumpkin carving ideas, it's not strictly necessary. Just make sure the inside is clean and ready for your artistic touch.
Simple and Sweet: Easy Cute Pumpkin Carving Ideas
Simple and Sweet: Easy Cute Pumpkin Carving Ideas
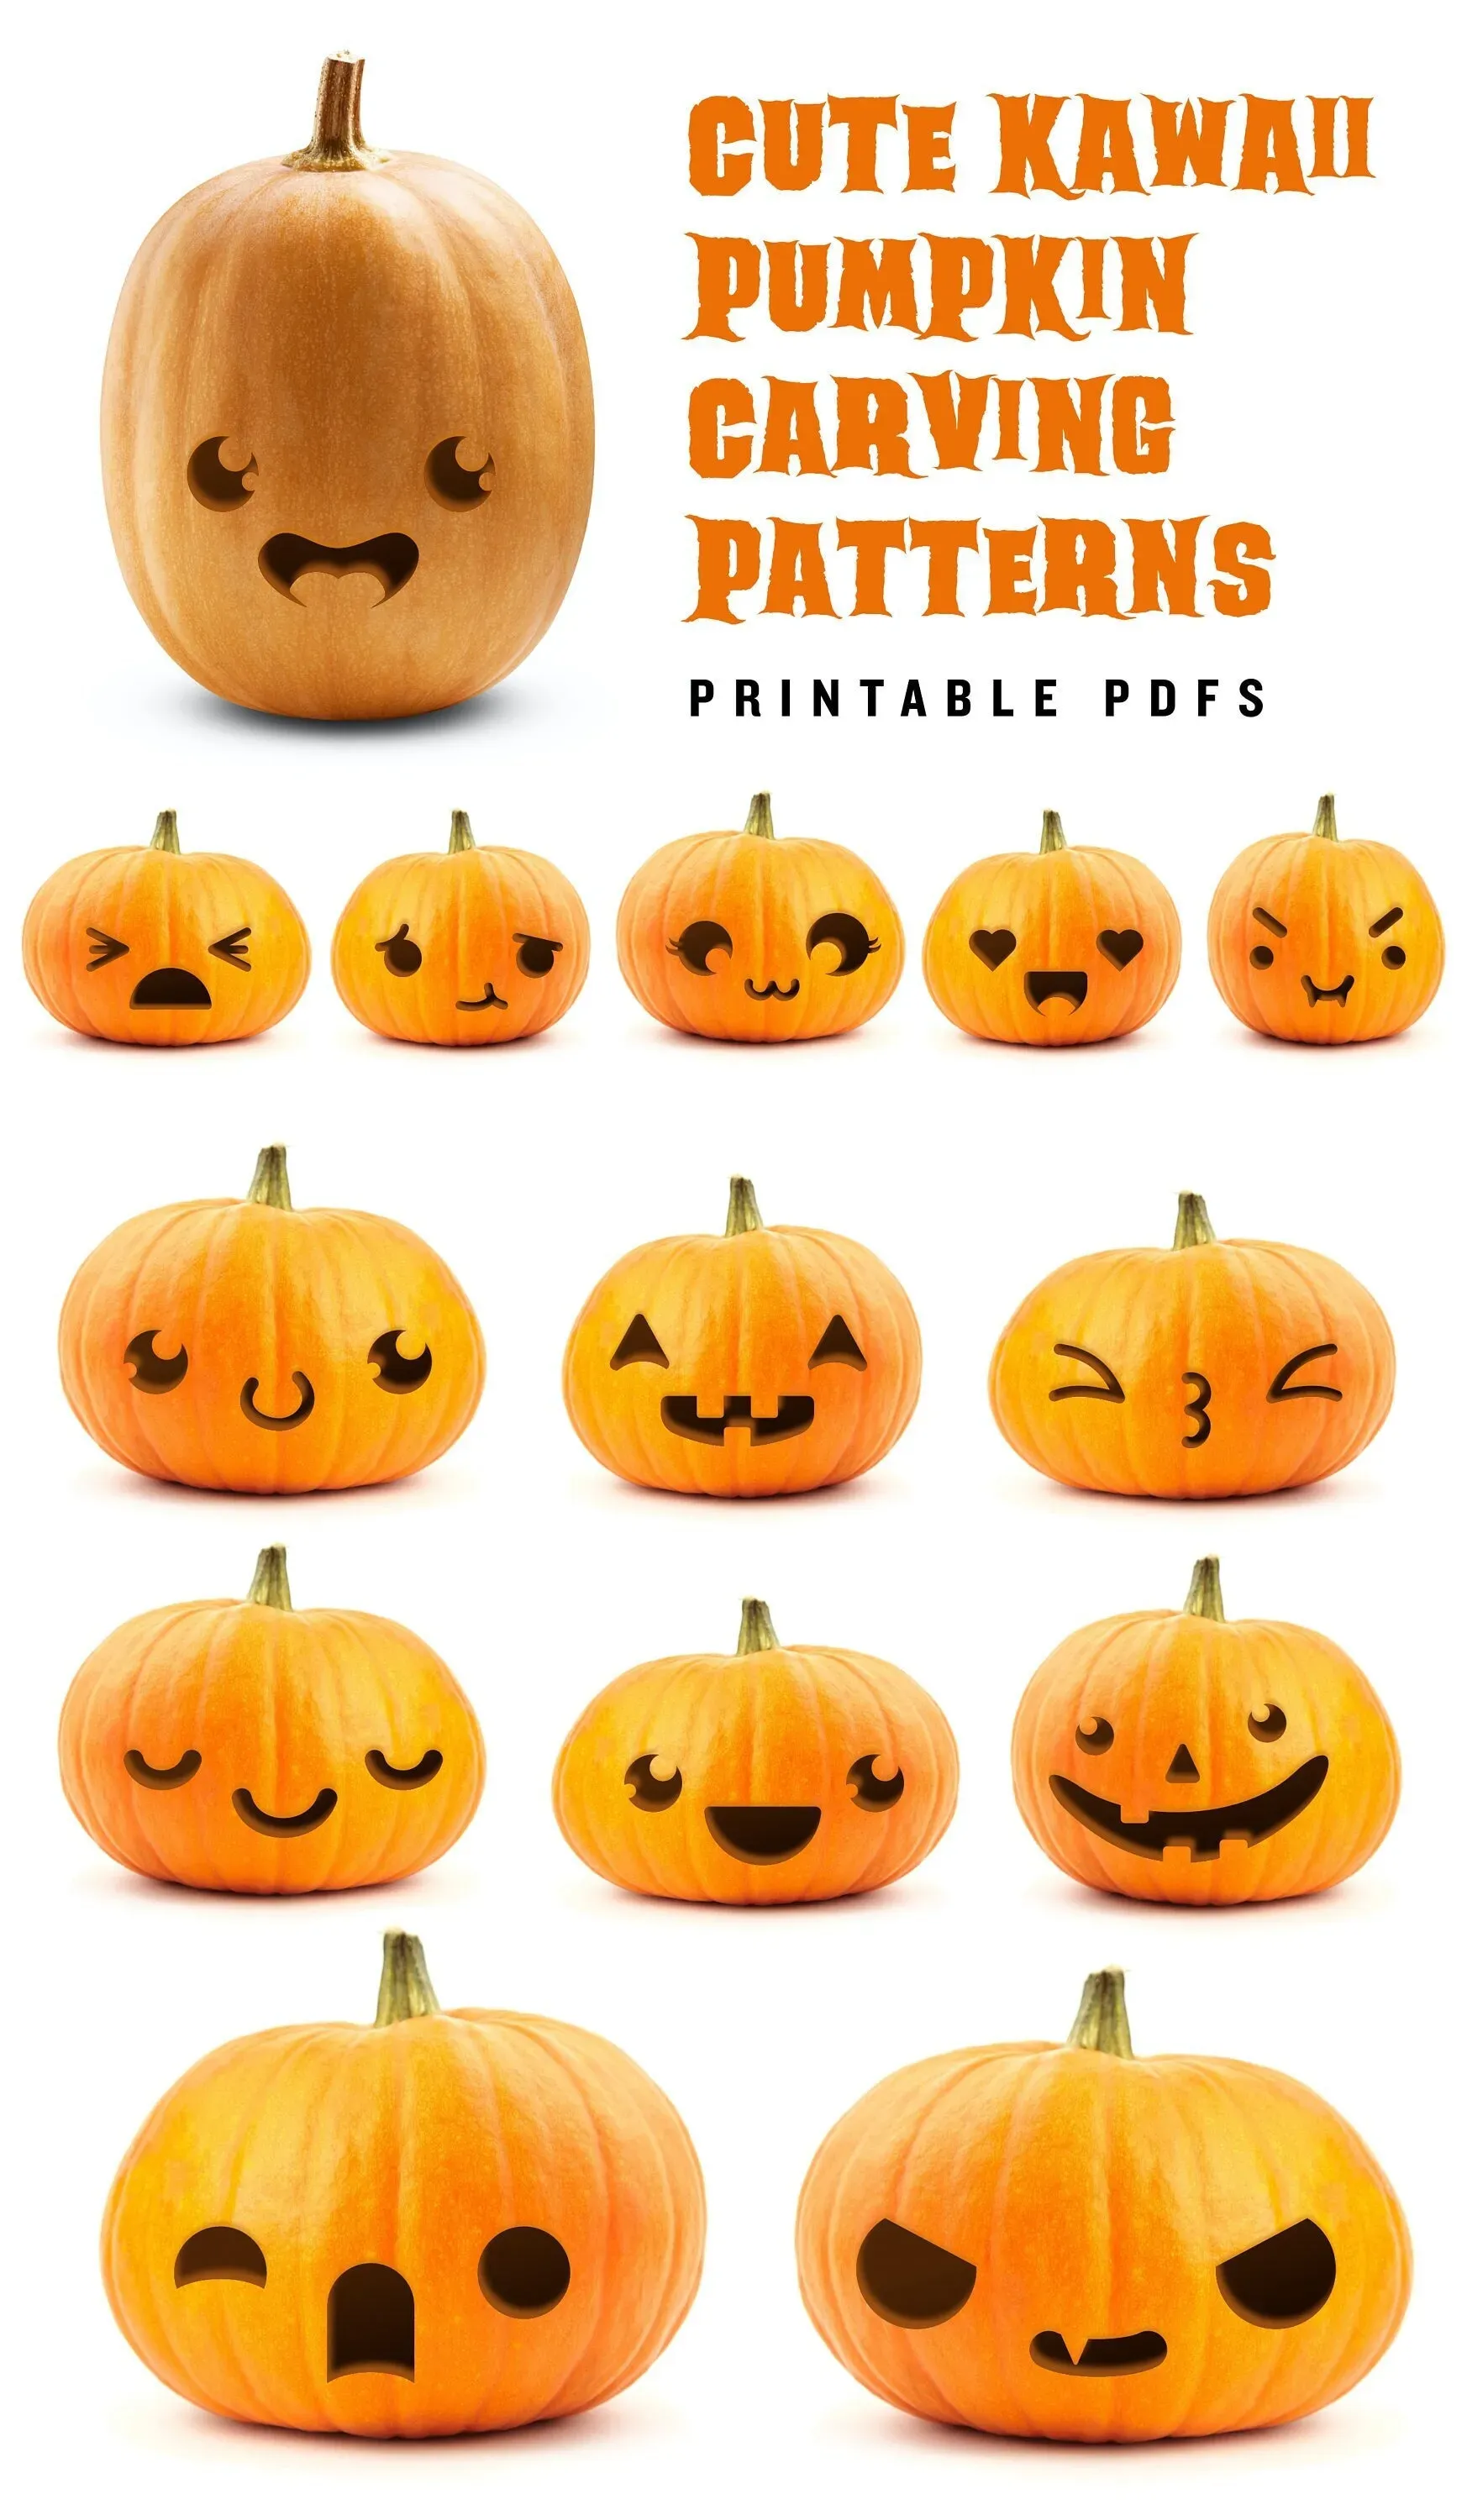
Starting Simple: Classic Cute Faces and Shapes
so you've prepped your pumpkin, guts are gone, and you're ready to make some magic happen. Let's start with the absolute basics for some truly easy cute pumpkin carving ideas. Forget the jagged, scary teeth. Think friendly smiles, big round eyes, and maybe a little button nose. You can use simple shapes – circles for eyes, a triangle for a nose, and a curved line for a smile. Don't be afraid to make the eyes different sizes for a goofy look. A simple cat face with pointy ears cut out is always a winner, or maybe a friendly owl with big, wide eyes. These are designs that are hard to mess up and look genuinely charming sitting on your porch.
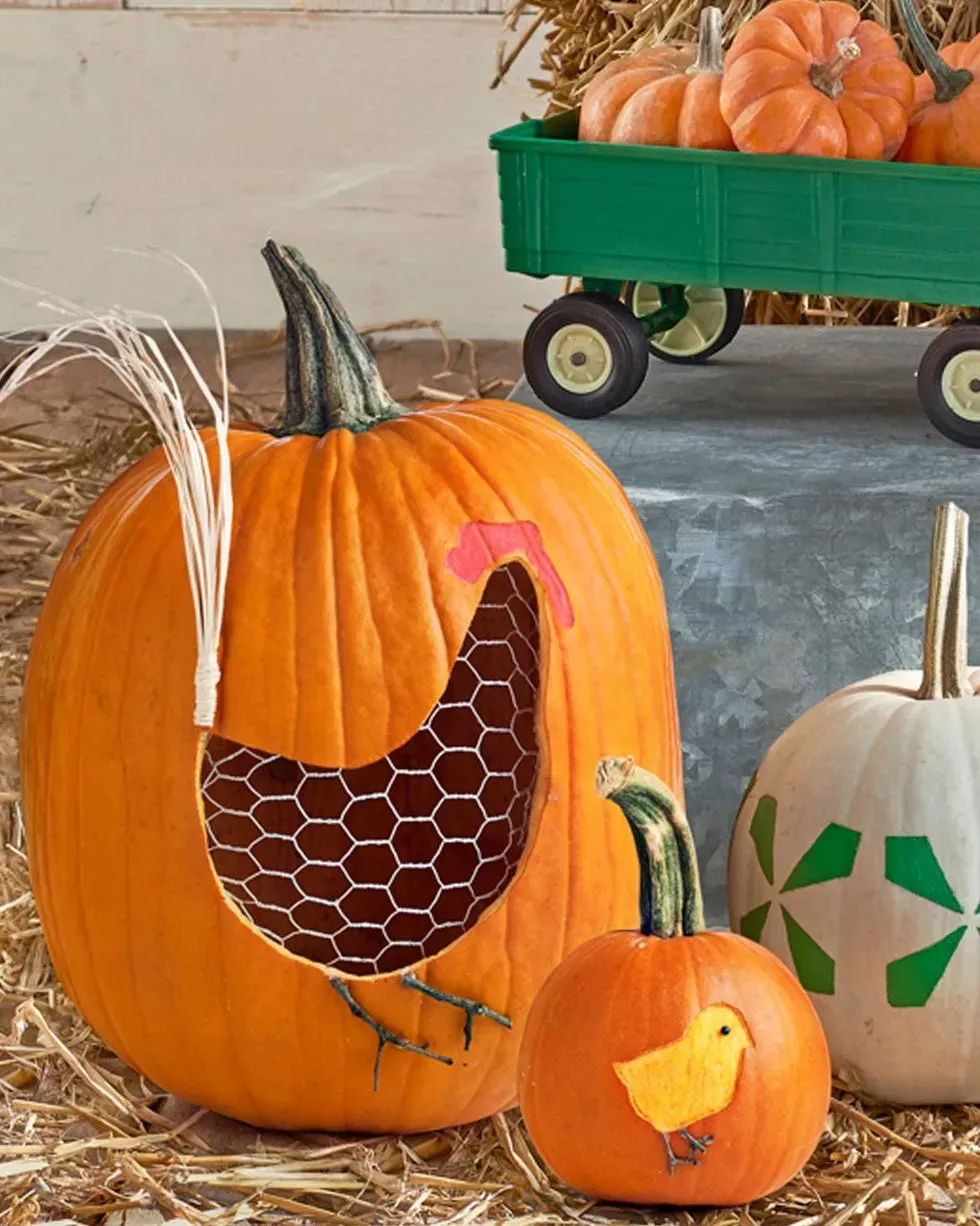
Adding Character: Cute Critters and Whimsical Designs
Ready to get a *little* more adventurous, but still keep it firmly in the "cute" category? How about turning your pumpkin into a different kind of character? Think beyond just faces. You could carve out simple shapes to make a friendly ghost silhouette, or maybe a scattering of stars and moons. Polka dots are surprisingly easy and look fantastic, especially if you vary the size of the holes. If you're feeling a bit more ambitious, a simple outline of a friendly bat or a little spider (the cute kind, not the creepy kind) can be etched onto the surface without cutting all the way through. Remember, the goal here is sweet, not spooky.
Here are a few cute character ideas:
- Friendly ghost outline
- Scattered stars and moons
- Simple polka dot patterns
- Cute bat or spider etching
- Goofy monster with mismatched eyes
Using Tools Creatively: Etching and Simple Cut-outs
You don't always need to cut completely through the pumpkin wall to create cool effects. Etching, where you just scrape away the top layer of skin, can create really subtle and sweet designs. You can draw intricate patterns, create shading, or add details like whiskers or eyelashes to your cute faces. Cookie cutters aren't just for baking! You can gently tap cookie cutters into the pumpkin wall (don't hammer them) to make perfect little shapes like stars, hearts, or tiny leaves. This is a fantastic trick for adding consistent, cute elements without freehand carving. It's all about using your tools smartly to achieve those adorable pumpkin carving ideas.
Beyond the Grin: More Cute Pumpkin Carving Ideas & Lighting Tricks

Beyond the Grin: More Cute Pumpkin Carving Ideas & Lighting Tricks
Thinking Outside the Orange Sphere
so you've mastered the simple faces and basic cut-outs. Feeling a bit bolder? Let's push those pumpkin carving ideas cute factor a little further. How about carving a scene instead of just a face? You could depict a little mouse peeking out of a carved hole, or maybe a friendly squirrel burying a nut (a real one, perhaps?). Silhouettes work great here – a line of cute little ducklings following their mother, or a couple of lovebirds on a branch. You can use different depths of carving to create dimension; carve shallow for outlines and deeper for full cut-outs. Mini pumpkins aren't just for decoration; you can carve tiny, adorable faces on them or even stack them for a whimsical look. Imagine a family of tiny carved pumpkins sitting beside your main one. It's simple, effective, and undeniably cute.
Shining a Light on Cuteness
The right light can totally change how your pumpkin carving ideas cute designs look at night. Forget traditional candles if you're worried about safety or uneven light. LED tea lights are your best friend here. They're battery-operated, safe, and give off a steady glow. You can even find ones that flicker like real candles. For a different effect, try string lights – you can poke small holes around your design and thread tiny fairy lights through them for a magical, twinkling look. Want to add color? Pop a piece of colored cellophane inside before you add the light source. A pink or blue glow behind a carved bunny or star pattern makes it even more charming. Experiment with where you place the light inside the pumpkin too; sometimes placing it off-center highlights different parts of your design.
Lighting Options for Cute Pumpkins:
- LED tea lights: Safe, steady, come in various colors.
- Flickering LED lights: Mimic real candles without the fire risk.
- String lights: Create a twinkling, magical effect.
- Colored cellophane: Adds a pop of color to the glow.
- Mini flashlights: Provide a stronger, more directed beam.
Keeping Your Cute Pumpkin Carving Ideas Looking Fresh
Keeping Your Cute Pumpkin Carving Ideas Looking Fresh
Give Your Pumpkin a Spa Treatment
you've put in the work, created some truly adorable pumpkin carving ideas, and now you want them to last longer than a day and a half, right? The enemy is dehydration and mold. Think of your carved pumpkin like a cut fruit – it starts to break down the minute you expose the inside to air. A simple trick is to give it a little moisture boost. Once you're done carving, you can spray the cut edges and the inside with a mix of water and a tiny bit of bleach (like one teaspoon of bleach per quart of water). This helps kill mold spores. Or, a less harsh method is just plain water. Keep a spray bottle handy and mist it daily, especially the cut surfaces. Another old-school tip is rubbing petroleum jelly (Vaseline) on all the cut edges. It creates a barrier that slows down moisture loss. It feels a bit weird, but it works surprisingly well to keep those cute details from shriveling up.
Location, Location, Location (and Maybe the Fridge)
Where you put your carved pumpkin makes a huge difference in how long it lasts. Direct sunlight is a killer. It dries out the pumpkin super fast. Rain and moisture are also bad news, encouraging mold and rot. Find a cool, dry, shaded spot on your porch or step. If you're having a heatwave, or you carved it way ahead of Halloween, the fridge is your best friend. Seriously. Pop your carved pumpkin in a large plastic bag or wrap it tightly in plastic wrap and put it in the refrigerator. It sounds extreme, but it will significantly extend its life. Just remember to take it out a little while before guests arrive so it can warm up a bit. A cool garage or basement is also better than a sunny windowsill.
Here are some ways to help your carved pumpkin last:
- Mist cut surfaces daily with water or a weak bleach solution.
- Apply petroleum jelly to cut edges to seal in moisture.
- Keep the pumpkin out of direct sunlight.
- Protect it from rain and excessive moisture.
- Store it in a cool, dry place, like a porch, garage, or even the fridge.
Wrap-Up: Your Cute Pumpkin Masterpiece Awaits
So there you have it. Turning a plain old pumpkin into something genuinely cute doesn't require professional sculpting skills or a workshop full of power tools. With a decent knife, a bit of patience, and maybe a stencil or two, you can create something charming that won't terrify the trick-or-treaters. Remember, the goal is to have some fun, not to win an art prize. Pick a design you like, take your time, and don't sweat the small stuff. Even a slightly wobbly smile or an uneven polka dot adds character. And with a few simple tricks, you can keep your adorable creation looking decent right through Halloween night. Go grab a pumpkin and give it a try. Worst case, you have a slightly less-than-perfect but still homemade decoration. Best case, you've got the cutest pumpkin on the block.