Table of Contents
Halloween 2021 is creeping closer, and that means it's time to unleash your inner artist (and maybe a little bit of your inner mad scientist) on a poor, unsuspecting pumpkin. Forget those basic triangle eyes and goofy grins! This year, we're diving headfirst into the realm of truly terrifying pumpkin carving ideas 2021 scary enough to make the neighborhood kids think twice before trick-or-treating at your door. Think beyond the traditional jack-o'-lantern. We're talking intricate zombie faces, menacing monster grins, and designs so detailed they'll look like they jumped straight out of a horror movie. But don't worry, you don't need to be a professional sculptor to achieve pumpkin-carving greatness. We'll break down everything from essential tools to step-by-step techniques, ensuring even beginners can create a show-stopping, scream-inducing masterpiece. So, grab your carving kit, fire up your imagination, and get ready to transform an ordinary gourd into a chilling Halloween spectacle. Let's get carving!
Embracing the Dark Side: Scary Pumpkin Faces for 2021

Embracing the Dark Side: Scary Pumpkin Faces for 2021
Classic Horror Icons Reimagined
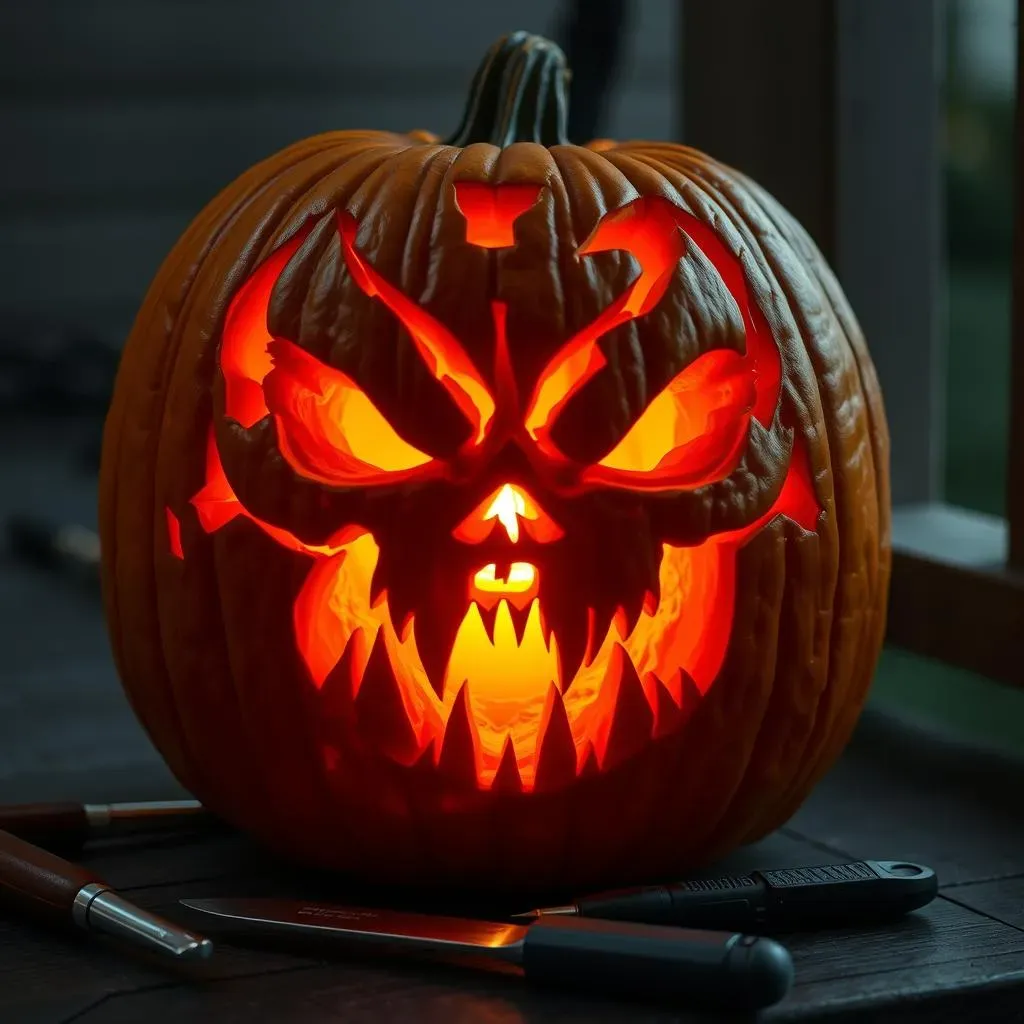
Let's kick things off with the heavy hitters, the horror icons that never go out of style. Think beyond just Frankenstein's monster (though a well-executed Frankenstein is always a win). Consider Dracula with his menacing fangs, a ghostly apparition floating ethereally, or even a disturbing Pennywise grin. The key here is detail. Don't just slap on a basic outline; really focus on capturing the essence of these characters through intricate carving.
I remember one year, I tried to carve a super realistic Freddy Krueger face. It was ambitious, I'll admit, but the result was terrifyingly awesome. I used a combination of carving and etching to get the burned skin texture just right. It took forever, but the reactions I got from the trick-or-treaters were totally worth it. Embrace the challenge!
Icon | Key Features | Carving Tips |
|---|---|---|
Dracula | Sharp fangs, piercing eyes, widow's peak | Use thin cuts for fangs, create depth around the eyes for a haunting look. |
Frankenstein's Monster | Bolt neck, heavy brow, stitched scars | Exaggerate features, use thick lines for a blocky, monstrous feel. |
Ghost | Ethereal, flowing shape, empty eye sockets | Focus on creating a wispy, translucent effect with varying depths of carving. |
Modern Monster Mashups
so maybe you're not feeling the classics. No problem! The beauty of scary pumpkin faces is that you can get as creative and bizarre as you want. Think about the monsters that have been haunting your nightmares lately. Is it the creepy creatures from the latest horror flick? Maybe a twisted take on a popular video game villain? The possibilities are endless.
One idea that's been brewing in my mind is a pumpkin carving inspired by a particularly unsettling scene from a psychological thriller. The goal is to capture the feeling of unease and dread through the carving itself, using distorted shapes and unsettling expressions. It's all about pushing the boundaries of what a "scary" pumpkin face can be.
Beyond the Basic JackO'Lantern: Creative Scary Pumpkin Carving Ideas

Beyond the Basic JackO'Lantern: Creative Scary Pumpkin Carving Ideas
3D Pumpkin Projections: Illusion Carving
Forget flat, two-dimensional carvings! Let's talk about creating the illusion of depth and dimension on your pumpkin. This involves strategically carving away layers of the pumpkin's flesh to create shadows and highlights. Think about carving a zombie hand reaching out from inside the pumpkin, or a gaping maw filled with rows of jagged teeth. The goal is to trick the eye and make your pumpkin appear to leap off the porch.
One technique I've experimented with is using light to enhance the 3D effect. By placing a light source inside the pumpkin at a specific angle, you can create dramatic shadows that emphasize the depth of your carving. It takes some trial and error to get it right, but the result is seriously impressive.
Here's what you'll need:
- Pumpkin
- Carving tools (knives, gouges, saws)
- Pencil or marker
- Reference images
- Light source (LED or flashlight)
Pumpkin within a Pumpkin: The Cannibal Carving
This one's a bit meta, a bit morbid, and a whole lot of fun. The idea is simple: carve a larger pumpkin to look like it's devouring a smaller pumpkin. You can get as creative as you want with the details. Maybe the larger pumpkin has a monstrous grin and is dripping with pumpkin "guts." Or perhaps the smaller pumpkin is screaming in terror. The possibilities are endless.
I saw a particularly gruesome example of this a few years back where the artist had actually hollowed out the smaller pumpkin and filled it with fake blood. When the larger pumpkin "ate" the smaller one, the blood oozed out. It was definitely not for the faint of heart, but it was undeniably effective.
Stencils are so last year: Freehand Fear
I know stencils are tempting, but seriously, ditch them! Embrace the chaos, unleash your inner artist, and carve freehand. It's a lot less intimidating than it sounds. Start with a simple sketch on the pumpkin's surface, then let your carving tools guide you. Don't be afraid to make mistakes; they can often lead to unexpected and awesome results.
I find that the best way to approach freehand carving is to just start. Don't overthink it. Pick a design, grab your tools, and go for it. The more you practice, the better you'll get. And who knows, you might just discover a hidden talent for pumpkin artistry.
Technique | Description | Difficulty |
|---|---|---|
3D Projection | Creating depth through layered carving. | Advanced |
Cannibal Pumpkin | Carving a larger pumpkin eating a smaller one. | Intermediate |
Freehand Carving | Carving without a stencil. | Beginner to Advanced |
Tools of Terror: Essential Gear for Scary Pumpkin Carving

Tools of Terror: Essential Gear for Scary Pumpkin Carving
The Surgeon's Kit: Knives, Saws, and Gouges
Alright, aspiring pumpkin surgeons, let's talk tools! You can't just go at a pumpkin with a butter knife and expect to create a masterpiece of horror. You need the right instruments for the job. Think of it like this: you wouldn't perform surgery with a rusty spoon, would you? ( maybe a zombie surgeon would, but that's beside the point). We need precision, control, and a touch of maniacal glee. Start with a good carving kit – those cheap plastic ones are okay for kids, but for serious scary pumpkin carving, you'll want something sturdier. Look for kits with a variety of saws for different thicknesses, small gouges for detail work, and a good, sharp knife for clean cuts. Trust me, your patience (and your fingers) will thank you.
Personally, I'm a big fan of those little linoleum cutters. They're designed for carving into soft materials, and they work wonders on pumpkin flesh. Plus, they're super affordable and easy to find at most craft stores. Don't be afraid to experiment with different tools and find what works best for you. It's all part of the fun.
Tool | Purpose | Why You Need It |
|---|---|---|
Serrated Pumpkin Saw | Cutting out large sections and intricate details. | Provides control and prevents slipping. |
Small Gouges | Creating fine details and textures. | Allows for precise carving and shaping. |
Paring Knife | Making clean, straight cuts. | Essential for creating sharp edges and outlines. |
StepbyStep: Mastering Advanced Scary Pumpkin Carving Techniques
StepbyStep: Mastering Advanced Scary Pumpkin Carving Techniques
Transferring Your Terrifying Vision: Stencils vs. Freehand
Alright, so you've got your tools, you've got a pumpkin staring back at you, now what? Time to get that design onto the gourd! You've got two main options here: stencils or freehand. Stencils are great for beginners or if you're tackling a particularly complex design. You can find tons of free scary pumpkin carving stencils online. Print one out, tape it to your pumpkin, and use a poking tool to transfer the design onto the surface. Easy peasy! For those feeling a bit more adventurous, freehand is the way to go. Sketch your design directly onto the pumpkin with a marker or pencil. Don't worry about being perfect; embrace the imperfections! They'll add character to your scary creation.
I will say, even if you're planning on going freehand, it's not a bad idea to sketch out a rough stencil on paper first. It helps to visualize the design and work out any potential problems before you commit to carving.
- Stencils: Great for beginners, precise designs.
- Freehand: More creative freedom, unique results.
- Hybrid: Use stencils as a base, then add freehand details.
The Art of Controlled Chaos: Carving Techniques
design's on the pumpkin, time to get carving! Remember, patience is key here. Don't try to rush things, or you'll end up with a mangled mess. Start by carving out the smaller, more intricate details first. This will help you avoid accidentally damaging larger sections later on. Use a sawing motion with your carving tools, and always cut away from yourself (safety first, people!). Vary the depth of your cuts to create shadows and highlights. This is what will really make your scary pumpkin carving pop. Think about carving some areas all the way through, while leaving others only partially cut to create a translucent effect.
I've found that it helps to have a bowl of water nearby to dip your tools in occasionally. This keeps the pumpkin flesh from sticking to the blades and makes carving a lot smoother. Also, don't be afraid to take breaks! Carving can be tiring, and a fresh perspective can help you avoid mistakes.
Here's a quick tip: If you accidentally cut off a piece that you didn't mean to, don't panic! You can usually reattach it with toothpicks. Just make sure to insert them at an angle so they're less visible.
Illuminating the Horror: Lighting and Presentation
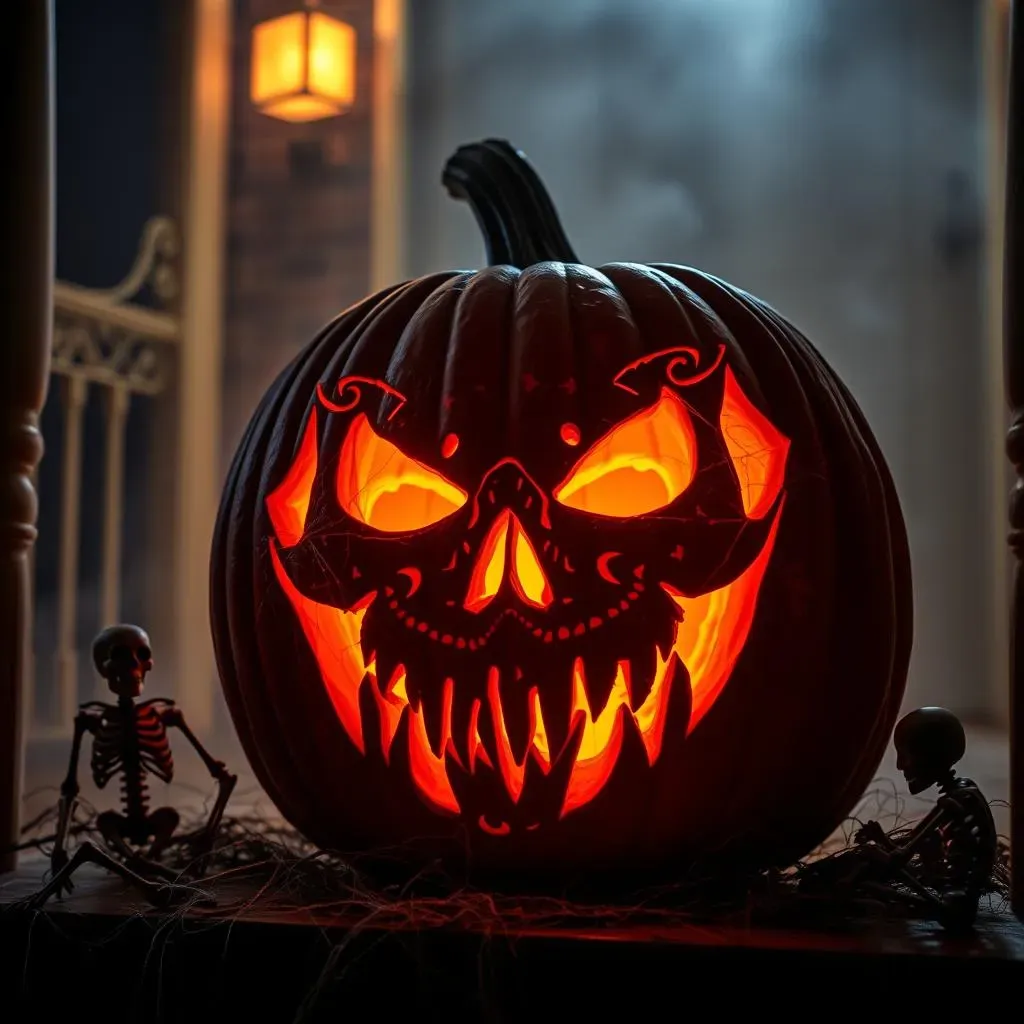
You've spent hours carving your masterpiece; don't let it go unnoticed! Lighting is crucial for showcasing your scary pumpkin carving. A simple tea light can work in a pinch, but for a truly dramatic effect, consider using an LED light. They're brighter, last longer, and don't produce heat, which can dry out your pumpkin. Experiment with different colors of light to create different moods. A green light can give your pumpkin a sickly, undead glow, while a red light can make it look like it's burning from within.
I'm personally a fan of using flickering LED candles. They add a realistic flame effect that really enhances the spooky atmosphere. As for presentation, think about where you're going to display your pumpkin. A well-lit porch is always a good choice, but you could also get creative and hang your pumpkin from a tree or place it in a graveyard scene in your front yard. The possibilities are endless!
Showcasing Your Scary 2021 Pumpkin Carving Masterpieces
Showcasing Your Scary 2021 Pumpkin Carving Masterpieces
The Grand Reveal: Presentation is Key
Alright, you've poured your heart and soul (and maybe a little pumpkin guts) into creating a truly terrifying masterpiece. Now, it's time to show it off! But simply plopping your pumpkin on the porch isn't going to cut it. We need to think about presentation. Think of it like a red carpet event for your gourd. How can you make it stand out and grab attention? Lighting, as we discussed earlier, is crucial. But also consider the setting. Is your porch well-lit? Does it have any spooky decorations already? If not, maybe it's time to add some cobwebs, skeletons, or even a fog machine to create the perfect eerie ambiance.
I always like to take photos of my pumpkins at night, with the lights on, to capture the full effect. And don't forget to share your creations on social media! Use relevant hashtags like #Halloween #PumpkinCarving #ScaryPumpkins #Halloween2021 to get your work seen by other Halloween enthusiasts. You might even inspire someone else to try their hand at scary pumpkin carving!
Element | Description | Impact |
|---|---|---|
Lighting | Strategic placement of lights to highlight details. | Creates drama and enhances the spooky atmosphere. |
Setting | Decorations and props surrounding the pumpkin. | Adds context and reinforces the theme. |
Photography | Capturing high-quality images of your creation. | Allows you to share your work and inspire others. |
The Digital Haunt: Sharing Your Creations Online
In today's digital age, showcasing your scary 2021 pumpkin carving masterpieces goes beyond just your front porch. The internet is your playground! Share your creations on platforms like Instagram, Pinterest, and even TikTok for maximum exposure. When posting, be sure to use relevant hashtags such as #PumpkinCarving, #HalloweenDecor, and #DIYHalloween to reach a wider audience. Engage with other users' posts, leave comments, and participate in online carving contests to connect with fellow Halloween enthusiasts and showcase your skills. You never know, your pumpkin might just go viral!
Pro-tip: create a short video showcasing the carving process or a time-lapse of your pumpkin glowing at night. These types of visuals tend to perform well on social media and can help you gain more followers and recognition for your work. And most importantly, don't forget to have fun and let your creativity shine through!
Unleash the Spirits: Your Scary Pumpkin Carving Legacy
As the last sliver of pumpkin flesh falls away, and your masterpiece stands illuminated in the eerie glow of Halloween night, take pride in your creation. You've not only mastered the art of scary pumpkin carving, but you've also contributed to the time-honored tradition of spooking and delighting all who dare to cross your haunted threshold. Whether you went for gruesome gore or subtly sinister smiles, your 2021 pumpkin is a testament to your creativity and dedication to the spirit of Halloween. So, light a candle, step back, and bask in the glow of your terrifying triumph. Happy haunting!