Table of Contents
Halloween is creeping closer, and that means it's pumpkin carving season! But who says every jack-o'-lantern needs to be a terrifying monster? If you're looking for some fun, family-friendly ways to decorate your pumpkins this year, you've come to the right place. This article is packed with not scary pumpkin carving ideas that are perfect for kids, beginners, or anyone who prefers a touch of sweetness over spine-chilling scares. We'll explore delightful designs, from cute animal faces to whimsical patterns, offering a refreshing alternative to the usual ghouls and goblins. Get ready to unleash your creativity and transform your pumpkins into charming works of art. We'll cover easy-to-master techniques and provide inspiration for unique decorations that will make your doorstep the talk of the town – in a good way! So, grab your carving tools and let's dive into a world of pumpkins that are more adorable than alarming.
Delightful Designs: Embracing Not Scary Pumpkin Carving Ideas
Delightful Designs: Embracing Not Scary Pumpkin Carving Ideas
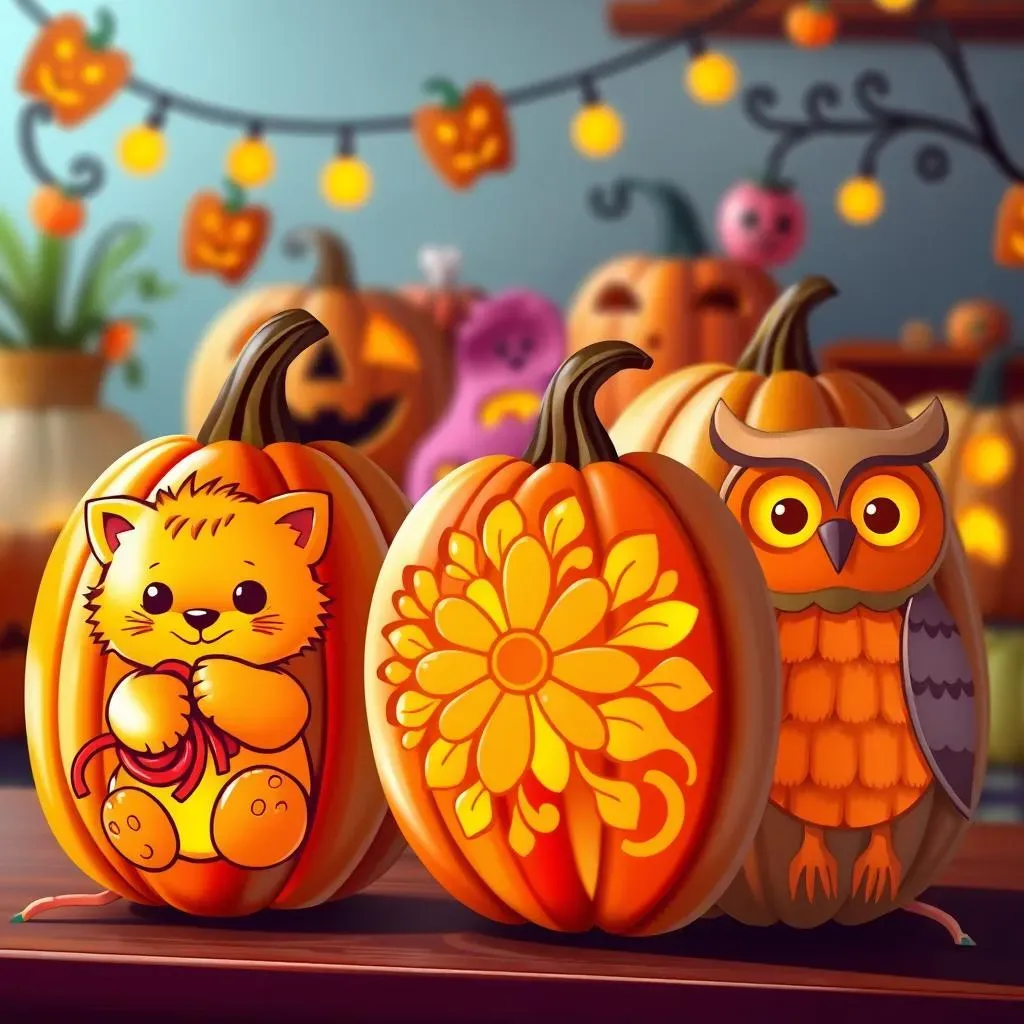
Cute Characters and Creatures
Forget the fangs and googly eyes! When it comes to not scary pumpkin carving ideas, adorable animals and beloved characters are always a hit. Think fluffy kittens with yarn balls, playful puppies with wagging tails, or even a cheerful family of ducks waddling across your pumpkin. Cartoon characters are another fantastic option. From Mickey Mouse to Winnie the Pooh, these familiar faces bring instant smiles and create a warm, welcoming vibe. The key is to focus on soft features, gentle expressions, and bright, inviting colors. These pumpkins are guaranteed to be a neighborhood favorite!
Consider carving a friendly owl with big, round eyes, a happy hedgehog munching on an apple, or a sweet little bunny with floppy ears. For a personal touch, you could even carve your pet's likeness onto a pumpkin. Imagine the delight of your kids (or yourself!) seeing their furry friend immortalized in pumpkin form. It's a fun way to celebrate your love for animals and add a unique, heartwarming touch to your Halloween decorations.
Whimsical Patterns and Shapes
Beyond characters, there's a whole world of not scary pumpkin carving ideas centered around whimsical patterns and shapes. Think polka dots, stars, swirls, and even geometric designs. These options are not only visually appealing but also relatively easy to execute, making them perfect for beginner carvers. Plus, they offer a chance to get creative with different carving depths and lighting techniques to create stunning effects.
Imagine a pumpkin adorned with delicate floral patterns, twinkling stars scattered across its surface, or a mesmerizing spiral design that draws the eye. You could even try carving out simple shapes like hearts, moons, or even musical notes. The possibilities are endless! These patterned pumpkins add a touch of elegance and sophistication to your Halloween decor, proving that you don't need to be scary to be stylish.
Design Idea | Difficulty Level | Best For |
|---|---|---|
Polka Dots | Easy | Beginners, Kids |
Stars | Easy | All Skill Levels |
Swirls | Medium | Intermediate Carvers |
Floral Patterns | Medium to Advanced | Experienced Carvers |
KidFriendly Carving: Easy and Fun Not Scary Pumpkin Faces

KidFriendly Carving: Easy and Fun Not Scary Pumpkin Faces
Simple Shapes for Little Hands
When it comes to kid-friendly carving, simplicity is key. Forget intricate designs that require precision and patience. Instead, focus on basic shapes that are easy for little hands to manage. Think circles, triangles, and squares. These shapes can be combined to create surprisingly expressive and adorable faces. A big circle for the mouth, two triangles for the eyes, and a small square for the nose – voilà, a cute and not scary pumpkin face!
Consider using stencils to guide your little ones. You can find tons of free printable stencils online with simple shapes that are perfect for kids. Or, get creative and draw your own designs directly onto the pumpkin. Just remember to keep it simple and focus on clear, defined lines. The goal is to make the carving process fun and rewarding for your kids, not frustrating and overwhelming.
No-Carve Alternatives: Painting and Decorating
If you're worried about sharp tools and little fingers, there are plenty of no-carve alternatives that are just as fun and festive. Painting is a fantastic option. Let your kids unleash their creativity with colorful paints, glitter, and googly eyes. They can paint silly faces, abstract designs, or even their favorite characters onto the pumpkin. Another option is to use craft supplies like felt, buttons, and pipe cleaners to create unique and whimsical decorations.
Imagine a pumpkin covered in colorful polka dots, adorned with felt ears and a button nose, or decorated with glittery stars and pipe cleaner antennas. The possibilities are endless! No-carve pumpkins are not only safer for kids but also allow for more creative expression. Plus, they last longer since you're not cutting into the pumpkin's flesh.
Safety First: Tips for Carving with Kids
If you do decide to carve pumpkins with your kids, it's essential to prioritize safety. First and foremost, always supervise your children closely. Never let them handle sharp tools unsupervised. Consider using kid-friendly carving tools that are designed with safety in mind. These tools typically have rounded edges and are easier for little hands to grip.
Another important tip is to prepare the pumpkin beforehand. Clean out the insides and thin the walls to make it easier for your kids to carve. You can also draw the design onto the pumpkin yourself to provide a clear guide for your children to follow. Remember to take breaks often and keep the mood light and fun. The goal is to create a memorable and enjoyable experience for everyone involved.
Safety Tip | Description |
|---|---|
Supervise Closely | Always watch children when carving. |
Use Kid-Friendly Tools | Rounded edges and easy-grip handles are key. |
Prepare the Pumpkin | Thin walls and pre-drawn designs help. |
Take Breaks | Avoid fatigue and keep it fun! |
Beyond the Ghoul: Unique and Creative Pumpkin Decorating Ideas
Beyond the Ghoul: Unique and Creative Pumpkin Decorating Ideas
Painting with Personality: Acrylics, Watercolors, and More
Let's ditch the carving tools for a moment and explore the vibrant world of pumpkin painting! This is where you can truly let your imagination run wild. Acrylic paints are a fantastic choice for bold, opaque colors that really pop. Watercolors, on the other hand, offer a more delicate and translucent effect, perfect for creating subtle gradients and washes. You can even experiment with different painting techniques, like stippling, splattering, or dry brushing, to add texture and visual interest.
Think beyond basic colors! Use metallic paints for a touch of glamour, glow-in-the-dark paints for an eerie nighttime effect, or even chalkboard paint so you can change your pumpkin's design every day. Get inspired by your favorite artists, nature, or even your own imagination. Paint a portrait of your pet, a landscape scene, or an abstract design. The possibilities are endless!
Remember to seal your painted pumpkin with a clear coat of varnish or sealant to protect the paint from the elements and keep your masterpiece looking its best. This will also help prevent the paint from chipping or fading over time.
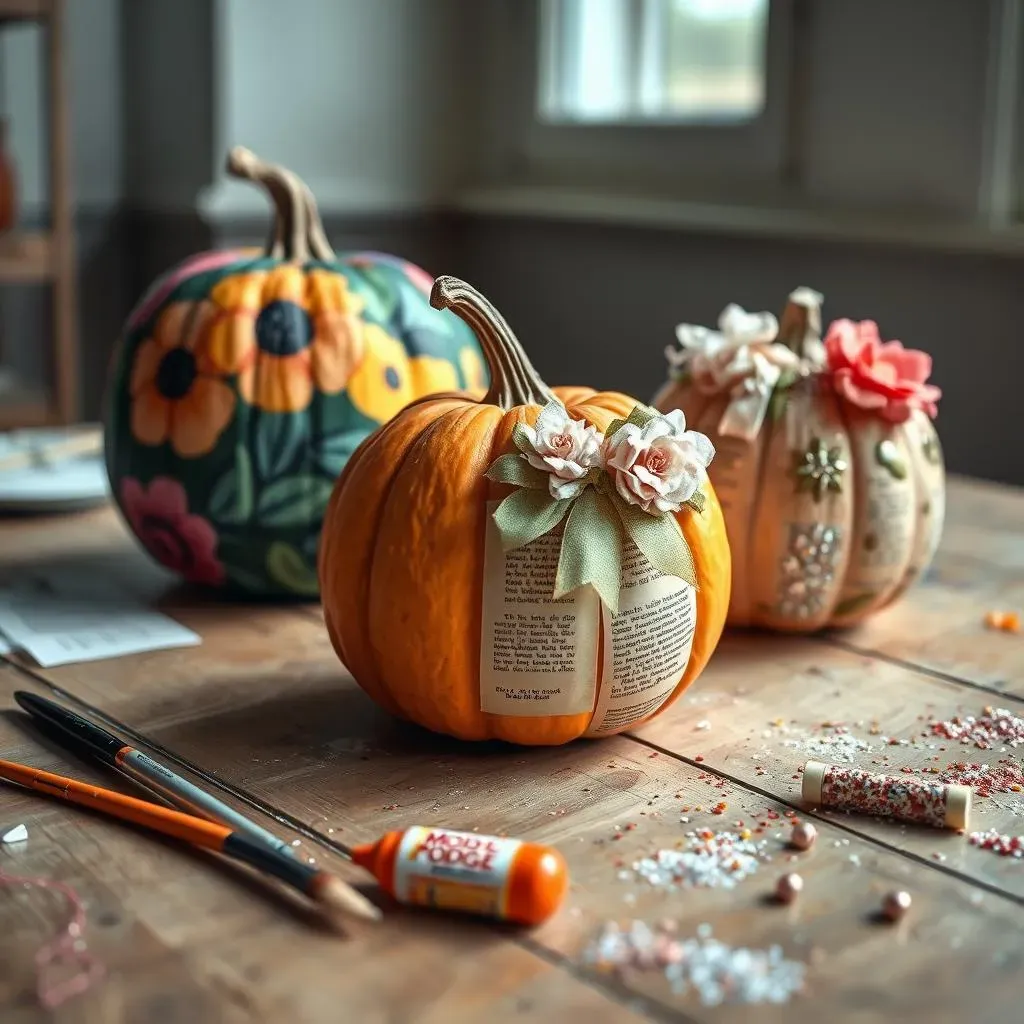
Decoupage Delights: Paper, Fabric, and Mixed Media
Decoupage is another incredibly versatile and fun way to decorate your pumpkins. This technique involves gluing pieces of paper, fabric, or other materials onto the pumpkin's surface to create a collage-like effect. You can use anything from old book pages and newspaper clippings to colorful fabric scraps and patterned napkins. The key is to choose materials that complement each other and create a cohesive design.
Consider using Mod Podge or another decoupage adhesive to glue your chosen materials onto the pumpkin. Apply a thin layer of adhesive to both the back of the material and the pumpkin's surface, then carefully press the material into place. Smooth out any wrinkles or bubbles with your fingers or a soft cloth. Once the adhesive is dry, seal the entire pumpkin with another layer of Mod Podge to protect the decoupage and give it a glossy finish.
Material | Best For | Tips |
|---|---|---|
Old Book Pages | Vintage, Rustic Look | Tear edges for a weathered effect. |
Fabric Scraps | Colorful, Textured Designs | Use different patterns and textures. |
Patterned Napkins | Delicate, Intricate Details | Peel off the backing layers before gluing. |
Embellishments and Accents: Adding Sparkle and Shine
Don't underestimate the power of embellishments! Adding a few well-chosen accents can take your pumpkin from ordinary to extraordinary. Think glitter, sequins, beads, ribbons, and even faux flowers. These embellishments can be used to highlight certain features, add texture, or simply create a touch of sparkle and shine. Get creative and experiment with different combinations to see what works best for your design.
Consider using hot glue or craft glue to attach your embellishments to the pumpkin. Be careful when using hot glue, especially if you're working with kids. Always supervise them closely and make sure they understand how to use the glue gun safely. For smaller embellishments, like sequins and beads, you can use a toothpick or tweezers to apply them precisely.
Remember to think about the overall theme and color scheme of your pumpkin when choosing embellishments. If you're going for a rustic look, consider using natural materials like twigs, leaves, and pinecones. If you want a more glamorous look, opt for glitter, sequins, and metallic accents. The key is to have fun and let your personality shine through!
Tools and Techniques: Mastering Not Scary Pumpkin Carving
Tools and Techniques: Mastering Not Scary Pumpkin Carving
Gathering Your Carving Arsenal
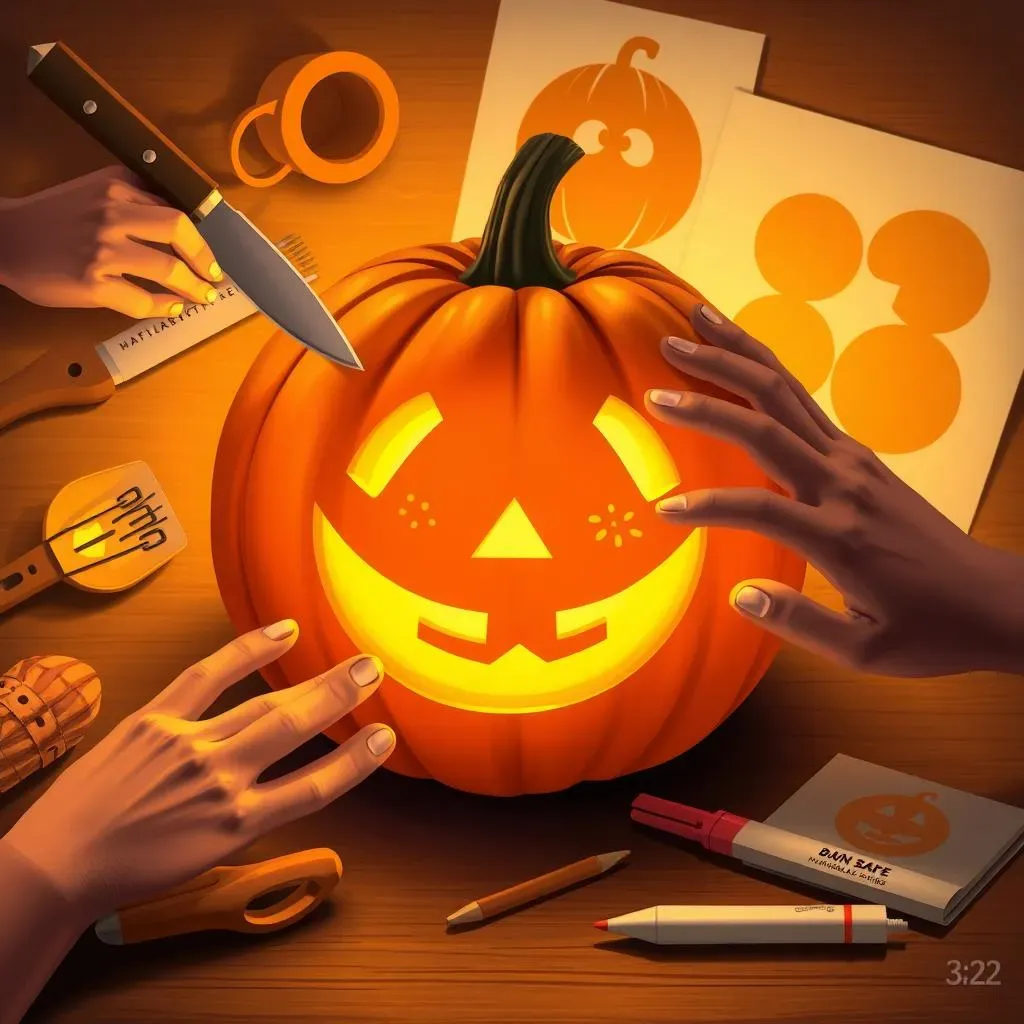
Before you even think about making that first cut, you need the right tools! Forget those flimsy plastic pumpkin carving kits you find at the grocery store. For serious, not scary pumpkin carving, invest in a few quality tools that will make the process easier, safer, and more enjoyable. A serrated knife is essential for cutting the lid and thinning the pumpkin walls. A scoop is a must for removing all those stringy guts. And a set of detail carving tools, with various shapes and sizes, will allow you to create intricate designs with precision.
Consider also investing in a pumpkin carving stencil kit. These kits come with a variety of pre-designed stencils that you can tape onto your pumpkin and use as a guide for carving. They're perfect for beginners or anyone who wants to create a professional-looking design without having to freehand it. Also, don't forget about lighting! A battery-operated candle or LED light is a safer and more convenient alternative to a traditional flame candle. They come in a variety of colors and can even flicker like a real candle, adding a touch of ambiance to your pumpkin display.
The Art of the Outline: Stencils and Freehanding
Once you have your tools, it's time to transfer your design onto the pumpkin. If you're using a stencil, simply tape it onto the pumpkin and use a poking tool or marker to trace the design onto the surface. If you're feeling more adventurous, you can try freehanding your design. Use a washable marker to sketch your design directly onto the pumpkin. Don't be afraid to make mistakes! You can always erase the marker and start over. The key is to have a clear idea of what you want to create before you start carving.
When freehanding, start with basic shapes and gradually add more detail. Use reference photos or drawings to guide you. And remember, practice makes perfect! The more you carve, the better you'll become at creating intricate and beautiful designs. Whether you choose to use a stencil or freehand your design, take your time and be patient. Rushing the process will only lead to mistakes and frustration.
Tool | Purpose | Tips |
|---|---|---|
Serrated Knife | Cutting Lid, Thinning Walls | Use a sawing motion. |
Scoop | Removing Guts | Scrape thoroughly. |
Detail Carving Tools | Intricate Designs | Use a variety of shapes and sizes. |
Poking Tool | Transferring Stencils | Poke holes close together. |
Carving Techniques: From Simple Cuts to Intricate Details
Now for the fun part: carving! Start by making small, controlled cuts. Don't try to cut all the way through the pumpkin in one go. Instead, use a sawing motion to gradually cut through the flesh. For larger areas, you can use a larger knife. For smaller details, switch to a detail carving tool. Remember to always cut away from yourself to avoid accidents. If you're carving with kids, make sure they're supervised at all times and using kid-friendly carving tools.
As you carve, periodically clean out the pumpkin to remove any excess pulp or seeds. This will make it easier to see your progress and prevent the pumpkin from becoming too heavy. Also, don't be afraid to experiment with different carving depths. Carving deeper in some areas and shallower in others can create interesting shadows and highlights. And finally, remember to have fun! Pumpkin carving is a creative and rewarding activity. So relax, enjoy the process, and let your imagination run wild.
Farewell Frights, Hello Fun: Your Pumpkin Carving Adventure Awaits!
So, there you have it – a treasure trove of not scary pumpkin carving ideas to light up your Halloween with smiles instead of screams. From adorable animals to playful patterns, we've shown you how to transform a simple pumpkin into a delightful work of art. Remember, the most important thing is to have fun and let your creativity shine. Gather your family, grab your tools, and get ready to carve some unforgettable memories. Happy carving, and may your Halloween be filled with joy, laughter, and pumpkins that are anything but scary!