Table of Contents
Ready to ditch the basic jack-o'-lantern and create something truly spectacular this Halloween? This article is your guide to the world of intricate pumpkin carving ideas for adults. We'll take you beyond simple designs, exploring advanced techniques and breathtaking inspiration to transform ordinary pumpkins into stunning works of art. Get ready to elevate your Halloween decorations from "cute" to "show-stopping." First, we'll cover essential techniques that will give you the confidence to tackle even the most complex designs. Next, we'll dive into a gallery of stunning intricate pumpkin carving ideas, offering a wide range of styles and skill levels. Finally, we'll challenge you with advanced projects to push your creative boundaries and create truly unique and memorable Halloween masterpieces. So gather your tools, embrace your creativity, and let's get carving!
Mastering Intricate Pumpkin Carving Techniques for Adults
Choosing the Right Pumpkin and Tools
Picking the perfect pumpkin is half the battle! Look for a pumpkin that's firm, symmetrical, and free of bruises. A larger pumpkin gives you more canvas for intricate designs, but smaller ones are easier to manage for beginners. Remember, a perfectly smooth surface makes carving easier. Check out our guide on advanced pumpkin carving tools to see what you'll need. You'll want a variety of carving tools, from small detail knives for fine work to larger saws for removing bigger sections. Don't forget a good scoop for cleaning out the inside!
Once you've got your pumpkin and tools, it's time to sketch your design. Don't be afraid to experiment! Start with simpler designs if you're new to intricate carving. Many find tracing stencils onto the pumpkin helpful. You can find lots of free stencils online or even create your own using printable templates. Remember, practice makes perfect – even simple designs require precision.
Tool | Use |
|---|---|
Small detail knives | Fine lines and intricate details |
Larger saws | Removing large sections of pumpkin |
Scoop | Cleaning out the inside of the pumpkin |
Essential Carving Techniques for Intricate Designs
Start by carefully cutting a hole in the top of the pumpkin, large enough to easily access the inside. Then, thoroughly clean out the seeds and pulp. This is crucial for preventing rot and ensuring a long-lasting masterpiece. For intricate designs, think about layering. Carving in stages, starting with the larger elements and then moving to smaller details, is key. This prevents mistakes and allows you to make adjustments as you go.
Remember to work slowly and deliberately. Rushing can lead to mistakes and injuries. Use a steady hand and take your time with each cut. If you make a mistake, don't panic! Often, you can incorporate the mistake into the design, turning a mishap into a unique feature. For incredibly detailed work, consider using intricate pumpkin carving patterns as a guide. And don't be afraid to experiment with different techniques—the possibilities are endless!
- Plan your design carefully
- Work in stages, starting with larger elements
- Use a steady hand and take your time
- Don't be afraid to experiment
Stunning Intricate Pumpkin Carving Designs for Adults: Inspiration and Ideas
Stunning Intricate Pumpkin Carving Designs for Adults: Inspiration and Ideas
Nature-Inspired Designs
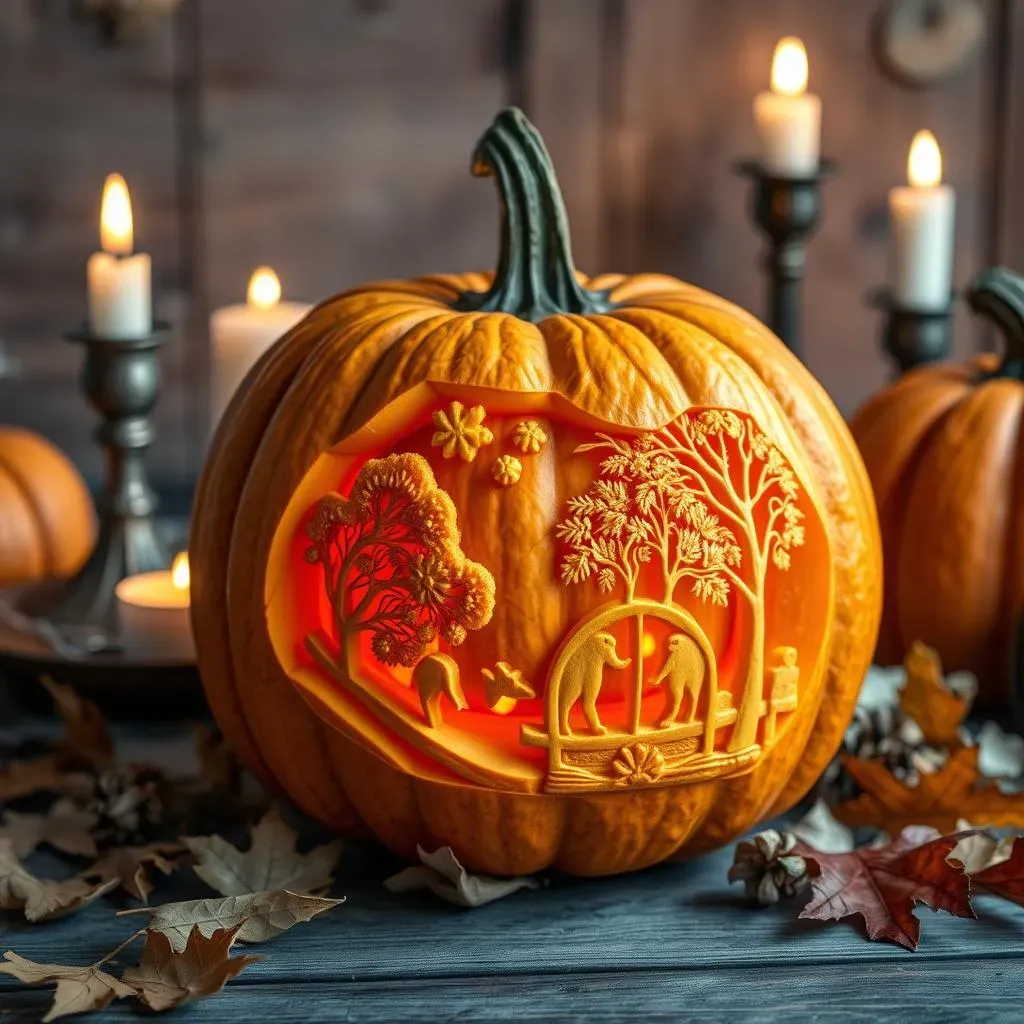
Think beyond spooky faces! Nature offers a wealth of intricate pumpkin carving inspiration. Imagine a detailed autumnal scene with falling leaves, intricately carved acorns, or even a miniature forest complete with tiny trees and mushrooms. The possibilities are as limitless as your imagination. For some truly stunning examples and patterns, check out our collection of intricate pumpkin carving patterns. These patterns can easily be adapted to create unique and beautiful designs. Remember, even a simple flower can become a masterpiece with careful carving.
For those who love a challenge, consider carving a realistic animal. A majestic owl, a playful squirrel, or even a delicate hummingbird would be a stunning addition to your Halloween display. Using various carving tools to create texture and depth will make your animal designs come alive. Need more ideas? Browse our advanced Halloween pumpkin designs for more inspiration.
- Autumnal scenes (leaves, acorns, mushrooms)
- Realistic animals (owls, squirrels, hummingbirds)
- Floral designs (roses, sunflowers, lilies)
Geometric and Mandala Designs
If you prefer a more structured approach, geometric and mandala designs offer a fantastic way to showcase your precision carving skills. Intricate patterns featuring repeating shapes, lines, and curves can create stunning optical illusions when lit from within. These designs often involve lots of small, precise cuts, which can be very satisfying to create. The symmetrical nature of these designs also makes them easier to plan and execute.
Consider using a stencil or template to create a perfectly symmetrical mandala. The repetitive nature of the design allows you to focus on perfecting your technique with each individual element. Once you've mastered the basics, experiment with different tools and techniques to add texture and depth to your design. You can find many free templates online or even design your own using geometric software. For extra intricate designs check out our complex pumpkin carving designs gallery for inspiration.
Design Type | Characteristics | Skill Level |
|---|---|---|
Geometric | Repeating shapes, lines, angles | Intermediate to Advanced |
Mandala | Symmetrical, circular patterns | Advanced |
Pop Culture and Fantasy Themes
For those who love pop culture or fantasy, the possibilities are endless! Carve your favorite movie character, a mythical creature, or a scene from your favorite book. This is a chance to really let your creativity shine and create a truly unique pumpkin carving. Think about incorporating elements from the source material to add depth and detail to your design.
Remember to consider the level of detail involved when choosing your design. A highly detailed character might require more time and skill than a simpler scene. If you're a beginner, start with a design that's less intricate, and gradually work your way up to more challenging projects. Don't forget to check out some great advanced pumpkin carving ideas for more inspiration. And remember, the most important thing is to have fun and enjoy the process!
Advanced Intricate Pumpkin Carving Projects for Adults: Taking it to the Next Level
Multi-Pumpkin Installations
Once you've mastered individual pumpkin carving, it's time to think bigger! Create a multi-pumpkin installation. Imagine a spooky graveyard scene with several pumpkins carved as tombstones, or a whimsical fairytale village with tiny houses carved into smaller pumpkins. The possibilities are endless! You can use different sizes and shapes of pumpkins to add visual interest and create a dynamic display. For inspiration on complex designs, check out our guide to complex pumpkin carving designs.
Consider using additional materials to enhance your installation. Dried branches, artificial cobwebs, miniature figurines, or even LED lights can add depth and atmosphere. Plan your installation carefully, sketching out a rough design before you start carving. This will help you ensure that your pumpkins are appropriately sized and positioned for the overall effect. Don't be afraid to experiment with different techniques and materials – let your creativity run wild!
- Graveyard scene
- Fairytale village
- Haunted forest
3D Pumpkin Carving
Ready for a real challenge? Take your pumpkin carving to the next dimension with 3D designs. This involves carving not just on the surface of the pumpkin but also into its interior, creating depth and shadow play that brings your design to life. This requires advanced carving skills and a lot of patience, but the results are truly stunning. For inspiration, check out our page on advanced pumpkin carving ideas for some mind-blowing examples.
Start with a simple 3D design, such as a layered flower or a geometric pattern. Use a variety of carving tools to create different textures and depths. Remember to work slowly and carefully, removing small amounts of pumpkin at a time. Lighting is crucial for 3D pumpkin carving. Experiment with different light sources and positions to highlight the details and create the desired effect. For detailed instructions and tips, you might find our advanced pumpkin carving instructions helpful. Remember to take your time; this is about precision and patience.
Technique | Description | Difficulty |
|---|---|---|
Surface Carving | Carving only the pumpkin's outer layer | Beginner |
3D Carving | Carving into the pumpkin's interior | Advanced |