Table of Contents
Halloween's just around the corner, and what better way to celebrate than by transforming ordinary pumpkins into breathtaking works of art? This article is your guide to creating stunning intricate pumpkin carving designs for Halloween. Forget those simple jack-o'-lanterns; we're diving into a world of intricate detail, where pumpkins become canvases for your creativity. We'll walk you through everything you need to know, from selecting the perfect tools and pumpkins to finding inspiration for your design and executing it flawlessly. Whether you're a seasoned carving pro or a complete beginner, you'll find techniques and tips to elevate your pumpkin-carving game. Get ready to unleash your inner artist and create intricate pumpkin carving designs for Halloween that will leave everyone spellbound. Prepare to be amazed by the incredible transformations possible, and discover how easy it is to craft truly unique and memorable Halloween decorations. Let's get started on your spooky masterpiece!
Mastering Intricate Pumpkin Carving Designs for Halloween
Mastering Intricate Pumpkin Carving Designs for Halloween
Understanding the Basics
Before you dive into complex designs, mastering the fundamentals is key. Start with simple patterns to practice your carving techniques. Think of it like learning to write – you wouldn't start with a novel before mastering the alphabet! Practice your cuts, learn to control the depth and precision of your carving tools, and experiment with different techniques. This foundational practice is essential to confidently tackle more intricate designs later. For inspiration on simpler designs, check out some detailed pumpkin carving techniques for beginners.
Once you're comfortable with basic carving, you can start to experiment with different tools. A good set of carving tools is an investment that will pay off handsomely. Different tools are suited for different tasks—some for making detailed cuts, others for removing larger sections of pumpkin flesh. Experiment to find the tools you like best, and don't be afraid to try different approaches. You might also want to check out some advanced pumpkin carving tools for more intricate work.
Tool | Use |
|---|---|
Small Saw | Making initial cuts and removing large sections |
Detail Carving Tools | Creating fine lines and intricate details |
Scoop | Cleaning out the inside of the pumpkin |
Planning Your Design
Don't just jump into carving without a plan! Sketch your design on paper first. This allows you to refine your ideas, experiment with different layouts, and ensure your design fits the size and shape of your pumpkin. Consider the overall aesthetic you want to achieve – spooky, cute, elegant, or something else entirely? This planning stage is crucial for achieving a polished and professional-looking final product. For some extra inspiration, browse through these intricate pumpkin carving designs for Halloween.
Transferring your design to the pumpkin requires precision. You can use a variety of methods, such as tracing the design directly onto the pumpkin skin using a pencil, or using stencils for more complex patterns. Remember, a well-executed transfer is half the battle. Take your time and be careful not to make any mistakes that could ruin your finished piece. For more advanced techniques and ideas, consider reviewing these complex pumpkin carving designs for inspiration.
- Sketch your design on paper.
- Choose a transfer method (pencil, stencil).
- Carefully transfer the design to your pumpkin.
Adding the Finishing Touches
Once you've carved your design, it's time to add those final touches that will really make it shine. Consider adding details like LED lights or strategically placed candles to enhance the glow and create an even more dramatic effect. A well-lit pumpkin will showcase your intricate carving even better. Experiment with different lighting options to see what works best for your design.
Finally, don't forget to protect your masterpiece. A coat of sealant will help prevent your pumpkin from rotting too quickly, extending its life and allowing you to enjoy your creation for a longer period. Consider adding a little bit of extra flair to your pumpkin carving with some of these advanced Halloween pumpkin designs for some extra inspiration. This will ensure your hard work lasts throughout the Halloween season.
Choosing the Right Tools and Intricate Pumpkin Carving Designs for Halloween
Essential Tools for Intricate Carving
Choosing the right tools is crucial for creating those amazing intricate pumpkin carving designs for Halloween. Think of it like baking a cake – you wouldn't try to frost it with a spork, would you? You need the right tools for the job. A basic carving kit usually includes a saw for cutting out large sections, various sizes of gouges for shaping and detailing, and a scoop for gutting the pumpkin. But for truly intricate designs, you'll want to step up your game. Consider investing in some fine detail tools, like those tiny little carving knives used for wood or linoleum. These allow for incredibly precise cuts and will let you add all those tiny flourishes that take your pumpkin from "nice" to "wow!" Check out some advanced pumpkin carving tools to get some ideas.
Beyond the basic carving tools, consider adding some supplementary items to your arsenal. A good quality stencil kit can be a lifesaver when it comes to transferring complex designs. And don't underestimate the power of a few well-placed LED lights. These can dramatically enhance the glow and depth of your carving, bringing your intricate designs to life. For even more ideas, check out these complex pumpkin carving designs and see what tools the artists used.
Tool Type | Specific Tool | Use |
|---|---|---|
Saw | Small Hand Saw | Cutting out large sections |
Gouges | Various Sizes | Shaping and Detailing |
Detail Knives | Small, Precise Blades | Fine Lines and Intricate Details |
Selecting Pumpkins for Intricate Designs
The pumpkin itself plays a huge role in the success of your intricate design. You wouldn't try to paint a masterpiece on a crumpled canvas, would you? Similarly, you need a pumpkin that's the right size and shape for your design. Larger pumpkins offer more surface area for complex patterns, while smaller pumpkins are better suited for simpler, more delicate designs. A well-chosen pumpkin is the foundation of a stunning creation. Look for pumpkins that are firm, smooth, and free of blemishes or soft spots. These are less likely to crack or crumble during the carving process.
Beyond size and condition, consider the shape of your pumpkin. A perfectly round pumpkin is great for symmetrical designs, while a more oblong pumpkin might be better suited for a design that incorporates curves and flowing lines. Don't be afraid to get creative and choose a pumpkin that inspires you! Sometimes an unusual shape can lead to a truly unique and unexpected design. For more inspiration, check out these intricate pumpkin carving designs for Halloween and see what kind of pumpkins were used.
- Assess the pumpkin's size and shape.
- Check for firmness, smoothness, and blemishes.
- Consider the pumpkin's shape in relation to your design.
Stunning Intricate Pumpkin Carving Designs for Halloween: Inspiration and Ideas
Classic Halloween Themes with a Twist
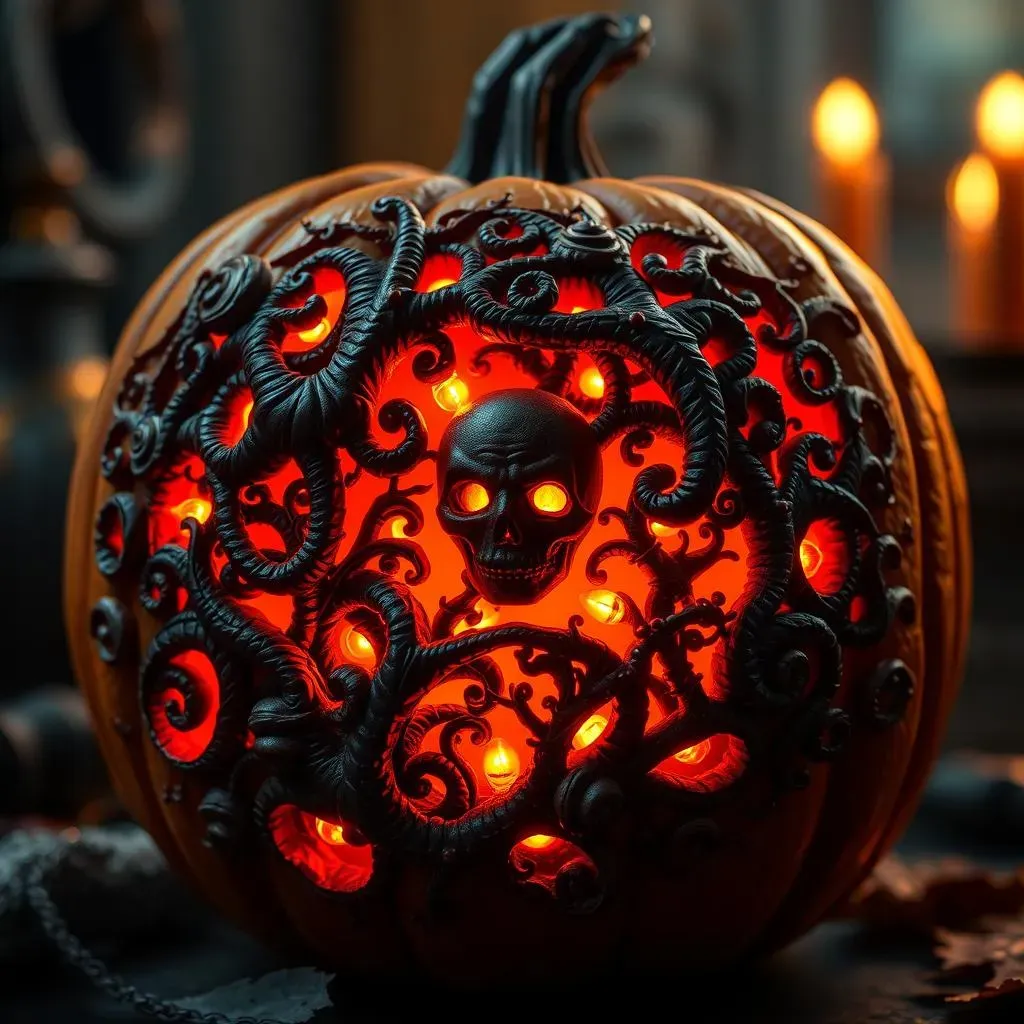
Let's start with the classics! Think spooky skeletons, mischievous witches, and grinning jack-o'-lanterns, but with a modern, intricate spin. Instead of simple outlines, add detailed textures to the bones, intricate patterns to the witch's robes, or a complex, three-dimensional design to the jack-o'-lantern's grin. The key is to elevate the familiar into something truly unique and eye-catching. Don't be afraid to experiment with different levels of depth and shadow to add realism and dimension. For more ideas on classic themes, take a look at some intricate pumpkin carving designs for Halloween featuring classic themes.
Consider adding elements of surprise and whimsy to your classic designs. Maybe your skeleton is playing a tiny violin, or your witch is riding a miniature broomstick. These little details can add personality and charm to your pumpkin, transforming it from a simple carving into a miniature work of art. Remember, the more creative you are with your design, the more likely it is to stand out. For some extra inspiration, check out these detailed pumpkin carving ideas to get started.
- Skeletons playing musical instruments
- Witches riding miniature broomsticks
- Jack-o'-lanterns with intricate 3D features
Nature-Inspired Designs: Leaves, Vines, and More
Nature offers a plethora of inspiration for intricate pumpkin carving designs. Think about the delicate veins of a leaf, the intricate patterns of a spiderweb, or the graceful curves of a vine. These natural forms lend themselves beautifully to intricate carving, allowing you to showcase your skills and create a stunning, organic aesthetic. The key here is to carefully observe the details of the natural forms you're trying to recreate, paying attention to the subtle variations in texture and shape. For some nature-inspired ideas, you can check out these intricate pumpkin carving patterns based on nature.
Beyond simple leaves and vines, consider incorporating other natural elements into your design. Perhaps a flock of intricately carved birds perched on a branch, or a swirling vortex of leaves caught in a gust of wind. These more complex designs allow you to showcase a wider range of carving skills, from delicate detailing to the removal of larger sections of pumpkin flesh. Remember to use a variety of tools to achieve the desired textures and depths in your carving. For some more advanced nature designs, try taking a look at these advanced pumpkin carving ideas.
Natural Element | Carving Technique |
|---|---|
Leaves | Fine detail carving, use of various gouges |
Vines | Curved cuts, varying depths |
Spiderwebs | Precise, radiating lines |
Geometric and Abstract Designs: A Modern Approach
If you're looking for something a bit more modern and abstract, geometric and patterned designs can be incredibly striking. Think intricate tessellations, kaleidoscopic patterns, or bold, graphic shapes. These designs allow you to explore different carving techniques and create a visually stunning effect. The key here is to carefully plan your design and ensure that the patterns are balanced and visually appealing. For some geometric inspiration, check out these complex pumpkin carving designs that use geometric patterns.
Don't be afraid to experiment with different colors and textures to enhance your geometric designs. You can use paint, glitter, or even strategically placed LED lights to add depth and dimension to your carving. Remember, the goal is to create a visually arresting piece that showcases your creativity and skill. For more inspiration on modern designs, check out these advanced Halloween pumpkin designs which feature modern styles.