Table of Contents
Halloween looms, or maybe you just decided a Tuesday needed more orange and light. You've got the pumpkin, staring back at you with its uncarved potential, and suddenly the question hits: how do you carve a pumpkin for beginners without it turning into a lopsided, sad-faced failure? It looks easy when others do it, but the reality of scooping out slimy guts and wielding sharp objects can feel a bit daunting.
Getting Ready to Carve Your First Pumpkin
Getting Ready to Carve Your First Pumpkin
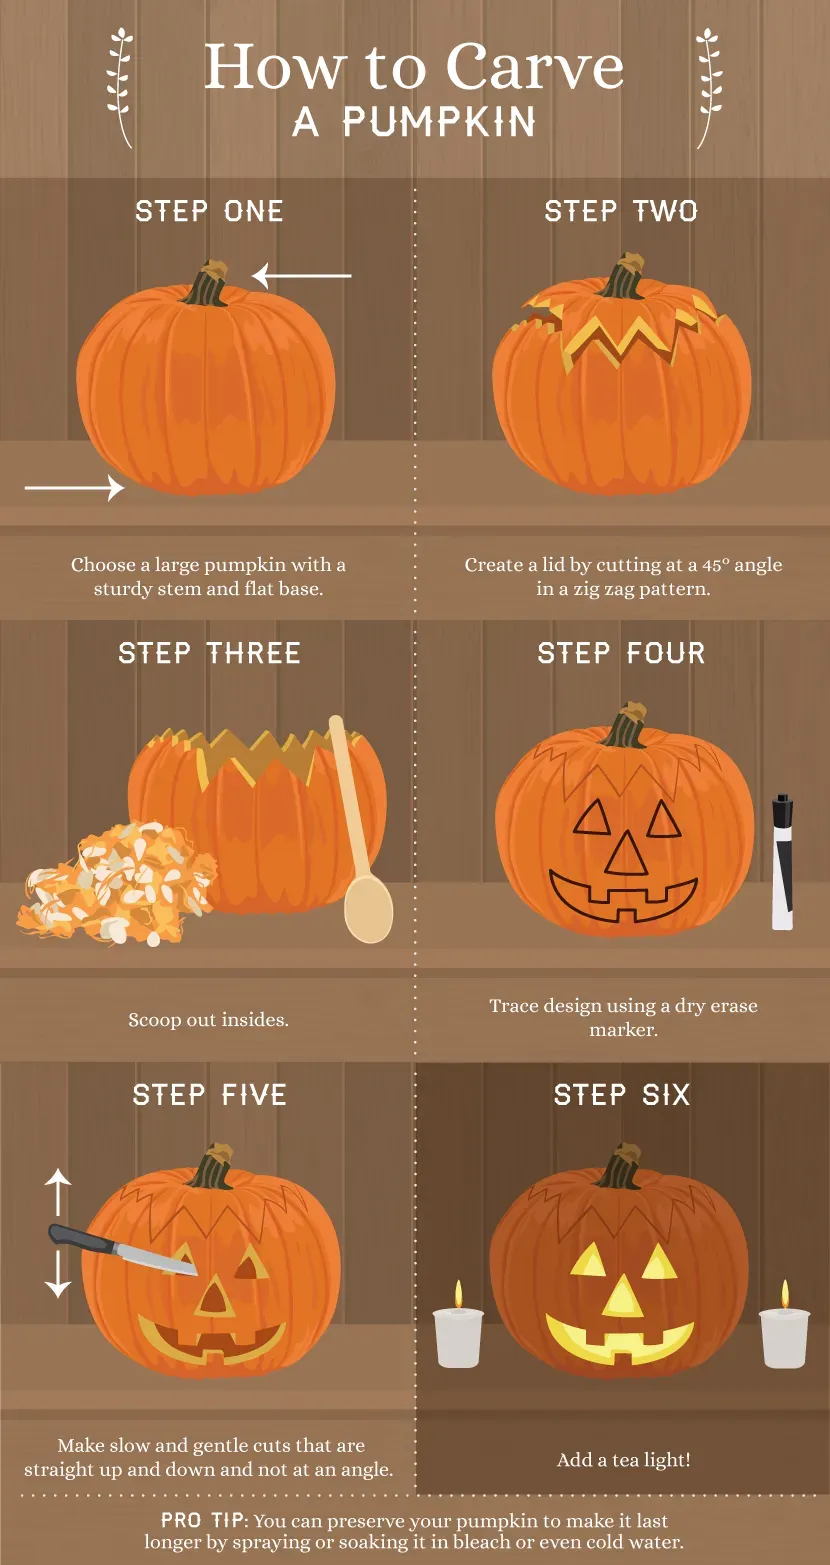
Alright, so you've committed. You're going to tackle this pumpkin carving thing. The first step, before you even think about knives, is picking the right pumpkin. Don't just grab the biggest one you see; sometimes smaller, flatter pumpkins with smooth surfaces are easier to handle when you're figuring out how do you carve a pumpkin for beginners. Check for a sturdy stem and a flat bottom so it won't roll away while you're working. Give it a tap; it should sound hollow. Also, make sure there are no soft spots or deep bruises – those are just asking for trouble later.
Safety First: Essential Steps Before You Carve a Pumpkin for Beginners
Safety First: Essential Steps Before You Carve a Pumpkin for Beginners
before any sharp objects come near that pumpkin, let's talk safety. This isn't just for kids; even adults can have a bad time if they're not paying attention. You need a clean, dry workspace. Slippery surfaces and sharp knives are a terrible combination. Also, ditch the kitchen knives. They're often too big and unwieldy for pumpkin carving. Get a proper pumpkin carving kit. They have smaller, specialized tools that are much easier to control, which is key when you're learning how do you carve a pumpkin for beginners. And seriously, take your time. Don't rush the process just because you're eager to see the final result.
Scooping Out the Guts and Prepping Your Design
Getting Down and Dirty: Hollowing Out the Pumpkin
gloves on, maybe? Or just embrace the slime. This is the messy part, but it's essential. You need to cut a lid. Most people cut around the stem, making a circle or hexagonal shape. Angle your knife inward slightly as you cut; this creates a lip for the lid to rest on, so it doesn't just fall into the pumpkin later. Once the lid is off, grab your scoop tool – the one that looks like a big, sturdy spoon with a serrated edge. If you don't have one from a kit, a strong metal spoon works, but it takes more elbow grease. Start scraping the inside walls, getting rid of all the strings and seeds. You want the walls to be relatively smooth and thin, maybe an inch thick, so light can shine through later. This step is crucial for how you carve a pumpkin for beginners, as thick walls make cutting much harder.
Transferring Your Masterpiece Design
Guts are out, walls are scraped. Now for the blueprint. You need a design. Keep it simple for your first go. Elaborate scenes with delicate details are best left for later attempts. Draw your design directly onto the pumpkin with a dry-erase marker (easy to wipe off mistakes) or a pencil. Another method is to print a template you like, tape it to the pumpkin, and use a poker tool (or a nail) to make small holes along the lines of the design. These holes act as a dotted guide when you remove the paper. Make sure the design is positioned where you want it and that it fits comfortably on the surface you've chosen.
Tips for Gutting:
- Use a dedicated pumpkin scoop if possible; they're designed for this job.
- Scrape hard enough to thin the walls but not so hard you go through.
- Save the seeds! Roasting pumpkin seeds is a classic fall snack.
- Consider cutting the lid from the bottom instead of the top if you want a cleaner look from above.
Making the Cut: How You Carve a Pumpkin for Beginners

Making the Cut: How You Carve a Pumpkin for Beginners
Starting Your First Cuts
the scary part. You've got your design marked, either with marker lines or dotted holes. Pick a starting point, maybe a simple line or a corner. If you used the poker method, connect the dots with your small, sharp carving knife. Push the knife straight in, perpendicular to the pumpkin's surface, then start sawing gently along the line. Don't try to push the knife all the way through in one go. Use a back-and-forth motion, like a tiny saw. Keep the blade clean as you work; pumpkin gunk builds up fast and makes cutting harder. Patience is your best friend here. Rushing leads to slips and jagged edges, which nobody wants.
Navigating Curves and Corners
Cutting straight lines is one thing, but pumpkins have curves, and designs have corners. When you hit a corner or need to change direction, pull the knife out of the pumpkin completely. Re-insert it at the next point on your line and continue sawing. For curves, make small, incremental cuts, pulling the knife out and re-inserting it slightly ahead along the curve. Think of it like connecting a series of tiny straight lines rather than trying to bend the blade around a corner. This technique is key to getting clean shapes when figuring out how you carve a pumpkin for beginners.
Common Beginner Carving Mistakes to Avoid:
- Using a dull knife. Seriously, it's more dangerous than a sharp one.
- Trying to cut too fast. Slow and steady wins the jack-o'-lantern race.
- Twisting the knife while it's still in the pumpkin. This can break the blade or the pumpkin wall.
- Not cleaning out the inside well enough, making walls too thick to cut through easily.
- Picking a design that's too complex for your first attempt. Start simple!
Removing Pieces and Finishing Touches
As you complete sections of your design, the cut-out pieces won't always just fall out. Sometimes they need a little nudge. Use the back of your carving tool or even just your finger to gently push the cut-out pieces inward. If a piece is stuck, check if you've cut all the way through the pumpkin wall around its entire edge. Don't force it; you might crack the pumpkin. Once the pieces are out, you can use a small, sharp paring knife (carefully!) or the detail tools from your kit to clean up any rough edges or slivers of pumpkin left clinging to your design. A clean edge makes a big difference in the final look.
Lighting Up Your First Carving
So there you have it. You’ve wrestled with the guts, navigated the sharp edges, and hopefully, your kitchen floor isn't a total disaster zone. You started wondering how do you carve a pumpkin for beginners, and now you've got a glowing face staring back at you from your porch or windowsill. It might not be gallery-worthy art, and maybe one eye is a little higher than the other, but it's yours. It's the result of a bit of effort, a willingness to get messy, and following some basic steps. Take a step back, light the candle (carefully!), and enjoy the simple, satisfying glow of your very first carved pumpkin. It's a messy, slightly imperfect, and entirely worthwhile tradition.