Table of Contents
Halloween is coming, and that blank, orange canvas sitting on your porch can feel... intimidating. You've got the pumpkin, maybe a carving kit that looks slightly less lethal than a set of dentist's tools, but where do you even start? Staring at a gourd and hoping inspiration strikes usually results in a lopsided grin or, worse, a regrettable attempt at a ghost that looks more like a melted marshmallow. That's wherehalloween pumpkin carving ideas templatescome in. Think of them as your cheat sheet to crafting something truly spooky or spectacularly silly, instead of just a pumpkin that looks vaguely annoyed.
Why Use Halloween Pumpkin Carving Templates?

Why Use Halloween Pumpkin Carving Templates?
Ditching the Freehand Frustration
let's be real. You've seen those perfectly carved pumpkins online, the ones that look like they were sculpted by a professional artist with tiny, magical knives. Then you look at the sad, misshapen hole you carved last year trying to freehand a scary face and sigh. It's okay. Most of us aren't born with the innate ability to translate a spooky vision directly onto a curved, lumpy surface using a flimsy plastic saw. This is preciselyWhy Use Halloween Pumpkin Carving Templatesbecomes less a suggestion and more a necessity for maintaining your sanity and dignity during the carving process.
Trying to wing it often leads to uneven lines, features that slide south, and a general sense of disappointment that no amount of candy corn can fix. Templates give you a roadmap. They take the guesswork out of proportions and placement, ensuring your vampire fangs look like fangs, not just random jagged cuts. It's like following a recipe instead of just throwing ingredients into a pot and hoping for the best. You get predictable, often impressive, results.
Consistency and Cool Designs
Beyond just avoiding carving calamities, templates open up a world of possibilities you might never attempt on your own. Want a detailed spiderweb? A complex character face? Good luck drawing that accurately freehand while wrestling a slippery gourd. Templates allow you to tackle designs that look far more intricate and professional than your skill level might actually dictate. They democratize the cool pumpkin club.
Plus, using a template means you can replicate designs easily or try something completely different each year without starting from scratch mentally. You pick a design, stick it on, and follow the lines. It’s efficient, it’s effective, and it consistently produces pumpkins that make neighbors stop and say, "Hey, nice job!" instead of "Uh, what is that supposed to be?"
- Saves time and reduces mistakes.
- Allows for more complex and detailed designs.
- Gives consistent, predictable results.
- Great for all skill levels, especially beginners.
- Provides a wide variety of design options instantly.
Your StepbyStep Guide to Using Pumpkin Carving Templates
Your StepbyStep Guide to Using Pumpkin Carving Templates
Getting Ready to Carve Like a Pro (Or Close Enough)
Alright, you've got your pumpkin, you've picked out a cool template – maybe something spooky, maybe something goofy. Now comes the part where you actually make the magic happen. Don't worry, it's not brain surgery, though sometimes it feels like you need that level of precision. This is your practical roadmap forUsing Pumpkin Carving Templateswithout the usual Halloween night panic. We're going to break it down into simple steps, because nobody needs extra stress when there's candy to be eaten.
First things first, gather your gear. You need the pumpkin, obviously. A sharp carving kit is essential – those cheap plastic saws from the grocery store will test your patience and potentially your fingers. Get something decent. You'll also need your printed template, some tape (masking tape works well), a poking tool (an old pen, a specialized poker from the kit, even a thumbtack will do), and a bowl for the guts. Maybe some old newspapers or a drop cloth, unless you enjoy scraping dried pumpkin goop off your floor later.
Prep Your Gourd and Stick the Plan
Before you even think about the template, you need to prep the pumpkin. Cut a hole in the top (or the bottom, some people swear by cutting the bottom for stability and easier lighting – try it!). Make it big enough to get your hand and a scooper inside. Then, get to scooping. This is arguably the messiest part. Scrape out all the seeds and stringy bits. Get it as clean as you can inside. A metal ice cream scoop or a specialized pumpkin scooper works wonders here. The thinner the wall, the easier it is to carve, but don't go too thin or your pumpkin will collapse.
Once the inside is clean, dry the surface where you plan to put the template. Position your printed template on the pumpkin. If it's a flat design on a round pumpkin, you'll need to make small cuts or darts in the paper template so it can lie flat against the curve. Use masking tape liberally to secure the template smoothly to the pumpkin. Don't rush this part; a well-taped template is key to accuracy.
- Gather: Pumpkin, sharp carving tools, printed template, tape, poking tool, bowl, newspaper.
- Prep: Cut top/bottom, scoop out all seeds and stringy bits, dry the surface.
- Attach: Make small cuts in template edges if needed, tape smoothly to the pumpkin's surface.
Transferring the Design and Making the First Cut
With the template firmly in place, it's time to transfer the design. Using your poking tool, firmly poke holes through the paper and into the pumpkin skin, following the lines of the template. Space the holes closely together – about an eighth to a quarter of an inch apart. This creates a dotted outline on the pumpkin that you'll follow with your carving saw. Don't press so hard you go through the entire pumpkin wall, just enough to leave a clear mark.
Carefully remove the paper template. You should now have a series of dots outlining your design on the pumpkin. This is your carving guide. Now, grab your carving saw. Start with the smallest, most intricate parts of the design first. It's usually easier to work from the inside out or from the center of a feature towards the edges. Use a gentle sawing motion, following the dotted lines. Don't try to push the saw straight through; let the teeth do the work.
The Carving Continues and the Big Reveal
As you carve, apply steady, even pressure. If the saw gets stuck, don't force it; pull it out and try again from a slightly different angle. For larger pieces, once you've carved all the way around, gently push the piece out from the inside. Sometimes they pop right out, sometimes they need a little persuasion. A dull knife or the back of a spoon can help nudge stubborn pieces. Be careful not to break off parts you didn't intend to.
Once all the pieces are carved out, remove any leftover bits of paper or pumpkin string around the edges. You can use a small knife or scraping tool to clean up the edges and make them look crisp. Step back and admire your work! Pop a candle or an LED light inside (LEDs are safer, just saying) and turn off the lights. See? Templates work. You've gone from a plain pumpkin to a spooky spectacle, all thanks to a little paper guide and some careful sawing.
Tool | Best Use | Tip |
|---|---|---|
Small Saw | Intricate details, tight curves | Use a gentle sawing motion, don't force it. |
Large Saw | Straight lines, larger sections | Good for the initial top/bottom cut too. |
Poker/Thumbtack | Transferring the design | Keep holes close for a clear line. |
Scooper | Removing guts | Metal ones work faster and scrape cleaner. |
Spooky & Fun Halloween Pumpkin Carving Ideas & Templates

Spooky & Fun Halloween Pumpkin Carving Ideas & Templates
Classic Chills and Thrills
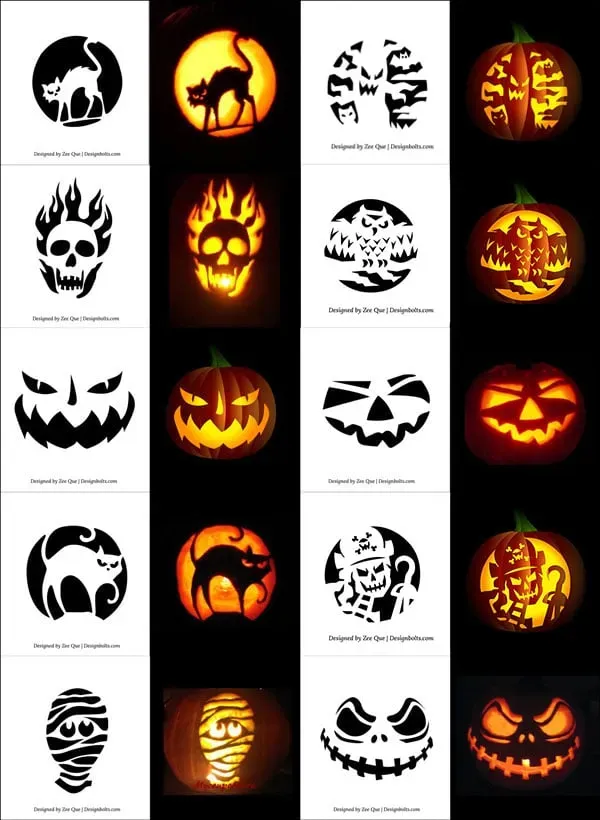
Alright, so you've prepped your pumpkin and you're ready to transfer some terror onto its surface. When it comes toSpooky & Fun Halloween Pumpkin Carving Ideas & Templates, you can't go wrong with the classics. We're talking about those iconic images that just scream Halloween: grinning skulls, cackling witches silhouetted against a spooky moon, bats mid-flight, and creepy crawly spiders. These aren't just easy wins; they're timeless. A well-executed classic design, guided by a solid template, looks sharp and instantly recognizable. It’s the bread and butter of Halloween decorating for a reason. Forget trying to freehand a symmetrical spiderweb; a template makes it look like you actually know what you're doing.
Think about the impact. A row of pumpkins featuring different classic monsters – Frankenstein's monster, a vampire face, a howling werewolf – creates a consistent, eerie theme without requiring you to be a portrait artist. Templates for these often feature bold lines and clear shapes, making them ideal for beginners or when you're carving with kids (with supervision, obviously, unless you want tiny fingers carved instead of pumpkins). You get that satisfying feeling of popping out a perfectly shaped eye socket or a row of jagged teeth, knowing the template did half the work.
Beyond the Basics: Getting Creative with Templates
Once you've mastered the basics, or if you're feeling ambitious from the get-go, templates unlock a whole other level of creativity. We're not just talking about simple shapes anymore. You can find templates for incredibly detailed scenes – haunted houses with tiny windows, intricate graveyard settings, or even famous movie monsters with surprising likeness. This is wherehalloween pumpkin carving ideas templatesreally shine, allowing you to tackle designs that would take hours (and probably end in tears) if you tried to draw them yourself.
Have you seen those pumpkins carved with portraits of pop culture icons? Or intricate lace-like patterns? Yep, templates. They break down complex images into manageable lines and shapes you can actually follow. It requires patience, especially with the tiny bits, but the result is a pumpkin that looks less like a decoration and more like a piece of temporary art. It’s a fantastic way to stand out from the sea of basic jack-o'-lanterns on your block.
- Detailed haunted houses
- Intricate spiderwebs
- Pop culture character portraits
- Animal skeletons (cats, bats, etc.)
- Spooky word art ("Boo," "Beware")
- Mythical creatures (dragons, gargoyles)
Making Them Your Own (Even with a Template)
Using a template doesn't mean your pumpkin has to be identical to everyone else's who used the same design. Think of the template as the blueprint, but you're still the contractor. You can modify details slightly, change the size, or combine elements from different templates. Maybe you like the eyes from one ghost template and the mouth from another? Go for it. Templates are a starting point, not a rigid commandment set in stone (or pumpkin).
Consider how you light the pumpkin too. Different types of lights can change the whole mood. A flickering LED candle gives that classic spooky vibe, while a colored light can make a ghost glow green or a vampire's eyes burn red. You can also scrape away the skin in certain areas instead of carving all the way through, allowing light to filter through the thinner wall for a different effect. This technique, often called "shadow carving," adds depth and can make template designs look even more dynamic.
Beyond the Template: Tips, Tricks, and Alternatives
Beyond the Template: Tips, Tricks, and Alternatives
Making Your Carving Pop
So you've used yourhalloween pumpkin carving ideas templates, you've poked, you've sawed, and your design is transferred. Great! But don't just stop there. Think about how to make that design really stand out. One simple trick is to bevel the edges of your carved areas. Instead of a straight 90-degree cut, angle your saw slightly outwards as you carve. This makes the hole wider at the outside surface than the inside, giving the design more definition and allowing more light to spill out.
Another thing to consider is scraping the inner wall behind thin areas of your design. If your template has parts that aren't meant to be cut all the way through, but rather just scraped, do that carefully. Even behind carved-out sections, thinning the wall slightly can make the light brighter. Just be careful not to scrape too much, or you'll weaken the structure. It's a delicate balance, like trying to explain internet memes to your grandma.
Keeping Your Masterpiece Fresh
You spent all that time carving, the last thing you want is your pumpkin collapsing into a sad, moldy mess before Halloween night. Once carved, pumpkins start to dry out and deteriorate pretty quickly, especially in warmer weather. There are a few things you can do to buy yourself some time. Giving the carved pumpkin a bath in cold water for a few hours can rehydrate it. Some people swear by rubbing petroleum jelly on all the cut edges – it seals in moisture.
You can also mist your pumpkin with water daily. If it starts to look a little shriveled, another cold water soak might perk it up temporarily. And always, always use an LED light inside instead of a real candle if you want it to last longer. The heat from candles cooks the pumpkin from the inside out, speeding up the decay process. Plus, LEDs are way safer, no risk of setting your porch on fire.
- Give carved pumpkin a cold water bath.
- Rub petroleum jelly on cut edges.
- Mist daily with water.
- Use LED lights, not candles.
- Keep it in a cool spot when not displayed.
What If Carving Isn't Your Jam?
Let's face it, carving isn't for everyone. Maybe the mess gives you anxiety, maybe sharp objects and your coordination aren't on speaking terms, or maybe you just prefer a different look. The good news is you can still decorate a fantastic Halloween pumpkin without ever touching a saw. "No-carve" pumpkins are hugely popular and offer endless creative possibilities.
Think paint, markers, glitter, googly eyes, yarn, fabric scraps, buttons – basically anything you can stick or draw on a pumpkin. You can paint spooky scenes, turn pumpkins into characters, create elegant metallic or glittery gourds, or even wrap them like mummies. It's a fantastic option for younger kids or anyone who wants a less messy, longer-lasting decoration. Plus, a painted pumpkin won't attract as many fruit flies as a carved one eventually will. Just saying.
Carve On: Making Your Gourd Goals Happen
So there you have it. Usinghalloween pumpkin carving ideas templatesisn't some kind of artistic surrender; it's a practical move to get a better result without the frustration. Nobody needs another Halloween spent scraping pumpkin guts off their ceiling fan after a freehand attempt went sideways. Grab a template, follow the steps, and you'll likely end up with something that actually resembles the design you intended. It's about making the process less of a chore and more of a reason to actually enjoy putting a spooky face on a squash. Give it a shot. At worst, you'll still have a pumpkin. At best, you'll have a genuinely cool jack-o'-lantern lighting up your porch.