Table of Contents
Halloween is creeping closer, and you know what that means – it's time to get your carve on! Forget those basic triangle eyes and goofy grins. This year, we're diving headfirst into the realm of the truly terrifying with some seriously scary halloween pumpkin carving ideas. Are you ready to transform your humble gourd into a nightmarish masterpiece? This article isn't just a collection of pretty pictures, it's your guide to creating the most spine-chilling jack-o'-lanterns on the block. We'll start with classic scary faces, those tried-and-true designs that always deliver a good fright, and then we'll crank up the creep factor with some unique and intricate designs that'll make your neighbors do a double-take. Think beyond the usual, and get ready to explore detailed techniques and step-by-step guides to elevate your pumpkin carving game this Halloween. So grab your tools, unleash your inner monster, and let's get carving!
Classic Scary Faces: Halloween Pumpkin Carving Ideas
Classic Scary Faces: Halloween Pumpkin Carving Ideas
The Timeless Terror
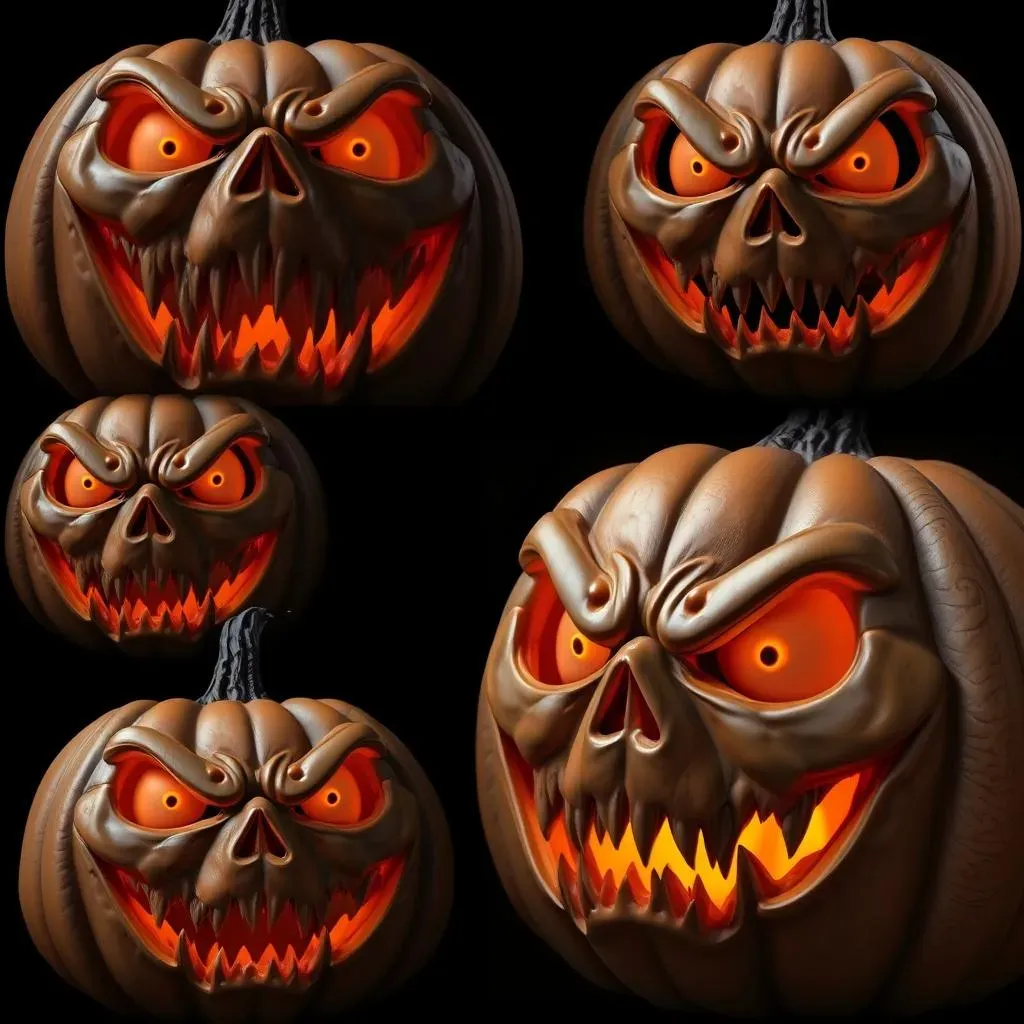
Let's be honest, some scares never get old. When it comes to Halloween, the classic scary faces are a must. We're talking about those jagged teeth, the menacing brows, and the eyes that seem to follow you in the dark. These designs are the bread and butter of any proper jack-o'-lantern, and they're surprisingly easy to pull off, even if you're not exactly a pumpkin Picasso. The beauty of these faces lies in their simplicity, they are a great starting point for anyone looking to dip their toes into the world of scary pumpkin carving. Think of them as the 'greatest hits' of halloween scares, always a crowd-pleaser.
I remember my first attempt at a scary face, it was pretty basic, but the feeling of accomplishment was huge. It's all about the shapes, the angles, and the overall vibe you want to create. Don't overthink it too much. Let the pumpkin guide you, and don't be afraid to experiment with different expressions – an angry scowl, a menacing grin, or even a look of pure terror. These faces are all about embracing the spooky spirit of the holiday.
Essential Elements of a Classic Scary Face
So, what makes a classic scary face so, well, scary? It's all in the details. Here’s a quick rundown of the key elements that’ll transform your pumpkin from cute to creepy:
- Eyes: Think sharp, angular shapes. Triangles, squares, or even uneven, jagged circles work wonders. The key is to make them look intense and unsettling.
- Mouth: A wide, toothy grin is a classic choice. Make those teeth pointy and irregular for maximum impact. You can also try a simple jagged line for a more sinister, less cartoonish feel.
- Eyebrows: Don't underestimate the power of eyebrows! Angled downward towards the center of the face adds a menacing look. Keep them thick and bold for extra drama.
- Nose: A simple triangle or diamond shape will do the trick. You can also get creative and try a jagged or hook-shaped nose for a more unique touch.
Putting it All Together
Now, how do you bring these elements together? The trick is to start with a basic sketch. Use a marker to outline your design on the pumpkin before you start carving. This will help you visualize the final product and avoid any major carving mishaps. Remember, it doesn't have to be perfect, in fact, imperfections often add to the spooky charm. When carving, use a sturdy knife or a carving tool, and always be careful. Start with the smaller details, like the eyes and nose, and then move on to the mouth and eyebrows. Take your time, and don’t be afraid to adjust your design as you go. After all, the goal is to create a jack-o'-lantern that's both scary and uniquely yours.
I've seen some amazing takes on the classic scary face, some people add small details like scars or stitches, which can make a huge difference. It’s all about taking those classic elements and making them your own. Don’t be afraid to get a little weird and let your inner monster shine.
Beyond the Basics: Unique Scary Halloween Pumpkin Designs
Beyond the Basics: Unique Scary Halloween Pumpkin Designs
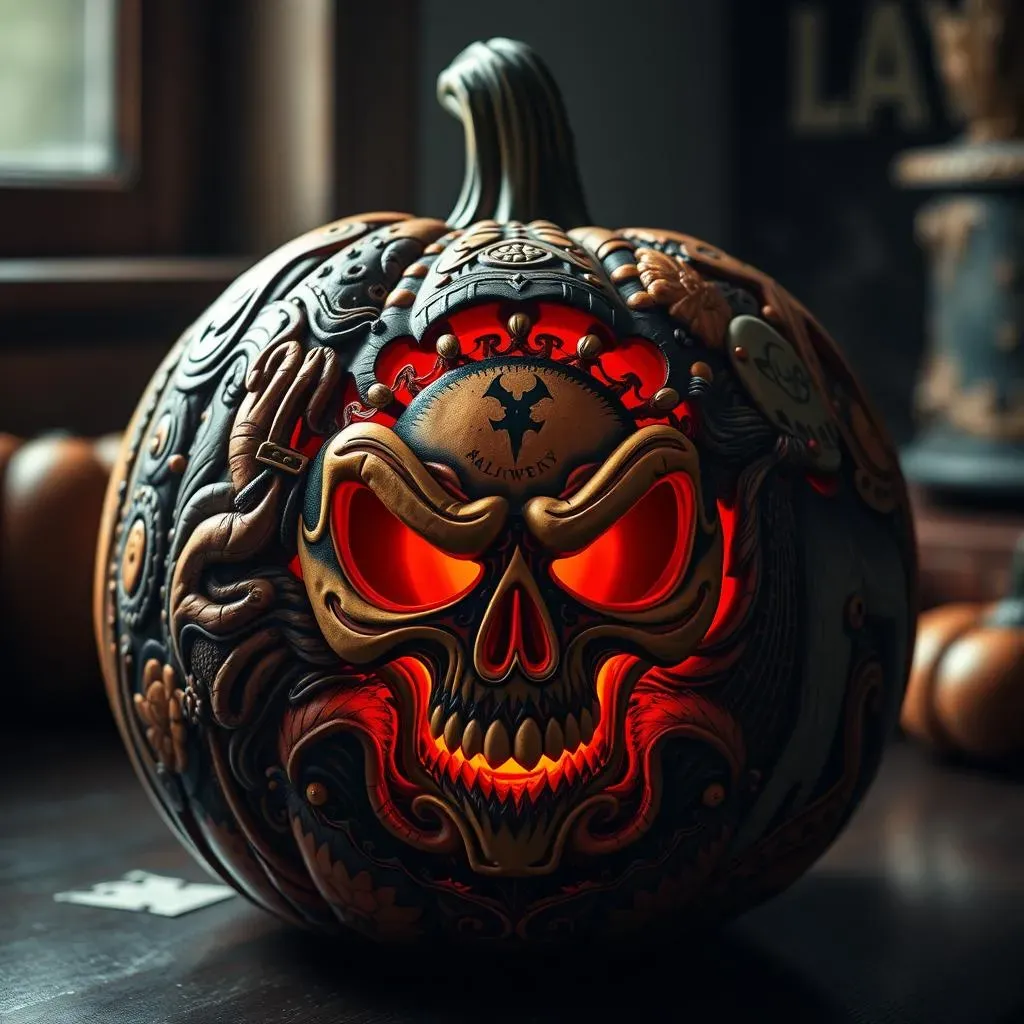
Alright, so you've mastered the classic scary face? Awesome! But let's be real, there's a whole universe of creepy possibilities beyond those basic designs. We're talking about taking your pumpkin from "meh" to "OMG, what is that?!" This is where the fun really begins. Forget the usual suspects; we’re venturing into the territory of unique scary halloween pumpkin designs that will make your porch the talk of the neighborhood. Think intricate patterns, pop culture monsters, and mind-bending optical illusions. It's time to unleash your creativity and carve a pumpkin that's as unforgettable as it is frightening. This isn't just about carving a face; it’s about crafting a piece of art that screams Halloween.
I always get a kick out of seeing how far people push the boundaries of pumpkin carving, some designs are so elaborate they look like they belong in a museum and not on a porch. It's not just about the scare factor, it's about the artistry and the sheer creativity that goes into these elaborate designs. One year, I saw a pumpkin carved to look like a scene from a horror movie, complete with tiny little characters and a miniature landscape. It was incredible, and it totally inspired me to try something more ambitious. So don’t think you have to stick to just a simple face, let your imagination run wild.
Design Idea | Description | Difficulty |
|---|---|---|
Monster Mash | Combine elements from different monsters for a unique, terrifying look. | Medium |
Optical Illusion | Use carving techniques to create the illusion of depth or movement. | Hard |
Pop Culture Horror | Recreate iconic characters from your favorite horror movies or shows. | Medium to Hard |
Intricate Patterns | Use small, detailed cuts to create complex and eerie designs. | Hard |
Ready to try something different? Consider these ideas: a pumpkin that looks like it's melting, dripping with gooey "slime," or one that features a colony of creepy crawlies emerging from its core. You could even try carving a silhouette of a haunted house or a spooky graveyard scene. Remember, the key is to get creative and don't be afraid to experiment with different techniques. Try using stencils for more complex shapes, or using different carving tools to create various textures. The more you experiment, the more unique and scary your pumpkin will become. It's all about pushing the boundaries of what a pumpkin can be.
I've learned that sometimes, the simplest ideas can have the biggest impact. One year, I carved a pumpkin with just a single, large, unsettling eye. It was surprisingly creepy, and it took me very little time to do. It's all about playing with shapes, shadows, and negative space. So, as you move beyond the classic scary face, embrace the freedom to experiment and create something truly unique and terrifying. The possibilities are endless, so let your imagination run wild and see what kind of spooky masterpiece you can conjure up.
Tools and Techniques for Scary Pumpkin Carving
Tools and Techniques for Scary Pumpkin Carving
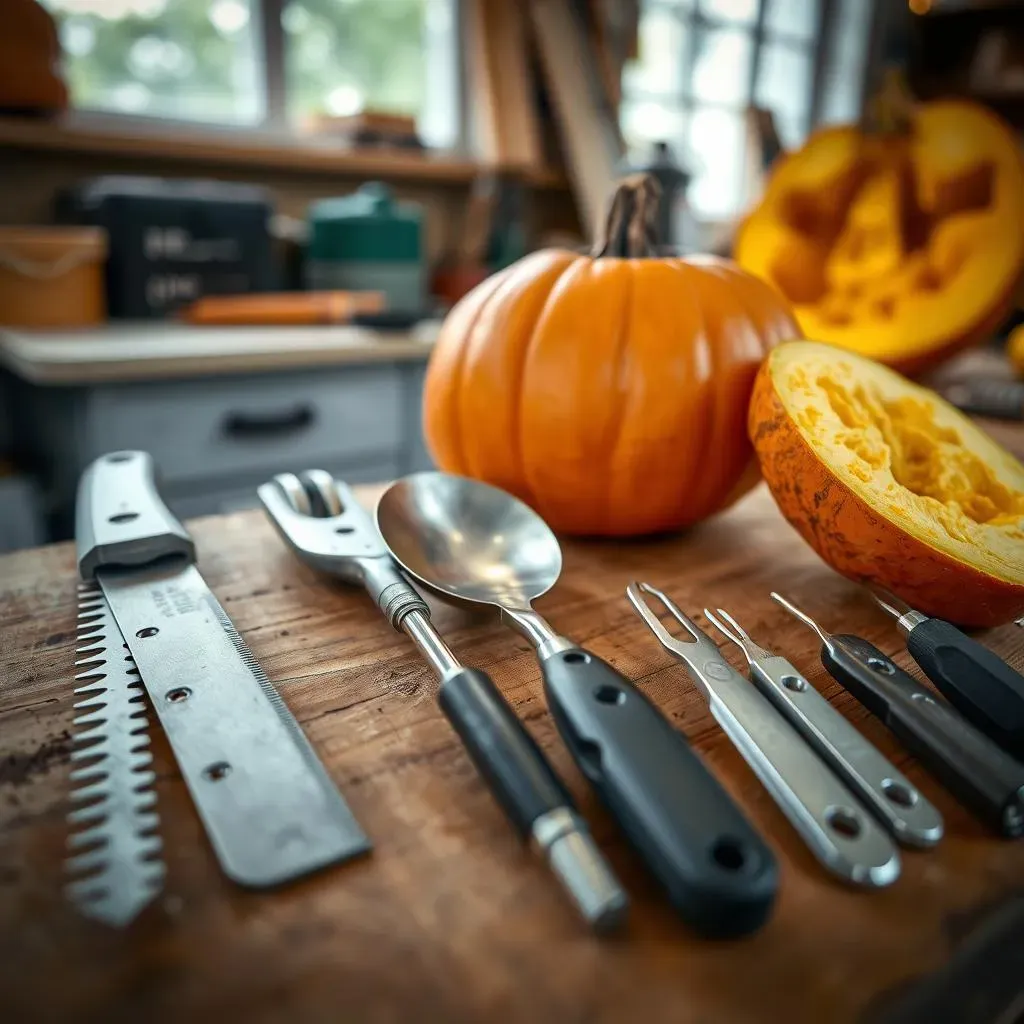
Okay, so you've got your scary design ideas swirling in your head, that's awesome! But before you start hacking away at your pumpkin with a butter knife, let's talk tools. Having the right equipment is crucial for a successful and, more importantly, safe carving session. I've learned the hard way that using the wrong tools can lead to frustration, injuries, and a pumpkin that looks more like a mangled mess than a menacing masterpiece. So, let's get you equipped with the essentials, plus some handy tips and tricks to make the carving process smooth and efficient. Think of it as prepping your workshop before starting a major project. You wouldn't build a house with just a spoon, would you? Same logic applies here.
First up, you'll need a good carving kit. Forget those flimsy plastic things you find at the grocery store. Invest in a decent set with sturdy tools; it will make a world of difference. A good kit should include a small serrated saw for cutting out large sections, a scoop for removing the pumpkin guts (trust me, you'll want this), and some smaller tools for detail work, like a poker for transferring stencils and a variety of small blades for fine carving. I know a lot of people who use their kitchen knives, and while that can work in a pinch, it’s not ideal. Proper carving tools are designed to give you more control and precision, which is essential for those intricate scary designs we talked about. It's like the difference between using a paintbrush and a finger for painting, one is way more effective.
Tool | Purpose | Tip |
|---|---|---|
Serrated Saw | Cutting large sections, removing the top | Use a sawing motion, not pushing down hard. |
Scoop | Removing seeds and pulp | A metal scoop works best, but a large spoon will do. |
Poker/Awl | Transferring stencils, creating small holes | Use it to trace your design before carving. |
Small Blades/Knives | Detail work, fine carving | Choose blades with different shapes for different effects. |
Beyond the basic tools, there are some other techniques that can really enhance your carving game. For example, using stencils can be a great way to transfer complex designs onto your pumpkin. You can find tons of free stencils online, or you can even create your own. Another technique that I've found useful is to use a dry erase marker to draw your design directly onto the pumpkin before you start carving. This allows you to easily correct any mistakes before you make them permanent. Also, don't underestimate the power of lighting. Once you've finished carving, use a candle or an LED light to illuminate your creation from the inside. The right lighting can make your scary design look even more menacing.
And lastly, safety first, always! Carving pumpkins can be fun, but it's also easy to accidentally cut yourself if you're not careful. Always carve in a well-lit area, and make sure your pumpkin is stable so it doesn't wobble while you're working. Use slow, controlled movements when carving, and never force your tools. If you're working with kids, be sure to supervise them closely and ensure they are using age-appropriate tools. Think of it like a science experiment, you need to be careful and precise to get the best results and avoid any unwanted accidents. The goal is to have fun and create a scary masterpiece, not to end up with a trip to the emergency room.
Scary Pumpkin Carving Ideas: Stepbystep guides
Scary Pumpkin Carving Ideas: Stepbystep guides
Alright, let's get down to the nitty-gritty. You've got the tools, you've got the inspiration, now it's time to put it all together. I know that sometimes the hardest part is just getting started, so here are some step-by-step guides to help you create some awesome scary pumpkin carving ideas. Don't worry, it's not as complicated as it looks. We’ll break it down into easy-to-follow steps, so you can go from a plain pumpkin to a spooky masterpiece in no time. Think of it like a cooking recipe, but instead of baking a cake, you're carving a scary face. It's all about following the instructions and adding your own personal touch. Let's get carving!
First up, let's tackle the classic scary face. It's a great starting point, and it's perfect for beginners. Start by drawing your design on the pumpkin using a marker. A simple triangle for the eyes, a jagged line for the mouth, and a couple of downward-pointing triangles for the eyebrows works just fine. Once you're happy with the design, use your serrated saw to carefully cut out the top of the pumpkin. Then, scoop out all the seeds and pulp, making sure the inside is clean and smooth. Now, use your smaller carving tools to start cutting along your marked lines. Remember, it's better to start with small cuts and gradually increase the size of the opening. As you carve, keep your knife at an angle to create a beveled edge, this will make your cuts look sharper and cleaner. Take your time, don't rush, and don't be afraid to make adjustments as you go.
Step | Action | Tip |
|---|---|---|
1 | Draw your design | Use a marker, don't worry about mistakes |
2 | Cut the top | Use a serrated saw, cut at an angle |
3 | Scoop out the insides | Make sure it's clean and smooth |
4 | Carve the details | Start small, take your time |
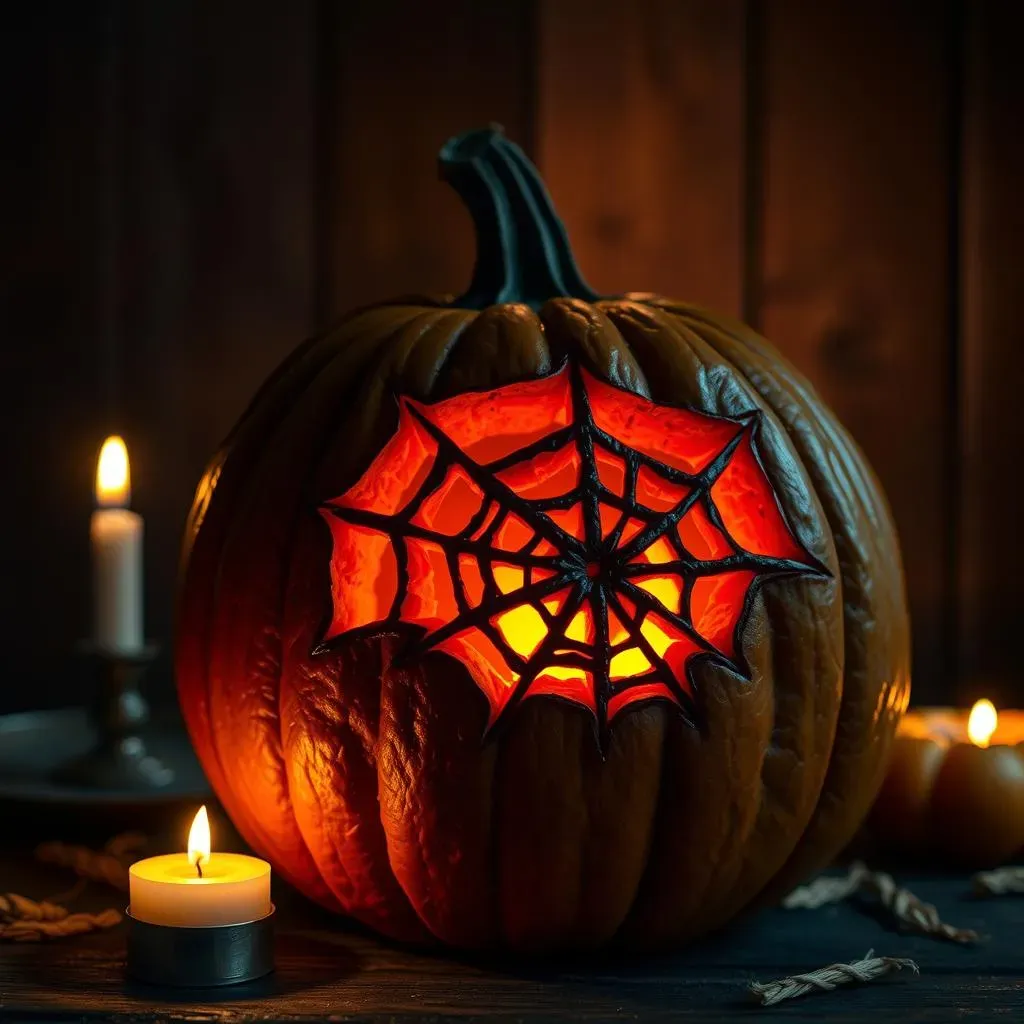
Now, let’s move on to something a little more intricate. How about a creepy spiderweb design? Start by drawing a large circle in the center of your pumpkin, then draw lines radiating out from the center to create the basic web structure. Use a small, thin carving tool to cut along the lines, being careful to keep your cuts consistent and even. Once you have your web structure carved, you can add small details, like tiny spiders crawling on the web or a spider's lair in the center. If you’re feeling extra creative, you can even try carving a 3D spider on top of the pumpkin. It might sound complicated, but if you break it down step-by-step, it’s totally achievable. It's all about patience and attention to detail.
Finally, let's talk about lighting. The way you light your pumpkin can make a huge difference in the overall effect. A simple candle can give you a warm, flickering glow, but if you're looking for something a little more dramatic, try using an LED light. You can even get colored LED lights to create different moods and effects. Also, consider the placement of your light. Placing it directly in the center of the pumpkin will give you a standard, even glow, but if you move the light to one side, you can create more interesting shadows and highlights. It’s like the final touch on a painting, the lighting brings everything to life. Remember, it's all about experimentation and having fun. Don't be afraid to try new things and see what you can create.