Table of Contents
Alright, let's talk pumpkins. Every October, the pressure mounts. You want that perfect jack-o'-lantern glowing on your porch, but the reality often involves slippery guts, dull knives, and a design that looks less like a spooky ghost and more like... well, a potato with a dental problem. You’ve seen those elaborate carvings online and thought, "Yeah, right." Most of us just want something that looks decent, doesn't take five hours, and won't require a trip to the emergency room. That's where we come in.
Picking Your Perfect Pumpkin and Tools for Easy Carving

Picking Your Perfect Pumpkin and Tools for Easy Carving
Finding Your Ideal Gourd
first things first: you need a pumpkin that isn't going to fight you every step of the way. Forget the giant, lumpy ones unless you're a masochist or have actual power tools. For good easy pumpkin carving ideas, you want something medium-sized with relatively smooth skin. Check the bottom – it should be flat enough to sit without wobbling. Tap it; a hollow sound usually means it's ripe and ready, not mushy inside. Look for a sturdy stem, too; it's a good handle and a sign of a healthy pumpkin. Skip any with soft spots or deep gashes; they'll rot faster than you can say "Boo!"
Gathering Your Carving Arsenal
You don't need a professional sculpting kit, but the little plastic tools that come in those cheap kits? They're mostly useless. For simple designs, a few key items make a world of difference. A sturdy spoon or ice cream scoop is essential for scraping out the guts. A small, serrated knife (a paring knife works well) is better than a big one for cutting the lid and initial shapes. Detail knives or even just a sharp utility knife can help with smaller cuts. An apple corer is surprisingly handy for making perfect circles for eyes or patterns. And don't forget a marker to draw your design first!
- Sturdy Spoon or Ice Cream Scoop (for gutting)
- Small Serrated Knife (for lid and basic cuts)
- Detail Knife or Utility Knife (for finer lines)
- Apple Corer (for perfect circles)
- Dry Erase Marker (easy to wipe off mistakes)
- Bowl (for seeds and pulp)
Prepping for the Carve
Before you even think about cutting, set up your workspace. Cover your table with old newspapers or a plastic tablecloth – pumpkin guts are surprisingly messy. Cut a lid, usually from the top, but cutting from the bottom can make lighting easier later and keeps the top looking neat. Angle your knife inward when cutting the lid so it has a ledge to rest on and doesn't fall in. Then, get scraping. Get *all* the stringy bits and seeds out. The thinner the walls, the easier it is to carve. Aim for about an inch thick if you can manage it without breaking through.
Simple Techniques for Good Easy Pumpkin Carving Ideas
Simple Techniques for Good Easy Pumpkin Carving Ideas
Drawing Your Design: The Blueprint for Success
you've got your pumpkin prepped and your tools laid out. Now for the fun part: deciding what goes on this glorious gourd. For good easy pumpkin carving ideas, don't try to freehand a portrait of your cat. Start simple. Think classic shapes: triangles for eyes, a jagged smile. A dry-erase marker is your best friend here. You can draw, erase, and redraw until you get it right. If you mess up, just wipe it off. No harm, no foul. You can also use stencils if you want something a bit more intricate but still manageable. Tape it on, trace the lines with a marker or a poking tool, and you've got your guide.
Making the Cut: Slow and Steady Wins the Race
With your design marked, it's time to put knife to pumpkin. This is where patience pays off. Don't try to push the knife straight through in one go, especially with thicker pumpkin walls. Use a gentle sawing motion. Follow your lines carefully. For corners, pull the knife out, reposition it, and start sawing again from the new angle. Don't twist the knife while it's in the pumpkin; that's how things break. If a piece doesn't pop out easily, don't force it. Wiggle it gently or try sawing from the other side. Remember, the goal is looking spooky, not proving you're a pumpkin-carving ninja.
What's the worst pumpkin carving disaster you've ever had?
Cleaning Up and Refining the Edges
Once all your pieces are cut out, you'll likely have some stringy bits or rough edges hanging around. Grab a small paring knife or even a toothpick to carefully clean these up. Trim away any stray pulp or skin that's blocking the light. A little bit of cleanup makes a huge difference in how sharp and clean your design looks. Wipe down the outside with a damp cloth to get rid of any marker lines or pumpkin residue. Now step back and admire your handiwork. You've just brought one of those good easy pumpkin carving ideas to life.
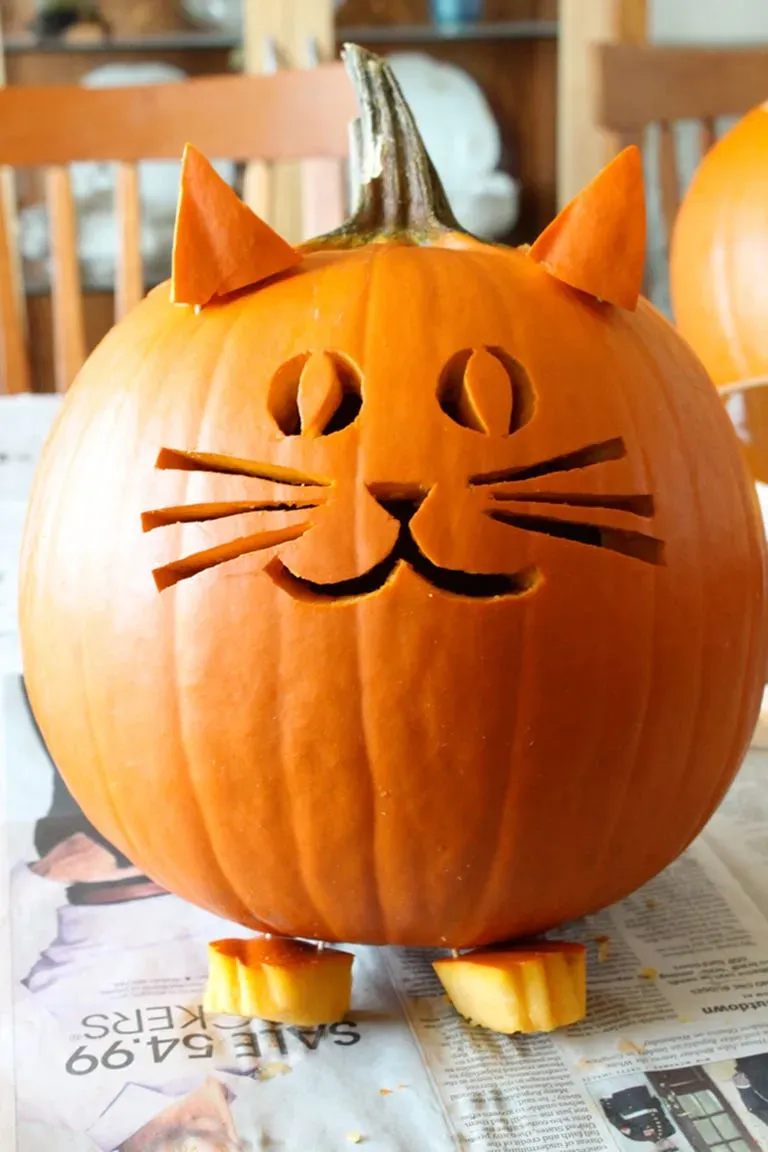
Showcasing Good Easy Pumpkin Carving Ideas
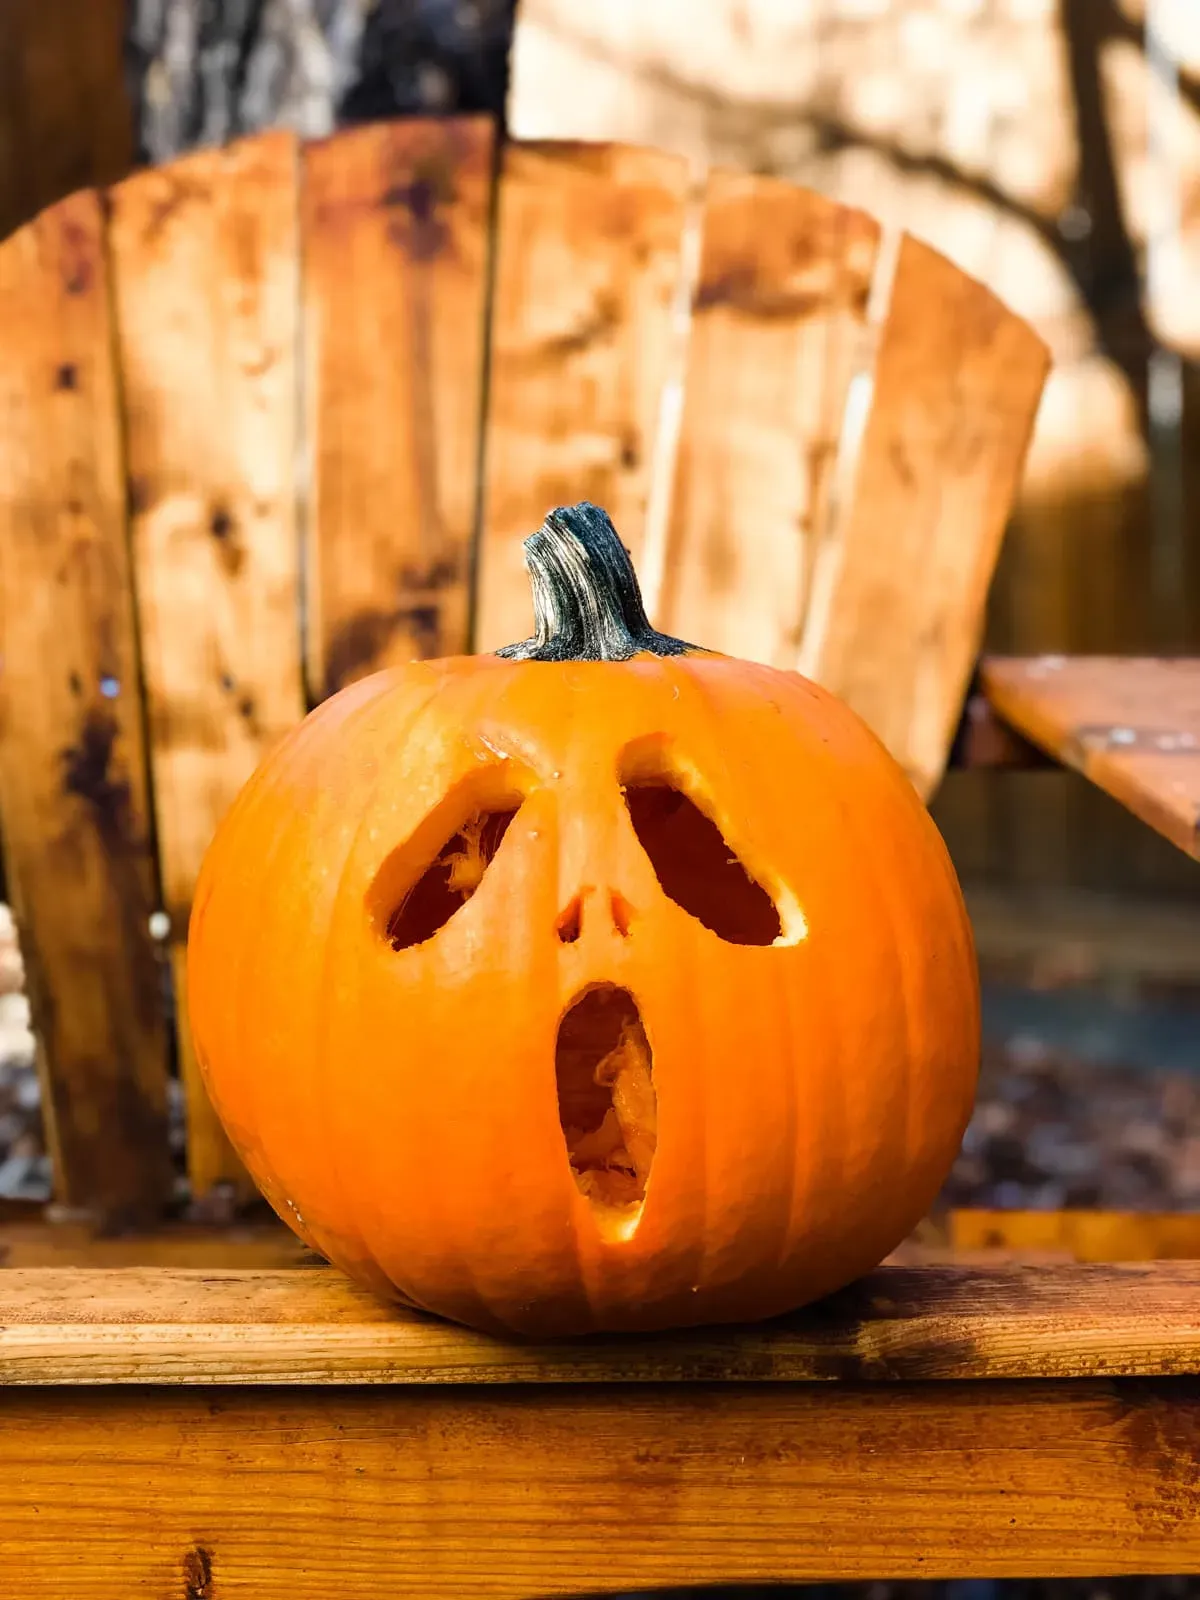
Showcasing Good Easy Pumpkin Carving Ideas
Alright, you've prepped your pumpkin, you've got your tools ready, and you've mastered the basic cuts. Now for the fun part: the actual designs! This is where we get into the nitty-gritty of showcasing good easy pumpkin carving ideas that actually look good without requiring an art degree or surgeon-level precision. We're talking classic spooky faces, simple silhouettes, and clever tricks that make your pumpkin pop with minimal effort. Think less "Michelangelo's David" and more "charmingly spooky porch decoration." These ideas are designed to be achievable for anyone with a sharp knife and a bit of patience, proving that you don't need to spend hours to get a result you're proud of.
Ready to see some examples?
Lighting Up Your Carved Pumpkin Masterpiece

Lighting Up Your Carved Pumpkin Masterpiece
Bringing Your Creation to Life with Light
You've done the hard part. You wrestled with the guts, made the cuts, and now your pumpkin is looking sharp. But a carved pumpkin in the dark is just... a pumpkin with holes. The real magic happens when you add light. Traditionally, that meant a candle. A simple votive or tea light placed inside gives that classic flickering glow. Just make sure the top is off or has some vents cut in it so the heat doesn't build up and potentially start a fire. Also, put the candle on a flat, non-flammable surface inside the pumpkin, like a small plate or a bit of sand, to keep it stable.
Safer Alternatives to the Open Flame
Let's be honest, open flames and dry, rotting gourds on your porch aren't always the best combination, especially with trick-or-treaters running around. Luckily, technology has given us some excellent, safer options. Battery-operated LED lights or fake tea lights are a game changer for good easy pumpkin carving ideas. They don't get hot, they don't blow out in the wind, and they won't set your prize-winning pumpkin (or your house) on fire. You can even find flickering LED lights that mimic a real candle's effect. They're cheap, last a long time, and you can often find them in different colors if you want to get fancy.
Here are a few popular lighting choices:
- Traditional Tea Lights (use with caution and ventilation)
- Small Votive Candles (requires stable placement)
- Battery-Operated LED Tea Lights (safe, flicker option available)
- Small LED String Lights (great for filling the space and brighter glow)
- Pumpkin Lights (specifically designed LED lights for pumpkins, often brighter)
Placement and Making the Light Count
Where you put the light matters. For simpler faces, placing the light centrally usually works best. If you have a more elaborate design or cuts on different sides, you might need more than one light source to illuminate everything evenly. Try placing the pumpkin in its final spot and then experimenting with the light inside to see where it looks most dramatic. Make sure the light source is low enough that it doesn't show through any unwanted spots. A little bit of strategic placement can take your carved pumpkin from "okay" to "wow, that looks cool!" just by getting the lighting right.
Your Carved Pumpkin, Ready for Prime Time
So there you have it. You've picked a decent gourd, avoided slicing off a finger, and hopefully, created something that looks less like a melted snowman and more like an intentional piece of Halloween decor. These good easy pumpkin carving ideas are designed to be achievable, even after a long day or if your artistic skills peaked in kindergarten. The point isn't to win a national carving competition, but to have some fun, make a mess, and end up with a spooky or silly face glowing on your porch. They won't last forever, nothing truly good does, but for a few nights, they'll add that classic Halloween vibe. Now go light it up and try not to trip over it in the dark.