Table of Contents
Let's be honest. Sometimes the classic orange jack-o'-lantern feels a bit... done. You spend hours scooping out slimy guts, hacking away with a dull knife, and the final result looks less like a terrifying ghoul and more like a lopsided potato with a toothache. There has to be a better way, right? Maybe something a little more sophisticated, a little less messy, and definitely, unequivocally, easier. Enter the elegant, understated white pumpkin. These pale beauties offer a fresh canvas for your spooky or stylish decor. Forget the struggle; we're talking about achieving a chic, impressive look without needing a fine arts degree or the patience of a saint. If you're looking for easy white pumpkin carving ideas that actually work, the kind you can pull off after a long day without wanting to throw the whole gourd across the yard, you're in the right place. We'll cut through the noise, talk about why these pumpkins are a better choice for simple designs, what tools you *actually* need, and serve up some genuinely doable ideas. No promises of perfect artistry, just practical ways to get a cool-looking carved pumpkin on your porch with minimal fuss. Ready to swap the struggle for something effortlessly cool?
Why Go White? The Appeal of NonOrange Pumpkins
Why Go White? The Appeal of NonOrange Pumpkins
Breaking the Orange Mold
let's talk about the elephant in the room, or rather, the bright orange gourd on the porch. For decades, Halloween has been synonymous with that specific, vibrant hue. It's tradition, sure. But sometimes, tradition feels a bit...limiting. White pumpkins, often called 'ghost pumpkins' or 'lumina,' offer an immediate shift in aesthetic. They look cleaner, more modern, and frankly, a little more sophisticated right off the bat. Placing a cluster of these against a dark door or vibrant fall foliage creates a striking contrast that an orange pumpkin just can't replicate. It’s like swapping a loud, primary color for something more subtle and elegant. They instantly elevate your fall decor beyond the standard kitcsh.
A Better Canvas for Carving
Beyond just looking good uncarved, the white surface offers practical advantages for carving, especially if you're aiming for easy white pumpkin carving ideas. Think about it: when you carve an orange pumpkin, the carved-out areas reveal the lighter flesh underneath, creating contrast. With a white pumpkin, the contrast isn't just between orange skin and light flesh; it's between the bright white skin and the pale interior, or if you carve all the way through, the dark void inside. This subtle difference can make simpler designs pop in unexpected ways. Plus, marker lines for tracing designs are often much easier to see on a white surface than on orange, which helps immensely when you're just trying to get the design right without squinting.
Why White Might Be Easier
- Tracing lines show up clearer.
- Subtle carvings create elegant shadows.
- Less visual "noise" to distract from the design.
- Often have slightly thinner rinds (though this varies).
Versatility Beyond Spooky
Orange pumpkins scream "Halloween!" White pumpkins? They whisper "Fall." Their neutral color makes them incredibly versatile for decorating throughout the entire autumn season, not just the last week of October. You can use them in elegant Thanksgiving centerpieces, pair them with pastels for a softer look, or integrate them into a modern, minimalist aesthetic. When you carve them, especially with non-traditional designs, they can serve as sophisticated luminaries rather than just spooky jack-o'-lanterns. This means your effort gets you decor that lasts longer and fits more moods than the standard Halloween fare. It’s a smart choice for extending your seasonal decorating mileage.
Getting Started: Tools and Tricks for Easy White Pumpkin Carving
Getting Started: Tools and Tricks for Easy White Pumpkin Carving
Gathering Your Carving Arsenal (Keep it Simple)
so you've got your beautiful white pumpkin sitting on the counter, looking all pristine and ready for its glow-up. Now, before you grab the biggest kitchen knife you can find, let's talk tools. For genuinely easy white pumpkin carving ideas, you don't need a professional kit with twenty different saw blades. A few key items make all the difference. You'll definitely want a sturdy, serrated pumpkin carving saw – the kind that comes in those cheap kits works fine for basic cuts. A scoop or a large metal spoon is essential for gutting (the most glamorous part, obviously). And here's a pro-tip that isn't always in the basic instructions: a dry-erase marker. Since white pumpkins are, well, white, a dry-erase marker lets you draw your design directly onto the surface. If you mess up, wipe it off and try again. Much better than permanent marker or trying to poke holes with a pointy tool. For finer details, if you dare, a small paring knife can be useful, but for *easy* ideas, the basic saw is your workhorse.
Prep Work: Less Guts, More Glory
Alright, tools in hand. First step is always the lid. Cut a circle around the stem, angling your knife slightly inward so the lid has a lip to rest on and doesn't just fall straight into the pumpkin. Make it big enough to get your hand and scoop inside. Once the lid is off, time for the messy part: scraping out the insides. Get rid of all the seeds and stringy bits. The smoother the interior wall, the better the light will shine through your carvings. For easy white pumpkin carving ideas, you don't need to scrape the wall paper-thin, but get the bulk of the pulp out. Some people like to thin the walls where they plan to carve, but for simple designs, just a general clean-out is fine. Now, flip it over and let it drain for a bit. A dry surface is easier to work with, especially when you're drawing your design on.
- Basic Pumpkin Carving Saw: Serrated edge cuts through rind easily.
- Large Metal Spoon or Scoop: For efficient gutting.
- Dry-Erase Marker: Draw and erase designs directly on the white surface.
- Small Paring Knife (Optional): For minor detail work if your design requires it.
- Gloves (Optional, but Recommended): Keeps the pumpkin goo off your hands.
Simple Shapes & Spooky Silhouettes: Easy White Pumpkin Carving Ideas to Start With
Simple Shapes & Spooky Silhouettes: Easy White Pumpkin Carving Ideas to Start With
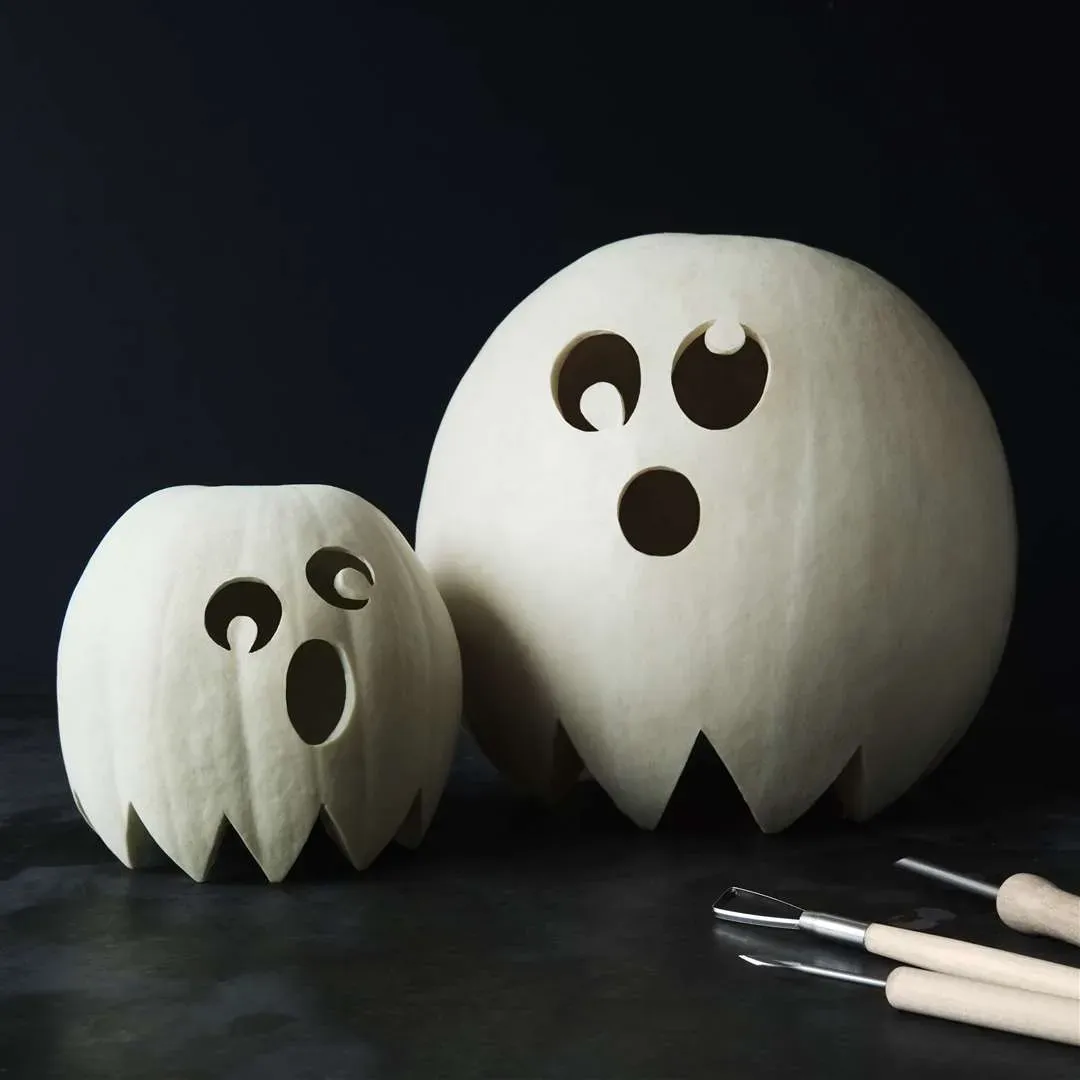
Alright, the pumpkin is prepped, the dry-erase marker is ready, and you haven't lost a finger yet. Excellent. Now for the fun part: the carving itself. When we talk about easy white pumpkin carving ideas, we're not aiming for intricate portraits of historical figures or scenes from classic literature. We're talking about designs that are forgiving, quick, and still look sharp on that pale canvas. Simple geometric shapes work wonders – think circles, triangles, squares, maybe even stars if you're feeling ambitious. Cut them clean through, and you get striking negative space. Or, just etch the surface layer off to create translucent areas that glow when lit. Silhouettes are also your friend here. A simple bat shape, a ghost outline (which feels extra appropriate on a white pumpkin), or even just scattered dots of different sizes can create a really effective, modern look with minimal effort. The beauty of the white pumpkin is that even the most basic cut stands out.
Stencils and Templates: Cheating Your Way to Cool Easy White Pumpkin Carving Ideas

Stencils and Templates: Cheating Your Way to Cool Easy White Pumpkin Carving Ideas
Finding Your Cheat Sheet
let's talk about the ultimate shortcut. If drawing freehand makes your palms sweat or you just want a guaranteed decent outcome without the artistic struggle, stencils and templates are your best friends. Think of them as the assembly instructions for a cool pumpkin. You can find tons of free printable stencils online, ranging from classic spooky faces to more intricate patterns. Websites, craft blogs, even major brands put these out every year. Look for designs labeled "easy" or "beginner." Simple silhouettes work best, especially for easy white pumpkin carving ideas, because they require fewer cuts and less precision. You just print it out, maybe resize it to fit your pumpkin, and you're halfway there. It removes the guesswork of whether your ghost looks more like a blob or your bat resembles a sad kite.
Transferring the Design Without Tears
So you've got your perfect stencil printed. Now, how do you get that design onto the round, sometimes bumpy, surface of your white pumpkin? Taping it on is the simplest method. Use painter's tape or masking tape; it holds well but won't damage the skin. Position the stencil where you want it. For slightly curved surfaces, you might need to make small cuts in the edges of the paper so it lies flatter. Once it's secure, you need to transfer the lines. The classic way is using a pumpkin poking tool (often included in those kits) to make small, closely spaced holes along the lines of the design. You're basically creating a connect-the-dots outline on the pumpkin skin. Another method, especially easy on white pumpkins, is to trace the lines firmly with a dull pencil or stylus, which can leave a faint indentation. Or, if you used a dry-erase marker earlier, you can trace over the stencil lines directly onto the pumpkin with the marker, then remove the paper. Pick the method that feels least likely to send you into a fit of frustration.
- Printable stencils are widely available online for free.
- Look for "easy" or "beginner" designs, like simple shapes or silhouettes.
- Tape the stencil securely to the pumpkin surface.
- Use a poking tool or dull pencil to transfer the design outline.
- Dry-erase markers work well on white pumpkins for tracing.
Making Your Masterpiece Last (Even the Easy White Pumpkin Carving Ideas)
Making Your Masterpiece Last (Even the Easy White Pumpkin Carving Ideas)
Making Your Masterpiece Last (Even the Easy White Pumpkin Carving Ideas)
Alright, you've done the deed. Your easy white pumpkin carving ideas are now glowing, or at least sitting there looking pretty sharp. The sad truth is, carving is essentially signing a pumpkin's death warrant. Exposure to air causes drying and shriveling, and let's not forget the mold and rot that inevitably set in. You spent precious minutes (or maybe even a whole hour, let's not judge) on this, so you want it to last more than two days before it starts looking like a deflated swamp creature. There are tricks, though. Some folks swear by coating the cut edges with petroleum jelly, claiming it seals in moisture. Others advocate for a bleach solution bath – a quick dip in water mixed with a little bleach is supposed to kill off mold spores. Misting the inside daily with water can also help keep things hydrated, though it's a fine line between moist and moldy. Keeping it out of direct sunlight and away from heat helps slow the decomposition process too. None of these are magic bullets, mind you. It's a delaying tactic, at best. But hey, a few extra days of looking good is better than none.
The Final Cut: Easy White Pumpkin Success
Look, carving pumpkins doesn't have to be an all-day wrestling match with a gourd. White pumpkins offer a clean slate and, frankly, make achieving a polished look much less painful. We've walked through why they're a good choice and tossed out some genuinely easy white pumpkin carving ideas that skip the intricate detail work and head straight for impact. Whether you went for simple shapes or cheated a bit with stencils, the goal was a cool decoration without the usual Halloween carving headache. So, put down the complicated patterns, grab a white pumpkin, and enjoy the fact that you actually pulled it off.