Table of Contents
Halloween is right around the corner, and for many, that means it's time to grab a pumpkin and a knife. But maybe you're tired of the same old spooky faces or intricate spiderwebs. Maybe you want something a little more magical, a little less... gruesome. If that sounds like you, then you're in the right place to explore some truly enchanting easy pumpkin carving ideas unicorn style.
Why choose easy unicorn pumpkin ideas?

Why choose easy unicorn pumpkin ideas?
Skip the Struggle, Embrace the Sparkle
Let's be honest. Intricate pumpkin carving can quickly go from a fun fall activity to a frustrating mess. You've seen the pictures online – masterpieces of detail that look like they took a week and a team of sculptors. Trying to replicate those often ends with a cracked pumpkin, broken tools, and a general sense of defeat. That's where focusing on easy pumpkin carving ideas, specifically unicorn designs, saves the day. Instead of battling tiny details, you get to create something charming and magical without the stress. It's about enjoying the process, not just the outcome, and definitely not ending up with a lopsided jack-o'-lantern that looks more like a melted alien.
Magic Without the Mayhem
Unicorns offer a fantastic contrast to the typical ghouls and goblins of Halloween. They bring a sense of wonder, fantasy, and pure, unadulterated magic. Opting for easy pumpkin carving ideas unicorn themed means you're creating a welcoming, cheerful decoration perfect for families, neighborhoods with lots of trick-or-treaters, or anyone who just prefers rainbows over gore. These designs appeal across ages, from toddlers who adore mythical creatures to adults who appreciate a touch of whimsy. Plus, a unicorn pumpkin stands out in a sea of scary faces – it's memorable, positive, and frankly, adorable.
Considering a unicorn pumpkin? Ask yourself:
- Are you tired of complex, frustrating carving patterns?
- Do you want a cheerful, non-spooky Halloween decoration?
- Are you carving with kids or looking for a family-friendly project?
- Does the idea of a little magic appeal to you more than monsters?
Gathering your gear for easy pumpkin carving unicorn style
Gathering your gear for easy pumpkin carving unicorn style
Basic Tools for Magical Results
let's talk tools. You don't need a fancy, expensive kit to pull off these easy pumpkin carving ideas unicorn style. Seriously. You probably have most of what you need lurking in your kitchen drawers right now. A sturdy spoon or scoop is essential for clearing out the pumpkin guts – the messiest but arguably most satisfying part. A sharp, small knife is key for the actual carving. Think paring knife size, something you have control over. Bigger knives just make things harder and more dangerous when you're trying to navigate curves. A poking tool, like a skewer or even a thick needle, helps transfer your design onto the pumpkin surface. That's really it for the absolute basics to start your easy unicorn pumpkin project.
Making it Even Easier: Stencils and Specialized Kits
Want to simplify things further? Grab a printable stencil. There are tons online, often free, designed specifically for easy unicorn shapes. Just tape it on and use your poking tool to transfer the outline. It takes the guesswork out of drawing. While not strictly necessary for *easy* designs, those small, specialized pumpkin carving kits with saw-like tools can be helpful, especially for tighter spots or if you're nervous about using a kitchen knife. They're designed to saw through the pumpkin wall rather than slice, which some find safer. Plus, they often come with scoops and pokers, consolidating your gear.
Here’s a quick list of essentials:
- A medium-sized pumpkin (not too big, not too small)
- Sturdy spoon or scoop
- Small, sharp knife (paring knife works)
- Poking tool (skewer, needle)
- Printed unicorn stencil (optional, but recommended for easy designs)
- Cutting surface (old newspaper, plastic tablecloth)
Safety First and Finishing Touches
Before you start slicing, a quick word on safety. Always cut away from yourself. Keep your fingers clear of the blade. If you're carving with kids, adult supervision is non-negotiable. Maybe give them the job of scooping or tracing the stencil. Now, for the fun part beyond the carving: making your unicorn pop! Think about adding a horn (rolled paper, craft foam, or even a painted carrot), maybe some yarn for a mane, glitter glue for sparkle, or paint for extra details like eyes or rosy cheeks. These additions turn a simple carved outline into a truly magical creature and are essential steps in completing your easy pumpkin carving ideas unicorn masterpiece.
Stepbystep easy pumpkin carving ideas: Unicorn editions
Stepbystep easy pumpkin carving ideas: Unicorn editions
Prep Your Canvas: Cleaning and Transferring
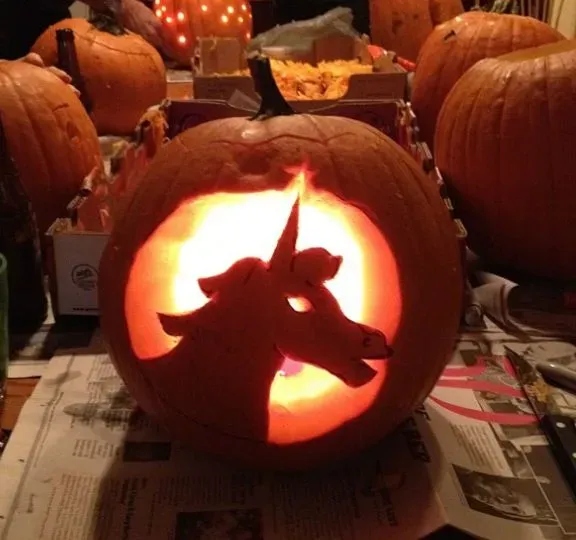
Alright, you've got your pumpkin and your basic tools. First things first, clean that squash. Wipe down the outside to get rid of any dirt or grime. Then, cut a lid around the stem – angle your knife inwards slightly so the lid has a lip and doesn't just fall into the pumpkin later. Scoop out all the seeds and stringy bits. Get it good and clean inside; nobody likes a moldy pumpkin before Halloween even arrives. Now, for getting that magical unicorn design onto the surface for your easy pumpkin carving ideas unicorn project. If you're using a stencil, tape it firmly to the pumpkin where you want the unicorn. Use your poking tool to make small holes all along the lines of the stencil. Keep the holes close together, maybe about an eighth of an inch apart. This creates a dotted outline you can follow. If you're freehanding or using a simple drawing, just draw directly onto the pumpkin with a dry-erase marker or pencil.
Carving the Simple Shapes
With your outline ready, it's time to carve. This is where the "easy" part of easy pumpkin carving ideas unicorn really comes in. We're not attempting intricate swirls or tiny features yet. Focus on the main shapes: the unicorn's head outline, maybe a simple horn shape, and perhaps an ear or two. Use your small, sharp knife and follow the dotted lines or your drawn lines. Take it slow and steady. Don't try to push the knife through in one go. Use a gentle sawing motion. Cut out the pieces you want removed entirely. For areas you just want to scrape the skin off (like for eyes or cheek details if you're doing that), use the edge of your spoon or a scraping tool from a kit. Remember to pop out the carved pieces from the inside of the pumpkin.
Here’s a basic carving sequence:
- Cut the lid and clean the inside.
- Tape the stencil and poke holes along the lines, or draw your design.
- Using a small knife, carefully saw along the main outlines (head, neck, horn).
- Push out the carved sections from the inside.
- Scrape away skin for any detailed areas you don't want to cut through.
- Clean up any stray pumpkin bits around your design.
Adding Simple Details and Variations
Once the main shape is cut, you can leave it as is for a super minimalist look, or add a few simple details to enhance your easy pumpkin carving ideas unicorn design. For example, you could scrape away the skin to create a simple eye or perhaps a few lines for a mane. Another easy approach is to use different techniques. Instead of cutting all the way through, you can just carve deeply enough to remove the outer skin layer, creating a design that glows differently from the inside. This works well for stars around the unicorn or simple mane lines. Don't overthink it. The goal is charming, not hyper-realistic. A simple outline and a few scraped details can look incredibly effective, especially when lit from within.
Beyond the stencil: Finishing your easy unicorn pumpkin
Beyond the stencil: Finishing your easy unicorn pumpkin
Adding That Iconic Horn and Mane
Carving the basic unicorn shape is step one for these easy pumpkin carving ideas unicorn projects. Step two, and arguably the most fun part, is bringing it to life with accessories. A unicorn isn't a unicorn without its horn. You could try to carve one, sure, but for *easy*, think outside the pumpkin. Rolling a piece of gold or silver cardstock into a cone is simple and effective. Glue it together, maybe add a swirl with a marker, and then just attach it to the pumpkin's forehead with toothpicks or strong glue. Seriously, don't overcomplicate it. For a mane, yarn is your best friend. Hot glue strands of colorful yarn along the back of the pumpkin's "neck" or head. Braids, loose strands, rainbow colors – go wild. It instantly adds personality and covers up any carving mishaps you might have had.
Sprinkling on the Sparkle and Color
Carving provides the shape, but paint and glitter add the magic to your easy pumpkin carving ideas unicorn. Acrylic paints work great on pumpkin skin. Think about painting the carved horn gold or silver if you went that route, or adding a pop of color to the ears. You can paint simple eyes and eyelashes if you didn't carve them. Glitter glue is a non-negotiable for a unicorn. Outline the carved edges, add swirls on the cheeks, or just go heavy on the horn. Just know that glitter gets everywhere, so maybe do this outside or lay down a serious amount of newspaper. It's a small price to pay for maximum sparkle, right?
Consider these easy finishing touches:
- Attach a cardstock, foam, or even painted carrot horn with toothpicks.
- Glue yarn or felt for a colorful mane.
- Use acrylic paint for eyes, cheeks, or horn details.
- Apply glitter glue along carved lines or as decorative accents.
- Add stick-on gems or sequins for extra sparkle.
Lighting Up Your Magical Creation
The final touch for any carved pumpkin, including your easy pumpkin carving ideas unicorn masterpiece, is the light source. Ditch the old-school candles unless you enjoy the smell of roasting pumpkin and the constant fire hazard. Modern battery-operated LED lights are safer, brighter, and last way longer. You can find small tea lights or strings of fairy lights. Pop a few inside your unicorn pumpkin, put the lid back on, and watch it glow. The light shining through the carved areas and reflecting off the glitter and painted details is what makes all your easy carving efforts worth it. Place it on your porch, in a window, or anywhere you need a little extra magic this Halloween. It's proof that you don't need to be a master carver to create something truly enchanting.
Your Magical Unicorn Pumpkin Awaits
So there you have it. Turning a humble gourd into a creature of myth doesn't require an advanced degree in sculpture or the patience of a saint. These easy pumpkin carving ideas unicorn styles prove you can add a bit of sparkle to your Halloween decor without the usual carving-induced frustration. You've got the tools, the simple steps, and hopefully, a newfound appreciation for glitter and fake flowers on a vegetable. Display your creation proudly – it's a welcome change from the tenth generic frowny face on the block. Now, go enjoy the compliments (and maybe keep a broom handy for the glitter fallout).