Table of Contents
Halloween is just around the corner, and you've got that big, round gourd sitting on your porch, staring back at you. The pressure is on to create something suitably spooky, something that says, "Yeah, I put in *some* effort, but I'm not trying out for a reality carving show." You might think intricate designs are out of reach, especially if you're picturing those super detailed, anatomically correct skeletons that look like they belong in a museum rather than on your doorstep.
Why Choose Easy Skeleton Pumpkin Carving Ideas This Year?
Why Choose Easy Skeleton Pumpkin Carving Ideas This Year?
They're Instantly Recognizable and Spooky
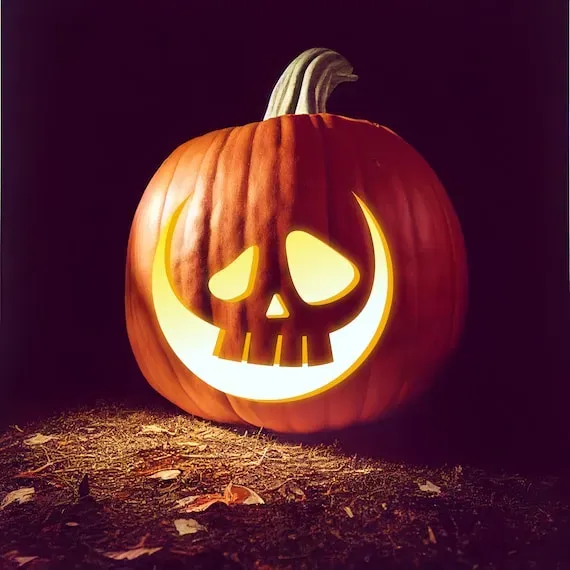
Look, when you're trying to get into the Halloween spirit, you want something that screams "spooky." A skeleton does that without needing a complex backstory or explaining some obscure horror movie reference. Everyone gets a skeleton. It's primal, a little bit creepy, and perfectly suited for the season. Choosing easy skeleton pumpkin carving ideas means you tap into that universal fear and fascination with bones and the afterlife without needing an art degree. Plus, there's something inherently cool about a bony grin staring out from a glowing gourd on a dark night.
Skeletons Offer Surprising Versatility
You might think "skeleton" means just one thing, but there's a surprising amount of room to play, even with easy designs. You're not limited to just a basic skull face. You can do skeleton hands reaching out, a simple rib cage, or even just a few key bones like femurs crossed. This variety keeps things fresh. One year I did a whole line of pumpkins with different skeleton parts – one with hands, one with just eyes and a nose hole that looked like a skull, another with simple crossbones. It felt like a whole bony family without any single design being overly complicated.
What's your go-to spooky Halloween theme?
- Ghosts
- Zombies
- Vampires
- Skeletons
- Witches
- Monsters (Frankenstein, Mummy, etc.)
Easy Designs Mean Less Stress, More Fun
Let's be real. Pumpkin carving can sometimes feel like a chore, especially if you pick a design that's way over your skill level. You end up frustrated, covered in pumpkin guts, and with a lopsided mess that barely resembles what you intended. That's where focusing on *easy* skeleton pumpkin carving ideas pays off. Simple shapes, clear lines, and forgiving patterns make the process enjoyable. You spend less time stressing about intricate details and more time just enjoying the act of carving, maybe with some spooky tunes playing and a warm drink nearby. It’s about embracing the fun, not striving for perfection.
Essential Tools for Your Skeleton Pumpkin Project

Essential Tools for Your Skeleton Pumpkin Project
Alright, so you're sold on the idea of tackling some easy skeleton pumpkin carving ideas. Great choice. Now, before you just grab the biggest kitchen knife you own (please, don't), let's talk about the gear. You don't need a professional carving kit with 50 different tiny blades. For simple skeleton designs, you really only need a few key things. Think of it like basic surgery – you need the right instruments for clean cuts, not a whole toolbox for building a house.
Simple Steps & Easy Skeleton Pumpkin Carving Ideas to Get Started
Simple Steps & Easy Skeleton Pumpkin Carving Ideas to Get Started
Prep Your Pumpkin Like a Pro (Almost)
Alright, you've got your tools and your chosen pumpkin. First things first, you need to get the guts out. Don't slice off the top like you see in the movies; cut a hole in the *bottom*. Seriously. This makes it way easier to place the pumpkin over a light source later and keeps the top looking clean. Scoop out all the seeds and stringy bits. Get it nice and scraped down on the inside, especially the wall you plan to carve. A thinner wall is easier to cut. Once clean, tape your chosen skeleton pattern onto the pumpkin face. Use a poker tool or even a sharp pencil to transfer the design by poking holes along the lines. Think of it as connecting the dots for your bony friend.
Picking Your First Easy Skeleton Design
With your design transferred, it's time to start carving. Remember, we're focusing on *easy* skeleton pumpkin carving ideas. This isn't about intricate bone structure; it's about the spooky silhouette. A simple skull face with big eye sockets and a jagged grin is a fantastic starting point. You can also try carving just a pair of skeleton hands reaching up from the bottom or sides. Another easy win is a simple rib cage shape – just a few curved lines and a spine down the middle. These designs rely on bold shapes rather than fine detail, making them much more forgiving if your hand isn't perfectly steady.
As the old saying goes, "Practice makes perfect, but messy pumpkins still look spooky in the dark."
Adding Detail and Light to Your Spooky Skeleton Pumpkin

Adding Detail and Light to Your Spooky Skeleton Pumpkin
Adding Simple Details Without Overcomplicating Things
you've got the basic skeleton shape carved out. Maybe it's a skull, maybe some hands. It looks decent, but you want to give it a little something extra without spending another hour hunched over the pumpkin. This is where shallow cuts or scraping come in. Instead of carving all the way through, you can use a smaller tool (or even a sturdy spoon handle) to scrape away just the outer layer of the pumpkin skin. This creates areas that will glow dimly when lit, adding texture and definition. Think of simple lines for teeth inside the mouth cavity, or shallow curves to suggest finger bones on a hand. It’s about creating contrast, not carving tiny masterpieces. I did this once on a simple skull face, scraping lines around the eye sockets and a few vertical lines on the forehead. It took maybe five extra minutes but made the whole thing look way more intentional.
Lighting Up Your Bony Creation for Maximum Spookiness
The final step to making your easy skeleton pumpkin carving ideas pop is the lighting. Ditch the old-school candles unless you enjoy fire hazards and uneven flickering. Battery-operated LED lights are the way to go. They're safe, they last a long time, and they provide a consistent glow. Drop one or two inside your bottom-cut pumpkin, and place it on the ground or a surface. The light shines up, illuminating your spooky skeleton design perfectly. If you carved a bottom-cut pumpkin, just lift it and place it over the light source. Easy peasy. The goal here isn't blinding brightness, but that eerie, flickering glow that makes carved pumpkins so iconic on a dark Halloween night.
What's the easiest way to get that spooky glow?
- Traditional candle (Use with extreme caution!)
- Battery-operated tea light
- Small LED puck light
- String of fairy lights stuffed inside
Time to Unearth Your Inner Pumpkin Artist
So there you have it. Turns out, summoning a spooky skeleton onto your pumpkin doesn't require a degree in osteology or hours hunched over a carving kit the size of a toolbox. We've covered the basics, tossed out some genuinely achievable ideas, and hopefully, convinced you that yes, you can absolutely do this. Grab a pumpkin, find a design that doesn't make your eyes water, and give it a go. The worst that happens? You have a slightly lopsided, charmingly imperfect bony friend guarding your door. Happy carving, and may your Halloween be just the right amount of creepy.