Table of Contents
Alright, let's talk Halloween. You've got the pumpkin, maybe a slightly wobbly kitchen knife, and a vague dream of creating something that doesn't look like it lost a fight with a badger. Add Disney into the mix, and suddenly you're picturing intricate Cinderella castles or a perfectly rendered Stitch face, feeling the cold dread of potential failure creep in. Most of us aren't sculpting wizards, and attempting a photo-realistic Captain Jack Sparrow on a gourd seems… ambitious, at best. But what if you could bring a little Disney magic to your porch without needing a fine art degree or risking a trip to the emergency room? That's where easy pumpkin carving ideas Disney come into play. We're skipping the complex stuff and focusing on simple, achievable ways to get your favorite characters onto your Halloween display. We’ll dig into finding the right designs, simple methods that actually work, what to do when things go wrong, and even how to show off your finished (and hopefully intact) creation. Ready to ditch the frustration and embrace the fun? Let's carve out some manageable magic.
Finding Easy Pumpkin Carving Ideas Disney Characters
Finding Easy Pumpkin Carving Ideas Disney Characters
Why "Easy" is Key When Finding Disney Pumpkin Designs
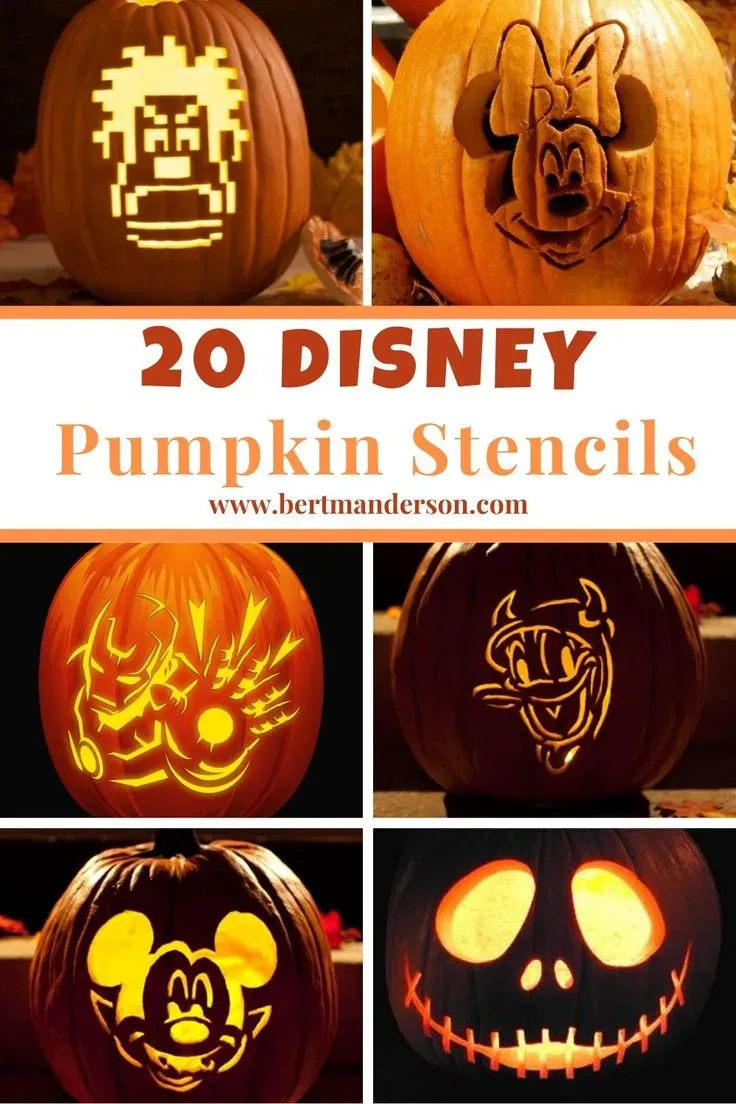
so you decided you want to carve a Disney pumpkin. Great. Then you Google it and suddenly you're looking at images that look like they were etched by laser on Cinderella's carriage. That's not "easy." When we talk about Finding Easy Pumpkin Carving Ideas Disney Characters, we mean designs that won't make you weep into your pumpkin guts or require specialized tools you don't own. The internet is flooded with stunning, complex patterns. They look amazing on Pinterest, sure, but trying to replicate Olaf's exact goofy grin with a dull knife at 8 PM the night before Halloween? Not happening for most of us. We need simplicity. Bold lines, clear shapes, minimal intricate details. Think basic Mickey Mouse ears, a classic Tinkerbell silhouette, or maybe a simple outline of Buzz Lightyear's helmet. The goal is recognizable, not museum-worthy.
Where to Hunt for Simple Disney Character Patterns
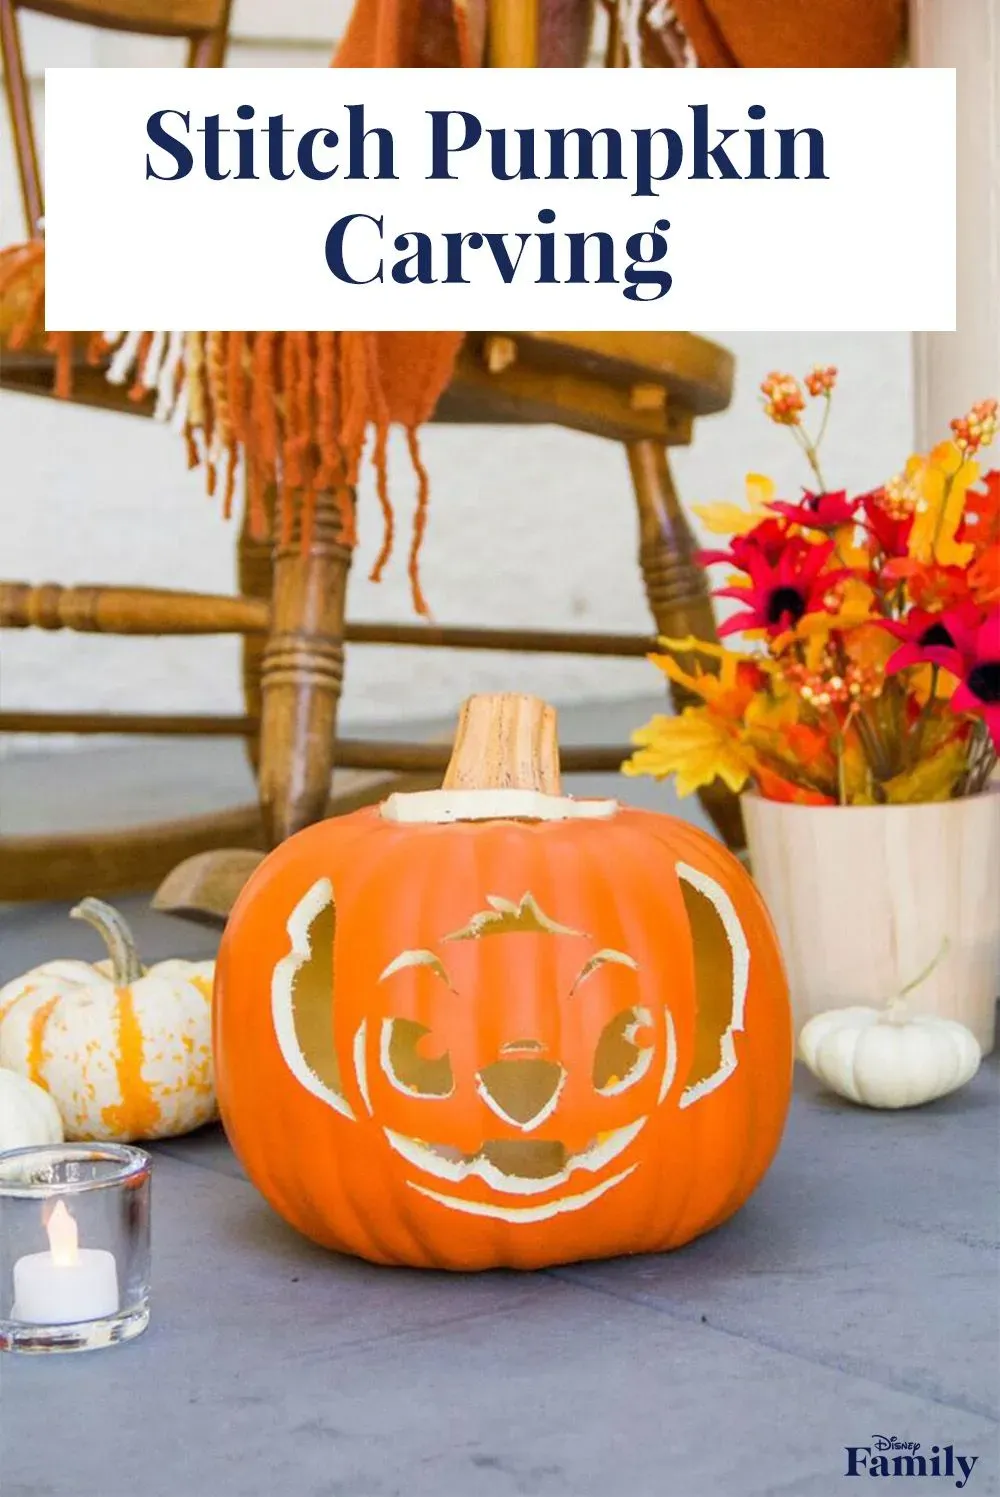
So, where do these mythical easy designs hide? Start with official Disney resources if you can find them – sometimes they release simple stencils around Halloween. More often, you'll strike gold on fan sites or blogs dedicated to crafts and holidays. Search specifically for "simple Disney pumpkin stencils" or "silhouette Disney pumpkin patterns." Silhouette designs are your best friend here. They don't require carving away layers or making tiny cuts for eyes and mouths. You just cut around the outline. Think of characters with distinct shapes: Simba's profile, Ariel's tail fin, or even the outline of the Haunted Mansion's facade. Avoid characters with lots of hair, complex costumes, or detailed facial expressions unless you're feeling particularly brave (and have a backup pumpkin).
Judging if a Disney Idea is Actually Easy
Alright, you've found a design. Now, be brutally honest with yourself. Is this *actually* easy? Look at the lines. Are they mostly straight or gentle curves? Great. Are there a zillion tiny points, sharp angles, or places where lines almost touch but don't? Probably not easy. Count the separate pieces you'd need to remove. A design with two or three big areas to cut out is much simpler than one with twenty small ones. Imagine holding the knife and trying to follow the line. If your hand cramps just looking at the picture, move on. Stick to patterns designed for basic carving tools, not surgical instruments. A good rule of thumb? If it looks like a coloring book page with thick lines, you're on the right track for easy pumpkin carving ideas Disney style.
Simple Techniques for Easy Disney Pumpkin Carving Ideas

Simple Techniques for Easy Disney Pumpkin Carving Ideas
Simple Techniques for Easy Disney Pumpkin Carving Ideas
you've found a simple Disney design. Now for the fun part – getting it onto the pumpkin and cutting it out without losing a finger or your sanity. The simplest technique for easy pumpkin carving ideas Disney style involves transferring your pattern. Print your chosen design to fit the pumpkin's flatter side. Tape it securely. Now, grab a sharp, pointy tool – a pumpkin poking tool from a cheap kit, a thumbtack, or even a sturdy toothpick works. Follow the lines of your pattern, poking holes closely together, maybe an eighth to a quarter inch apart. This creates a dotted outline on the pumpkin skin. Rip off the paper. You now have a connect-the-dots guide for your knife. When you cut, use a small, sharp carving saw (those cheap kits actually have decent ones for this) and follow the dotted lines. Don't rush. Saw gently, letting the tool do the work. If a piece gets stuck, don't force it; wiggle the saw a bit or try cutting from a different angle. Simple shapes and a steady hand are the keys here.
Beyond Carving: Other Easy Disney Pumpkin Ideas
Beyond Carving: Other Easy Disney Pumpkin Ideas
Painting Your Way to Easy Disney Pumpkin Magic
Look, sometimes the idea of sticking a sharp object into a round, unwieldy squash just doesn't spark joy. Maybe you've had a carving disaster before, or perhaps you're working with smaller kids where knives are a definite no-go. This is where painting swoops in like Mary Poppins with an umbrella. You can still achieve fantastic easy pumpkin carving ideas Disney looks, but with brushes and paint instead of saws. Grab some acrylic paints – they stick well to pumpkin skin. Think simple character faces: Mickey, Minnie, maybe a basic Pooh Bear or Piglet. You can freehand it if you're brave, or use stencils (again, simple ones are best) or even transfer a design by coloring the back of a printout with pencil, taping it on, and tracing over the lines to leave a faint outline. You can also paint solid colors and add vinyl decals or stickers of Disney characters. It's less messy than carving guts, generally safer, and lets you get really creative with colors and details that are hard to achieve with just cuts.
Painting Tips for Disney Pumpkins
- Wash and thoroughly dry the pumpkin first.
- Use acrylic craft paints; they cover well.
- Consider painting a base coat (like white or black) for brighter colors to pop.
- Use simple stencils or freehand bold shapes.
- Allow each color layer to dry before adding the next.
Using Decals, Markers, and More for Simple Disney Themes
Alright, let's go even simpler. Forget carving, forget paintbrushes. You can still have fantastic easy pumpkin carving ideas Disney style using methods that require minimal artistic talent or sharp tools. Think vinyl decals. You can buy or cut out silhouettes of characters – Cinderella's carriage, Peter Pan flying, the Genie's lamp – and simply stick them onto the pumpkin. This is ridiculously fast and effective. Permanent markers are another option, especially for outlining painted shapes or drawing simple faces directly onto the pumpkin. You can also use craft foam to cut out shapes like Mickey ears, attach them with glue, and suddenly you have a character pumpkin. Pipe cleaners, googly eyes, felt scraps – the craft aisle is your oyster. The point is, you don't *have* to carve or even paint to get that Disney vibe. Sometimes, sticking some well-placed felt circles on an orange pumpkin is all you need to say "Hey, it's Mickey!" and call it a day. And frankly, that's perfectly acceptable.
Troubleshooting Your Easy Disney Pumpkin Carving Projects
Troubleshooting Your Easy Disney Pumpkin Carving Projects
When Your Knife Gets Stuck (Because It Will)
So you're midway through outlining Mickey's ear, feeling pretty good about your easy pumpkin carving ideas Disney project, and suddenly, the little saw blade jams. Or maybe it just refuses to turn that corner smoothly. This is less about your skill and more about the pumpkin's thickness and the tool itself. First, don't force it. Applying too much pressure is how blades snap or, worse, you slip. Pull the saw back out. Check if there's any stringy pumpkin flesh caught in the teeth – clear that out. Sometimes, the blade just needs a little lubrication from the pumpkin's own juice; wiggle it gently. If it's a tight corner, try approaching it from a different angle or making a few relief cuts leading into the turn. Think of it like navigating a tight parking spot, slow and deliberate movements work better than jamming the wheel. If your cheap kit saw is just bending, well, that's why they're cheap. A slightly sturdier, but still small, serrated knife can sometimes handle thicker spots, but be extra careful.
Your Pattern Transfer Isn't Working
You poked a zillion holes following your chosen easy Disney pattern, ripped off the paper with anticipation, and... half the dots are gone, or they're impossible to see. Annoying, right? Especially when you thought you were doing everything right for your easy pumpkin carving ideas Disney attempt. The pumpkin skin might be too light, or your poking tool wasn't pointy enough, or you didn't poke close enough together. Don't panic. You can re-tape the pattern (if it's still intact) and go over the missing spots, poking deeper this time. Or, if the pattern's a goner, grab a fine-tip permanent marker (black works best) and carefully draw over the faint dotted lines you *can* see, connecting the dots freehand. It doesn't have to be perfect; it's a guide, not a finished drawing. If even that fails, and you have the original printed pattern, you can try taping it back on and using the marker to trace the lines directly onto the pumpkin skin. It might look messy close up, but from a distance, with the light inside, it usually works out.
- Problem: Knife stuck/won't turn. Solution: Withdraw, clear debris, try different angle, gentle sawing motion.
- Problem: Pattern dots hard to see. Solution: Repoke, use marker to connect visible dots, trace directly onto pumpkin.
- Problem: Pumpkin starts rotting too fast. Solution: Apply petroleum jelly to cut edges, store in cool place, use artificial light.
- Problem: A carved piece falls out prematurely. Solution: Use toothpicks to reattach the piece carefully.
When Your Disney Design Looks... Off
You've finished carving, you pop the light in, and instead of a cheerful Goofy, you've got something that looks vaguely like he's seen a ghost and is regretting his life choices. It happens. Sometimes the negative space you carved changes the look entirely, or a line is a bit wobbly. When your easy pumpkin carving ideas Disney project doesn't quite match the vision, first, dim the lights. Seriously. Pumpkin carvings almost always look better in low light with the candle (or LED) flickering inside. It hides imperfections. If a shape is just fundamentally wrong, see if you can carefully trim a little more away to refine it, but be cautious – you can't put pumpkin back. If a thin piece looks weak or is bending, use a toothpick snapped to size to brace it from the inside. If a smaller piece accidentally fell out (like an eye or a tooth), you can often reattach it using toothpicks pushed into the surrounding pumpkin and into the piece itself. It's not seamless surgery, but it can save the design from looking gappy. Embrace the slightly imperfect, handmade charm. It gives your Disney character... character.
Displaying Your Easy Disney Pumpkin Carving Masterpieces
Displaying Your Easy Disney Pumpkin Carving Masterpieces
Finding the Right Spot for Your Disney Pumpkin
you’ve put in the work on your easy pumpkin carving ideas Disney project. You’ve got a pumpkin that (hopefully) looks like a recognizable character and hasn't collapsed into a sad heap. Now you want to show it off. Don't just plop it on the front step and walk away. Location matters. You need a spot where people can actually see your creation, ideally both during the day and at night. A porch, a prominent windowsill, or even a sturdy garden bench works well. Make sure it's relatively protected from the elements – rain can make carved pumpkins deteriorate faster than you can say "Bibbidi-Bobbidi-Boo." Position it so the best side of the carving is facing outwards. If you messed up one ear on Mickey, angle it so the good ear is front and center. We're highlighting the successes, not the imperfections.
Lighting Up Your Easy Disney Carvings
A carved pumpkin without light is just… a pumpkin with holes. The magic happens when you illuminate it. Traditional candles are classic, but they are a fire hazard, especially with kids or pets around, and they can cook the inside of your pumpkin, speeding up decay. For easy pumpkin carving ideas Disney style, where you want that character to shine, LED lights are the way to go. You can get small, battery-operated tea lights or even strings of fairy lights specifically designed for pumpkins. They provide a consistent, safe glow that really makes your design pop after dark. Experiment with placement inside the pumpkin to get the best effect – sometimes centering it works, sometimes pushing it closer to the carved surface is better. A well-lit pumpkin transforms from a simple gourd into a glowing piece of Halloween art.
Lighting Options for Disney Pumpkins
- Battery-operated LED tea lights: Safe, simple, classic flicker effect.
- Small LED string lights: Can provide more even light coverage inside larger pumpkins.
- Color-changing LED lights: Adds a fun, dynamic element, maybe green for the Hulk or blue for Elsa.
- Mini flashlights: Good for a strong, directed beam if needed for specific details.
Keeping Your Disney Pumpkin Looking Fresh
Carved pumpkins are, unfortunately, temporary art installations. They start to break down the moment you cut into them. Nobody wants their carefully executed easy pumpkin carving ideas Disney design to turn into a moldy, saggy mess before Halloween night. There are a few tricks to extend its lifespan, though don't expect miracles. Once carved, you can rub petroleum jelly (like Vaseline) onto all the cut edges. This helps seal in moisture and slows down dehydration, which is what causes the edges to shrivel. Some people swear by a bleach solution soak (a teaspoon of bleach per gallon of water) for a few hours before displaying, claiming it kills mold spores, but rinse it thoroughly if you try this. Keeping the pumpkin in a cool location, away from direct sunlight during the day, also helps. If it starts looking a bit sad, a light misting of water can sometimes perk it up temporarily. Just accept that it's not going to last forever, enjoy it while it looks good, and take plenty of pictures.
Wrapping Up Your Easy Disney Pumpkin Project
So there you have it. Bringing a bit of Disney sparkle to your pumpkins doesn't require surgical precision or an art school background. We've looked at finding designs that don't make you want to throw the gourd across the yard, simple techniques that are actually, well, simple, and how to fix things when your attempt at Mickey's ear looks suspiciously like a potato chip. The point isn't to craft a museum-worthy masterpiece, but to have some fun and end up with a pumpkin that makes you smile when you see it lit up. Give it a shot. Worst case, you've got a slightly lopsided Jack Skellington and a good story. Happy carving.