Table of Contents
Halloween looms, and that round, orange gourd on your porch is staring you down, demanding transformation. Maybe you've scrolled through Pinterest, seen those intricate, multi-layered carving masterpieces, and felt a wave of "nope" wash over you. Or perhaps you're just short on time and patience but still want a carved pumpkin that gets a chuckle instead of a confused frown. If the thought of complex designs sends shivers down your spine (and not the good spooky kind), you're likely on the hunt for something manageable. Good news: we're talking about easy minion pumpkin carving ideas. Yes, those goggle-eyed, denim-clad troublemakers from the *Despicable Me* world. They happen to be remarkably well-suited for beginner-level pumpkin surgery. Forget needing an art degree or a workshop full of specialized tools. We'll walk you through finding simple designs, gathering the right (minimal) gear, and tackling the carving process step-by-step. Think less "masterpiece," more "manageable fun" that still gets the Halloween job done. Ready to turn that plain pumpkin into a cheerful, if slightly dim-witted, character?
Why Choose Easy Minion Pumpkin Carving Ideas This Halloween?
Why Choose Easy Minion Pumpkin Carving Ideas This Halloween?
Alright, let's be honest. You've seen the pumpkin carving tutorials that look like they require a degree in sculpting and a steady hand that could disarm a bomb. Who has time for that when you're also trying to find costumes that don't itch and locate the candy stash before the trick-or-treaters arrive? This is precisely where easy minion pumpkin carving ideas swoop in to save your Halloween sanity. Think about it: Minions are basically yellow, pill-shaped blobs with goggles. Their features are simple – big eyes, a line for a mouth, maybe a few strands of hair. No intricate shading, no complex anatomical structures to worry about. They are, by design, forgiving. Plus, everyone knows who they are. You won't have neighbors squinting at your porch, trying to figure out if that's supposed to be a zombie flamingo or abstract art. It's a Minion, plain and simple, and that immediate recognition gets you points for effort without actually requiring *that* much effort. It's the low-effort, high-reward play of the Halloween decorating game.
Gathering Your Gear for Easy Minion Pumpkin Carving
Gathering Your Gear for Easy Minion Pumpkin Carving
What Tools Do You Actually Need?
so you're sold on the easy minion pumpkin carving ideas. Now, what do you actually need to make this happen? Forget those fancy, expensive carving kits with a million tiny tools you'll never use again. For a Minion, you keep it simple. You absolutely need a sturdy, sharp knife for cutting off the top (ask an adult for help here!). Then, you'll need a big spoon or a scoop – something robust – to get all the guts and seeds out. Trust me, this is messier than you think, so maybe do it outside or on newspaper. For the actual carving of the features, a smaller, sharp paring knife or even a dedicated pumpkin carving saw (the little serrated ones) works great. These give you more control for the eyes and mouth. Don't forget a marker to draw your design on first! A dry-erase marker is handy because you can wipe it off if you mess up.
Prepping Your Pumpkin and Staying Safe
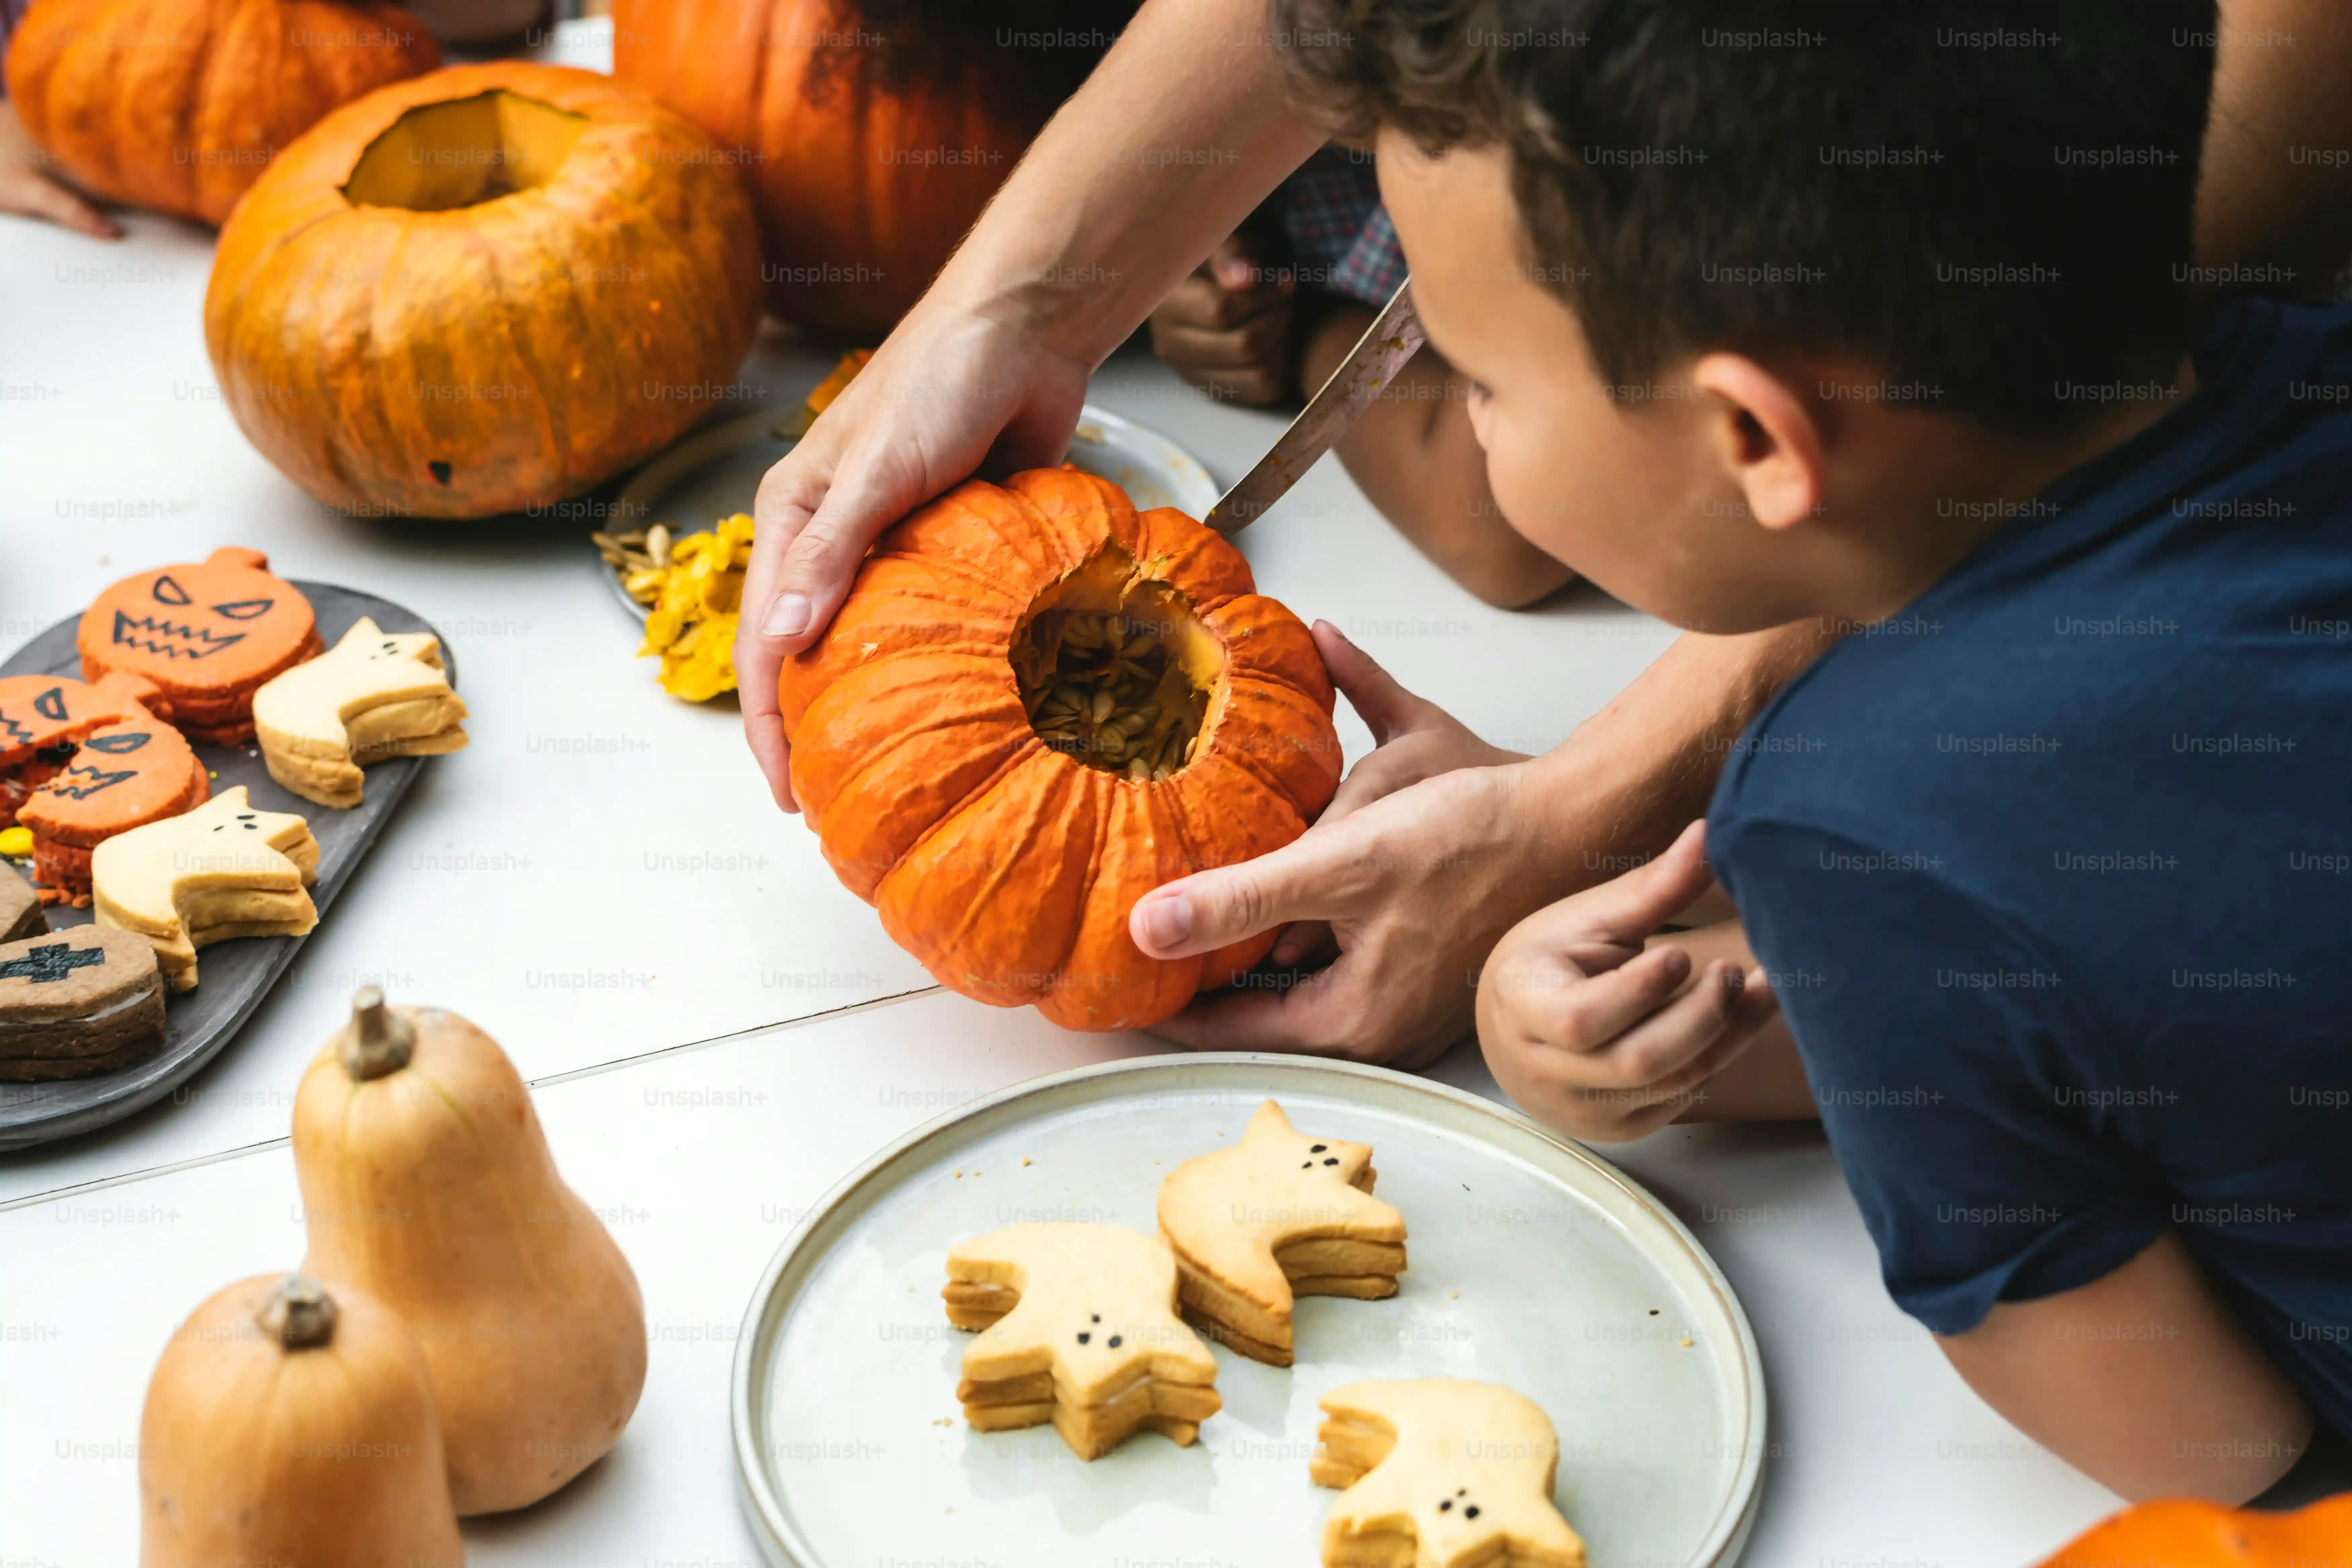
Before you even think about making the first cut, you need to prepare your canvas. This means cleaning off any dirt from the outside of the pumpkin. Then, comes the messy part: removing the top and scooping. Cut around the stem, making sure the hole is big enough to get your hand and scoop inside. Angle your cut slightly inward so the lid doesn't fall into the pumpkin later. Get *all* the stringy bits and seeds out. A clean interior makes carving easier and helps the pumpkin last longer. Safety isn't the most exciting part, but it's crucial, especially with kids around. Always cut away from yourself. Use controlled, steady motions. If little hands are helping, stick to the scooping and maybe drawing the design. Leave the sharp stuff to the grown-ups. Easy minion pumpkin carving should be fun, not a trip to the emergency room.
Here's a quick rundown of the essential gear:
- A medium-sized pumpkin (look for one with a relatively smooth surface)
- Sturdy knife (for cutting the lid)
- Large spoon or scoop (for gutting)
- Small, sharp paring knife or pumpkin carving saw
- Dry-erase marker
- Newspaper or drop cloth
- Bowl for seeds and guts (snack on roasted seeds later!)
Simple Stencil Strategies for Easy Minion Pumpkin Designs
Simple Stencil Strategies for Easy Minion Pumpkin Designs
Finding or Making Your Minion Template
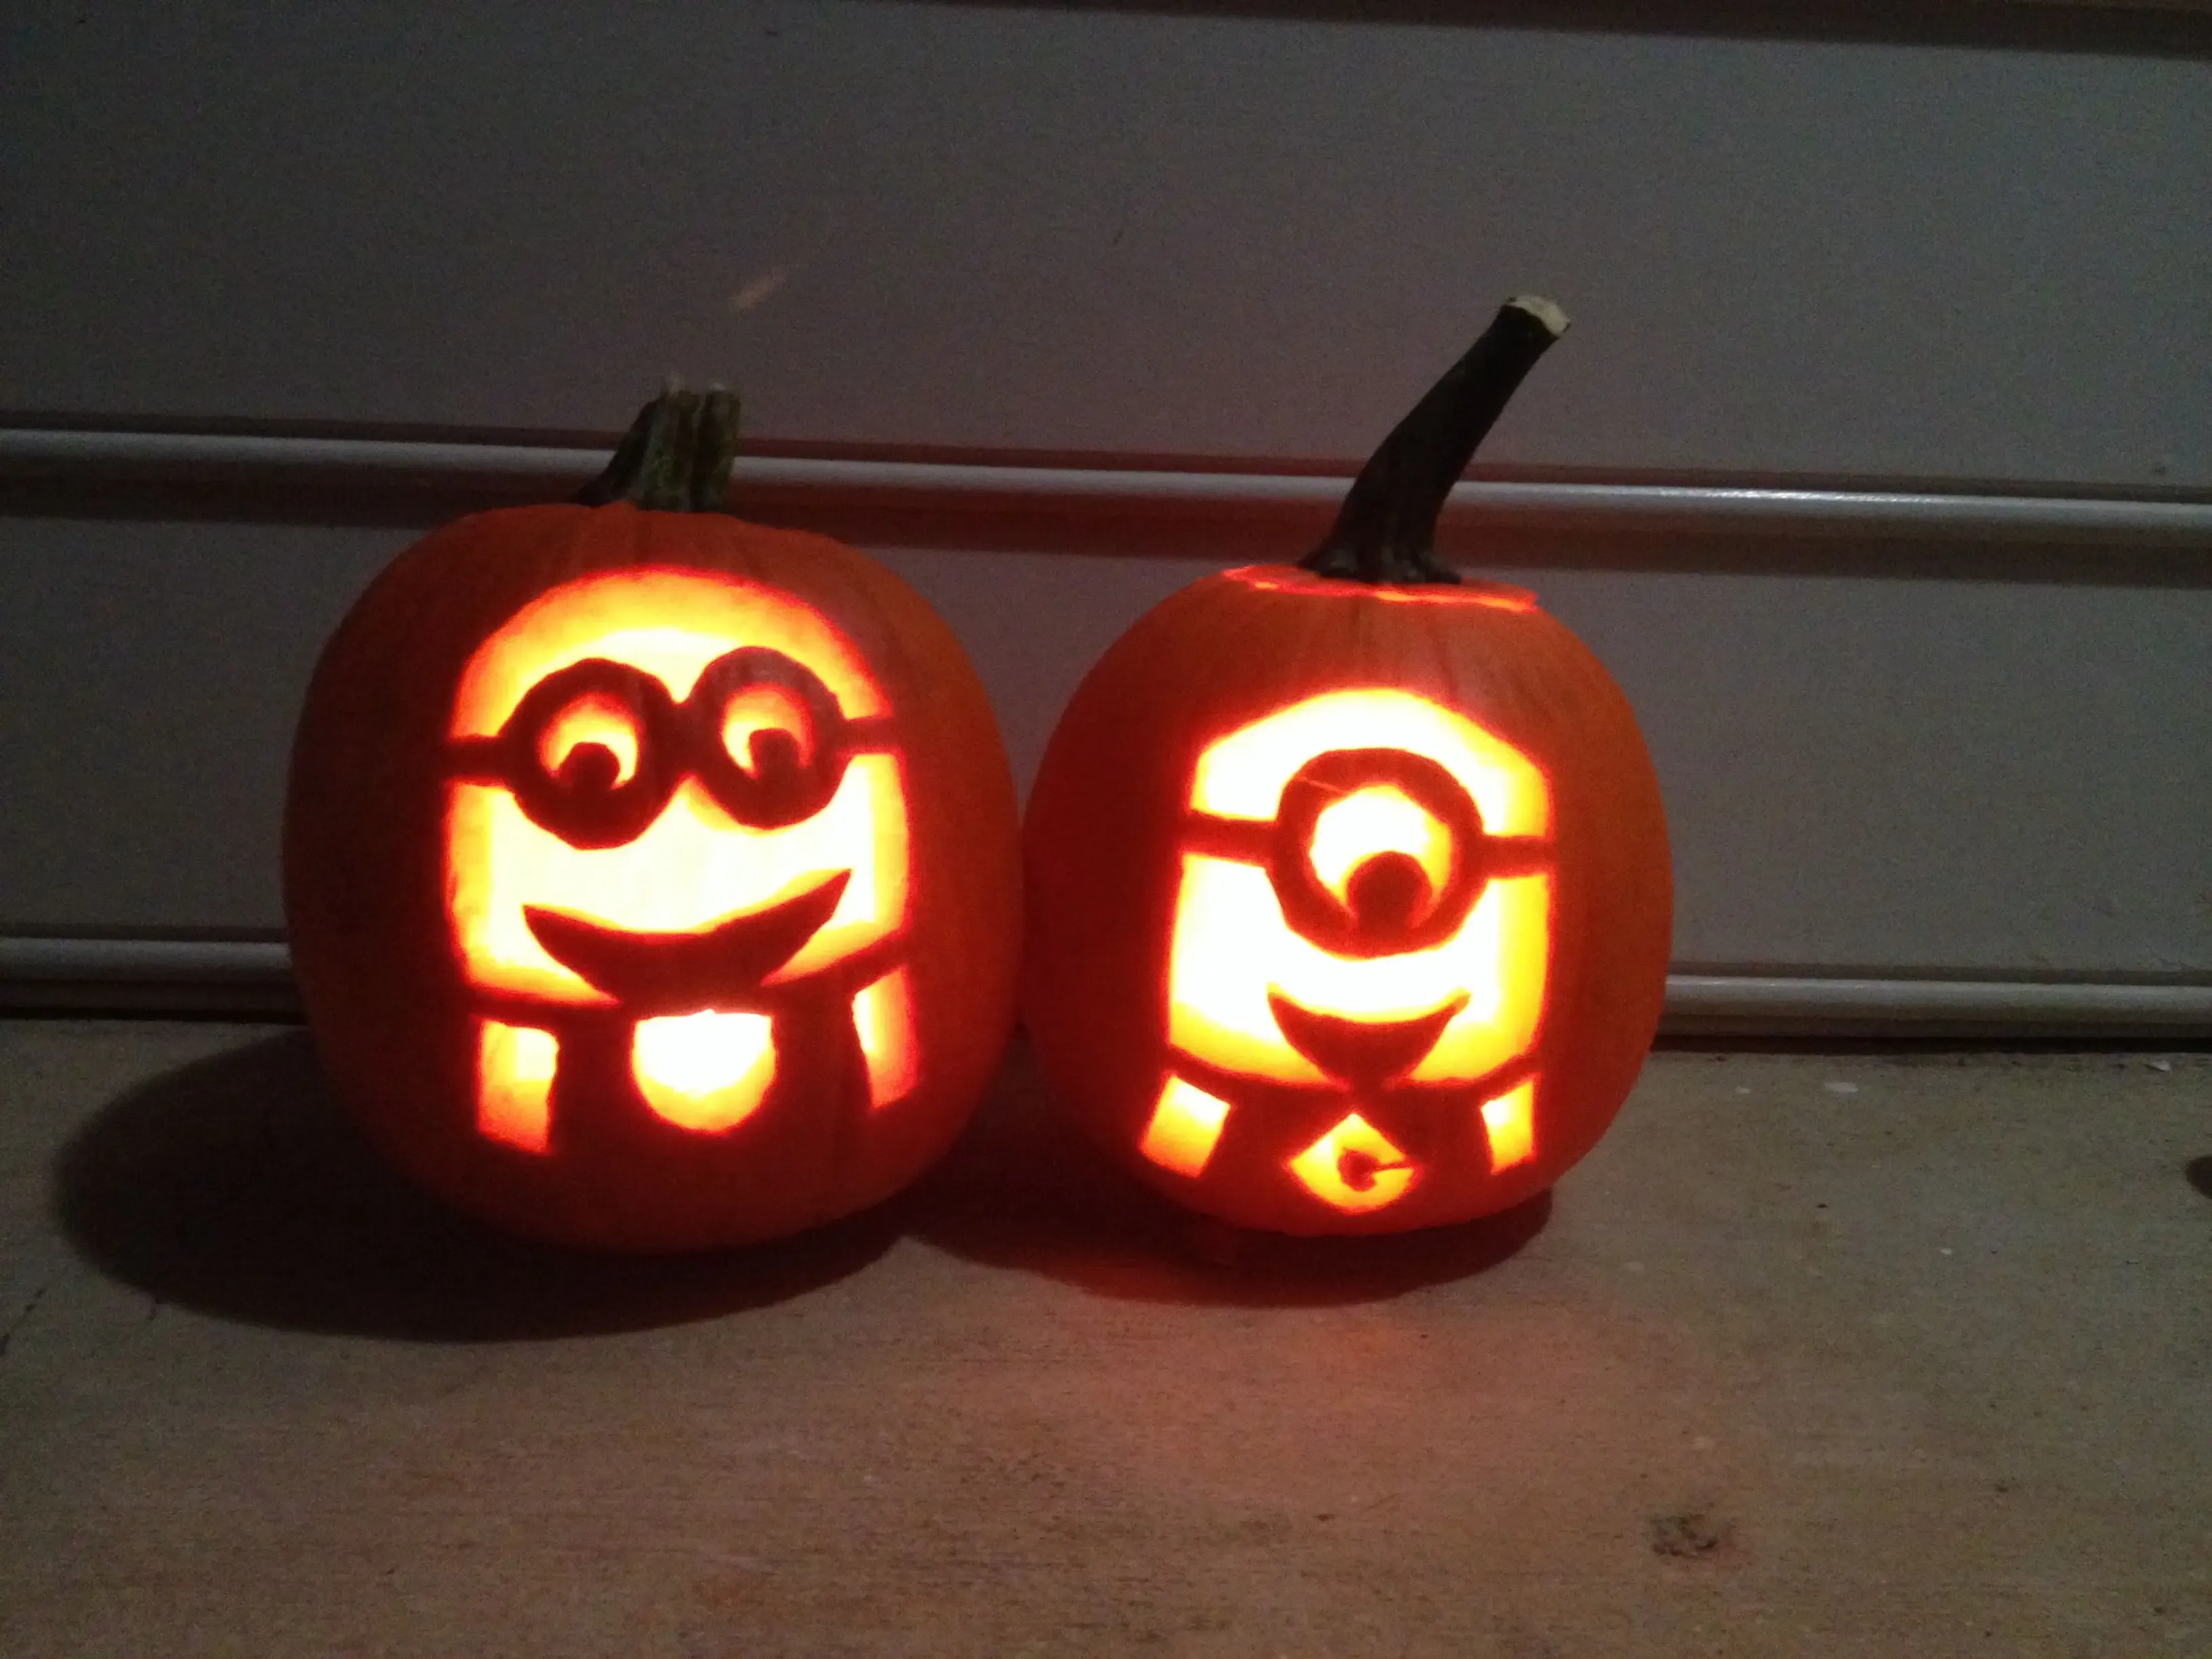
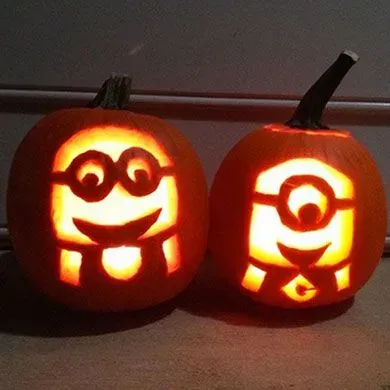
So, you've got your pumpkin gutted and ready, feeling a bit like a victorious surgeon. Now comes transferring that glorious Minion visage onto the orange canvas. For truly easy minion pumpkin carving ideas, stencils are your best friend. Why freehand it and risk ending up with something that looks less like a Minion and more like a melted potato with eyes? The internet is lousy with free printable Minion stencils. A quick search for "Minion pumpkin stencil printable" will yield plenty of options, from simple one-eyed versions to slightly more complex two-eyed designs. Look for ones with thick lines and minimal detail – remember, we're aiming for *easy*. If you're feeling slightly ambitious, you can even design your own. Just grab a piece of paper, draw a big circle for the eye (or two), add some goggles around it, and draw a simple curve for the mouth. Don't overthink it. The beauty of a Minion is its inherent simplicity.
Transferring the Design to Your Pumpkin
you've got your chosen stencil or your own crude but effective drawing. How do you get it onto the pumpkin without it looking like a crumpled mess? The simplest way is to tape the stencil firmly onto the smoothest part of your pumpkin. Make sure it's flat against the surface. Then, use a dry-erase marker to trace the lines of the stencil. Press firmly enough to leave a visible mark. Dry-erase is key here because if your goggle isn't quite centered or the mouth looks a little wonky, you can just wipe it off and try again. No permanent mistakes before you even pick up the knife. Once you've traced everything, carefully peel off the paper stencil. You should have a clear outline on the pumpkin, ready for carving. This step is crucial for keeping your easy minion pumpkin carving ideas from becoming frustrating nightmares.
Where to find simple Minion stencils:
- General web searches for "Minion pumpkin stencil"
- Craft blogs and websites
- Pinterest (use specific terms like "easy Minion pumpkin template")
- Create your own simple drawing with basic shapes
Carving Your Easy Minion Pumpkin: A StepbyStep Approach
Carving Your Easy Minion Pumpkin: A StepbyStep Approach
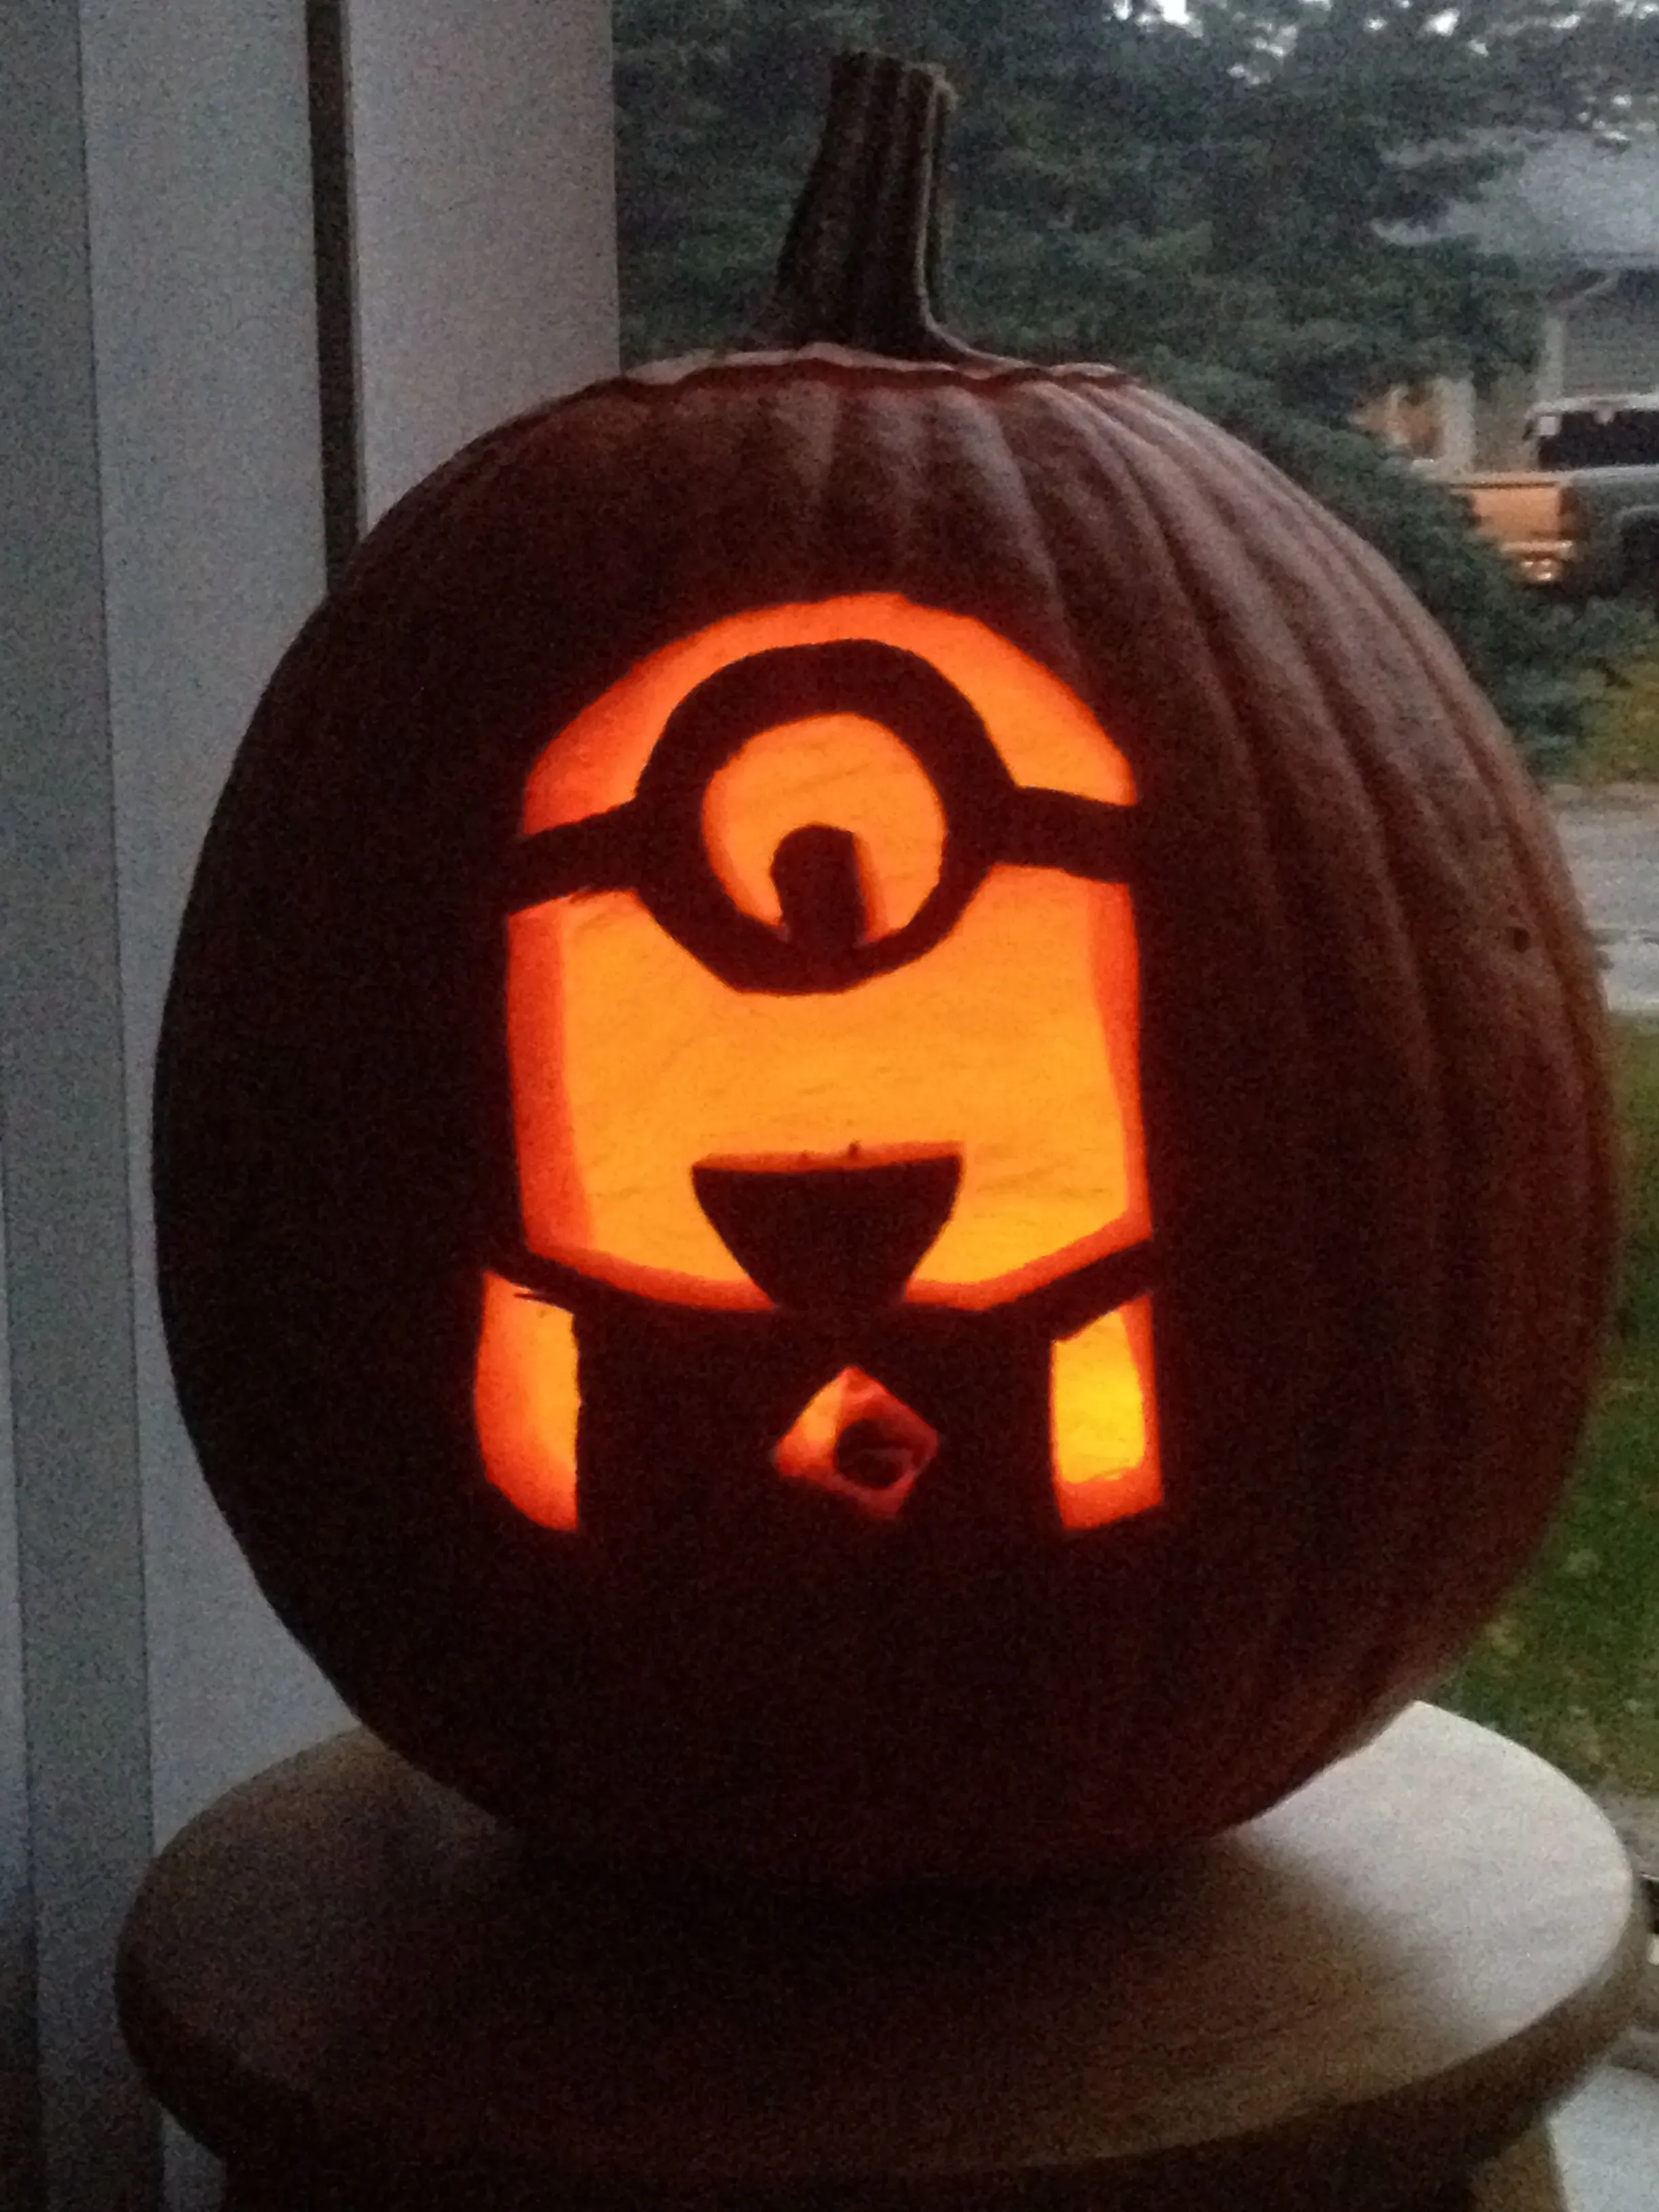
Starting the Cuts: Eyes and Goggles First
the stencil lines are on your pumpkin, looking like a very simple blueprint for fun. This is where the real action for your easy minion pumpkin carving ideas begins. Grab that small, sharp paring knife or your pumpkin saw. Start with the biggest, most forgiving shapes – usually the eyes or the outline of the goggles. Don't try to push the knife straight through the thick pumpkin wall in one go. Use a gentle, back-and-forth sawing motion with the small carving saw, following your traced lines precisely. If you're using a knife, make small, controlled cuts, angling the blade slightly inward as you go. This beveling helps the cut piece pop out cleanly. Take your time. This isn't a race. Rushing leads to slips and unintended pumpkin surgery. Work your way around the shape, making sure each cut connects. Once you've gone all the way around, gently push the cut-out piece from the inside. If it doesn't pop out easily, check for any spots where your cuts didn't quite meet.
Handling the Mouth and Other Simple Features
With the eyes or goggles successfully carved out, you're on a roll with your easy minion pumpkin carving ideas. Next up is the mouth. Minion mouths are usually just simple curves – a smile, a surprised O shape, maybe a silly open grin. Use the same technique as the eyes: follow your traced line with small, careful sawing motions or knife cuts. If your design has a thin line mouth, be extra careful not to break the pumpkin wall between the cuts. Sometimes it helps to carve thin lines by scoring the surface first, then carefully cutting deeper. Don't forget any simple details like overall straps or a pocket outline if your stencil included them. These are often just surface scrapes, not full cut-throughs, which adds a bit of dimension without extra work. Remember, Minions aren't known for their intricate facial features, so keep it basic, keep it clean, and you'll have a recognizable character staring back at you in no time.
Having trouble with a piece sticking?
- Check the back of the pumpkin – are the cuts fully connected?
- Use the back of a spoon or your finger to gently push from the inside.
- If a small bit is still attached, carefully use the tip of your knife or saw to sever it.
- Don't force it; you might crack the pumpkin.
Making Your Easy Minion Pumpkin Creation Shine
Making Your Easy Minion Pumpkin Creation Shine
Lighting Up Your Googly-Eyed Friend
Alright, you've successfully carved your easy Minion pumpkin. It's sitting there, looking proud (or maybe just slightly bewildered, depending on your carving skills). But a pumpkin isn't truly finished until it's glowing in the dark. Forget those old-school candles that are a fire hazard waiting to happen and make your pumpkin smell like a chimney. Battery-operated LED lights are the way to go. They're safe, they last a long time, and they provide a nice, even glow. You can find small tea lights or strings of lights specifically designed for pumpkins. Just pop them inside the pumpkin cavity before putting the lid back on. Make sure the light source is centered so the glow is even. A single LED tea light is usually enough for a standard-sized pumpkin. It casts that perfect spooky-but-cute light through the carved eyes and mouth, bringing your little yellow character to life after dark.
Simple Ways to Extend Your Minion's Lifespan
You put in the work for your easy Minion pumpkin carving ideas, and you want that effort to last longer than one night. Pumpkins, sadly, are organic and prone to decay. There are a few simple tricks to help your carved creation hold up a bit longer against the elements and general pumpkin rot. After carving, you can give the entire pumpkin, inside and out, a spray with a bleach solution (about one teaspoon of bleach per quart of water). This helps kill bacteria and mold spores. Let it dry completely. Another method is to rub petroleum jelly on the cut edges. This seals in moisture and prevents them from drying out and shriveling too quickly. Keep your pumpkin out of direct sunlight and rain if possible. Bringing it inside overnight, especially if temperatures drop significantly, can also help preserve it. It's not a guaranteed forever fix, but these steps can buy you a few extra days of Minion cheer on your porch.
Quick Tips for Pumpkin Longevity:
- Spray inside and out with a weak bleach solution (1 tsp bleach per quart water).
- Let the pumpkin dry completely after cleaning or spraying.
- Apply petroleum jelly to all cut edges to seal in moisture.
- Avoid direct sunlight and rain.
- Bring the pumpkin indoors during extreme temperature changes.
Your Minion Pumpkin: Mission Accomplished
So, you've navigated the slightly sticky, sometimes messy, world of pumpkin carving and hopefully ended up with a Minion staring back at you. It might not be gallery-worthy, the goggles might be a little lopsided, or maybe one eye is bigger than the other. That's perfectly fine. The goal here wasn't perfection; it was tackling a design that felt achievable and adding a bit of personality to your Halloween setup without needing a master craftsman's skill set. These easy minion pumpkin carving ideas were meant to be a low-stress way to participate in the tradition. Whether your Minion looks exactly like the movie version or more like its distant, slightly-off cousin, it's your creation, ready to greet trick-or-treaters with its simple, carved grin. Now, go admire your handiwork before the squirrels find it.