Table of Contents
Every October, the pressure mounts. You see those intricate pumpkin masterpieces online, and suddenly your carving dreams feel less like festive fun and more like a daunting art project. Maybe you've tried before and ended up with a sad, lopsided mess that looked less like a spooky spirit and more like it lost a fight with a garden gnome. It's okay. We've all been there, staring at an orange orb with a dull knife and zero artistic talent. But what if you could create something genuinely cool, spooky, and *easy*? That's where easy ghost pumpkin carving ideas come in.
Why Easy Ghost Pumpkin Carving Ideas Are Your Halloween GoTo
Why Easy Ghost Pumpkin Carving Ideas Are Your Halloween GoTo
Ditching the Detail Disaster
Let's be honest, nobody needs another stressful task in October. You're already figuring out costumes, stocking up on candy, and possibly raking leaves that seem to multiply overnight. The last thing you need is to spend hours hunched over a pumpkin, trying to replicate a movie monster's face with a flimsy plastic saw, only for it to collapse into a sad, pulpy mess. That's where the beauty of easy ghost pumpkin carving ideas shines. They strip away the complexity. Forget intricate teeth or tiny pupils. A ghost is fundamentally simple shapes, forgiving of shaky hands and imperfect cuts. It's the anti-hero of complicated carvings, a welcome relief for anyone who's ever felt defeated by a gourd.
Maximum Spook, Minimum Struggle
Choosing easy ghost pumpkin carving ideas isn't just about avoiding frustration; it's about smart holiday decorating. You get a classic Halloween look – spooky yet often charming – without investing half your evening or needing a fine arts degree. This approach saves time, reduces the risk of needing a first-aid kit, and ensures a higher probability of a recognizable result. They are perfect for carving with kids, where patience might be shorter than the pumpkin stem, or for adults who just want a quick win. It’s the carving equivalent of a sheet mask – effective and low effort.
- Less time spent carving, more time for candy corn.
- Fewer complex cuts mean less chance of slicing a finger.
- High success rate, even for beginners.
- Perfect for all ages and skill levels.
- Classic, recognizable Halloween symbol.
Gather Your Gear for Easy Ghost Pumpkin Carving Ideas
Gather Your Gear for Easy Ghost Pumpkin Carving Ideas
Gathering Your Simple Spook Kit
Alright, let's talk tools. Before you dive headfirst into an easy ghost pumpkin carving project, you need the right arsenal. Forget those flimsy plastic kits that snap on the first tough spot. You want reliable gear that makes the job less of a wrestling match and more of a smooth operation. For easy ghost pumpkin carving ideas, you don't need much, but what you do need should work. A sturdy pumpkin carving saw (often metal with fine teeth) is crucial for cutting out shapes. You'll also want a scoop for cleaning out the guts – a large metal spoon works perfectly, or a dedicated pumpkin scoop with a serrated edge. A sharp paring knife can be useful for scraping skin or refining edges, though for simple ghosts, you might not need intricate detail work. And definitely, have a template or a marker ready to draw your ghost shape.
StepbyStep Guide to Easy Ghost Pumpkin Carving Ideas
StepbyStep Guide to Easy Ghost Pumpkin Carving Ideas
Prepping Your Pumpkin Pal
Alright, you've got your pumpkin, you've got your tools (or at least the sturdy ones). First things first, you need to prep this gourd. This means giving it a good wash to get rid of any dirt. Then, the dreaded lid. Cut a hole around the stem, angled inwards. Why angled? So the lid doesn't fall *into* the pumpkin later. Make it big enough to get your hand and scoop inside. Once the lid is off, it's gut-scooping time. Get in there and scrape out all the seeds and stringy bits. The cleaner you get the inside walls, the easier carving will be, especially if you plan to light it up later. Scrape the wall where your ghost face will go fairly thin, maybe about an inch thick, so the light shines through nicely.
Transferring the Spooky Shape
Now for the ghost itself. This is where your easy ghost pumpkin carving ideas start taking shape. If you're using a stencil, tape it firmly to the part of the pumpkin you cleaned out. Use a poker tool or even a sharp pencil to poke small holes along the lines of the stencil. These dots create a guide. If you're freehanding it (you brave soul!), use a dry-erase marker to draw a simple ghost shape – think a wobbly blob with maybe some arm nubs. Keep it simple. Then, take your pumpkin carving saw and start cutting along the lines you've made, either the poked dots or the drawn lines. Go slowly, especially around curves. Don't force the saw; let the teeth do the work.
- Wash the pumpkin surface clean.
- Cut the lid at an inward angle.
- Scoop out all seeds and pulp thoroughly.
- Thin the wall where the carving will be.
- Tape stencil securely or draw freehand.
- Use a poker/pencil or marker for the guide.
- Cut slowly along the lines with a carving saw.
Cutting and Cleaning Up Your Creation
As you cut, the pieces you're removing should pop out fairly easily if your wall is thinned properly. If they're sticking, gently push them from the inside. Once all your ghost shapes (usually just eyes and a mouth for easy ghost pumpkin carving ideas) are cut out, clean up the edges. You can use a small paring knife or the carving saw to trim away any rough bits. Wipe down the outside of the pumpkin to remove any marker lines or pumpkin juice. Pop a candle or an LED light inside, put the lid back on, and step back. You've just brought a simple, spooky ghost to life without needing a chisel or a therapy session. See? Easy.
Beyond Basic: Variations on Easy Ghost Pumpkin Carving Ideas

Beyond Basic: Variations on Easy Ghost Pumpkin Carving Ideas
Giving Your Ghost Some Personality
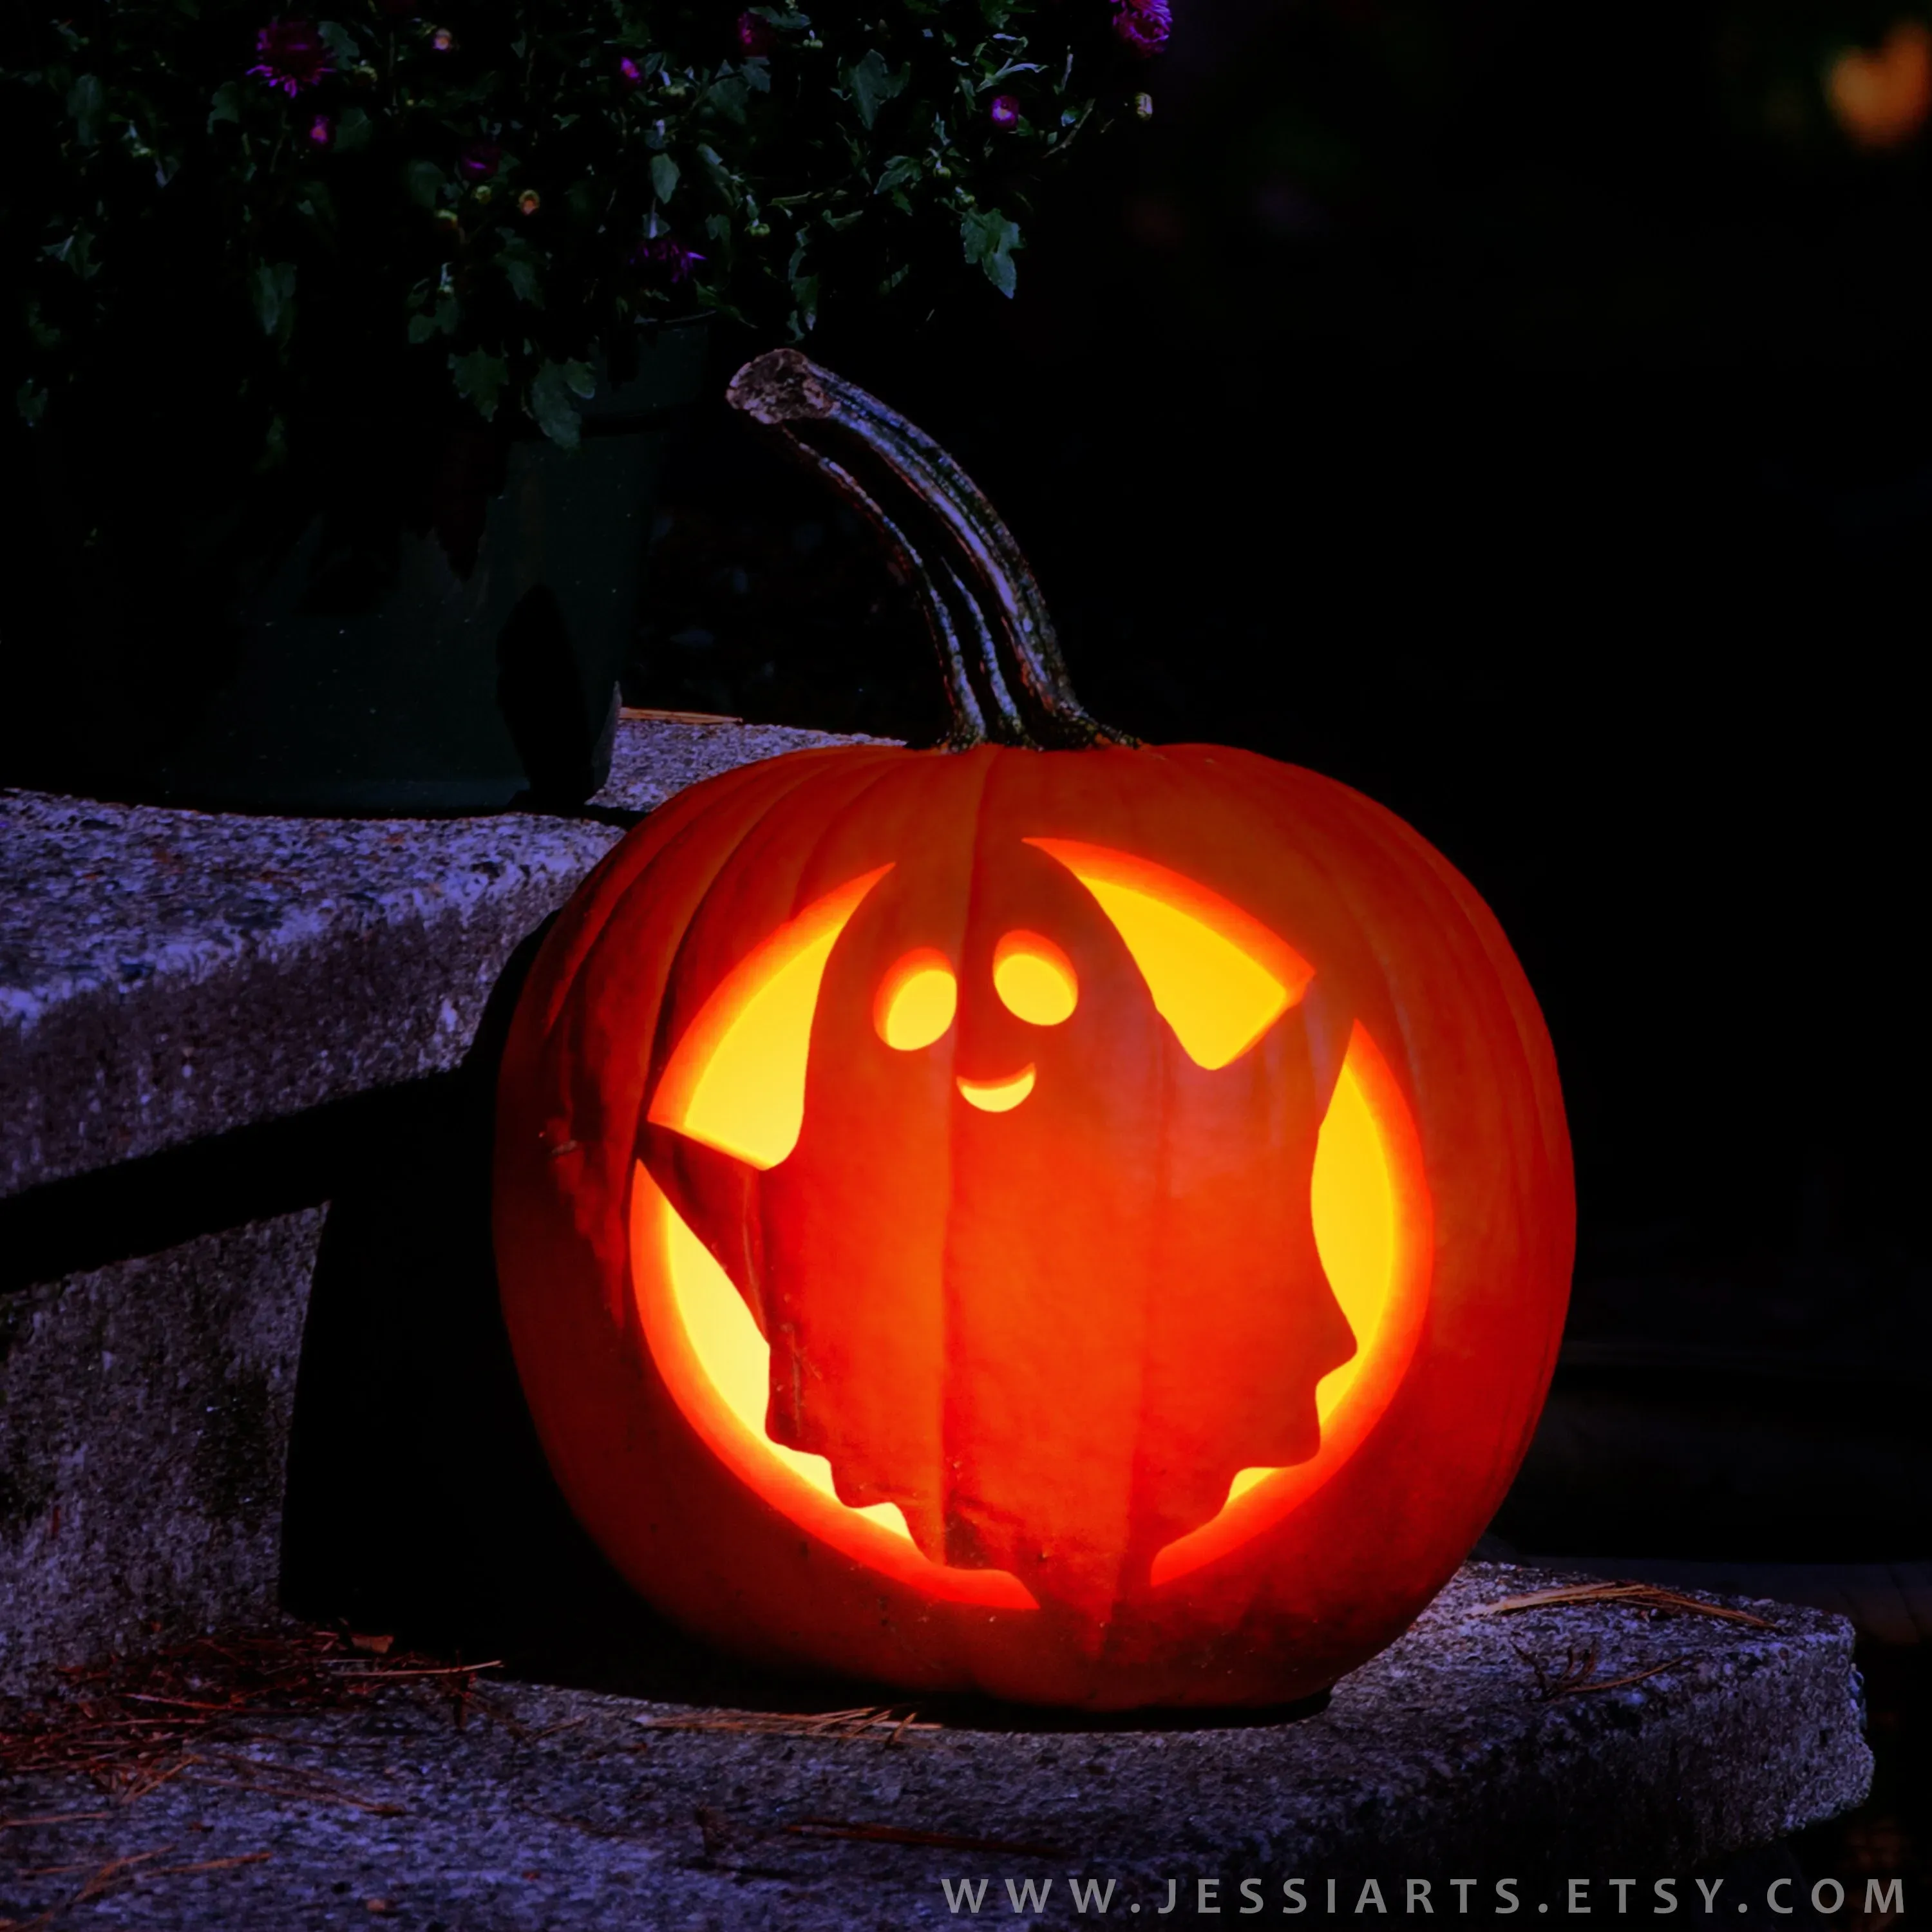
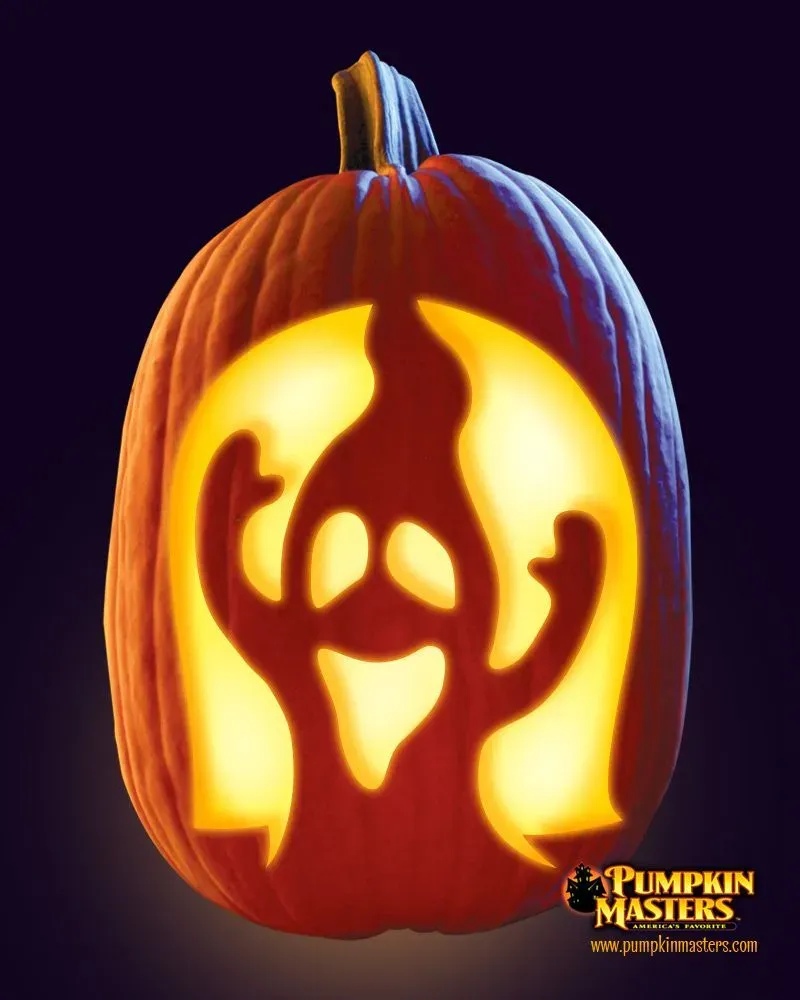
so you've mastered the basic blob with circles for eyes. Feeling a little adventurous, but still want to keep things firmly in the realm of easy ghost pumpkin carving ideas? Great. You don't have to go full-on horror movie monster to mix it up. Simple changes make a big difference. Instead of just circles, try cutting out different eye shapes: maybe jagged triangles for a spooked look, or narrow ovals for a sleepy ghost. A simple wavy line for a mouth can convey different moods – a gentle curve for friendly, a sharp zig-zag for startled. Think about adding a single, large, gaping mouth instead of separate features. It's still just cutting a shape, but it changes the vibe entirely. You can even scrape away the skin in a wavy line below the ghost to look like it's floating.
Adding Simple Details Without Stress
Want to add a bit more flair to your easy ghost pumpkin carving ideas without getting bogged down in detail work? Consider using tools other than just the carving saw. A simple linoleum cutter (the kind used for block printing) can be used to scrape away the top layer of pumpkin skin, creating patterns or textures without cutting all the way through. You could scrape thin lines radiating from the ghost to make it look like it's glowing, or create a swirling pattern around it. Another trick is using a drill with different sized bits to make perfect little circular holes for eyes or mouths – super easy and gives a clean look. Remember, the goal is still low effort, high reward. These aren't complex techniques; they're just different ways to remove pumpkin material.
Simple Variation | How to Do It (Easy!) |
|---|---|
Different Eye Shapes | Cut triangles, ovals, or slits instead of circles. |
Expressive Mouths | Use wavy, zig-zag, or single gaping shapes. |
Floating Effect | Scrape away skin below the ghost in waves. |
Textured Background | Scrape skin with a linoleum cutter around the ghost. |
Troubleshooting Common Easy Ghost Pumpkin Carving Issues
Troubleshooting Common Easy Ghost Pumpkin Carving Issues
When Your Knife Gets Stuck (and Other Cutting Woes)
Even with the simplest easy ghost pumpkin carving ideas, things can go sideways. The most common headache? Your carving saw getting jammed halfway through a cut. This usually happens because you're either pushing too hard, trying to turn too sharply, or the pumpkin wall is thicker than you thought. Stop forcing it. Pull the saw out slightly and try re-entering the cut at a slightly different angle. Sometimes, wiggling it gently helps. If the cut is just not progressing, you might need to switch to a smaller, sharper paring knife for that section, or even go back and thin the wall from the inside a bit more. Uneven cuts? Don't sweat it too much for a ghost. Ghosts are naturally wobbly. Just trim away the worst offenders with a knife. Remember, perfection isn't the goal here; spooky is.
Another snag with easy ghost pumpkin carving ideas pops up when trying to remove the cut-out pieces. If they don't just fall out, don't stab at them wildly. Push gently from the inside of the pumpkin. If they're still stuck, check if you've actually cut all the way through the rind around the entire shape. Sometimes a small section is still attached. Carefully use your saw or knife to complete the cut. Patience is key here, more than brute force. You're coaxing the piece out, not performing surgery under pressure.
Dealing with Sagging Shapes and Sad Ghosts
You've finished your ghost, you light it up, and then... oh no. The mouth is sagging, or an eye looks like it's about to fall in. This often happens if the cut-out pieces are too large or the pumpkin wall wasn't thick enough to support the shape above it. For easy ghost pumpkin carving ideas, keeping the cut-out shapes relatively contained helps. If a section is starting to sag, you can sometimes prop it up from the inside with a small piece of toothpick or a bit of carved-off pumpkin rind tucked underneath. It's a bit of a band-aid fix, but it works in a pinch for display. To prevent this next time, make your shapes a little smaller or ensure the pumpkin wall is consistently about an inch thick.
What about your ghost looking dry and sad after a few days? Pumpkins are organic, they don't last forever. To give your easy ghost pumpkin carving a longer life, you can rub petroleum jelly on the cut edges. This helps seal in moisture. Some people swear by spraying the inside and cut edges with a water and bleach solution (about one teaspoon of bleach per quart of water) to prevent mold, but honestly, for simple ghosts, keeping them out of direct sun and freezing temperatures helps most. Accept that they're temporary art. Enjoy them while they last, then compost 'em.
- Knife stuck? Pull back, re-angle, or use a paring knife.
- Pieces not coming out? Push gently from inside, check cuts.
- Sagging shapes? Prop with toothpicks or rind bits.
- Prevent drying? Rub petroleum jelly on cut edges.
- Prevent mold? Keep out of sun/frost, consider bleach spray (use caution).
Hauntingly Simple Success
So there you have it. Tackling easy ghost pumpkin carving ideas doesn't require an art degree or a professional carving kit. It’s about embracing the simplicity of the ghost shape and using straightforward tools and techniques. You've got the basics, a few variations to try, and a heads-up on potential snags. Your porch is about to get a lot friendlier, in a spooky, sheet-wearing sort of way. Go grab a pumpkin, put on some questionable Halloween music, and make some spectral magic happen. It's easier than you think, and honestly, a slightly wobbly ghost often looks spookier anyway.