Table of Contents
Let's be honest, those perfectly carved, intricate pumpkin masterpieces you see online can feel a bit intimidating. Maybe you've attempted a complex design before, only to end up with a lopsided mess or, worse, a broken pumpkin. It happens to the best of us. But here's the thing: creating a cool, spooky, or just plain fun Halloween pumpkin doesn't require an art degree or specialized tools you'll only use once. This guide is packed with easy diy pumpkin carving ideas designed for real people with real lives (and maybe slightly shaky hands). We're focusing on simple techniques, clever shortcuts, and ideas that look great without causing a crafting breakdown. Forget the hours spent meticulously sawing tiny details. We'll walk you through the straightforward steps, from prepping your pumpkin to bringing a simple design to life. If you're ready to ditch the carving anxiety and actually enjoy getting into the Halloween spirit, keep reading. You'll find plenty of inspiration to make your porch the envy of the neighborhood, the easy way.
Getting Started: What You Need for Easy Pumpkin Carving
Getting Started: What You Need for Easy Pumpkin Carving
Gathering Your Essential Tools
Alright, so you've got your pumpkin staring at you, full of potential (or maybe just looking like a large, orange obstacle). Before you dive in, let's talk tools. You don't need the fancy, expensive kits with twelve different saw blades you'll never identify. For truly easy diy pumpkin carving ideas, you just need a few key things that make the job way less frustrating. A good, sturdy serrated knife is crucial for cutting the top off. Don't try to use your mom's best chef's knife unless you want to be in the doghouse. You'll also need a large spoon or scoop – the sturdier, the better – for getting all that gooey pulp and seeds out. This is arguably the messiest part, but also kind of satisfying in a weird way.
Setting Up Your Space and Choosing Your Pumpkin
Picking the right pumpkin is half the battle for easy carving. Look for one with relatively smooth skin and a flat bottom so it doesn't roll away while you're working. Avoid pumpkins with soft spots or bruises; they're just asking for trouble. Once you have your perfect subject, find a workspace that you don't mind getting dirty. A garage floor, a covered patio, or even a large table covered with a drop cloth or old newspapers works great. Trust me, pumpkin guts have a way of getting everywhere. Good lighting is also a must so you can actually see what you're doing.
Essential Pumpkin Carving Gear
- A sturdy serrated knife (often comes in cheap carving kits)
- A large, strong spoon or scoop
- A smaller detail knife or poker tool (optional, but helpful)
- Paper towels or old rags for cleanup
- A bowl for seeds and pulp
- Newspaper or drop cloth to protect your surface
- A marker or pen for drawing your design
Simple Methods for Easy DIY Pumpkin Carving

Simple Methods for Easy DIY Pumpkin Carving
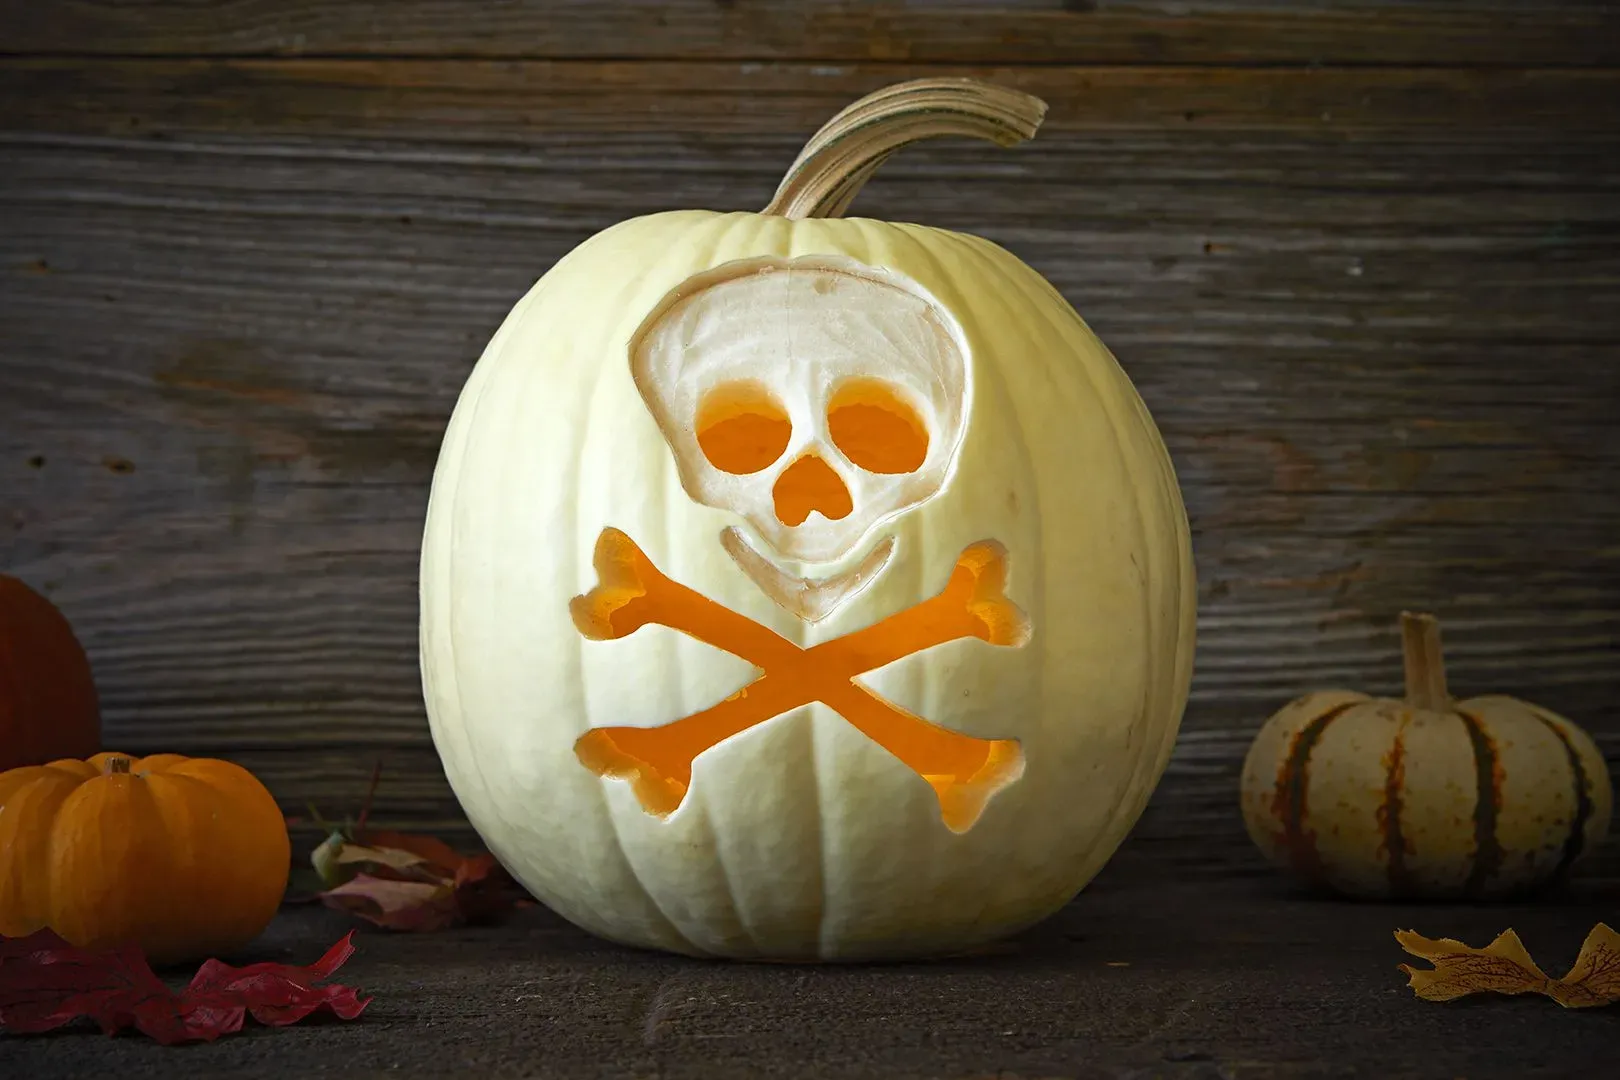
you've got your tools, your pumpkin, and your designated mess zone. Now for the fun part, or maybe the slightly nerve-wracking part: actually making a dent in that orange sphere. When we talk about easy diy pumpkin carving ideas, the real secret is keeping the design simple. Forget the elaborate spooky mansions or detailed portraits you see online. Start with basic shapes. Circles, triangles, squares – these are your friends. Think classic jack-o'-lantern faces: two triangles for eyes, a triangle or circle for a nose, and a jagged or goofy smile. These are timeless for a reason; they're effective and straightforward to execute. You can freehand these shapes directly onto the pumpkin with a marker, or if you're feeling less confident in your drawing skills, print out simple shapes online and tape them on.
Another excellent trick for simple designs involves using stencils. No, not those complicated ones that require a surgeon's precision. We're talking about basic shapes again. You can find free printable stencils online for things like stars, moons, simple ghosts, or even just different-sized circles. Tape the stencil firmly onto the pumpkin. Then, use a poker tool (or even a sturdy toothpick) to trace the outline by poking small holes through the paper into the pumpkin skin. Once you remove the stencil, you'll have a dotted outline to follow with your carving knife. This takes the guesswork out of drawing and gives you a clear path to follow, making the carving process much smoother for any easy diy pumpkin carving ideas you try.
- Start with basic geometric shapes: triangles, circles, squares.
- Use a marker to draw designs directly on the pumpkin.
- Print simple stencils and poke holes along the lines.
- Keep the designs large and avoid fine details.
- Consider classic jack-o'-lantern faces for guaranteed success.
Sometimes, the easiest method is to not carve all the way through everything. Partial carving, where you only remove the top layer of skin but not the full thickness of the pumpkin wall, can create cool effects with less effort. You can use different sized gouges or even just the tip of your knife to scrape away areas. This works well for creating shaded effects or simple outlines that will glow differently when lit from inside. Think about carving just the outline of a ghost or scraping away the skin to create polka dots or stripes. It's less messy than full cut-outs and offers a different kind of visual appeal.
Beyond the Jacko'Lantern: More Easy DIY Pumpkin Carving Ideas

Beyond the Jacko'Lantern: More Easy DIY Pumpkin Carving Ideas
Thinking Outside the Triangle Eyes
so you've mastered the classic triangle-eyed grin. Maybe you're feeling bold, ready to venture beyond the standard jack-o'-lantern but still want to keep things firmly in the "easy" category for your easy diy pumpkin carving ideas. Good news: you don't need to carve a whole haunted house scene. Consider simple silhouettes. Think a lone bat flying, a spooky spider dangling, or a basic crescent moon and stars. These shapes are often just one or two large cutouts, making them quick and painless. You draw the shape, you cut it out. Done. It's effective, gets the point across, and looks significantly more creative than just another set of pointy eyes, without requiring hours of painstaking work.
Combining Carving with Other Simple Techniques
Who says it all has to be about cutting? For genuinely easy diy pumpkin carving ideas, sometimes you use carving as just one part of the equation. Try carving a simple shape, like a circle or a square, and then using paint or markers to add details around it. Carve out a large hole and then paint a spooky scene *inside* the pumpkin visible through the opening. Or, carve a few basic holes and stick things in them – googly eyes, fake spiders, even small branches to look like creepy arms. This hybrid approach reduces the amount of carving you have to do while still letting you create something unique and visually interesting. It's about being clever, not necessarily being a master carver.
What's the most common mistake people make trying complicated pumpkin designs?
Keeping Your Easy Carved Pumpkin Looking Fresh
Keeping Your Easy Carved Pumpkin Looking Fresh
Humidity is Your Pumpkin's Friend (and Lack Thereof, Its Enemy)
You've put in the effort, created some fantastic easy diy pumpkin carving ideas, and now you want your masterpiece to last longer than a day or two, right? The enemy of a carved pumpkin is dehydration. Think of it like a plant that hasn't been watered; it starts to wilt and shrink. The cut edges dry out, curl, and eventually start to mold. This process happens faster in dry, warm conditions. If you live somewhere with low humidity, your pumpkin is going to age like a forgotten banana peel unless you intervene. Keeping those cut surfaces moist is key to slowing down the inevitable decay.
One simple trick is a daily spritz. Fill a spray bottle with water, maybe add a tiny splash of bleach (like a teaspoon per quart of water) to help deter mold, and lightly mist the carved areas every day. Do this especially on sunny or windy days, as these conditions accelerate drying. Some people swear by rubbing petroleum jelly or vegetable oil on the cut edges. This creates a barrier that locks in moisture. It can make the pumpkin look a little greasy, but it does help prevent rapid dehydration. Just be mindful that oils can attract dust and dirt.
The Bleach Bath Method: A Classic Defense
Beyond the daily spritz, a more proactive approach involves a bleach soak. This isn't about making your pumpkin look like it's been through a laundry cycle, but rather sanitizing the cut surfaces to kill bacteria and mold spores that are just waiting to set up shop. After you've finished carving your easy diy pumpkin carving ideas and cleaned out the insides, you can give the whole pumpkin, or at least the carved sections, a bath. Mix about 1 to 2 tablespoons of bleach per gallon of water in a tub or large bucket. Submerge the pumpkin for a few hours, or even overnight if it's really dry.
After its dip, take the pumpkin out and let it air dry completely before displaying it. The bleach solution helps disinfect the cuts, giving your pumpkin a fighting chance against the microscopic invaders that cause rot. This step is particularly useful if you notice any fuzzy spots or discoloration starting to appear. It's not a permanent fix, nothing is when dealing with organic material left outside, but it buys you some precious extra days of spooky glory. Just remember to wear gloves and do this in a well-ventilated area; bleach is potent stuff.
- Mist carved areas daily with water (add a little bleach to deter mold).
- Rub petroleum jelly or vegetable oil on cut edges to seal in moisture.
- Give the pumpkin a bleach bath (1-2 tbsp bleach per gallon water) for a few hours.
- Keep the pumpkin out of direct sunlight and harsh weather.
- Consider storing it in a cool, dark place overnight if temperatures drop significantly.
Location, Location, Location: Where You Put Your Pumpkin Matters
Where you place your carved pumpkin has a huge impact on how long it lasts. Direct sunlight is the enemy. It acts like a dehydrator, sucking the moisture right out of those vulnerable carved surfaces. A covered porch, a shady spot under a tree, or even indoors (if you don't mind potential mess or bugs) are much better locations than a sunny doorstep or an open deck. Rain and frost aren't great either; excessive moisture can promote mold and rot, while freezing temperatures will cause the pumpkin's cell walls to break down, leading to mush.
Think about the microclimate on your porch. Is it sheltered from the wind? Does it get direct sun in the afternoon? Choose the spot that offers the most protection from the elements. If you have particularly harsh weather coming, consider bringing your pumpkin inside temporarily. A cool garage or basement is ideal overnight, especially if frost is in the forecast. A little strategic placement and protection can significantly extend the lifespan of your easy diy pumpkin carving ideas, letting you enjoy your hard work for longer.
Carve Your Way to Halloween Fun
So there you have it. You don't need to be a master sculptor to create a fantastic Halloween pumpkin. We've covered straightforward methods and plenty of easy diy pumpkin carving ideas that won't leave you frustrated or covered in pumpkin guts (well, maybe a little on the guts). The goal here is to have a good time and end up with something you're proud to display, not to stress over perfection. Grab a pumpkin, pick a simple design, and give it a shot. Even a basic shape or a few well-placed holes can look surprisingly effective with a candle flickering inside. Halloween is about fun, not flawless artistry. Go make some pumpkin magic happen, the easy way.