Table of Contents
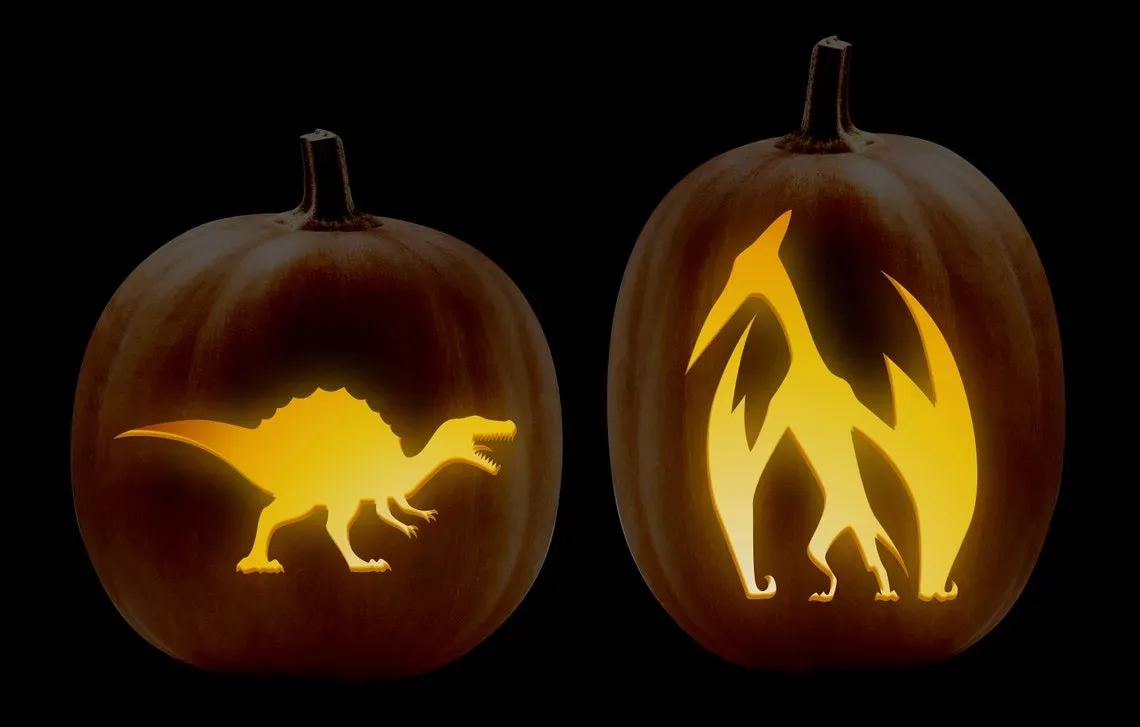
Alright, let's talk pumpkins. Every year, the pressure's on to create some kind of carved masterpiece, right? But maybe you're tired of the same old spooky faces, or perhaps the thought of intricate designs just makes your hand cramp before you even start. What if you want something cool, something different, something that screams "awesome" without requiring an art degree or surgical precision? That's where easy dinosaur pumpkin carving ideas stomp in. Forget the stress and the mess of overly complicated patterns. We're talking about bringing a bit of prehistoric fun to your porch or party without losing your sanity. This article is your guide to making that happen. We'll walk you through why dinosaurs are a fantastic choice, what simple tools you'll need, and give you a straightforward, step-by-step plan, complete with free stencils to make the process genuinely easy. Ready to trade carving anxiety for a T-Rex triumph? Stick around, and let's dig into how you can create a roaring good pumpkin display.
Why Easy Dinosaur Pumpkin Carving Ideas Are a Hit
Why Easy Dinosaur Pumpkin Carving Ideas Are a Hit
Escaping the Spooky Rut
Look, Halloween pumpkins are great, but sometimes you just need a break from the endless parade of jagged-toothed grins and weary ghosts. Or maybe you tried that intricate spiderweb pattern last year and ended up with a sad, collapsed mess. That's where the magic of easy dinosaur pumpkin carving ideas comes in. Kids are absolutely obsessed with dinosaurs – they’re big, they’re powerful, they’re just plain cool. Bringing that fascination to a pumpkin instantly makes it more exciting than another generic monster face. Plus, let's be honest, the simpler the design, the less chance you have of carving your finger instead of the pumpkin. It's a relief to know you can create something impressive without needing the steady hand of a brain surgeon.
- They appeal to all ages, not just little kids.
- Dinosaurs offer unique shapes beyond typical Halloween icons.
- Simpler designs mean less frustration and fewer carving accidents.
- They stand out in a sea of traditional spooky pumpkins.
Roaring Fun for Everyone
Beyond just being a cool subject, easy dinosaur pumpkin carving ideas are genuinely accessible. Think about the shapes: a T-Rex head, a Stegosaurus plate, a long Brontosaurus neck. Many of these translate well to basic carving techniques like cut-outs or scraping. You don't need to be an artist to follow a simple dino outline. It’s a fantastic project to do with family – kids can help scoop out the guts (the truly messy, squishy part everyone loves to hate/love), and even younger ones can participate by drawing on the pumpkin or helping tape a stencil. It turns what can sometimes feel like a chore into a genuinely fun, shared activity with a prehistoric twist.
Gather Your Gear: Tools for Simple Dino Pumpkins
Gather Your Gear: Tools for Simple Dino Pumpkins
Just the Basics: What You Absolutely Need
let's cut to the chase. You don't need a workshop full of fancy gadgets to pull off easy dinosaur pumpkin carving ideas. You probably have most of this stuff lying around already. First up, obviously, a pumpkin. Pick one that's firm and has a relatively smooth surface where you plan to put your dino design. Trying to carve a detailed T-Rex on a bumpy, lopsided squash is just asking for trouble. Next, you need something to cut the lid off and something to scoop out the guts. A sturdy kitchen knife works for the lid, but be careful. For the scraping, a large spoon is your best friend. The kind you eat soup with, not the tiny coffee stirrer. Get it nice and clean inside; the thinner the wall, the easier the carving.
Leveling Up: Tools That Make It Even Easier
Now, while you can technically carve with just a knife, a few specialized (but still cheap) tools make the job way smoother, especially for curves and details. Pumpkin carving kits are everywhere around Halloween, and honestly, they're worth the few bucks. They usually come with small saws and poker tools. The little saws are key because they let you make turns and tight spots without risking a finger or splitting the pumpkin. A pokey tool, or even a sharp pencil or thumbtack, is essential for transferring your stencil design onto the pumpkin – you just poke holes along the lines. Don't skip this step. Trust me, freehanding a dinosaur outline rarely ends well unless you're secretly a master sculptor. A dry-erase marker is also handy for connecting the dots or sketching directly if you feel brave.
- A suitable pumpkin (smooth, firm)
- Sharp knife for the lid (adult use only!)
- Large spoon for scooping
- Pumpkin carving kit (small saws, poker tool)
- Sharp pencil or thumbtack
- Dry-erase marker
StepbyStep Guide: Carving Your Prehistoric Pumpkin

StepbyStep Guide: Carving Your Prehistoric Pumpkin
Prep Your Pumpkin Canvas
Alright, you've got your pumpkin and your tools. First things first: surgery. Lay the pumpkin on a stable surface. Using that sturdy knife (adults only, seriously), cut a lid around the stem. Make it a nice, wide opening, angled slightly inward so the lid doesn't fall in later. Sawing motions work better than trying to push straight down. Once the lid is off, grab that big spoon. It's gut-scooping time. Get in there and scrape the sides clean. The goal is a smooth interior and walls that aren't ridiculously thick – aiming for about an inch or less makes carving much easier. Don't skip scraping the lid either; you don't want stringy bits catching fire from a candle (though LED lights are smarter these days). A clean interior means your light shines brighter through the carving.
Transfer and Carve Your Dino Design
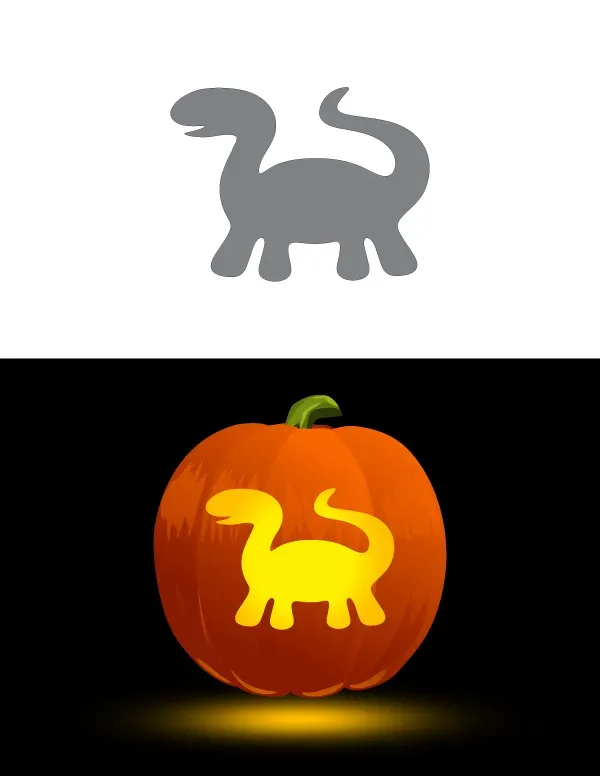
Now for the fun part of these easy dinosaur pumpkin carving ideas. Take your printed stencil (or your brave freehand sketch) and tape it securely onto the smoothest part of your pumpkin. Smooth out any wrinkles as best you can. Grab your pokey tool or thumbtack and start poking holes along the lines of the design. Keep the holes fairly close together, maybe about a quarter-inch apart, especially on curves. This creates a dotted outline on the pumpkin. Once you've poked all the lines, remove the paper stencil. You should see a dotted outline on the pumpkin surface. You can connect the dots with a dry-erase marker if it helps, but the dots themselves are your carving guide. Now, pick up one of those small pumpkin saws from your kit. Start carving along the dotted lines, using a gentle back-and-forth motion. Don't rush it. Take breaks. Small sections at a time are the way to go. If a piece gets stuck, gently push it out from the inside.
- Cut the lid at an inward angle.
- Scoop all the guts and stringy bits clean.
- Scrape the walls thin (about 1 inch).
- Tape your stencil flat on the pumpkin.
- Poke close holes along the stencil lines.
- Carve slowly along the dotted lines with a small saw.
- Push cut pieces out gently from the inside.
Beyond the Stencil: More Easy Dinosaur Pumpkin Ideas
Beyond the Stencil: More Easy Dinosaur Pumpkin Ideas
Beyond the Stencil: More Easy Dinosaur Pumpkin Ideas
so stencils are great for getting a specific shape, especially if you want a recognizable T-Rex profile. But maybe you don't have a printer, or you want something even simpler. That's totally doable. Think about basic shapes. A long, curved pumpkin could become a Brontosaurus neck and head with just a few carved lines for eyes and a mouth. You can use round cookie cutters (dinosaur shaped, perhaps?) to punch simple shapes into the pumpkin surface, either cutting all the way through or just scraping the skin off for a silhouette effect. Painting is another avenue – grab some acrylic paints and let kids go wild creating colorful scales, big eyes, or even just painting the whole pumpkin a vibrant dinosaur-skin green or brown. You can even use craft foam or felt cutouts of spikes, fins, or teeth and glue them onto the pumpkin for a 3D dino effect that requires zero carving skill.
What's the simplest dinosaur shape you can imagine creating with just a few cuts or painted lines?
Frequently Asked Questions About Easy Dinosaur Pumpkin Carving

Frequently Asked Questions About Easy Dinosaur Pumpkin Carving
What if I mess up while carving? Can I fix it?
deep breaths. It's a pumpkin, not the Mona Lisa. Mistakes happen, especially when you're tackling easy dinosaur pumpkin carving ideas for the first time. The good news is, you can often salvage things. If a small piece breaks off that wasn't supposed to, sometimes you can reattach it with toothpicks. Just push the toothpicks halfway into the piece you want to reattach, then line it up and push it back into the pumpkin wall. If it's a larger area, you might have to get creative. Maybe that T-Rex tooth didn't carve cleanly? Turn it into a battle scar! Or, hey, just own it. Call it abstract dinosaur art. Nobody expects perfection, and often the slightly imperfect ones have the most character.
How long will my dinosaur pumpkin last, and how can I keep it from getting moldy?
Ah, the age-old pumpkin problem: decay. Carved pumpkins are basically on borrowed time from the moment you cut into them. Generally, a carved pumpkin will last anywhere from a few days to a week or maybe a bit longer, depending on the weather where you live. Warm, humid conditions speed up the molding process, while cool, dry weather helps preserve it. To give your easy dinosaur pumpkin carving ideas the best chance at survival, you can try a few tricks. After carving, give the inside and cut edges a spray with a bleach solution (about one teaspoon of bleach to a quart of water) or a commercial pumpkin preservative spray. Let it dry completely. Some people swear by rubbing petroleum jelly on the cut edges to seal in moisture, but this can also trap bacteria. Keeping it out of direct sunlight and covering it during warm days helps too.
Here are a few ways to extend your pumpkin's life:
- Spray inside and cut edges with a bleach solution (1 tsp bleach per quart water).
- Use a commercial pumpkin preservative spray.
- Rub cut edges with petroleum jelly (use sparingly).
- Keep the pumpkin in a cool, dry place.
- Avoid direct sunlight.
Your Dino Pumpkin Awaits
So there you have it. Ditching the overly complicated designs doesn't mean settling for boring. With some simple tools, a straightforward plan, and a killer stencil, you can bring a bit of prehistoric punch to your Halloween decor. These easy dinosaur pumpkin carving ideas prove you don't need to be a master sculptor to create something memorable. It's about having a bit of fun, making something cool, and maybe even getting a few "Wow, how'd you do that?" comments. Go grab that pumpkin, pick your favorite dino, and give it a shot. Worst case, you make some cool compost. Best case? You've got the coolest pumpkin on the block.