Table of Contents
Let's be honest. Halloween is coming, and you want a killer jack-o'-lantern. You picture those intricate, glowing masterpieces you see online, but then you remember the mess, the slipping knife, the sheer frustration. Maybe you've got kids who want to help (or hinder), or maybe you just don't have hours to dedicate to gourd surgery. You want something that looks awesome without requiring an art degree or a trip to the emergency room. This is exactly where we come in. Forget the notion that impressive pumpkins require advanced skills. We're talking about hitting that sweet spot: easy but impressive pumpkin carving ideas.
Why Go for Easy But Impressive Pumpkin Carving Ideas This Year?
Why Go for Easy But Impressive Pumpkin Carving Ideas This Year?
Tired of Pumpkin Carving Fails?
We've all seen the Pinterest-perfect pumpkins. The ones that look like they were sculpted by a master artist with unlimited free time and surgeon's hands. Then we grab a cheap carving kit from the grocery store, a lopsided gourd, and quickly realize our ambitious design is turning into a lumpy, sad mess. The knife slips, a crucial piece breaks off, and what started as a majestic dragon ends up looking suspiciously like a slightly melted potato. It's frustrating, messy, and frankly, takes way too long for something that's going to rot on your porch in a week. This year, let's ditch the struggle and focus on what actually works: easy but impressive pumpkin carving ideas.
Save Time, Sanity, and Still Look Good
Look, Halloween is busy. Between costumes, candy, and maybe one too many spooky movie marathons, who has hours to spend hunched over a pumpkin, meticulously sawing away? Opting for easy but impressive pumpkin carving ideas isn't about being lazy; it's about being smart. You minimize the risk of accidental finger removal, reduce the cleanup time significantly, and most importantly, you actually finish the project before Halloween night. You get a fantastic-looking pumpkin that makes your place festive without the usual pre-Halloween carving stress sweat.
- Less chance of cutting yourself.
- Finish carving faster.
- Fewer broken pumpkin pieces.
- Still get "oohs" and "aahs" from visitors.
- More time for eating Halloween candy.
Impress Without the Stress
Now, you might think "easy" means "boring." Absolutely not. The goal here is impact with minimal effort. Think clever designs, smart techniques, and focusing on elements that pop when lit up. Your neighbors won't know you spent only 30 minutes on that masterpiece while they're still wrestling with their overly complicated ghoul. They'll just see a cool pumpkin and wonder how you managed it. That's the beauty of easy but impressive pumpkin carving ideas – maximum visual return for minimum time investment. It's the kind of efficiency we can all get behind.
Simple Cuts, Big Impact: Easy Carving Techniques That Impress

Simple Cuts, Big Impact: Easy Carving Techniques That Impress
Think Bold, Not Busy
so you've decided to skip the microscopic details that nobody will see in the dark anyway. Good call. Achieving simple cuts, big impact is the name of the game for easy but impressive pumpkin carving ideas. Forget trying to recreate the Mona Lisa on a gourd. We're talking about techniques that use the pumpkin's natural shape and light to their advantage. Think strong lines, clear shapes, and designs that read well from a distance. It's about making smart choices with your knife, not making a million tiny cuts.
One classic example is the simple geometric pattern. Triangles, squares, circles – cut clean shapes in varying sizes across the pumpkin. When you light it up, the different hole sizes create cool variations in light intensity. It looks graphic and modern, and honestly, it's hard to mess up a straight line or a circle if you take your time. No fiddly bits to break off, just clean, effective design. Another approach is the bold silhouette. Think a simple black cat, a single spooky tree branch, or a classic ghost shape. Trace it on, cut it out cleanly. The contrast against the glowing interior is what makes it pop.
- Clean geometric shapes (circles, squares, triangles).
- Bold, simple silhouettes (cat, bat, ghost).
- Varying cut sizes for light effect.
- Focus on strong lines, not intricate details.
- Use a good, sharp tool designed for pumpkins.
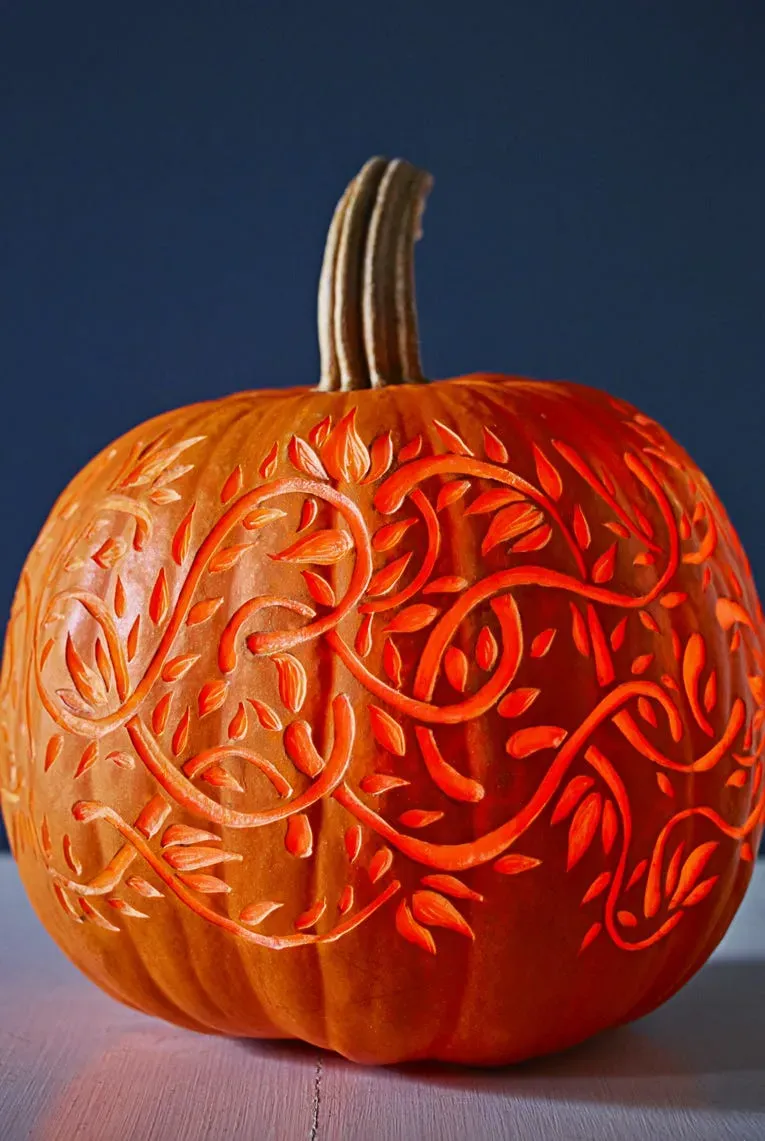
Etching: Your Secret Weapon for Easy Impressive Designs
Carving all the way through isn't your only option. Etching is a fantastic way to create dimension and detail without the risk of collapse. This involves scraping away just the outer layer of skin, leaving the flesh exposed. The scraped areas will glow with a softer light than the carved-through sections. You can etch patterns, textures, or even parts of a larger design, like spiderwebs, brickwork, or shading on a face.
Etching is incredibly forgiving. If you mess up, you can often scrape a little wider or deeper to fix it. It also lets you create designs that wouldn't be possible with full cuts, like subtle gradients or fine lines. Combine etching with a few strategic full cuts, and you get a really dynamic effect that looks way more complicated than it is. It’s a prime technique for achieving easy but impressive pumpkin carving ideas, adding depth without the drama.
Stencil Power: Using Guides for Easy But Impressive Pumpkin Carving Ideas
Stencil Power: Using Guides for Easy But Impressive Pumpkin Carving Ideas
No Shame in the Stencil Game
let's talk stencils. Some purists might scoff, but honestly, stencils are your best friend when you're aiming for easy but impressive pumpkin carving ideas. Why reinvent the wheel (or the spooky spiderweb) every single time? Stencils provide a clear roadmap, taking the guesswork out of transferring a design onto a curved, sometimes bumpy, surface. They instantly elevate your carving from a freehand guess-and-hope situation to something clean and recognizable. Think of it as having a professional artist sketch the outline for you before you pick up the knife. It dramatically cuts down on the "oops" moments and speeds up the process, leaving you with more time to admire your handiwork (or, let's be real, find more candy).
Using a stencil isn't a sign of weakness; it's a sign of efficiency. It ensures symmetry and proportion, especially for designs that require a bit more precision than a simple triangle eye. Whether you download free ones online, buy a cheap kit, or even make your own simple shapes, stencils are the cheat code for getting impressive results without the frustration. They are key to making those easy but impressive pumpkin carving ideas actually happen on your porch.
Picking and Applying Your Perfect Pattern
So, you've embraced the stencil life. Now, which one? There are tons out there, from classic spooky faces to intricate scenes. For easy but impressive pumpkin carving ideas, lean towards stencils with thicker lines and less tiny, isolated pieces. Designs where everything connects or has a clear separation are much easier to cut without bits breaking off. Once you have your stencil, applying it smoothly to the pumpkin is crucial. Tape is your friend here. Lots of tape. Use painter's tape or masking tape to secure the stencil flat against the pumpkin's surface, smoothing out wrinkles, especially on curves. Cutting slits in the edges of the paper can help it conform better.
Transfer the design by poking holes along the lines with a poker tool or even a sharp pencil tip. Keep the holes close together so you have a clear dotted line to follow when you start carving. Don't rush this part; a good transfer makes the carving much, much easier. Peel off the paper carefully, and you're left with a dotted outline ready for your knife or etching tool. This simple step ensures your easy but impressive pumpkin carving ideas look intentional and polished, not like you drew them on in the dark after too much cider.
- Free printable stencils are everywhere online.
- Look for stencils with connected lines or bold shapes.
- Use painter's tape or masking tape for application.
- Cut slits in the stencil edges to help it curve.
- Poke close holes along the lines to transfer the design.
Beyond the Knife: Painting and Etching for Easy Impressive Results
Beyond the Knife: Painting and Etching for Easy Impressive Results
Beyond the Knife: Painting and Etching for Easy Impressive Results
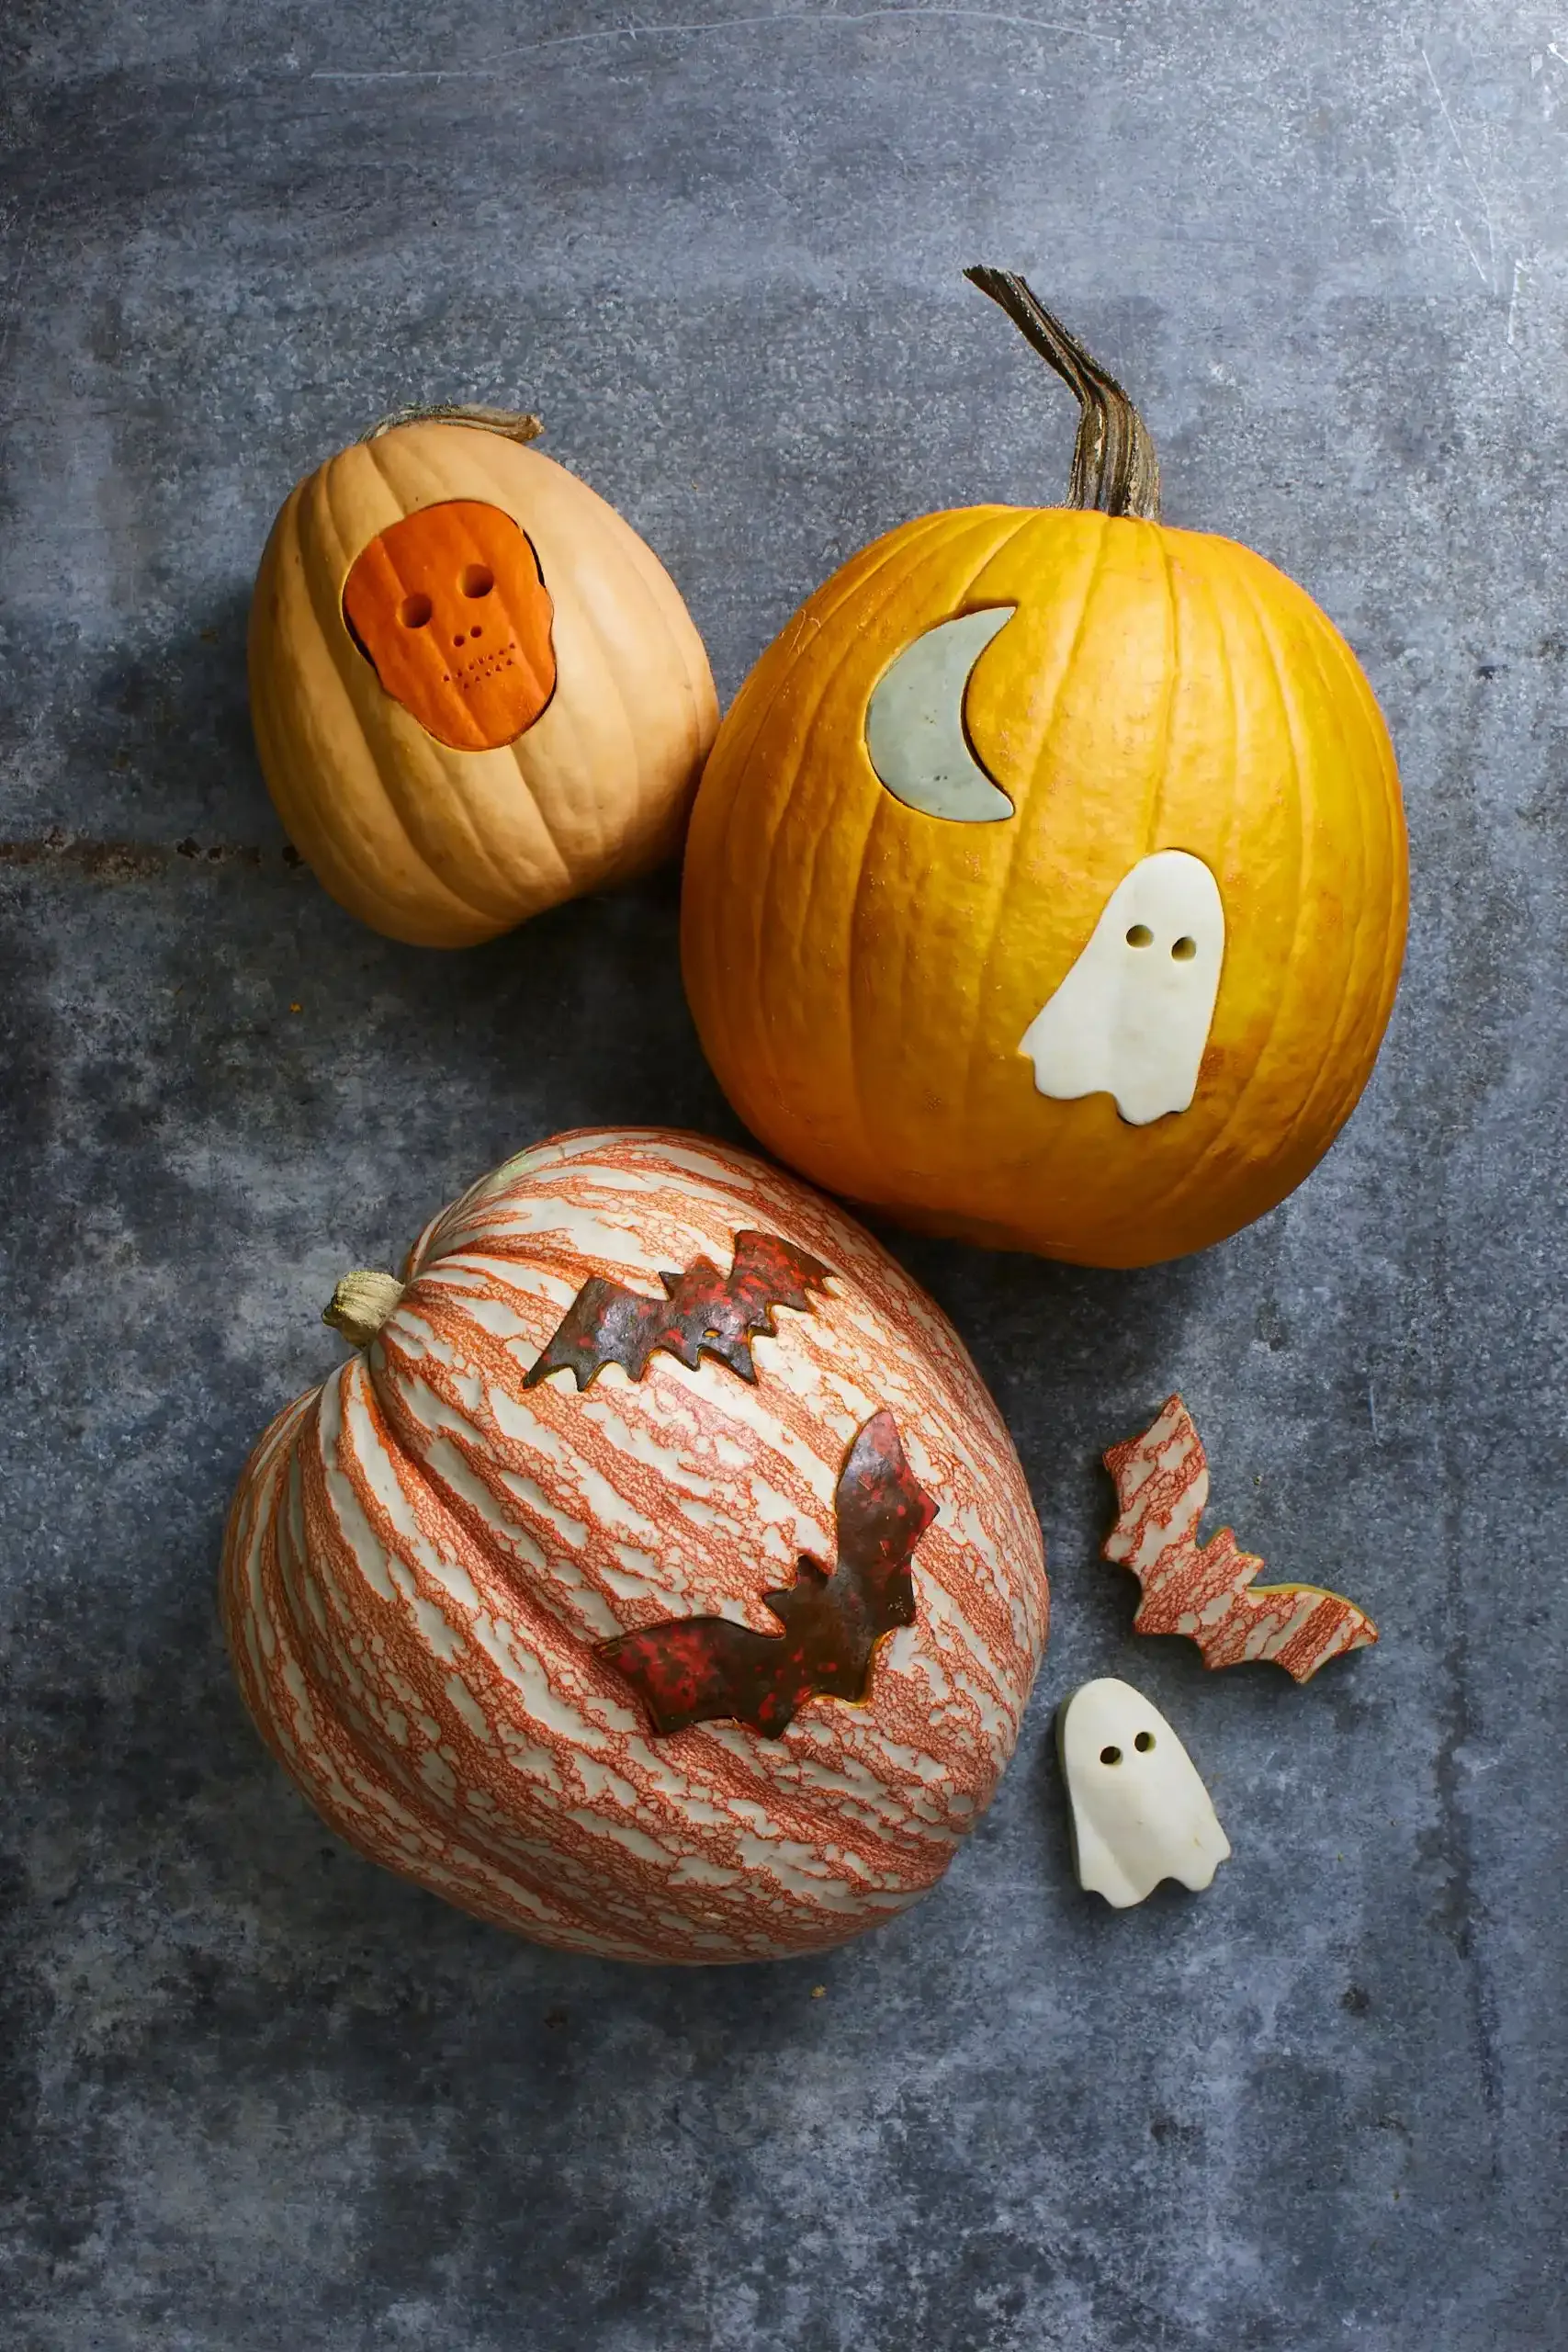
so maybe the idea of wielding a sharp object near a round, slippery surface still gives you the heebie-jeebies. Or perhaps you've got little ones whose fine motor skills are, shall we say, developing. Good news! You can still achieve truly easy but impressive pumpkin carving ideas without making a single full cut. Painting is your best friend here. Think bold colors, simple patterns, or even using paint to create the illusion of carving. Black paint for spooky silhouettes, white paint for ghosts or skeletons, or bright colors for fun, whimsical designs. You can freehand, use stencils (again, no shame!), or even use painters tape to create crisp geometric lines. Another fantastic technique is etching, which we touched on earlier. Instead of cutting all the way through, you just scrape off the skin. This reveals the lighter flesh underneath, creating a glowing effect when lit from inside, but it's much less likely to cause structural collapse than full carving. It's perfect for intricate-looking details like veins on a leaf, scales on a monster, or just cool textural patterns. Combining paint and etching gives you even more options for creating depth and visual interest with minimal effort, proving that easy can definitely be impressive.
Displaying Your Easy But Impressive Pumpkin Carving Ideas
Displaying Your Easy But Impressive Pumpkin Carving Ideas
Making Your Masterpiece Shine
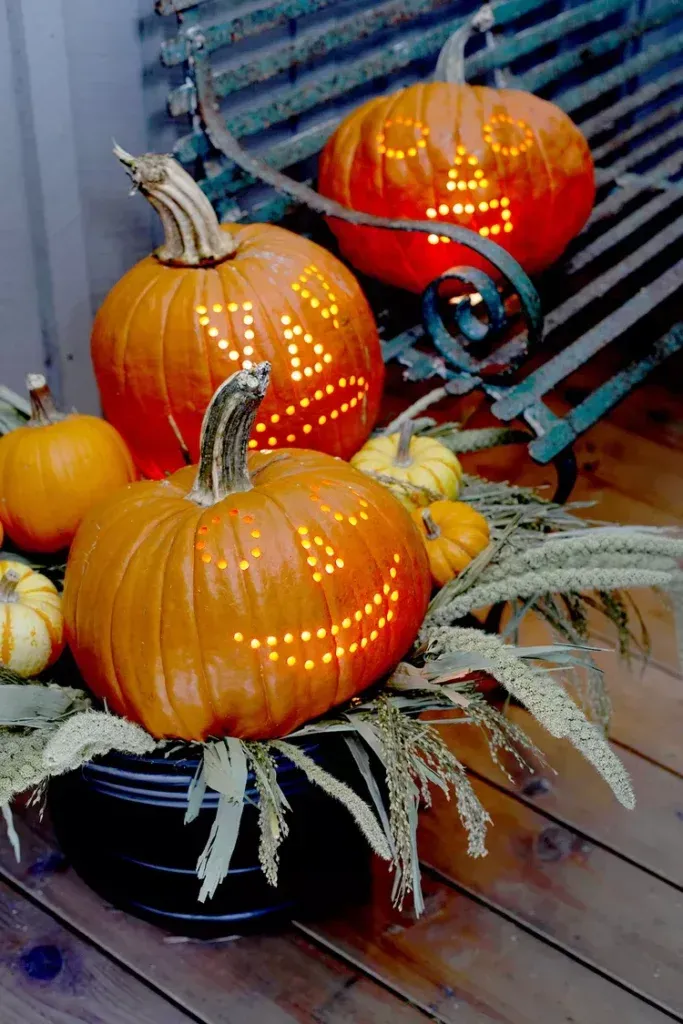
Alright, you've put in the (minimal, easy!) effort and crafted your easy but impressive pumpkin carving ideas. Now, don't just plop it on the porch and call it a day. How you display that bad boy makes a huge difference in how impressive it actually looks. Lighting is key; a flickering LED candle (safer than real flames, especially with kids or pets around) gives that classic spooky glow and highlights your cuts or etching. Place it where it can be seen, maybe near the walkway or on a prominent step. Consider grouping pumpkins of different sizes or using varied heights with crates or stands to create a more dynamic display. And a quick tip to make it last a bit longer: a light misting of water daily can help keep it from shriveling up too fast, extending the life of your easy but impressive pumpkin carving ideas for maximum viewing pleasure.
Your Impressive Pumpkin Awaits
So there you have it. Ditching the overly complicated methods doesn't mean settling for a sad, lopsided grin. We've covered how simple cuts, smart stencil use, and alternative decorating methods can deliver genuinely striking results. You don't need to be a master sculptor to create a pumpkin that turns heads. Pick a technique that feels right, grab your tools (or paints), and give it a go. Your porch deserves something better than the same old triangle eyes and jagged mouth, and achieving it is probably easier than you think.