Table of Contents
Alright, let's be honest. You've scrolled through Pinterest, seen those impossibly intricate pumpkin carvings, and thought, "Yeah, right. My kitchen would look like a crime scene, and the pumpkin would look like it lost a fight with a badger." The classic toothy grin is fine, but sometimes you want something a little more charming without needing an engineering degree or a week off work. This is where the magic ofeasy but cute pumpkin carving ideascomes in. Forget the hours of scraping guts and the risk of losing a finger. We're talking about simple designs, straightforward tools, and results that make people say "Aww," not "Uh-oh, did someone call 911?"
Why Choose Easy But Cute Pumpkin Carving Ideas?

Why Choose Easy But Cute Pumpkin Carving Ideas?
Ditch the Drama, Embrace the Darling
Let's face it, the image of a perfectly carved, complex jack-o'-lantern often comes with the reality of sticky hands, frustrated sighs, and maybe a trip to the ER for a minor carving-tool mishap. Seriously, who needs that kind of stress during the supposedly fun Halloween season? Choosingeasy but cute pumpkin carving ideasmeans you get to bypass the drama. You trade the intricate, fragile designs that are prone to collapse for simple shapes, charming faces, and designs that are much more forgiving of shaky hands or impatient little helpers. It’s about enjoying the process, not just surviving it to get a picture for Instagram. Think fewer tears (yours and maybe the kids'), less mess, and a pumpkin that actually looks like you intended, not like it went ten rounds with a squirrel.
Fun for Everyone, Results You'll Actually Like
One of the biggest wins with focusing on easy and cute designs is that it opens the activity up to everyone. Little kids can participate without needing surgeon-level precision. Older kids and adults can still get creative, but with a much lower barrier to entry. Remember that time I tried a multi-layered spooky scene? It ended up looking less like a haunted forest and more like a lumpy potato with questionable acne. Switching to simpler, cute designs meant my niece could help scoop seeds, my nephew could draw faces with a marker for me to follow (or not), and the final product was genuinely cheerful. It’s a shared activity that doesn't require specialized skills, just enthusiasm and a willingness to make something sweet for your porch.
So, why go the easy and cute route?
- Less frustration, more fun.
- Safer for little hands (and clumsy adult ones).
- Adorable results without expert skills.
- Makes it a genuinely inclusive family activity.
- Your pumpkin won't look like a carving fail highlight reel.
Tools and Simple Techniques for Easy But Cute Pumpkin Carving
Tools and Simple Techniques for Easy But Cute Pumpkin Carving
Forget the Fancy Kits: Your Kitchen is Your Toolbelt
Look, you don't need a twenty-piece, specialized pumpkin carving set that looks like it belongs in a surgeon's kit (unless you *want* that, you do you). For genuinelyeasy but cute pumpkin carving ideas, your kitchen drawers are probably already loaded. A sturdy spoon or ice cream scoop works wonders for gutting the pumpkin and thinning the walls – way better than those flimsy plastic scoops that come in kids' kits and bend under pressure. A sharp paring knife is essential for cutting the top and doing basic shapes. For detail work, think smaller: a melon baller can create perfect dots or scoop out small sections, and cookie cutters? Absolute game-changers for creating consistent shapes like stars, moons, or even tiny ghosts without needing a steady hand.
Beyond the Knife: Get Creative with Simple Gadgets
Once you've got the basics down, let's talk about tools that make simple designs shine with minimal effort. A basic drill with different sized bits can create fantastic polka dot patterns or constellations. It's fast, clean, and way easier than trying to poke a million holes with a skewer. Lino cutting tools, or even just a sharp, narrow V-gouge from an art supply store, let you etch designs into the pumpkin's skin without cutting all the way through. This "scraping" technique is perfect for adding texture, outlines, or drawing simple pictures. It removes the tough outer layer, letting the lighter flesh underneath show through, and it's incredibly forgiving. Mess up? Just scrape a little wider. Plus, it's significantly less likely to result in a structural collapse than cutting through the whole wall.
What's the most underrated pumpkin carving tool?
- An ice cream scoop (for gutting)
- Metal cookie cutters (especially small ones)
- A basic electric drill (with various bits)
- Lino cutting tools (for etching)
- A dry erase marker (for drawing your design first)
Techniques That Don't Require Art School
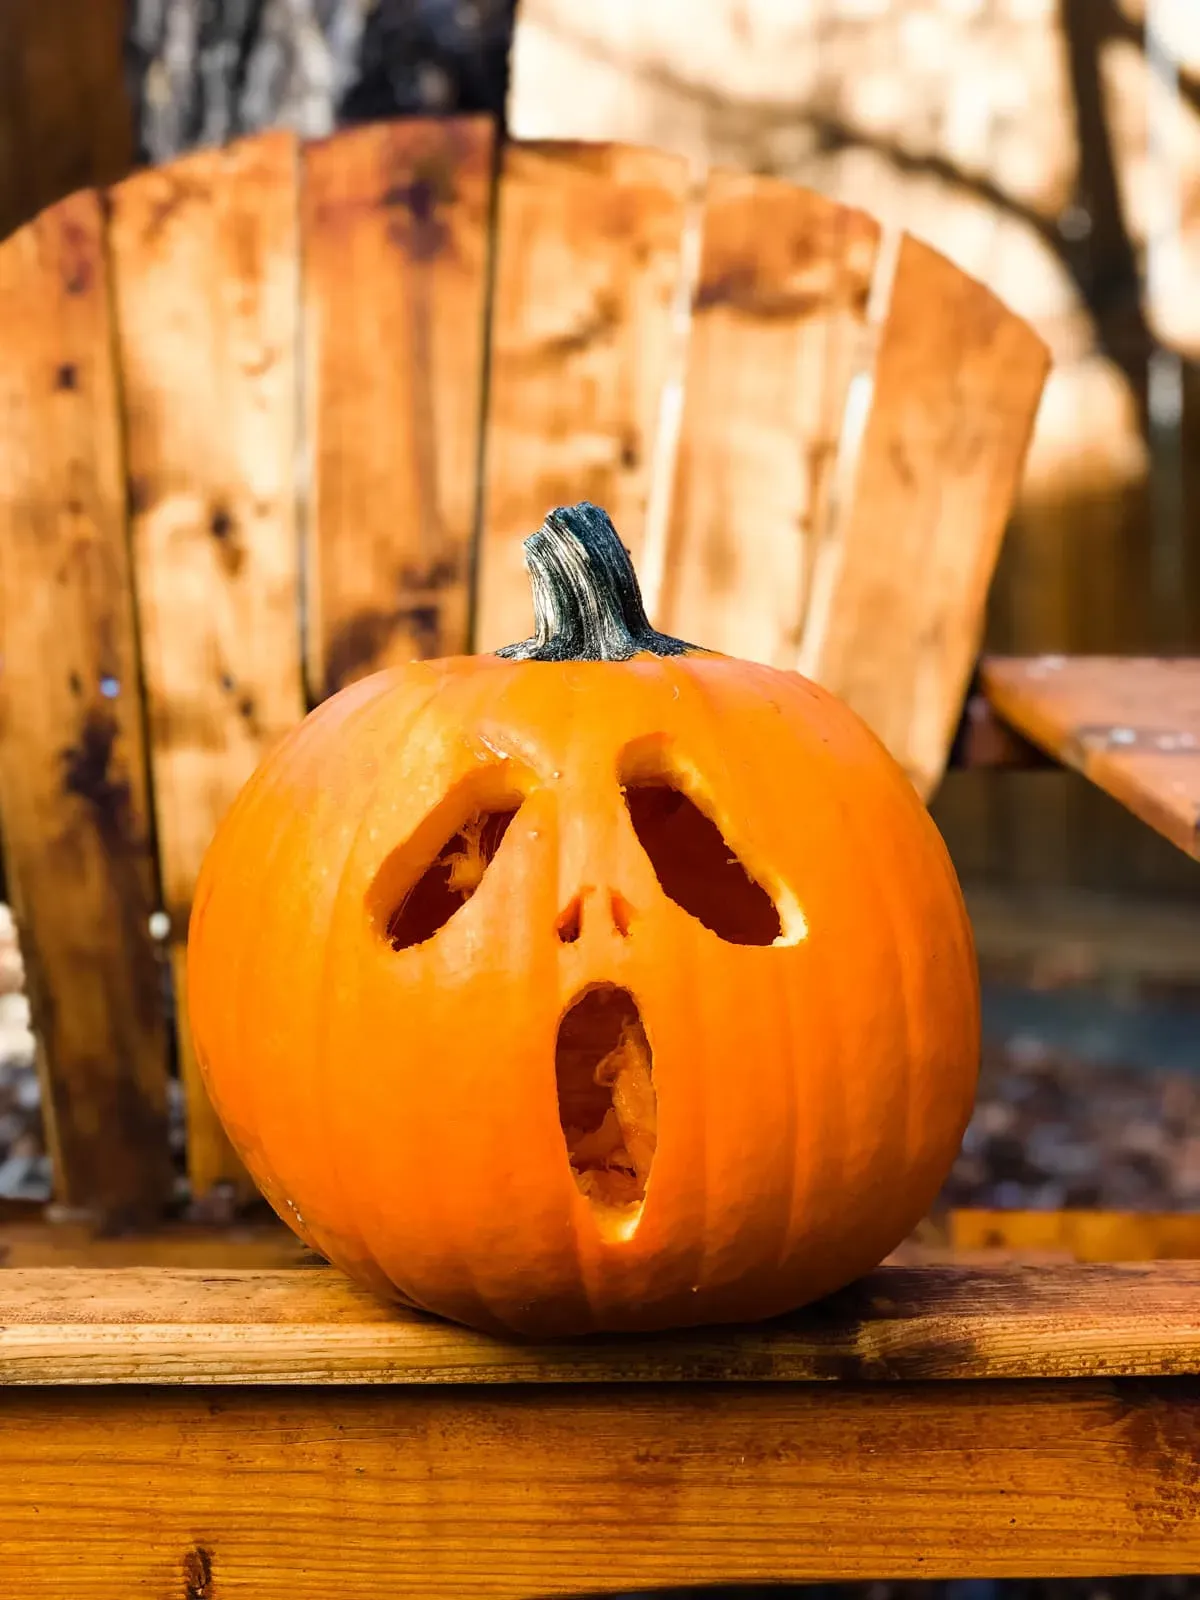
The secret to achievingeasy but cute pumpkin carving ideasisn't intricate skill; it's smart technique. Stencils are your best friend. Print one online, tape it on, and either poke holes along the lines with a pin or tracing wheel, or use it as a guide for etching or cutting. For simple faces, think shapes: triangles for eyes and noses, a simple curve for a smile. Don't aim for realism. Aim for charm. Scraping off patches of skin to create larger areas of light is much faster than cutting out big pieces. You can scrape a ghost shape, a simple word, or even just stripes. It looks intentional, catches the light nicely, and requires zero freehand drawing talent. My first attempt at a scraped design was a wonky cat face, but because it was scraped, it looked whimsical, not like I failed at drawing a realistic one. Embrace the simplicity; it's part of the cuteness.
Beyond Jacko'Lanterns: Easy But Cute Pumpkin Carving Ideas for Animals
Beyond Jacko'Lanterns: Easy But Cute Pumpkin Carving Ideas for Animals
Why Limit Yourself to Frowns and Grins?
Let's talk about breaking the mold. Jack-o'-lanterns are classic, sure, but they're also a bit… expected. And frankly, getting that perfect spooky expression can be tricky without messing up the whole face. Shifting your focus toeasy but cute pumpkin carving ideasopens up a whole menagerie of possibilities. Animals are inherently charming, and simplifying their features makes them perfect candidates for low-stress carving. A simple set of eyes, a nose, maybe some whiskers etched on the surface – suddenly, your pumpkin has personality without the pressure of getting a detailed, snarling mouth just right. Think sleepy owls, wide-eyed cats, or even a roly-poly hedgehog. It's a fresh take that feels approachable and delivers maximum cuteness with minimal effort.
Simple Shapes Make Adorable Critters
You don't need to sculpt a photorealistic pet. The beauty of creating animals witheasy but cute pumpkin carving ideaslies in using basic shapes. Circles for eyes, triangles for ears or noses, simple curves for mouths. A pair of round scoops for eyes and a small triangle below them instantly suggests a cat or an owl, depending on how you position them. Use cookie cutters for perfect circles or stars to make animal eyes sparkle. Scraping away patches of skin can create fur texture or the lighter belly of a creature. It’s about suggestion and simplicity. My neighbor once made a whole set of "pumpkin pets" using just scraped shapes and drilled holes for eyes – a bear, a rabbit, even a slightly abstract dog. They were ridiculously charming and took her maybe 20 minutes each.
Here are some easy animal ideas:
- Sleepy Owl: Two large scraped circles for eyes, small triangle cut-out for beak.
- Cute Cat: Triangle ears cut from the top rind, circular eyes, scraped whiskers.
- Simple Hedgehog: Scrape the top half for "spines," add small cut or scraped eyes and nose.
- Friendly Frog: Large scraped circles for eyes (maybe on bumps), wide scraped smile.
Adding Details Without the Hassle
Once you have the basic animal shape, adding simple details elevates the cuteness factor without adding complexity. Use a melon baller to scoop out small, consistent dots for eyes or a patterned effect on fur. A lino tool can etch fine lines for whiskers, feathers, or scales. Don't feel pressured to carve everything. Sometimes, painting on whiskers with non-toxic paint after carving the main features is easier and looks cleaner. You can attach felt ears or googly eyes with toothpicks for extra dimension. The goal is cute and easy, remember? A few well-placed simple details are far more effective than attempting intricate carving that risks splitting the pumpkin or looking messy.
Patterns, Shapes, and Simple Styles for Cute Pumpkins
Patterns, Shapes, and Simple Styles for Cute Pumpkins
Unlock Cuteness with Basic Geometry
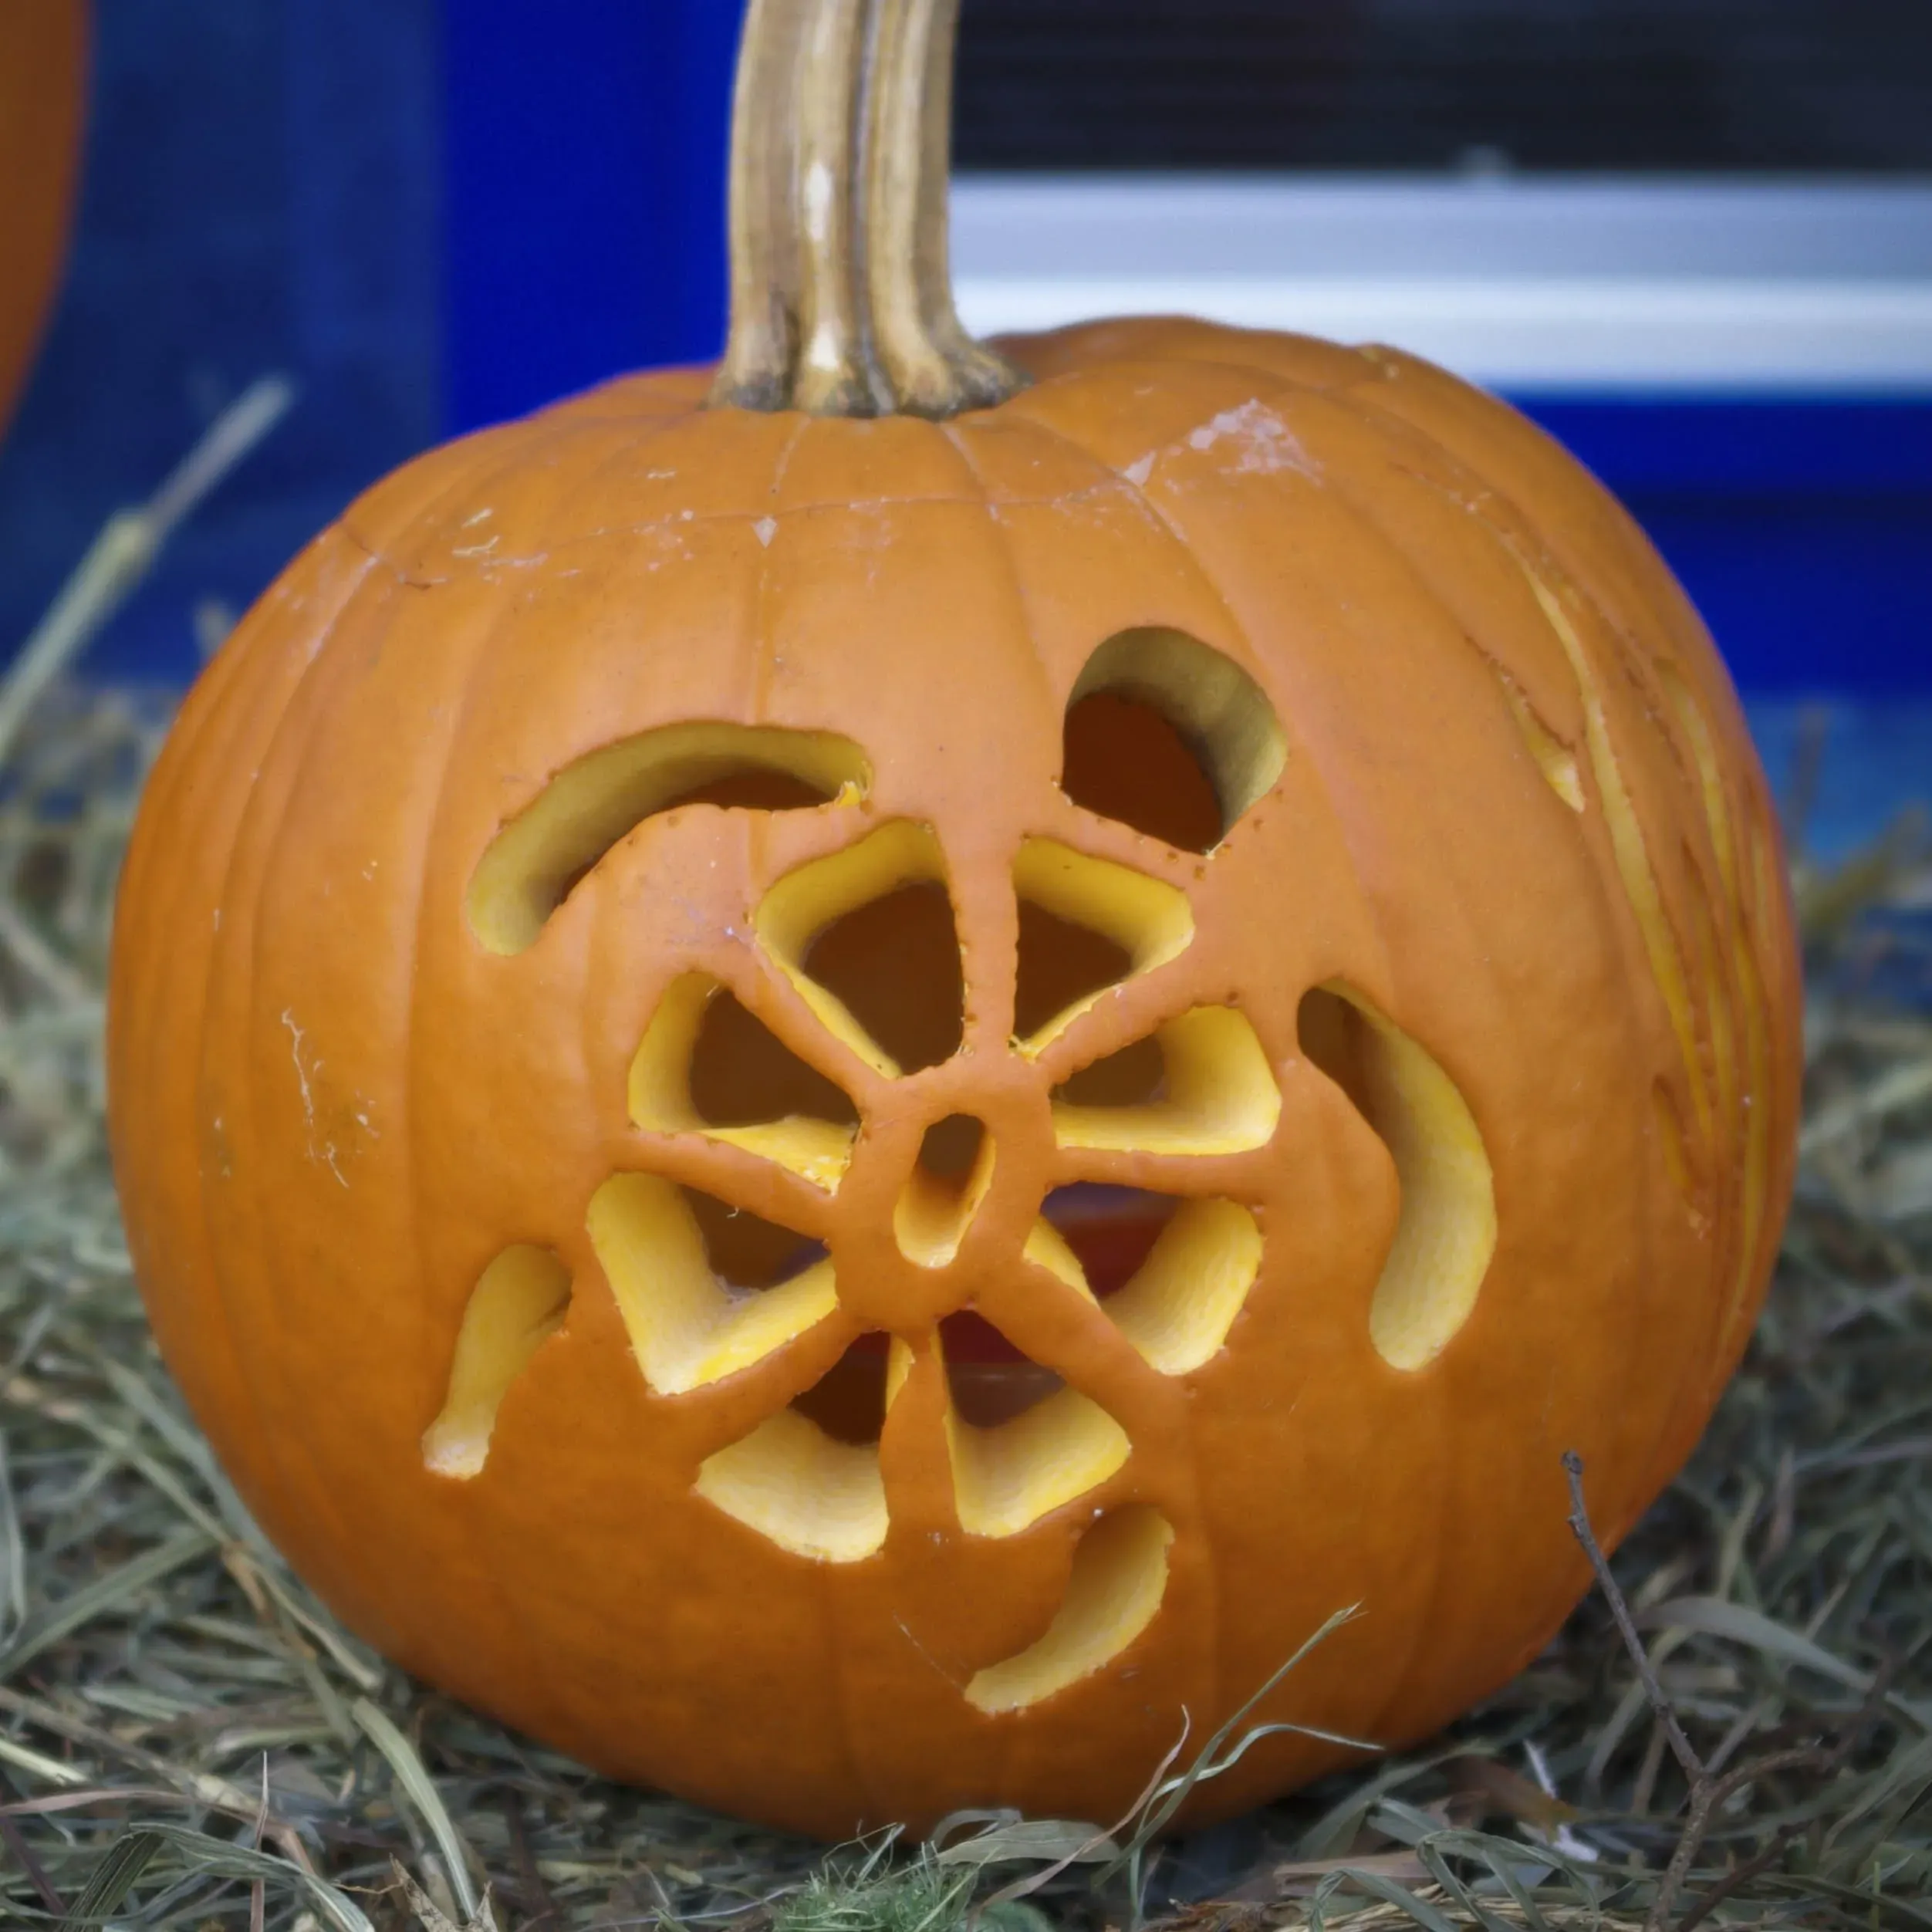
Think beyond the scary face. When exploringeasy but cute pumpkin carving ideas, simple geometric shapes are your secret weapon. Circles aren't just for eyes; imagine a pumpkin covered in scattered dots of varying sizes, created easily with a drill or melon baller. Triangles can form a playful pattern around the top edge or be used repeatedly to create a whimsical border. Stars cut with a cookie cutter add instant charm. You don't need artistic talent to make a pattern of drilled holes that looks like a constellation or a series of scraped circles that resemble bubbles. This approach removes the pressure of getting a face "right" and lets you focus on repetition and clean lines, which are surprisingly effective for a cute aesthetic.
Etching and Scraping: The Low-Commitment Way to Charm
Cutting all the way through the pumpkin wall is often the hardest part, leading to breaks and frustration. For trulyeasy but cute pumpkin carving ideas, lean into etching and scraping. This technique involves only removing the thin outer layer of skin, exposing the lighter flesh underneath. It's incredibly forgiving – a slip-up is easily blended in or widened. You can scrape simple stripes, polka dots, waves, or even draw basic pictures like flowers or swirls directly onto the surface using a lino tool or even just the tip of a sturdy knife held at a shallow angle. This creates a lovely, subtle glow when lit from within and looks polished without requiring precision cutting. Plus, pumpkins carved this way tend to last a bit longer than those with large sections cut out.
Simple Techniques for Cute Patterns:
- Use metal cookie cutters and a mallet to punch shapes.
- Drill holes of different sizes for polka dots or constellations.
- Scrape stripes or waves with a lino tool or knife tip.
- Use stencils for repeating patterns like stars or leaves.
- Combine scraped areas with small cut-out shapes for contrast.
Keeping Your Easy But Cute Pumpkin Carving Ideas Looking Fresh
Keeping Your Easy But Cute Pumpkin Carving Ideas Looking Fresh
Give Your Pumpkin a Spa Treatment
So you've put in the (minimal, because they're easy and cute!) effort to carve your pumpkin, and it looks fantastic. Now, how do you stop it from looking like a deflated, moldy mess within 48 hours? Think of it like skincare for gourds. The moment you cut into a pumpkin, you expose the flesh to air, which starts the drying and rotting process. To keep youreasy but cute pumpkin carving ideaslooking perky, hydration is key. After carving, give your pumpkin a bath. Seriously. Submerge it in a tub of cold water for a few hours, or at least mist it generously with water from a spray bottle. Getting that moisture back into the tissues helps prevent shrinkage and keeps the carved edges from curling and drying out. Some folks even swear by a little bleach in the water bath (like a teaspoon per gallon) to kill surface bacteria, just rinse it well afterward.
Barrier Methods: Keep the Nasties Out
Once your pumpkin is hydrated, you need to create a barrier against airborne bacteria and pesky bugs that think your adorable creation is a buffet. A thin layer of petroleum jelly (Vaseline) rubbed onto all the cut edges works wonders. It seals in moisture and makes the surface less appealing to mold and insects. You can also use a commercial pumpkin preservative spray, which usually contains mild bleach or other anti-fungal agents. Spraying the inside and outside, especially the cut areas, can significantly extend its lifespan. Remember that bleach bath? It's a good first step, but a follow-up barrier is crucial, especially if you're displaying it outside where it's exposed to the elements and all sorts of tiny critters.
Ways to Make Your Carving Last:
- Submerge in cold water for several hours after carving.
- Mist daily with water, especially in dry climates.
- Rub petroleum jelly on all cut surfaces.
- Use a commercial pumpkin preservative spray (inside and out).
- Consider a bleach solution bath (1 tsp bleach per gallon water) for initial sanitizing.
Picking the Right Spot Matters
Where you put your carved pumpkin makes a huge difference in how long thoseeasy but cute pumpkin carving ideasstay, well, cute. Direct sunlight is the enemy. It dries out the pumpkin fast, leading to shriveling and cracking. Heat is also bad news, accelerating decomposition. Display your pumpkin in a cool, shady spot if possible. Indoors is generally better than outdoors, especially if you live in a warmer climate or it's unusually warm for the season. If you have to put it outside, place it on a porch that doesn't get direct sun all day. Bringing it inside overnight, especially if temperatures drop significantly, can also help. A little common sense about temperature and sun exposure goes a long way in keeping your charming creation from turning into a sad, saggy mess before Halloween arrives.
Carve Less, Smile More with Cute Pumpkins
So there you have it. Ditching the overly complicated designs doesn't mean sacrificing charm. Focusing oneasy but cute pumpkin carving ideassaves your sanity and your fingers. We've covered the simple tools that make a difference, the appeal of non-traditional shapes, and ways to keep your effort from turning into a sad, shriveled mess before the 31st. These aren't about winning some elaborate carving contest; they're about adding a bit of straightforward, cheerful decor to your Halloween setup. Go grab a pumpkin, pick a simple design, and remember: the goal is fun, not fine art.