Table of Contents
October rolls around, and suddenly, everyone's got gourds on the brain. You grab that perfect pumpkin, plump and promising, ready to transform it into a spooky masterpiece or a charming fall display. Then you remember the mess, the struggle with dull tools, and the ambitious design that looked great online but turns into a lopsided mess on your kitchen table. Sound familiar? The annual battle between wanting an impressive jack-o'-lantern and just wanting to get it done without losing a finger is real. You crave something that looks cool, gets compliments, but doesn't require an art degree or three hours of painstaking work.
Why Choose Easy But Creative Pumpkin Carving Ideas This Year?
Why Choose Easy But Creative Pumpkin Carving Ideas This Year?
Ditch the Drama, Embrace the Fun
Let's be honest. We've all been there. You see some incredible, intricate pumpkin carving online, a true work of art, and think, "Yeah, I can totally do that." Fast forward an hour, your hands are cramped, the design is completely off-center, and you've accidentally poked a hole where a tooth should be. It's frustrating! Choosing easy but creative pumpkin carving ideas means you bypass that stress entirely. You get to actually enjoy the process, maybe even with kids around, without the pressure of perfection. It's about making memories, not masterpieces destined for a museum.
What's the biggest carving disaster you've ever had?
- The time the whole side fell off?
- When it looked more like a potato than a pumpkin?
- Trying a character that ended up looking... abstract?
Impress Without the Effort
Think "easy" means boring? Think again. Easy but creative pumpkin carving ideas aren't about settling for less; they're about smart design. It's amazing what you can achieve with simple shapes, strategic placement, and maybe a few non-carving elements mixed in. Sometimes the most striking designs are the ones that are clean and clever, not overly complicated. Your neighbors will still be impressed, and you'll have a fantastic-looking pumpkin sitting on your porch without having spent hours hunched over a wobbly gourd in the cold.
More Time for Spooky Stuff
Ultimately, Halloween is about more than just one perfect pumpkin. It's about the crisp air, the costumes, the candy, and the general spooky atmosphere. When you opt for easy but creative pumpkin carving ideas, you free up precious time. That means more moments for baking pumpkin seeds, watching scary movies, perfecting your costume, or simply enjoying the autumn evening. It’s a simple shift that pays off by giving you back your time and energy, letting you soak in the season instead of getting bogged down in a difficult carving project.
Simple Tools, Big Impact: Your Easy But Creative Pumpkin Carving Kit
Simple Tools, Big Impact: Your Easy But Creative Pumpkin Carving Kit
What You Actually Need (Hint: Not Much)
let's talk gear. You don't need a workshop full of specialized instruments to pull off easy but creative pumpkin carving ideas. Forget those flimsy plastic sets that come with tiny saws that snap on contact. What you really need are a few solid basics that you might even have lying around. A sturdy, sharp kitchen knife (a chef's knife or a serrated one works well for cutting the top off), a smaller paring knife for detail work, and maybe a large spoon or ice cream scoop for gutting the thing. That's pretty much it for the essentials. Seriously, keep it simple. The fewer finicky tools you have, the less likely you are to get bogged down in complexity.
Making Simple Tools Work for Creative Ideas
The magic of easy but creative pumpkin carving ideas isn't in the tool itself, but how you use it. A simple paring knife can create surprising effects with just a bit of careful scoring or etching, rather than full cut-throughs. Think about negative space or simple geometric shapes. A drill with different sized bits can make perfect holes for eyes or patterns – incredibly fast and clean. Even cookie cutters, hammered through the pumpkin wall (carefully!), can give you unique shapes without intricate knife work. These basic items, used cleverly, unlock a world of creative possibilities that don't require advanced skills.
Your Minimalist Carving Kit:
- Sharp kitchen knife (for the lid)
- Small paring knife (for details)
- Large spoon or scoop (for guts)
- Dry-erase marker (for sketching)
- Maybe a drill with bits
- Maybe some cookie cutters
From Spooky Shapes to Sweet Scenes: Easy But Creative Pumpkin Carving Ideas to Try
From Spooky Shapes to Sweet Scenes: Easy But Creative Pumpkin Carving Ideas to Try
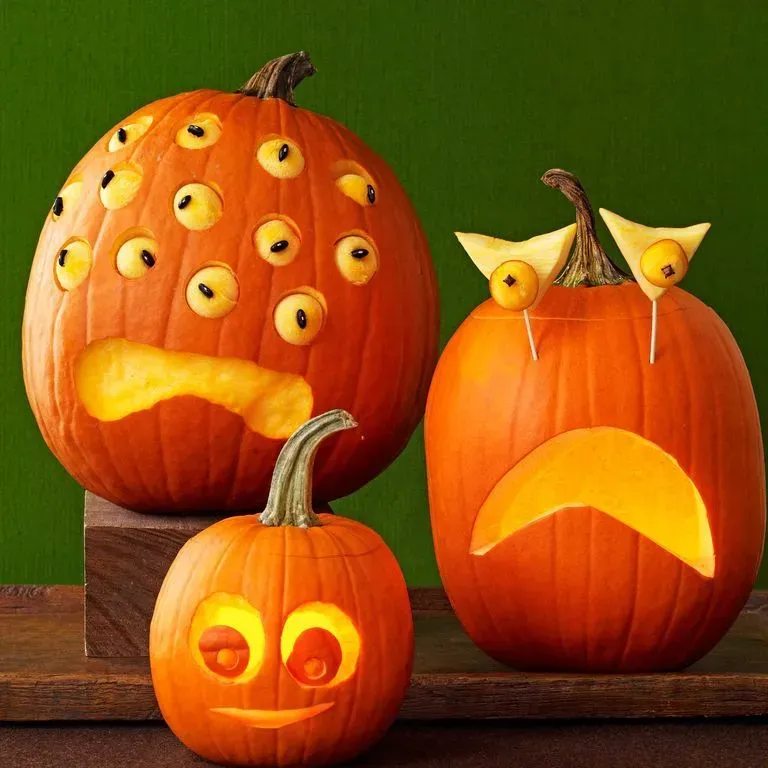
so you've got your pumpkin, your basic tools, and you're ready to actually put knife to gourd. Forget the complex portraits and detailed haunted houses you see on Pinterest. The real magic of easy but creative pumpkin carving ideas lies in simplicity and smart design. Think beyond the traditional jagged mouth and triangle eyes. What if you used different sized drill bits to create a pattern of holes that looks like stars or a swirling vortex? Or maybe focus on just one striking element – a single, oversized, slightly menacing eye, or a row of crooked, uneven teeth carved with just a paring knife. You can etch away the skin instead of cutting all the way through to create lighter areas that glow differently, perfect for ghosts or spiderwebs that look intricate but are surprisingly fast to do. These aren't just shortcuts; they're alternative artistic approaches that yield fantastic results with a fraction of the effort.
Adding Flair: Simple Twists on Easy But Creative Pumpkin Ideas

Adding Flair: Simple Twists on Easy But Creative Pumpkin Ideas
Beyond the Knife: Adding Non-Carving Elements
you've done the carving part, maybe it's a simple ghost shape or some geometric holes. How do you make it pop without getting out the scary-sharp detail tools again? This is where easy but creative pumpkin carving ideas get even easier. Think about accessories. Googly eyes in various sizes can instantly add personality, turning a basic shape into something comical or unsettling. Yarn or string can become messy hair or creepy spiderwebs draped over the carving. Pushpins or thumbtacks can create cool textures or patterns – imagine a constellation of tiny pinpricks glowing around a carved moon. Paint is your friend too; a little black paint around the carved edges makes them stand out, or you could paint the whole pumpkin first before carving for a colored glow. Don't underestimate the power of gluing things on. Felt shapes, buttons, even small twigs can transform a simple carved face into a character.
Simple Carving Enhancements for More Impact
Even with basic carving, you can add simple twists that look more complex than they are. Instead of cutting shapes all the way through, try etching just the top layer of skin. This works great for things like spiderwebs, scars, or patterns where you want the light to show through but not have a gaping hole. A linoleum carving tool or even just the tip of a sharp paring knife can do this. Varying the depth of your cuts on a single shape can add dimension – make the edges deeper and the center shallower, for instance. Consider using the stem as part of the design; sometimes a crooked stem is perfect for a grumpy face. Playing with light sources *inside* the pumpkin matters too. A flickering LED tea light gives a different vibe than a steady, bright bulb. These small adjustments are key to easy but creative pumpkin carving ideas that feel a bit more polished.
Easy Ways to Elevate Your Pumpkin:
- Glue on googly eyes or buttons
- Drape yarn for hair or webs
- Use pushpins for texture
- Paint the pumpkin before or after carving
- Etch designs instead of cutting through
- Vary carving depth
- Incorporate the stem into the face
- Experiment with different internal lights
Keeping Your Easy But Creative Pumpkin Looking Fresh

Keeping Your Easy But Creative Pumpkin Looking Fresh
Alright, you've put in the minimal effort for maximum spooky return with your easy but creative pumpkin carving ideas. Now, how do you keep your creation from turning into a sad, moldy mess on your porch before Halloween night? It's a common problem. You carve it, put a light in, and a few days later, it's starting to shrivel or, worse, sprout fuzzy green patches. Nobody wants a rotten pumpkin greeting trick-or-treaters. The good news is, a few simple steps can significantly extend the life of your carved pumpkin, keeping it looking sharp and spooky right through the main event.
Simple Tricks to Keep Your Pumpkin Looking Good:
- Wash the pumpkin first (outside and in) before carving.
- Apply petroleum jelly or vegetable oil to all cut edges to seal in moisture.
- Consider a bleach bath (1 tsp bleach per gallon of water) for a few hours after carving to kill bacteria.
- Spray daily with a water bottle mixed with a little bleach or a commercial pumpkin preservative spray.
- Keep it out of direct sunlight and rain if possible.
Carve On (Easily)
So there you have it. You don't need to dedicate your entire weekend or invest in a professional carving kit to get a pumpkin that turns heads. These easy but creative pumpkin carving ideas prove that sometimes, the simplest approaches yield the most effective results. It's about working smarter, not harder, using the right (basic) tools, and picking designs that look more complicated than they are. Ditch the panic, grab a decent knife and maybe a spoon, and remember that a slightly imperfect, hand-carved pumpkin often has more character than a factory-perfect one anyway. Now go make some glowing faces.