Table of Contents
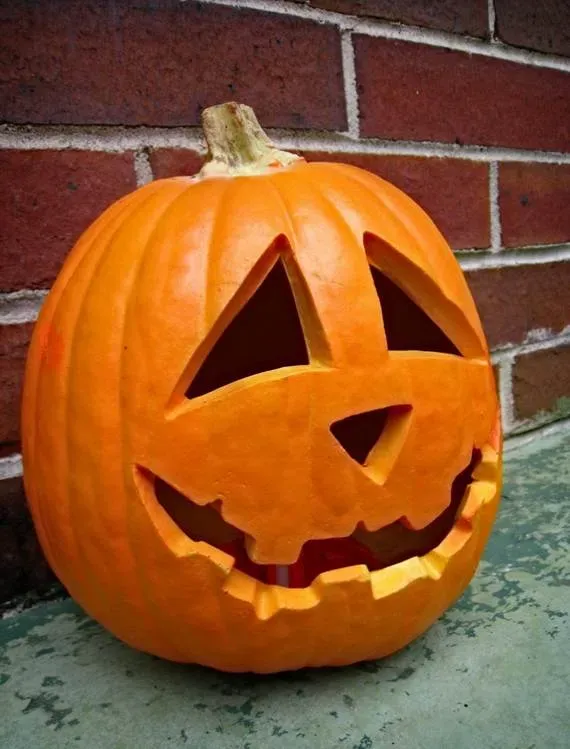
Let's be honest, the annual pumpkin carving ritual can feel less like a charming tradition and more like a messy, frustrating battle with a stubborn gourd. You picture a masterpiece; you end up with something vaguely resembling a startled ghost after an unfortunate incident. The kitchen is a disaster zone, seeds cling to everything, and the finished product... well, it's certainly a pumpkin. But what if achieving a genuinely cool Halloween display didn't require advanced sculpting skills or hours scraping out slimy insides? What if there were truly easy awesome pumpkin carving ideas that delivered impressive results without the headache?
Why Try Easy Awesome Pumpkin Carving Ideas This Year?
Why Try Easy Awesome Pumpkin Carving Ideas This Year?
Ditch the Drama, Embrace the Fun
Let's face it, the classic jack-o'-lantern struggle is real. You're hunched over a slippery, round object, wielding a flimsy saw, trying to coax a recognizable shape out of dense flesh. It often ends with jagged edges, questionable symmetry, and a sore wrist. That's exactly why exploring easy awesome pumpkin carving ideas is a game-changer. Instead of wrestling with complex patterns that demand surgical precision, you can opt for techniques that are forgiving, fast, and still look fantastic when illuminated on your doorstep.
Think less "fine art sculpture" and more "clever design hack." These simpler approaches cut down on the time commitment and the potential for mid-carve meltdowns. They make the process enjoyable again, rather than a chore you dread but feel obligated to do because, well, Halloween. Trying easy awesome pumpkin carving ideas means you can spend less time scraping guts and more time admiring your handiwork (and maybe eating candy).
Impress Without the Intimidation
You don't need to be a professional artist or own a specialized pumpkin carving kit with 50 different tools to create something cool. Many easy awesome pumpkin carving ideas rely on basic shapes, smart stencils, or even techniques that don't involve cutting all the way through the rind. This opens up the world of festive pumpkin decorating to everyone, regardless of their previous carving track record (or lack thereof).
Maybe you're short on time, carving with small kids, or just plain intimidated by the traditional method. Simple ideas remove those barriers. You can achieve a polished look with minimal effort, proving that impressive results don't always require advanced skills. It's about working smarter, not harder, to get that festive glow.
- Less time covered in pumpkin goo.
- Reduced risk of accidental finger removal.
- Results you'll actually want to show off.
- More energy left for trick-or-treating.
- Proof that "easy" doesn't mean "lame."
Unlock Unexpected Creativity
Sometimes, limitations breed innovation. Focusing on easy awesome pumpkin carving ideas can actually push you to think more creatively about how you use simple elements. Instead of trying to replicate a complex image, you might find yourself playing with patterns, textures, or negative space in interesting ways. Simple doesn't equal boring; it often forces you to be more clever with your design choices.
Plus, when the process is less stressful, you're more likely to experiment and have fun with it. You might try combining carving with painting, adding props, or using unconventional tools. Why try easy awesome pumpkin carving ideas this year? Because it lowers the barrier to entry, boosts confidence, and lets you enjoy the creative process without the usual Halloween-induced carving anxiety. It's about making a cool pumpkin happen, simply.
Gather Your Gear for Easy Awesome Pumpkin Carving Ideas

Gather Your Gear for Easy Awesome Pumpkin Carving Ideas
Essential Kit for Stress-Free Carving
before you even look at a pumpkin, let's talk tools. You don't need the entire aisle at the craft store. For most easy awesome pumpkin carving ideas, you just need a few key things. First up, a sturdy, sharp knife for cutting the top (or bottom, more on that later). A serrated one works well, like a small saw. Then, you need something to scoop out the guts. A large spoon is fine, but a dedicated pumpkin scoop with a serrated edge makes quick work of it. Trust me, your arm will thank you. Finally, you'll want something for the actual design. A small, sharp paring knife is good for detail, but cookie cutters and a rubber mallet are your secret weapon for many easy awesome pumpkin carving ideas.
Don't forget a marker – red dry-erase is genius because it blends in if you miss a spot, unlike black permanent marker which screams "oops." You'll also need a bowl for the seeds (roasting them later is a bonus!) and plenty of newspaper or old towels to contain the mess. Because there *will* be a mess. Even with easy awesome pumpkin carving ideas, pumpkin guts have a mind of their own.
Beyond the Basics: Clever Hacks
Now, let's get a little creative with the toolkit for these easy awesome pumpkin carving ideas. Remember those cookie cutters? They aren't just for dough. Press them into the pumpkin rind and give the back a few taps with a rubber mallet. Instant, perfect shapes! Circles, stars, bats – way easier than trying to freehand a jagged edge. Another trick? A drill. Yes, a drill. Different sized drill bits can create perfect holes for eyes, patterns, or even constellations. Just start slow and don't push too hard.
For etching (where you only remove the top layer of rind, not carve all the way through), grab a linoleum cutter or even a sturdy metal spoon. These let you scrape away the orange skin to reveal the lighter flesh underneath, creating cool designs without the risk of collapse. These simple additions make pulling off easy awesome pumpkin carving ideas way more achievable and less intimidating than you might think.
- Sharp Knife (for lid)
- Pumpkin Scoop (or sturdy spoon)
- Small Paring Knife (for details)
- Cookie Cutters & Rubber Mallet
- Red Dry-Erase Marker
- Newspaper/Old Towels
- Optional: Drill with bits, Linoleum Cutter
Beyond the Triangle: Simple Stencils for Easy Awesome Pumpkin Carving Ideas
Beyond the Triangle: Simple Stencils for Easy Awesome Pumpkin Carving Ideas
Why Stencils Simplify Everything
so you've got your pumpkin and your basic tools. Now, let's talk about skipping the freehand guesswork that often leads to lopsided eyes and wonky smiles. Stencils are your best friend when it comes to achieving easy awesome pumpkin carving ideas without needing an art degree. They take the pressure off designing from scratch and provide a clear guide for your knife (or other tools). Think of it as paint-by-numbers, but for pumpkins.
Using a stencil means you get consistent shapes and details. No more trying to make two eyes look even or sketching a complex design only to realize you have no idea how to cut it out. You just tape the pattern on, trace it, and follow the lines. It seriously cuts down on the "uh oh" moments and boosts your chances of ending up with something that actually looks like the picture.
Finding and Using Your Stencil
Where do you get these magical stencils for easy awesome pumpkin carving ideas? The internet is flooded with free printable patterns, from classic spooky faces to intricate scenes (though maybe stick to simpler ones for ease). You can find stencils of animals, words, geometric shapes, or even pop culture icons. Just print one out that matches the size of your pumpkin.
Once you have your printed stencil, tape it firmly onto the smoothest part of your pumpkin. Try to avoid wrinkles or bubbles. Now, use something sharp and pointy – like a thumbtack, a pushpin, or even the tip of your paring knife – to poke small holes along the lines of the design. Keep the holes close together, maybe about an eighth of an inch apart. This creates a dotted outline on the pumpkin when you remove the paper, giving you a clear path to follow with your cutting tool.
- Free online stencils are everywhere.
- Print stencils to fit your pumpkin size.
- Tape the stencil down firmly.
- Use a pin or thumbtack to poke holes along the lines.
- Poke holes close together for a clear guide.
Cutting Along the Dotted Line
With your dotted outline transferred onto the pumpkin, peel off the paper stencil. You should see a series of dots forming your design. Now comes the carving part, but it's much simpler now. Using your small paring knife or even a specialized pumpkin saw, carefully cut from dot to dot, connecting the pattern. Take your time, especially around corners or tight spots. Don't try to saw through the whole section at once; small, controlled cuts are key.
For really easy awesome pumpkin carving ideas using stencils, consider designs that have fewer, larger shapes. Simple circles, squares, or basic silhouettes are much faster and less prone to breaking than intricate details. Remember to push the cut-out pieces from the inside of the pumpkin outwards – sometimes they get stuck. And if a piece does break? Don't panic. Toothpicks can be surprisingly effective at reattaching wayward pumpkin parts. It's not art restoration, it's Halloween problem-solving.
Etching and Painting: NoCarve Easy Awesome Pumpkin Ideas
Etching and Painting: NoCarve Easy Awesome Pumpkin Ideas
Skip the Knife, Embrace the Scrape
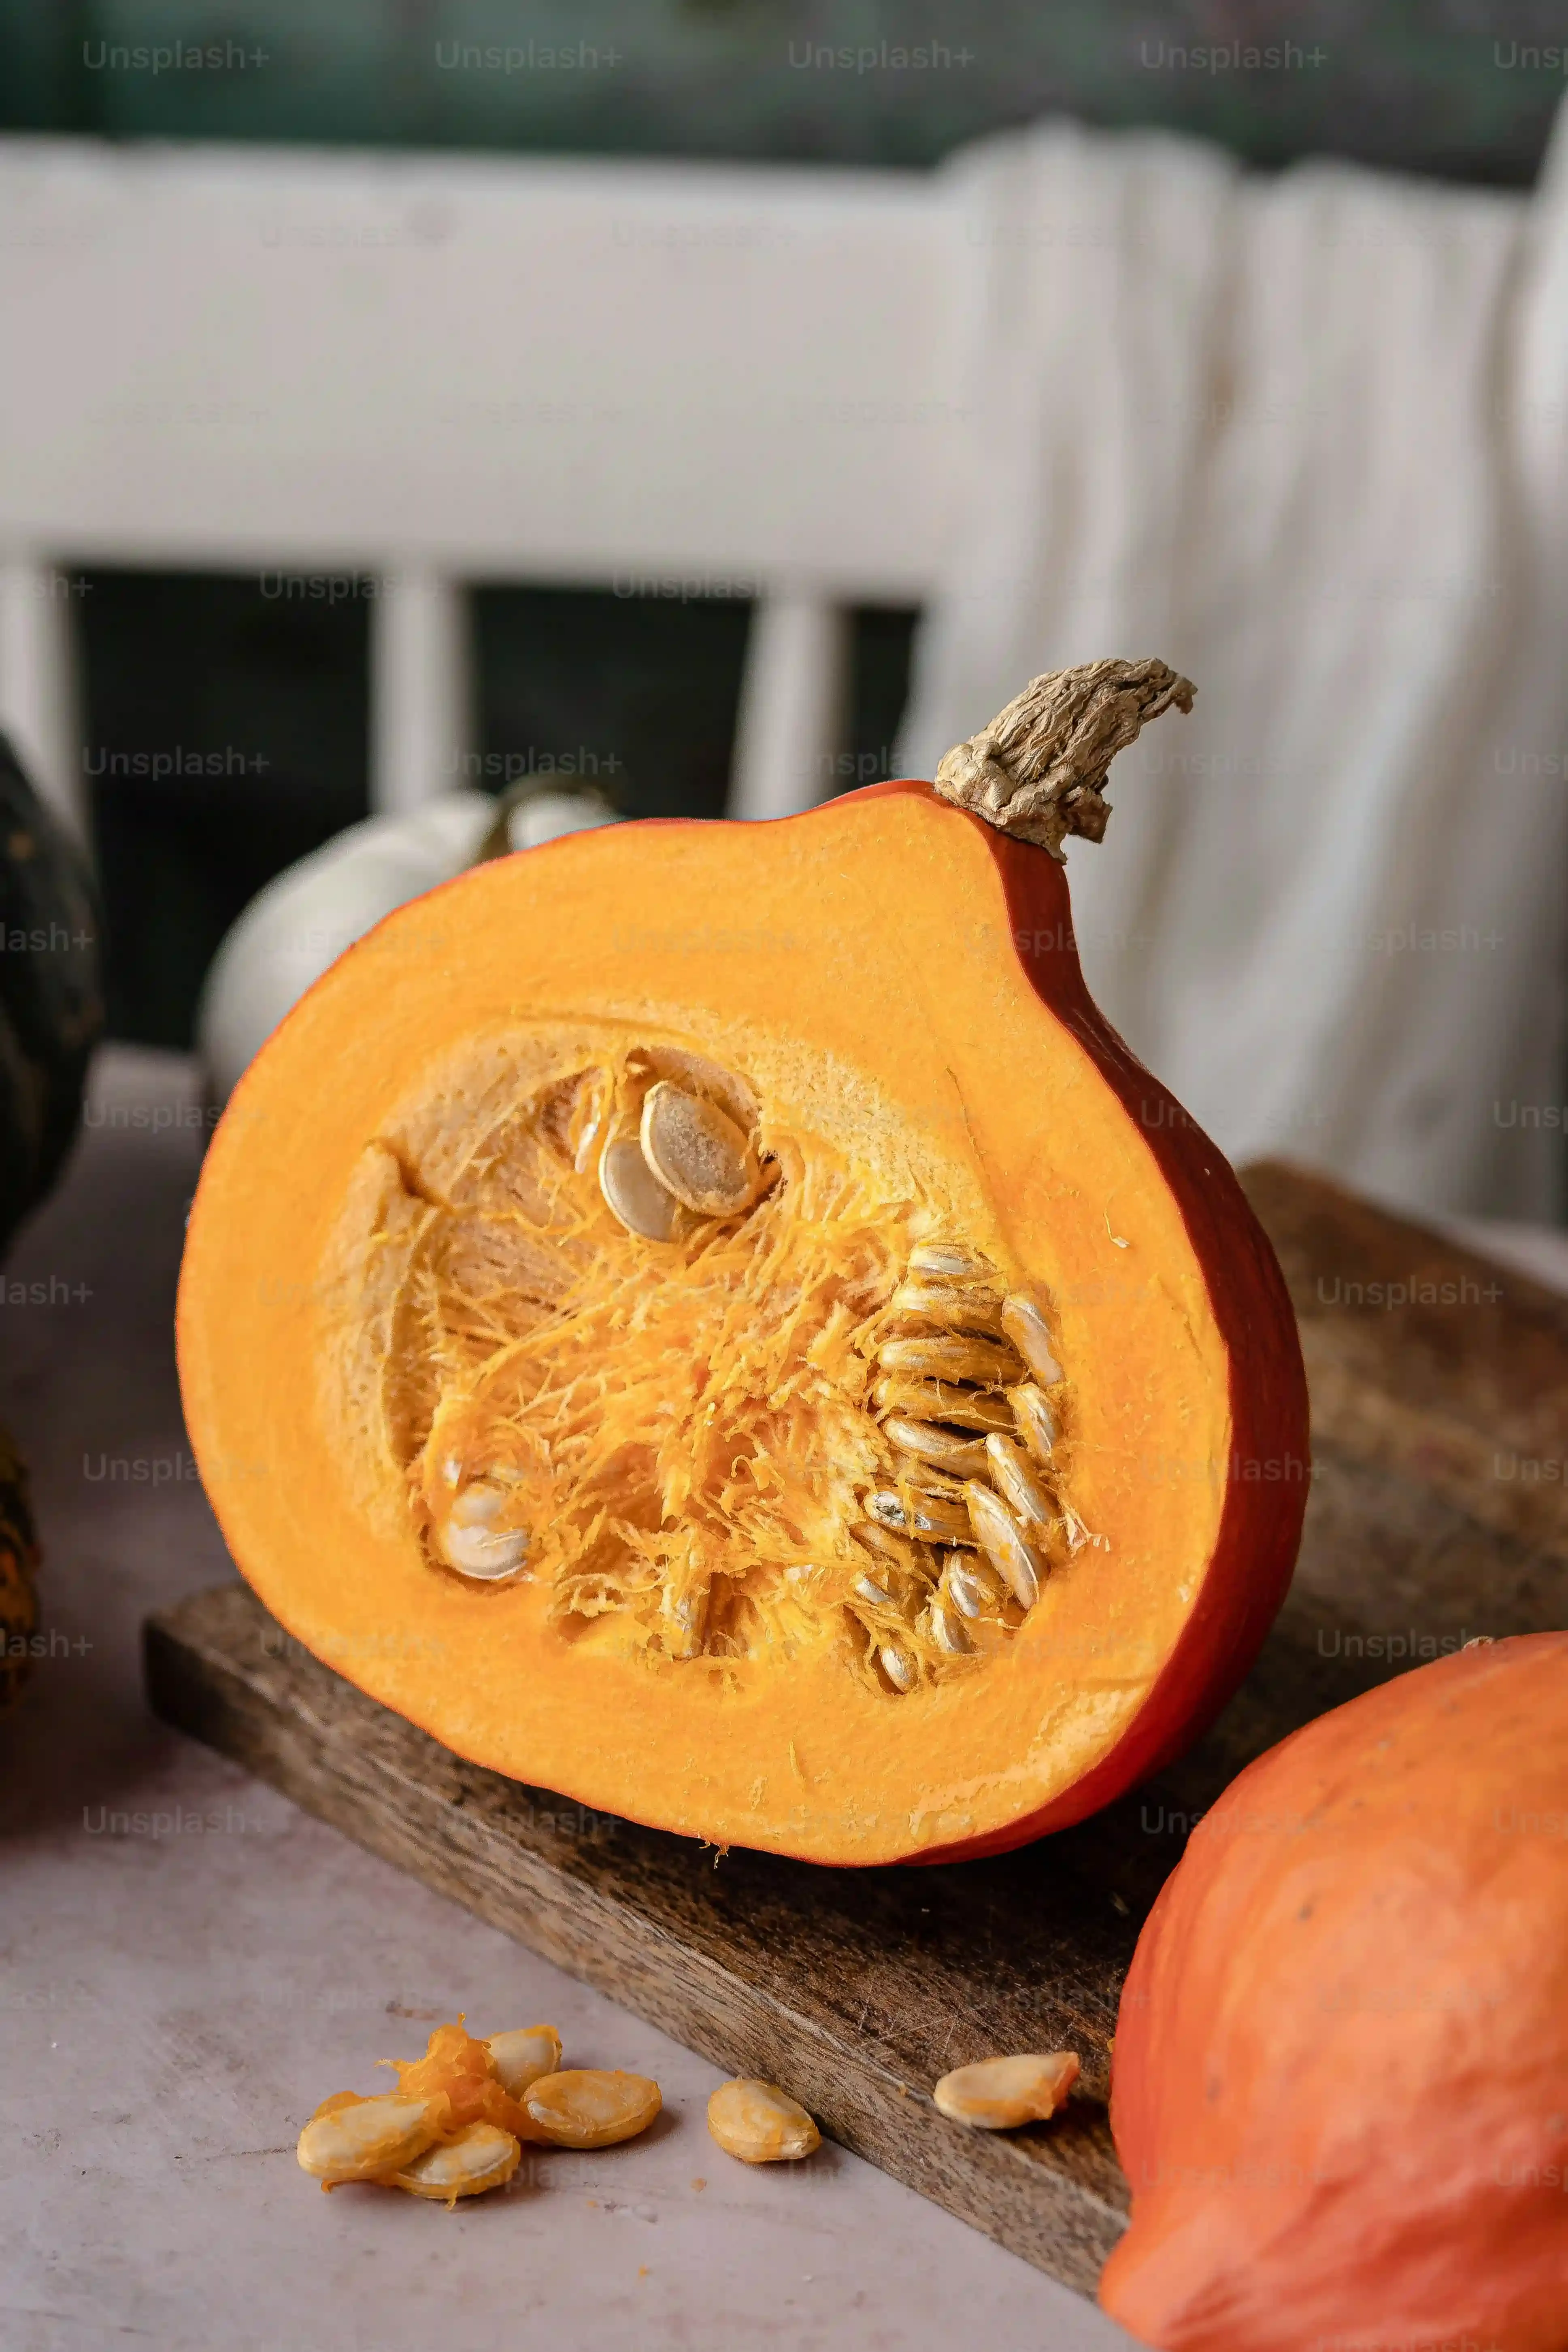
Look, maybe the idea of plunging a sharp object into a pumpkin just isn't your jam. Or maybe you're working with really small kids whose fine motor skills haven't quite progressed beyond "smash." This is where no-carve easy awesome pumpkin carving ideas come into play. They offer a fantastic alternative that reduces mess and eliminates the risk of losing a fingertip. One popular method is etching.
Etching isn't carving *through* the pumpkin; it's just scraping off the top layer of orange skin to reveal the lighter flesh underneath. This creates a two-tone effect that looks really striking when lit from within (or even just sitting on your porch). You can draw a design directly onto the pumpkin with a pencil or marker, and then use a variety of tools to scrape away the rind. It's surprisingly simple but allows for detailed work that would be tricky with a knife.
Tools for Etching and Texture
So, what do you use for etching your easy awesome pumpkin ideas? You don't need fancy gear. A simple metal spoon can work in a pinch, especially for larger areas. Linoleum cutters, the kind artists use for printmaking, are excellent for creating fine lines and details. Even a sturdy vegetable peeler can be used for wider strips or areas you want to clear quickly. The trick is to only remove the orange skin, leaving the thicker white layer intact.
You can use this technique to create patterns like stripes, polka dots, or even words. Try etching a spooky scene or a constellation. The contrast between the orange and light flesh is your design element. It's less messy than full carving, safer for little hands with supervision, and the pumpkin often lasts longer because you haven't compromised its structural integrity with gaping holes. It's a genuinely easy awesome pumpkin idea with minimal stress.
- Metal Spoon: Good for larger areas.
- Linoleum Cutter: Ideal for fine lines and details.
- Vegetable Peeler: Useful for wider sections.
- Pencil or Marker: For drawing your design guide.
- Steel Wool or Grater: For creating textured areas (use gently!).
Paint it On: Color and Creativity
Carving and etching aren't the only paths to easy awesome pumpkin ideas. Painting offers a whole different realm of possibilities, and frankly, it's even simpler. You can paint faces, spooky scenes, abstract patterns, or turn your pumpkin into a character. Acrylic paints work well and dry quickly. You can use brushes, sponges, or even spray paint for a solid base color.
Consider adding other elements too. Googly eyes, yarn hair, felt shapes, or even plastic spiders can be glued on to create fun characters or creepy crawlies. A painted pumpkin might not have the same internal glow as a carved one, but it offers durability and a wider palette of colors and textures. Plus, it’s probably the cleanest way to decorate a pumpkin, making it perfect for indoor displays or for anyone who absolutely loathes scooping out the insides. These are arguably the easiest awesome pumpkin ideas out there.
Making Your Easy Awesome Pumpkin Carving Idea Last
Making Your Easy Awesome Pumpkin Carving Idea Last
Why Your Pumpkin Starts to Sag (And How to Fight It)
You've just finished your easy awesome pumpkin carving idea. It looks fantastic, glowing on the porch. Now comes the inevitable reality: pumpkins are organic matter, and they start to decompose the moment you cut into them. Air hits the flesh, bacteria move in, and dehydration sets in. That crisp edge turns mushy, the details shrink, and the whole thing begins a slow, sad collapse. It's like watching a tiny, orange tragedy unfold in slow motion. The goal of Making Your Easy Awesome Pumpkin Carving Idea Last is to slow down this process, not stop it entirely, because frankly, nothing halts nature forever.
Humidity plays a big role. Dry air sucks the moisture right out, making the carved parts shrivel. Warm weather speeds up bacterial growth, leading to mold and rot. A perfect storm for pumpkin demise. You put in the effort for those easy awesome pumpkin carving ideas; you want them to look decent for more than two days. So, what's the strategy? It's all about moisture management and keeping the creepy crawlies (microbial ones, mostly) at bay.
Simple Tricks to Extend Pumpkin Life
let's get practical about Making Your Easy Awesome Pumpkin Carving Idea Last. The simplest trick involves hydration. Once your pumpkin is carved, give it a bath. Seriously. Submerge the whole thing in cold water for a few hours, or even overnight. This rehydrates the pumpkin flesh. After its soak, let it air dry completely. Then, apply a thin layer of petroleum jelly (like Vaseline) to all the cut edges. This acts as a barrier, sealing in moisture and keeping bacteria out. Some folks swear by spraying the pumpkin daily with a bleach solution (about one tablespoon of bleach per quart of water) to kill surface bacteria. Just be careful with bleach around fabrics or surfaces.
Another method is using a commercial pumpkin preservative spray, which you can find at most seasonal stores. These often contain mild fungicides and antibacterial agents. Whichever method you choose, consistency is key. Reapply the petroleum jelly every day or two, and if you're using a spray, follow the product instructions. It won't last forever, but these steps significantly extend the display time of your easy awesome pumpkin carving ideas.
- Give it a cold water bath (hours to overnight).
- Apply petroleum jelly to all cut surfaces daily.
- Use a bleach solution spray (1 tbsp bleach per quart water) daily (optional).
- Try a commercial pumpkin preservative spray.
- Keep the inside dry when not illuminated.
Placement Matters for Longevity
Where you put your finished easy awesome pumpkin carving idea makes a difference in how long it survives. Direct sunlight is the enemy. It bakes the pumpkin, drying it out and accelerating decay. Similarly, placing it right next to a heat source indoors is a bad idea. Cool, shaded locations are best. If you live in a warmer climate, bringing your pumpkin inside during the hottest part of the day or overnight can help. Freezing temperatures aren't great either, as they can cause the pumpkin structure to break down.
Think of it like keeping produce fresh – cool and out of direct heat. If you're using a real candle inside, remember the heat will cook the top of the pumpkin and potentially dry out the carved areas faster. LED lights are a much cooler alternative and often safer. By combining careful preservation techniques with smart placement, you can keep your easy awesome pumpkin carving ideas looking sharp for a good week or even two, which is usually enough to get through the main Halloween festivities.
Wrap Up Your Easy Awesome Pumpkin Project
So there you have it. Ditching the overly complicated designs and embracing a few smart, easy techniques can seriously elevate your Halloween pumpkin game. Whether you went classic carve, tried some simple etching, or grabbed a paintbrush, you've proven that you don't need to be a master sculptor to create something that looks pretty darn awesome sitting by your front door. Now go enjoy the spooky season – you've earned it.