Table of Contents
Alright, let's be real. Staring down a big, round pumpkin with a sharp knife can feel a little intimidating, especially if your last carving attempt looked more like a melted monster than a masterpiece. Maybe you’re tired of the same old jagged-tooth grins, or maybe you just want something undeniably cute sitting on your porch this year. If you’re nodding along, then diving into some easy animal pumpkin carving ideas might be exactly what you need.
Why Try Easy Animal Pumpkin Carving Ideas This Year?
Why Try Easy Animal Pumpkin Carving Ideas This Year?
Tired of the Same Old Jack-o'-Lantern Grin?
Let's face it, how many jagged-toothed, slightly-off-center pumpkin grins can one neighborhood handle? They're classic, sure, but also... a little boring after the fifth one on the block. If you're looking to stand out without needing an art degree or a full set of power tools, easy animal pumpkin carving ideas offer a refreshing change. Instead of just spooky, you get cute, quirky, or even a little majestic depending on your chosen creature. Think less "generic haunted house prop" and more "delightful porch resident."
Animals Are Instantly Relatable (and Less Scary)
Animals just have a universal appeal, don't they? A carved cat, a friendly owl, or even a slightly dopey-looking dog resonates with people differently than a standard monster face. This makes easy animal pumpkin carving ideas fantastic if you have younger kids around who might be spooked by the truly terrifying designs, or if you just prefer your Halloween decor on the charming side. Plus, the variety is huge. You're not limited to two eyes and a mouth; you can play with ears, whiskers, feathers, or even paws.
- Animals offer a break from traditional spooky designs.
- They appeal to a wider audience, including young children.
- The variety of animal shapes allows for more creativity.
- You can make them cute, funny, or even a bit fierce, but rarely truly terrifying.
Achievable Results Without the Frustration
The "easy" part of easy animal pumpkin carving ideas is key here. Nobody wants to spend hours hunched over a pumpkin, only for a crucial piece to snap off, leaving you with a lopsided mess. These designs are generally forgiving. They often rely on simpler shapes and techniques than intricate scenes or hyper-realistic faces. Getting a recognizable animal carved out provides a much higher satisfaction-to-effort ratio than wrestling with something overly complicated. You actually finish the project feeling accomplished, not defeated.
Getting Started with Easy Animal Pumpkin Carving Ideas: Tools & Prep

Getting Started with Easy Animal Pumpkin Carving Ideas: Tools & Prep
Gathering Your Gear for Easy Animal Pumpkin Carving Ideas
first things first. You don't need a professional carving kit with 50 tiny, confusing blades to tackle easy animal pumpkin carving ideas. Most of that stuff just gathers dust anyway. What you actually need are a few reliable items that make the job less of a struggle and more of a fun project. Think sturdy, sharp, and simple. A good, serrated kitchen knife is essential for cutting the lid – or even better, the bottom, which makes lighting later way easier. You’ll need a big spoon or scoop for gutting the thing; don't underestimate how much stringy mess is inside. For the actual carving of your animal features, those small, simple saws from basic pumpkin kits work fine, or even a sharp paring knife for finer details. Some prefer clay sculpting tools or even linoleum cutters for scraping designs instead of cutting all the way through.
Don't forget a dry-erase marker. Sketching your design on the pumpkin first is a lifesaver. Mistakes wipe right off, unlike permanent marker mishaps that stare back at you accusingly. A small bowl for seeds and guts is also handy. And plenty of newspaper or an old sheet to protect your workspace. Pumpkin guts have a way of getting everywhere.
- Serrated kitchen knife (or bottom-cutter)
- Large spoon or scoop
- Basic pumpkin carving saw (from a kit)
- Sharp paring knife (optional, for detail)
- Clay sculpting tools or linoleum cutters (optional, for scraping)
- Dry-erase marker
- Bowl for guts and seeds
- Newspaper or drop cloth
Prepping Your Pumpkin Canvas
Before you even think about sketching that adorable animal face, you need to get the pumpkin ready. Wash the outside first to get rid of any dirt. Then, decide if you're cutting the top or the bottom. Cutting the bottom makes the pumpkin sit flatter and makes it easier to place an LED light inside later without reaching down through the top. Cut a generous hole, angled slightly inwards so the lid doesn't fall in. Don't make it perfectly round; a small notch helps you line it up again later. Once the lid (or bottom piece) is off, it's time for the messy part: gutting.
Scoop out all the seeds and stringy bits. Get it as clean as you can inside. A thoroughly cleaned interior helps prevent mold later on. Scrape down the inner wall where you plan to carve your easy animal pumpkin carving ideas until it's about an inch thick. This makes carving much easier and reduces the chance of breaking thin sections. Some folks like to thin the entire wall, but focusing on the carving area is usually sufficient for simpler designs. Now you have a clean, prepped surface ready for your artistic vision.
Simple Steps for Popular Easy Animal Pumpkin Carving Ideas
Simple Steps for Popular Easy Animal Pumpkin Carving Ideas
Simple Steps for Popular Easy Animal Pumpkin Carving Ideas
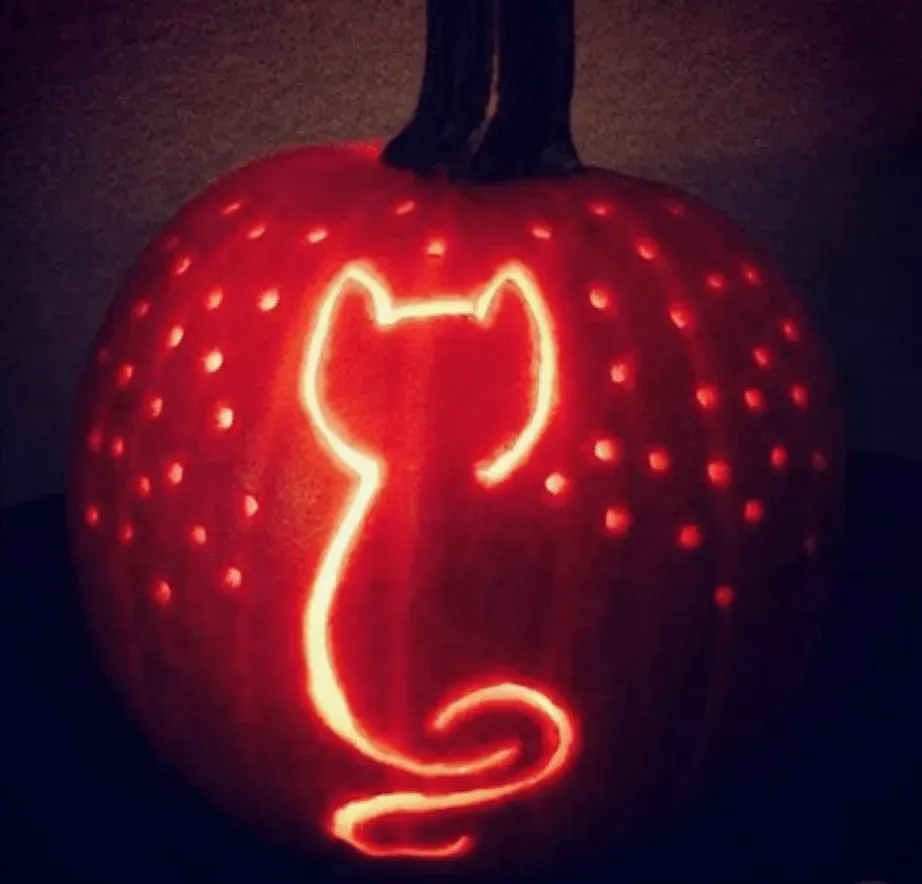
so you've got your cleaned-out pumpkin and your tools laid out. Now for the fun part: making an animal appear! Don't overthink this. For most easy animal pumpkin carving ideas, you're looking at simple shapes. Think circles for eyes, triangles for ears or noses, and maybe some curved lines for whiskers or mouths. The key is to sketch your design onto the pumpkin first with that dry-erase marker. Seriously, don't skip this. It lets you adjust sizes, placement, and overall vibe before you commit with a blade. A simple cat usually involves two pointy ears on top (carved or just outlined and scraped), round or almond-shaped eyes, and a small triangle nose with some whisker lines. An owl needs big, wide eyes, maybe some feathery textures scraped onto the forehead, and a small beak. A dog can be a bit more varied, but floppy ears carved on the sides and a goofy grin work wonders. Start with these basic shapes and refine them.
- Sketch your design with a dry-erase marker first.
- Focus on simple geometric shapes for features (circles, triangles, curves).
- Popular easy animals include cats, owls, and simple dog faces.
- Don't be afraid to erase and redraw until it looks right.
Beyond the Basics: Adding Flair to Your Easy Animal Pumpkin Carving Ideas
Beyond the Basics: Adding Flair to Your Easy Animal Pumpkin Carving Ideas
so you’ve got the basic animal shape carved out, maybe a simple cat face or a wide-eyed owl. Looks pretty good, right? But if you want to take your easy animal pumpkin carving ideas from "hey, that's a cat" to "wow, that's a *cool* cat," you can add some simple details without making things complicated. Think about texture. Instead of cutting all the way through for fur or feathers, try scraping just the surface layer of the pumpkin skin. A linoleum cutter or even a sturdy spoon handle can create fine lines or broader textured areas. You can outline features like eyes or ears by scraping a thin line around them, making them pop. For whiskers on that cat, forget trying to carve thin lines that will just break; use toothpicks or thin skewers poked into the pumpkin. It’s a cheap trick, sure, but it works and adds a fun, dimensional touch to your easy animal pumpkin carving ideas.
Keeping Your Easy Animal Pumpkin Carving Ideas Looking Fresh
Keeping Your Easy Animal Pumpkin Carving Ideas Looking Fresh
The Dreaded Pumpkin Slump: Why it Happens
You spent time carefully carving that adorable owl or goofy cat face using your easy animal pumpkin carving ideas, and for a glorious day or two, it looks fantastic perched on your porch. Then, inevitably, gravity and mold start doing their thing. The edges curl, the details shrink, and the whole thing begins to look less like a charming animal and more like a sad, deflated mess. This isn't personal; it's just science. Once you cut into a pumpkin, you expose the flesh to air and bacteria. The pumpkin starts losing moisture, causing it to shrivel, and various microorganisms begin setting up shop, leading to that fuzzy, greenish decay. The warmer the weather, the faster the demise.
Simple Sprays to Slow the Rot
While you can't stop the inevitable entirely, you can definitely buy yourself some extra time and keep your easy animal pumpkin carving ideas looking sharp for longer. The most common trick involves some household liquids. A simple spray bottle mix of one part white vinegar to one part water can help inhibit mold growth. Spray the inside and all the cut edges daily. Another popular method uses a very dilute bleach solution – think a tablespoon of bleach per quart of water. Bleach is more potent against bacteria and mold, but be careful not to get it on anything you don't want stained. Soak the entire carved pumpkin in a tub of this solution for a few hours after carving, then let it dry thoroughly before displaying. Some people swear by rubbing petroleum jelly on the cut edges to seal in moisture, though this can sometimes look a bit greasy.
- Mix equal parts white vinegar and water in a spray bottle.
- Spray inside and carved edges daily.
- Alternatively, soak the pumpkin in a dilute bleach solution (1 tbsp bleach per quart water) for several hours.
- Let the pumpkin dry completely after soaking.
- Consider applying petroleum jelly to cut edges to retain moisture.
Display Location Matters
Where you put your carved masterpiece makes a significant difference in how long it lasts. Heat and direct sunlight are the enemies of a fresh pumpkin. That sunny spot on the front step might look inviting, but it will accelerate drying and decay. Try to place your easy animal pumpkin carving ideas in a cooler, shadier location. A covered porch or even just a spot that gets afternoon shade is better than full sun all day. Bringing your pumpkin inside overnight, especially if temperatures drop significantly or if there's heavy dew, can also help preserve it, although displaying it indoors means missing out on spooking (or charming) trick-or-treaters.
Wrapping Up Your Animal Carving Adventures
So there you have it. You’ve wrestled a gourd, maybe made a minor mess, and hopefully ended up with an animal friend that looks reasonably like the idea you started with. These easy animal pumpkin carving ideas aren't about winning any art contests; they're about having a bit of fun, getting your hands dirty, and ending up with something a little more interesting than the standard triangle eyes. Keep it simple, embrace the imperfections (they just add character, right?), and enjoy the fact that you actually finished the project. Now go light that sucker up.