Table of Contents
let's talk pumpkins. Halloween rolls around, and you see those incredible, sculpted gourds online – faces contorted in spooky grins, creatures emerging from the rind. You think, "Wow, that looks impossible," and grab the stencil kit for the same old triangle eyes. But what if I told you that diving into the world of 3D pumpkin carving doesn't require an art degree or a workshop full of fancy tools? It’s true. Forget those intimidating masterpieces for a moment.
Demystifying 3D Pumpkin Carving: Easier Than You Think
Demystifying 3D Pumpkin Carving: Easier Than You Think
It's Not Just Cutting Holes
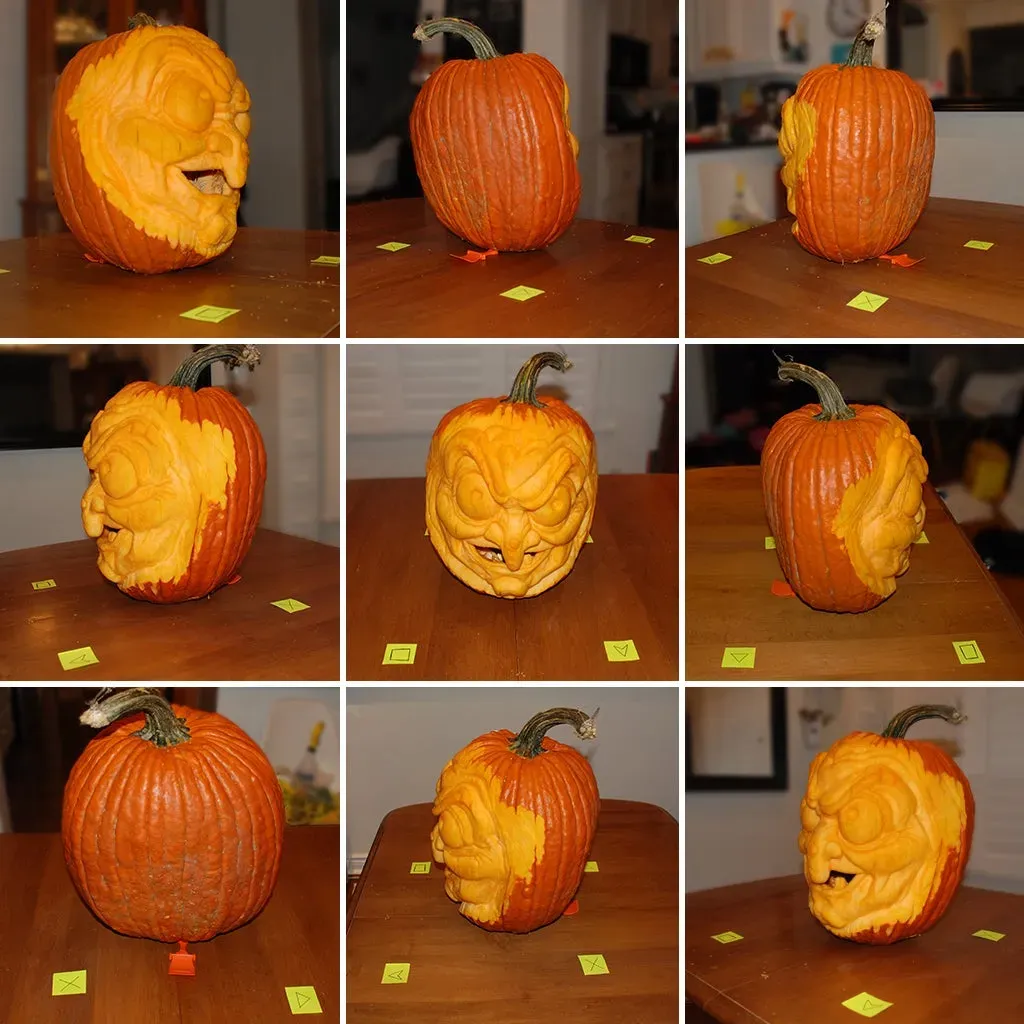
let's clear the air right away. When most people think "pumpkin carving," they picture slicing shapes clean through the rind – triangles for eyes, a jagged line for a mouth. That's traditional carving, and it's great for quick, backlit effects. But 3D carving? That sounds like something only Ray Villafane can do, right? Like you need years of sculpting experience and a garage full of specialized chisels. That's the biggest hurdle people put in front of themselves. It feels intimidating because you imagine intricate faces with teeth and wrinkles, which, yes, can be complex. However, the core techniques used in 3D carving are surprisingly simple and, dare I say, intuitive. We're talking about removing layers, not just punching through.
Shaving, Scooping, and Layering
Think of 3D carving less like surgery and more like controlled erosion. Instead of cutting all the way through the pumpkin wall, you're primarily working with the outer rind and the thick flesh beneath it. This involves shaving away the orange skin to reveal the lighter flesh, scooping out varying depths to create shadows and highlights, and layering – building up or recessing areas to give the illusion of form. It's about playing with light and shadow on the surface. An easy 3d pumpkin carving idea might involve simply shaving down areas to create a moon shape or scooping out around a drawn design to make it pop outwards. No need for perfect precision initially; it's a forgiving medium because you can often shave off a little more if you mess up.
Key Differences: 3D vs. Traditional Carving
- Traditional: Cuts *through* the pumpkin wall.
- 3D: Works *on* the surface, removing layers of rind and flesh.
- Traditional: Relies on light shining *through* the holes.
- 3D: Relies on light hitting the *sculpted surface* to create shadows and highlights.
- Traditional: Uses simple cut-out tools.
- 3D: Uses scraping, scooping, and shaving tools (often simple ones!).
Simple Tools, Big Impact
You don't need a professional sculpting kit to get started with easy 3d pumpkin carving ideas. In fact, some of the most effective tools are humble kitchen implements or things you might already have in a basic craft kit. A simple paring knife is essential for initial cuts and detail work. A sturdy spoon works wonders for scooping out larger areas of flesh. Even a vegetable peeler can be surprisingly useful for shaving off the outer rind smoothly. The key is having tools that allow you to control the depth and shape of the material you're removing, rather than just making clean cuts. With a few basic tools and a willingness to experiment with removing layers, you're well on your way to trying your first easy 3d pumpkin carving ideas.
Your Toolbox for Easy 3D Pumpkin Carving Ideas
Your Toolbox for Easy 3D Pumpkin Carving Ideas
Starting Simple: Kitchen Drawer Essentials
so you're ready to try some easy 3d pumpkin carving ideas but don't want to drop a ton of cash on gear. Good news: you probably have most of what you need already lurking in your kitchen drawers. A sharp paring knife is your absolute best friend here. It's versatile enough for outlining, making small cuts, and carefully shaving away rind. Don't underestimate a sturdy metal spoon either; it's perfect for scooping out the guts (the messy but necessary first step) and also for scraping larger areas of flesh to create smooth, recessed surfaces. Even a vegetable peeler can come in handy for quickly removing the outer skin on large, flat areas. See? You're practically halfway to your first 3D pumpkin masterpiece with just a few common items.
Stepping Up: Craft and Hobby Finds
Once you get a feel for working with the pumpkin's layers, you might find yourself wanting a bit more control for finer details. This is where a quick trip to the craft store or checking your old art supplies pays off. Clay sculpting tools, especially those with loop ends, are fantastic for scooping, shaping, and smoothing curves in the pumpkin flesh. Wood carving chisels, even a basic small set, offer different shapes for gouging and defining lines. A scalpel or craft knife (like an X-Acto) with different blade shapes is excellent for precise, shallow cuts and intricate textures, crucial for adding character to your easy 3d pumpkin carving ideas. Just remember, sharp tools are safer than dull ones because you don't have to force them.
Handy Tools for 3D Pumpkin Carving
- Paring Knife: Essential for outlines and controlled cuts.
- Metal Spoon: Great for gutting and initial flesh removal.
- Vegetable Peeler: Useful for large-area rind removal.
- Clay Loop Tools: Excellent for scooping and shaping flesh.
- Craft Knife/Scalpel: For fine details and texture.
- Small Chisels/Gouges: To remove larger chunks and define shapes.
Safety First, Always
Look, pumpkin carving, even easy 3d pumpkin carving ideas, involves sharp objects and a round, sometimes slippery canvas. It’s not the time to get reckless. Always carve away from yourself. Use a stable surface and make sure the pumpkin isn't wobbling. If you're working with younger helpers, stick to scraping tools or let them handle the gutting part. Consider wearing cut-resistant gloves, especially when using very sharp knives or scalpels. A small slip can ruin your design and your day. Keep a first-aid kit nearby, just in case. Being mindful of where your hands and fingers are relative to the blade is key to a fun, injury-free carving session.
Sculpting Basics: Easy Techniques for 3D Pumpkin Carving Ideas
Sculpting Basics: Easy Techniques for 3D Pumpkin Carving Ideas
Alright, you've got your pumpkin, your basic tools (maybe that slightly rusty spoon from the back of the drawer), and you're staring at this round orange thing wondering, " how do I make it *not* flat?" The secret sauce to easy 3D pumpkin carving ideas isn't some mystical carving incantation; it's just learning how to remove material strategically. Think of it like drawing, but instead of adding lines, you're erasing layers. You start by shaving off the outer orange rind to expose the lighter flesh underneath – this is your base layer, the blank canvas. Then, you use scooping or scraping tools to remove more flesh in certain areas, creating depth and shadow. Want something to look like it's sticking out? Carve *around* it, making the background recede. Want a gentle curve? Gently scrape and smooth the surface. It’s less about precise cuts and more about controlled removal and shaping, building form by subtracting material bit by bit.
Try These Easy 3D Pumpkin Carving Ideas Tonight
Try These Easy 3D Pumpkin Carving Ideas Tonight
Start with Simple Shapes: Moons, Stars, and Swirls
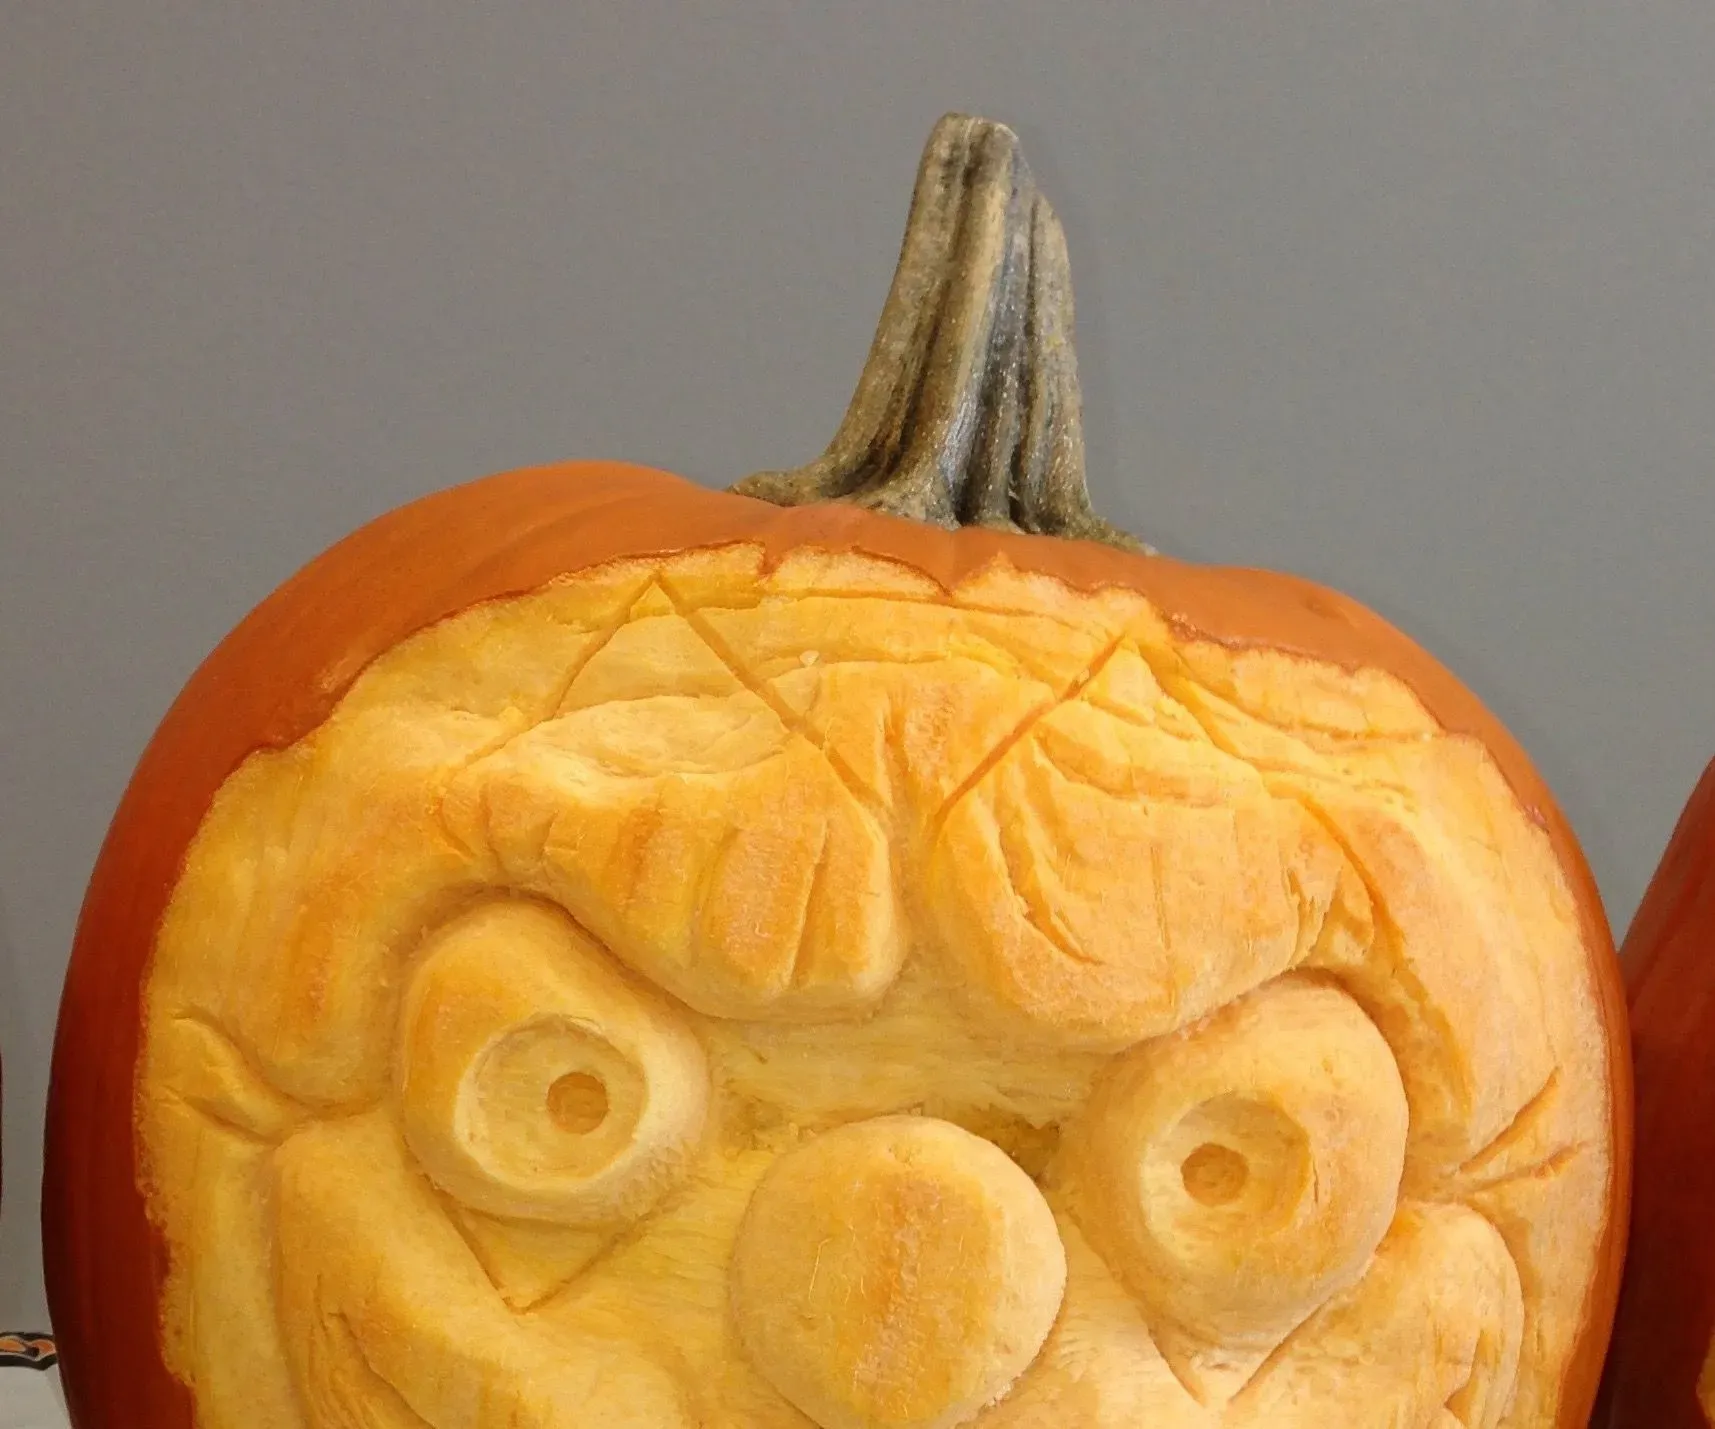
enough theory, right? Let's get our hands dirty with some actual easy 3d pumpkin carving ideas you can try right now. Forget the ghoulish faces for a second. The simplest way to dip your toe into 3D carving is by working with basic shapes. Draw a large circle on your pumpkin for a moon. Instead of cutting it out, grab that spoon or a loop tool and start scraping away the flesh *around* the circle. Go deeper the further you get from the edge of your moon shape. This makes the moon appear to pop out. You can do the same with stars, or even abstract swirls and curves. Just shave off the orange skin within your shape, then gently scoop away the flesh around it to create depth. It’s like creating a raised relief sculpture, and it's incredibly satisfying to see the form emerge just by removing material.
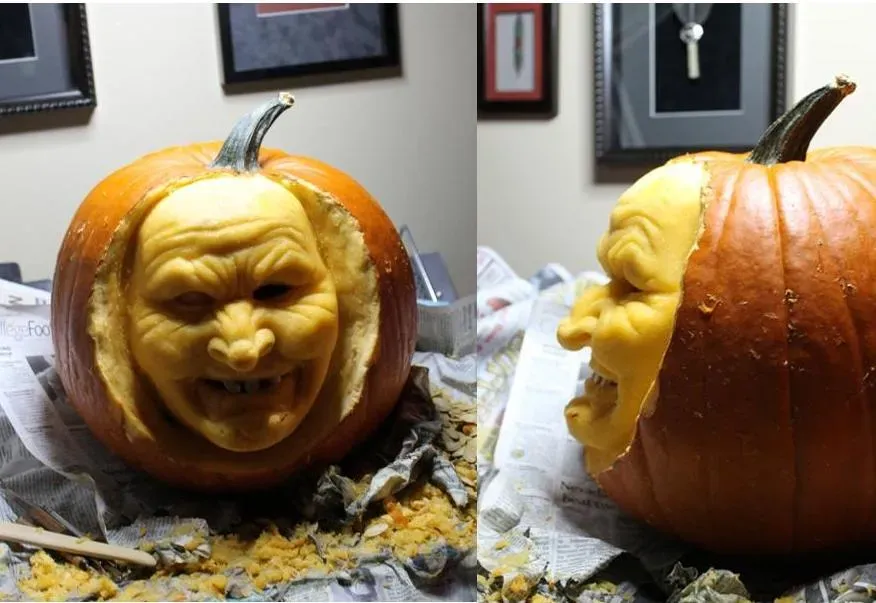
Giving Depth to Eyes and Mouths Without Cutting Through
Want to make a face but aren't ready for full-on realism? You can use easy 3d pumpkin carving ideas to give traditional features depth. Draw your eye shapes or a mouth outline. Now, instead of cutting them out, shave away the rind *inside* the shapes. This exposes the lighter flesh. Then, use a small spoon or loop tool to scoop out the center of the eye or the inside of the mouth. You can create eyelids by carefully shaving down the area just above the eye shape, leaving a slight ridge. For a mouth, scoop deeper in the center and less deep towards the corners. This technique gives your pumpkin features without creating holes, allowing light from inside to illuminate the *surface* rather than just shining through. It’s a clever trick that looks way more complicated than it is.
Easy 3D Ideas to Get Started
- The Raised Moon: Shave rind inside a circle, scoop around it.
- Simple Recessed Stars: Shave rind inside star shapes, scoop centers deeply.
- Depth Eyes: Shave rind inside eye shapes, scoop centers.
- Sculpted Mouth: Shave rind inside mouth shape, scoop varying depths.
- Abstract Swirls: Shave rind along lines, scoop around them for raised effect.
Putting Your Easy 3D Pumpkin Carving Ideas to Work
So, there you have it. Moving beyond the flat, stencil-driven world of pumpkin carving isn't some dark art reserved for professionals. With a few basic tools and a willingness to scrape and shape rather than just cut holes, those easy 3D pumpkin carving ideas start to feel pretty real. You might not sculpt a museum-worthy ghoul on your first try, or maybe you will, who knows? The point is, the barrier to entry is lower than you thought. Grab a pumpkin, grab a spoon and a knife, and see what emerges. At worst, you made some pumpkin guts. At best, you've got a pretty cool, slightly lopsided, three-dimensional friend sitting on your porch.