Table of Contents
Introduction
Let's be honest, staring at a blank pumpkin with a sharp knife can feel a bit daunting. You picture those amazing, intricate carvings you see online or in neighborhoods, and then you look at your own attempt, maybe a slightly lopsided grin. Getting a truly impressive Halloween display often feels out of reach unless you're some kind of gourd-sculpting savant. But what if there was a simpler way to get those jaw-dropping results? That's where using **display pumpkin carving stencils** comes in. This isn't about cheating; it's about smart crafting. This article will walk you through how these stencils can transform your pumpkins from "meh" to "WOW." We'll dive into finding patterns that match your skill level and desired look, explore techniques to make your stenciled pumpkins stand out, and share tips for arranging them into a display that stops traffic (the good kind). Get ready to ditch the carving anxiety and create a pumpkin display you'll be genuinely proud of. Let's get started on making your porch the envy of the block.
Why Display Pumpkin Carving Stencils Matter for ShowStopping Gourds
Why Display Pumpkin Carving Stencils Matter for ShowStopping Gourds
Precision and Complexity Made Possible
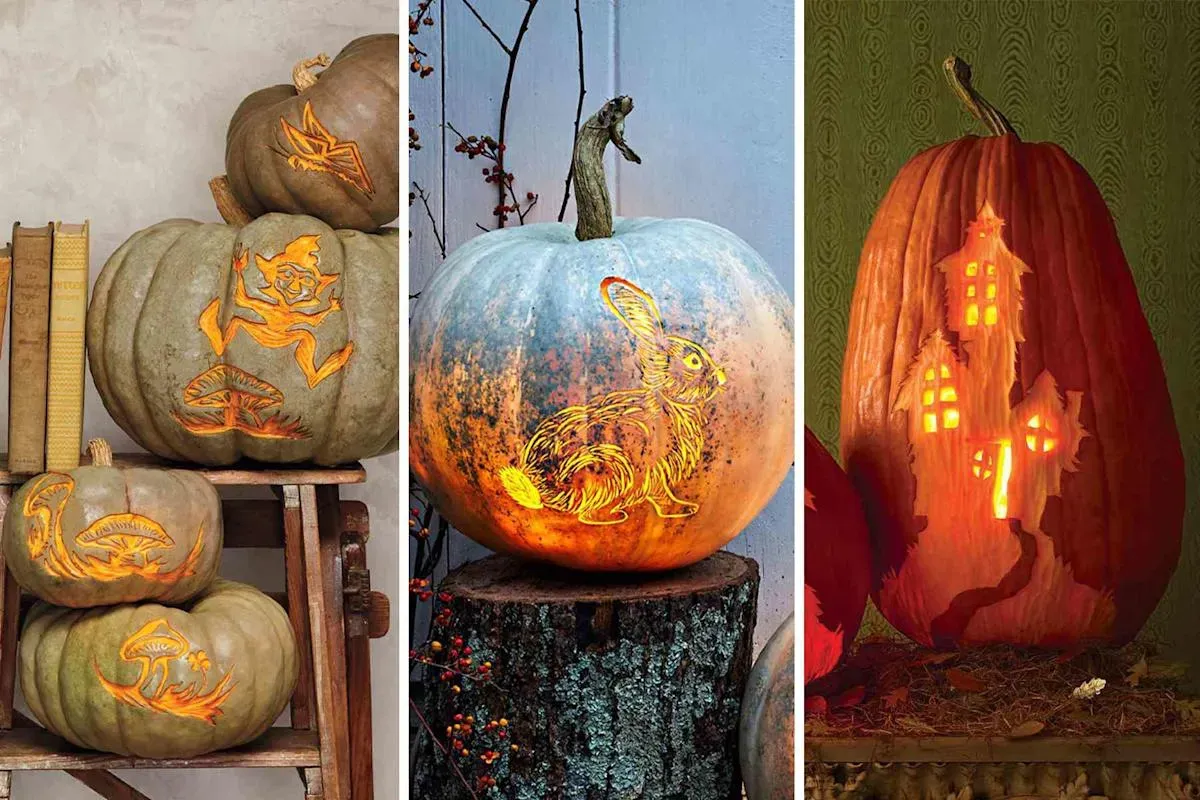
Let's face it, freehand carving can be a gamble. You start with a grand vision of a terrifying monster or a detailed scene, and five minutes in, you're wrestling with a dull knife and wondering if a simple triangle face was such a bad idea after all. This is precisely why **display pumpkin carving stencils** are your best friend for creating show-stopping gourds. They take the guesswork out of intricate designs. You get clean lines, balanced features, and patterns that look like they were done by someone who actually knows what they's doing – even if you're just a beginner. Trying to freehand a complex spiderweb or a detailed portrait? Good luck. With a stencil, it's a step-by-step process that guides your blade, ensuring that spooky, impressive result you're aiming for in your Halloween display.
Variety and Consistency for Impactful Displays
Building an impressive display isn't just about one cool pumpkin; it's about a collection that works together. **Display pumpkin carving stencils** make this achievable by offering a massive range of designs, from simple, friendly faces perfect for beginners to incredibly detailed, multi-stage patterns for the ambitious carver. Using stencils allows you to create a cohesive theme – maybe a whole patch of monstrous faces, a collection of spooky creatures, or even a series telling a story. Plus, stencils help maintain a level of consistency in quality across multiple pumpkins, which is crucial when you want your entire display, not just one gourd, to grab attention and make an impact on your porch or yard. Here's why stencils are a game-changer for your display:
- They allow for complex designs without advanced artistic skill.
- They save time and reduce frustration.
- They ensure cleaner, more professional-looking cuts.
- They enable theme creation and consistency across multiple pumpkins.
- They offer patterns for every skill level.
Finding the Best Display Pumpkin Carving Stencils for Any Skill Level
Finding the Best Display Pumpkin Carving Stencils for Any Skill Level
Where to Hunt for the Perfect Pattern
so you're sold on using **display pumpkin carving stencils** to up your game. But where do you actually find these magical guides? The internet is a goldmine, but it can also be a landfill of terrible, blurry images that are useless for carving. Start with reputable sites dedicated specifically to pumpkin carving patterns. Places like Stoneykins or Zombie Pumpkins (mentioned in the search results) have massive libraries categorized by difficulty. You'll find everything from simple geometric shapes perfect for a kid's first carving experience to complex, photorealistic patterns that require specialized tools and patience. Don't overlook craft store websites or even some major home improvement retailers around Halloween; they often have free printable options that are great for getting started. Think about the complexity you're comfortable with – don't grab an "Extreme" pattern if you're still figuring out how to hold the knife.
What Makes a Stencil Worth Your Time?
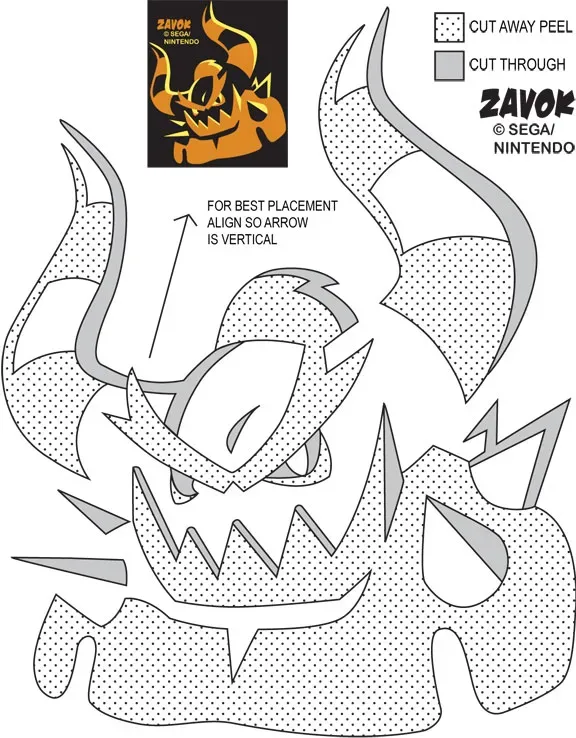
Not all **display pumpkin carving stencils** are created equal. A good stencil should have clear lines and distinct areas marked for cutting (going all the way through) versus etching (removing just the surface layer). Look for patterns that are scalable – you might have a giant prize-winning pumpkin or a smaller, rounder one, and being able to resize the pattern easily is key. Some paid patterns even come with multiple versions for different pumpkin sizes or carving methods. User reviews can be incredibly helpful here; see what other carvers say about the clarity and carva-bility of a specific design before you commit. A poorly designed stencil will lead to frustration and a less-than-stellar final product, no matter how steady your hand is. Here's a quick checklist for picking your stencil: * Does it match your carving skill level? * Are the lines clear and easy to follow? * Are cut and etch areas clearly marked? * Can you resize the pattern easily? * Are there reviews or examples of carved pumpkins using this stencil?
Beyond the Carve: Using Display Pumpkin Carving Stencils for Impact
Beyond the Carve: Using Display Pumpkin Carving Stencils for Impact
Mastering the Glow: Lighting Your Stenciled Creation
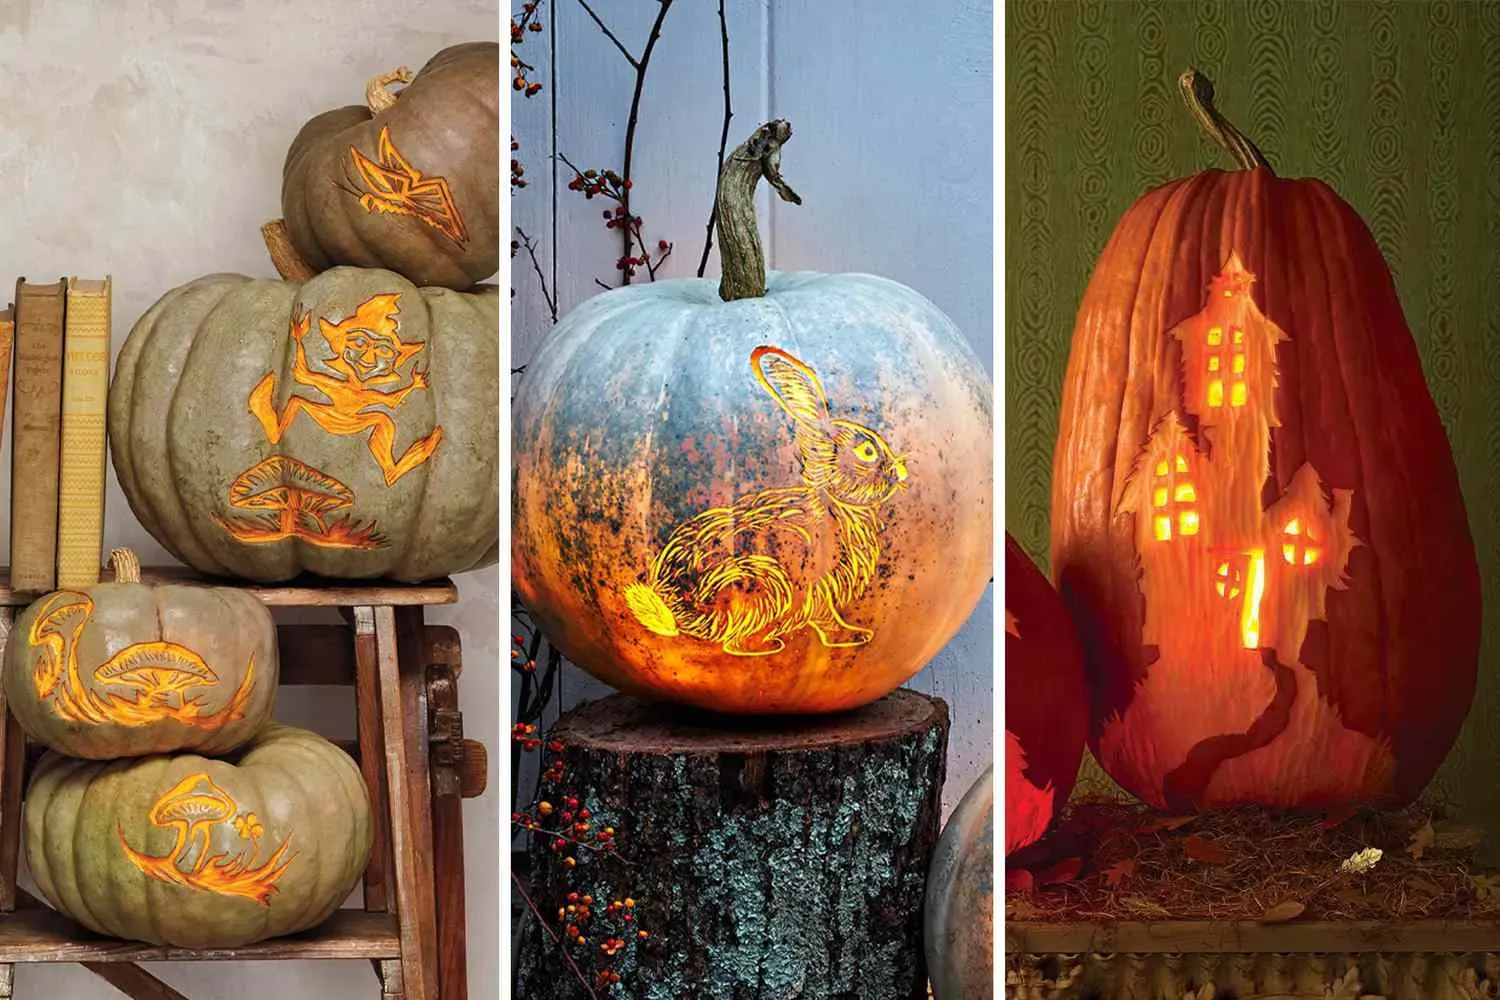
Carving with **display pumpkin carving stencils** gets you the sharp details, but the real magic happens when the lights go down. A beautifully carved pumpkin looks... well, like a carved pumpkin in daylight. At night, it transforms based on how you light it. Standard tea lights are okay, but they flicker, can be a fire hazard, and often don't provide consistent light. LED candles are safer and more reliable, but you can get fancier. Consider using different colored LEDs to cast an eerie or vibrant glow. Pointing a small spotlight at the pumpkin from a distance can highlight the carving and create dramatic shadows. For patterns with etched areas, internal lighting makes those thin spots glow brighter, adding depth and contrast to the fully cut-out sections. Experimenting with light sources is crucial; it’s what makes your stencil work truly pop after dusk.
Layering Techniques and Mixed Media
Using **display pumpkin carving stencils** doesn't mean you're limited to just cutting holes. Think of the stencil as a guide, not a straitjacket. You can combine stenciling with other techniques to add layers and texture. For example, after carving the main features using your stencil, you could use pottery tools or even a Dremel (carefully!) to shave away the outer skin in other areas, creating lighter, translucent spots that contrast with the carved-through parts. You can also incorporate paint, glitter, or even small props like plastic spiders or faux cobwebs around the carved areas to enhance the design. A stencil might give you the perfect spooky face, but adding some drippy fake blood around the mouth takes it from standard to seriously creepy. Don't be afraid to push beyond just the knife cuts. Here are a few ways to enhance your stenciled pumpkin:
- Use a dimmer LED light inside for a softer glow on intricate patterns.
- Shave the skin around carved areas for added depth.
- Paint details onto the uncarved parts of the pumpkin.
- Add external elements like straw, leaves, or small figures.
- Place a colored cellophane sheet inside the pumpkin behind the carving.
Integrating Stenciled Pumpkins into a Larger Scene
One great carved pumpkin is nice. A whole display of them, working together, is unforgettable. **Display pumpkin carving stencils** are perfect for creating a cohesive theme across multiple gourds. Maybe you use a series of monster stencils to populate your porch, arranging them by size or "scariness." Or perhaps you use different stencils to depict a spooky story unfolding across several pumpkins lined up on a wall. Think about levels – place some pumpkins on steps, others on hay bales, and hang a few smaller ones if possible. Add other elements like cornstalks, gravestones, or spooky lighting effects to create a full scene. Your stenciled pumpkins are the stars, but the surrounding environment is the stage that makes them shine. A single, well-executed stencil pumpkin is a statement, but a curated collection tells a story and truly elevates your Halloween curb appeal.
Tips and Tricks for a Memorable Stencil Pumpkin Display
Tips and Tricks for a Memorable Stencil Pumpkin Display
Prep Your Gourd Like a Pro
you've got your awesome **display pumpkin carving stencils**, but slapping them onto a dirty, bumpy pumpkin is asking for trouble. First things first, give that gourd a good wash. Get all the dirt and grime off so the stencil can adhere properly. Then, and this is crucial, make sure it's completely dry. Tape doesn't stick well to damp surfaces, and a shifting stencil means a messed-up design. When you cut the top (or bottom, which is often better for stability and lighting), make the hole large enough to work through, but not so big it weakens the structure. Scrape out *all* the guts and stringy bits. Seriously, get it spotless inside. A clean interior helps prevent rot and gives you a clear space to manage your light source later. A little prep work goes a long way in making sure your stencil transfers cleanly and your carving is a success.
Mastering the Transfer and the Cut
Applying the **display pumpkin carving stencils** seems simple, but it's where things can go sideways. Tape the stencil securely to your pumpkin, smoothing out wrinkles as much as possible, especially on curved surfaces. Some people cut small slits in the paper edges to help it conform. Then, use a poker tool (those little pointy wheels or picks that come with carving kits are perfect) to transfer the design by poking holes closely together along the lines of the stencil. You're essentially creating a dot-to-dot outline on the pumpkin skin. Don't space the dots too far apart, or you'll lose the shape. Once the design is transferred, remove the paper *carefully*. Now you have your guide. When carving, use a small, sharp saw tool. Saw *straight* in, following your dot outline. Avoid sawing at an angle, or your cut won't be clean. Take your time, especially on tight corners or intricate details. If a piece gets stuck, don't force it; gently push it from the inside. Here are common stencil carving pitfalls to avoid:
- Using a dull tool: It makes jagged cuts and is more likely to slip.
- Not transferring the design completely: You'll lose your guide mid-carve.
- Pulling the stencil off too soon: Let those poke marks set.
- Carving too quickly: Patience is your friend here.
- Ignoring different cut types: Some stencils require etching, not just cutting through.
Presenting Your Masterpiece
You've prepped, you've stenciled, you've carved. Now it's time to make your **display pumpkin carving stencils** work shine. How you present your finished pumpkins is just as important as the carving itself. Think about where they'll be seen – is it a porch, a walkway, a window? Arrange them at different heights. Use crates, hay bales, or even stacks of old books to create visual interest and make sure all your hard work is visible from the street. Consider the background; a dark backdrop makes the glowing carvings stand out more. Grouping themed pumpkins together works well. And for the love of all that is spooky, use good lighting! We talked about lighting techniques earlier, but placement matters too. Make sure the light source is positioned to maximize the effect of your carving, whether it's casting creepy shadows or making intricate details glow. A well-carved pumpkin deserves a spotlight, literally.
Finishing Your Display Strong with Stencils
So there you have it. Using **display pumpkin carving stencils** isn't just for beginners; it's a legitimate way to achieve consistent, eye-catching results without spending hours freehanding something that might end up looking like a melted alien. You've got the tools, the patterns are out there, and now you have a better idea of how to make them work for your specific display goals. Go grab some stencils, pick out your pumpkins, and get carving. Your neighbors will thank you for the upgrade.