Table of Contents
You spent hours scooping guts, battling stubborn rinds, and carefully etching that perfect spooky face or intricate scene into your pumpkin. You probably have the pumpkin guts under your fingernails to prove it. But let's be honest, just plonking that masterpiece on your porch step feels a bit... anticlimactic, doesn't it? You put in the work; now it's time to make it shine. The real magic happens when you properly display pumpkin carving designs. A killer carve deserves more than just a lonely spot by the door.
Choosing the Right Pumpkin and Pattern for Your Display
Choosing the Right Pumpkin and Pattern for Your Display
Picking the Perfect Gourd for the Task
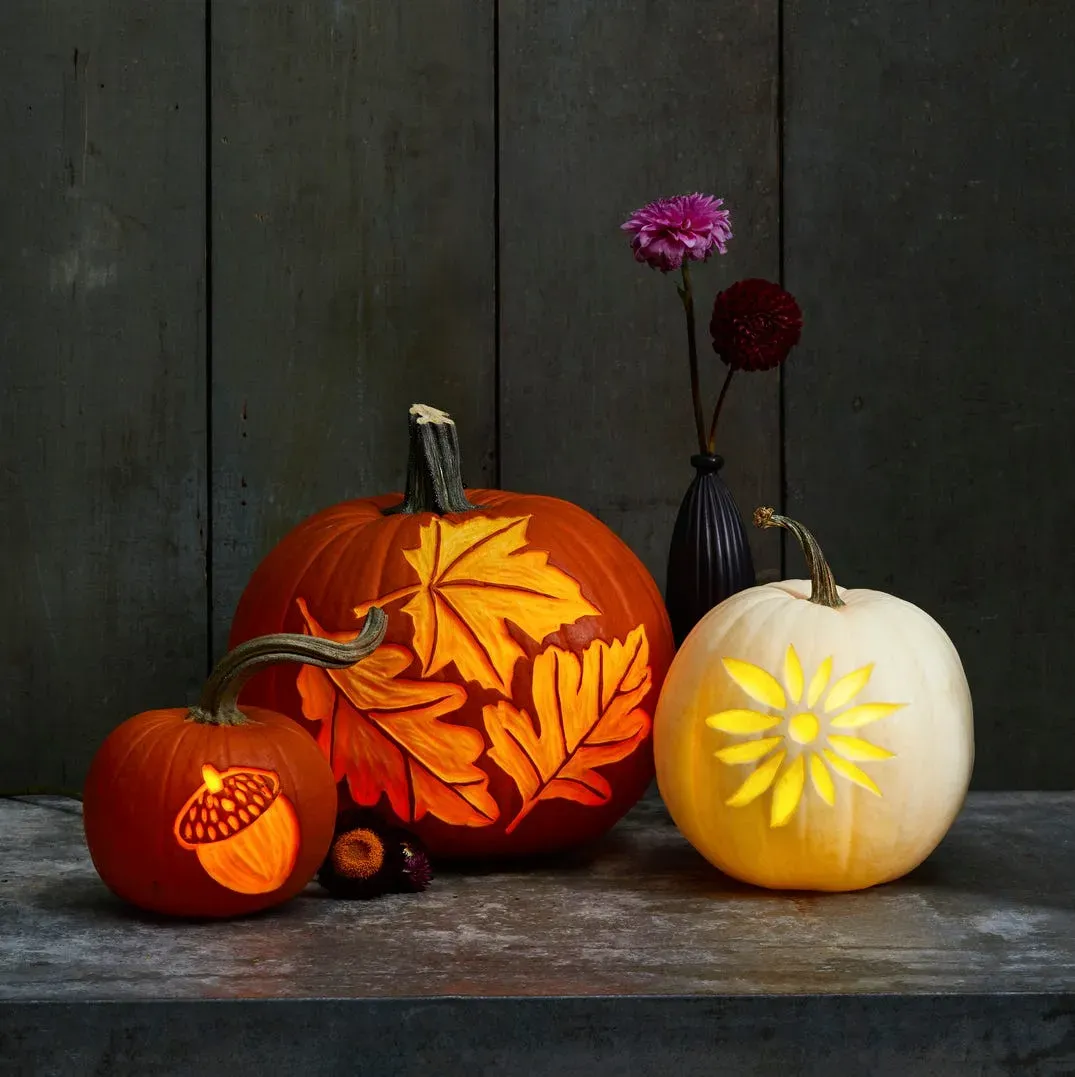
Alright, let's be real. You can have the most intricate design in the world, but if you start with a sad, bruised, or mushy pumpkin, you're setting yourself up for failure before you even make the first cut. Choosing the right pumpkin for your display pumpkin carving designs is the absolute first step, and it’s not rocket science, but people mess it up constantly. You want a pumpkin that feels solid and heavy for its size. Give it a good tap; it should sound hollow, not dull. Look for a smooth surface with minimal bumps or soft spots – those are just obstacles waiting to ruin your design. The stem should be firmly attached and ideally green or brown, not black and brittle. That tells you it's relatively fresh. Don't just grab the biggest one you see; consider the shape and how it fits your intended pattern.
Matching Your Skill to the Stencil
Now, about the pattern. There are a million designs out there, from classic goofy grins to elaborate scenes that look like they belong in a museum. When choosing the right pumpkin and pattern for your display, be honest with yourself about your carving prowess. Are you a first-timer who struggles to cut a straight line? Maybe skip the detailed portrait of Dracula this year. Start with simpler shapes, bold lines, fewer small details. A well-executed simple design looks far better than a mangled complex one. Consider the thickness of your pumpkin wall too; thicker walls handle more intricate cuts better, while thinner ones are easier to punch through accidentally. Think about negative space – what parts are you removing, and what parts are staying? This impacts the final look when lit.
- Look for firm, blemish-free skin.
- Tap the pumpkin; listen for a hollow sound.
- Check for a sturdy, healthy stem.
- Match pattern complexity to your carving experience.
- Consider the pumpkin's shape relative to the pattern.
Considering the Final Look and Location
Before you commit to a pattern, picture where this carved masterpiece is going to live. Is it going on a dark porch where only bold, lit-up areas will be visible? Or will it be indoors with ambient light, allowing for more surface etching and detail? The location dictates how much detail will actually be appreciated. A design with lots of fine lines might look amazing up close, but from the street, it just looks like a blurry mess. If your goal is maximum spooky impact from a distance, go for simpler, bolder shapes that read clearly when illuminated. This step in choosing the right pumpkin and pattern for your display is often overlooked, but it makes a huge difference in how your work is perceived.
Mastering the Carving: Techniques for Great Pumpkin Carving Designs

Mastering the Carving: Techniques for Great Pumpkin Carving Designs
Tools and Techniques That Actually Work
Alright, you've got your perfect pumpkin and your chosen pattern. Now comes the part where the rubber meets the road, or rather, the saw meets the rind. Mastering the Carving: Techniques for Great Pumpkin Carving Designs isn't just about hacking away; it requires a bit of finesse and the right gear. Forget that flimsy plastic saw that came with the grocery store kit; those things are more likely to snap than cut cleanly. Invest in a decent small carving saw, maybe a loop tool for scraping and thinning the walls (this is key for getting light through), and a few different sized detail tools. Think of it like surgery, but way messier and with better smells. Slow, steady strokes are your mantra. Don't try to force the saw; let the teeth do the work. If you hit a tough spot, don't just push harder; back out slightly and try a different angle. Thinning the inside of the pumpkin behind the design areas will make the light glow brighter and more evenly, which is crucial for making your display pumpkin carving designs truly pop after dark.
Making Your Display Pumpkin Carving Designs Shine
Making Your Display Pumpkin Carving Designs Shine
Let There Be Light (The Right Kind)
you’ve successfully avoided slicing off a finger and your design actually resembles the pattern. High five. Now, how do you make that hard work look spectacular after dark? Lighting is absolutely critical for great display pumpkin carving designs. Forget those cheap tea lights that flicker weakly and are a fire hazard waiting to happen. Seriously, don't burn your house down for Halloween. LED lights are your friend here. They're bright, they're safe, and they last way longer. You can get small LED puck lights that fit inside, or strings of battery-operated fairy lights work wonders, especially if your design has a lot of negative space or intricate areas you want to highlight. Experiment with color too! A green or purple light can make a spooky face look even more menacing than standard orange or white.
Setting the Scene: Placement and Props
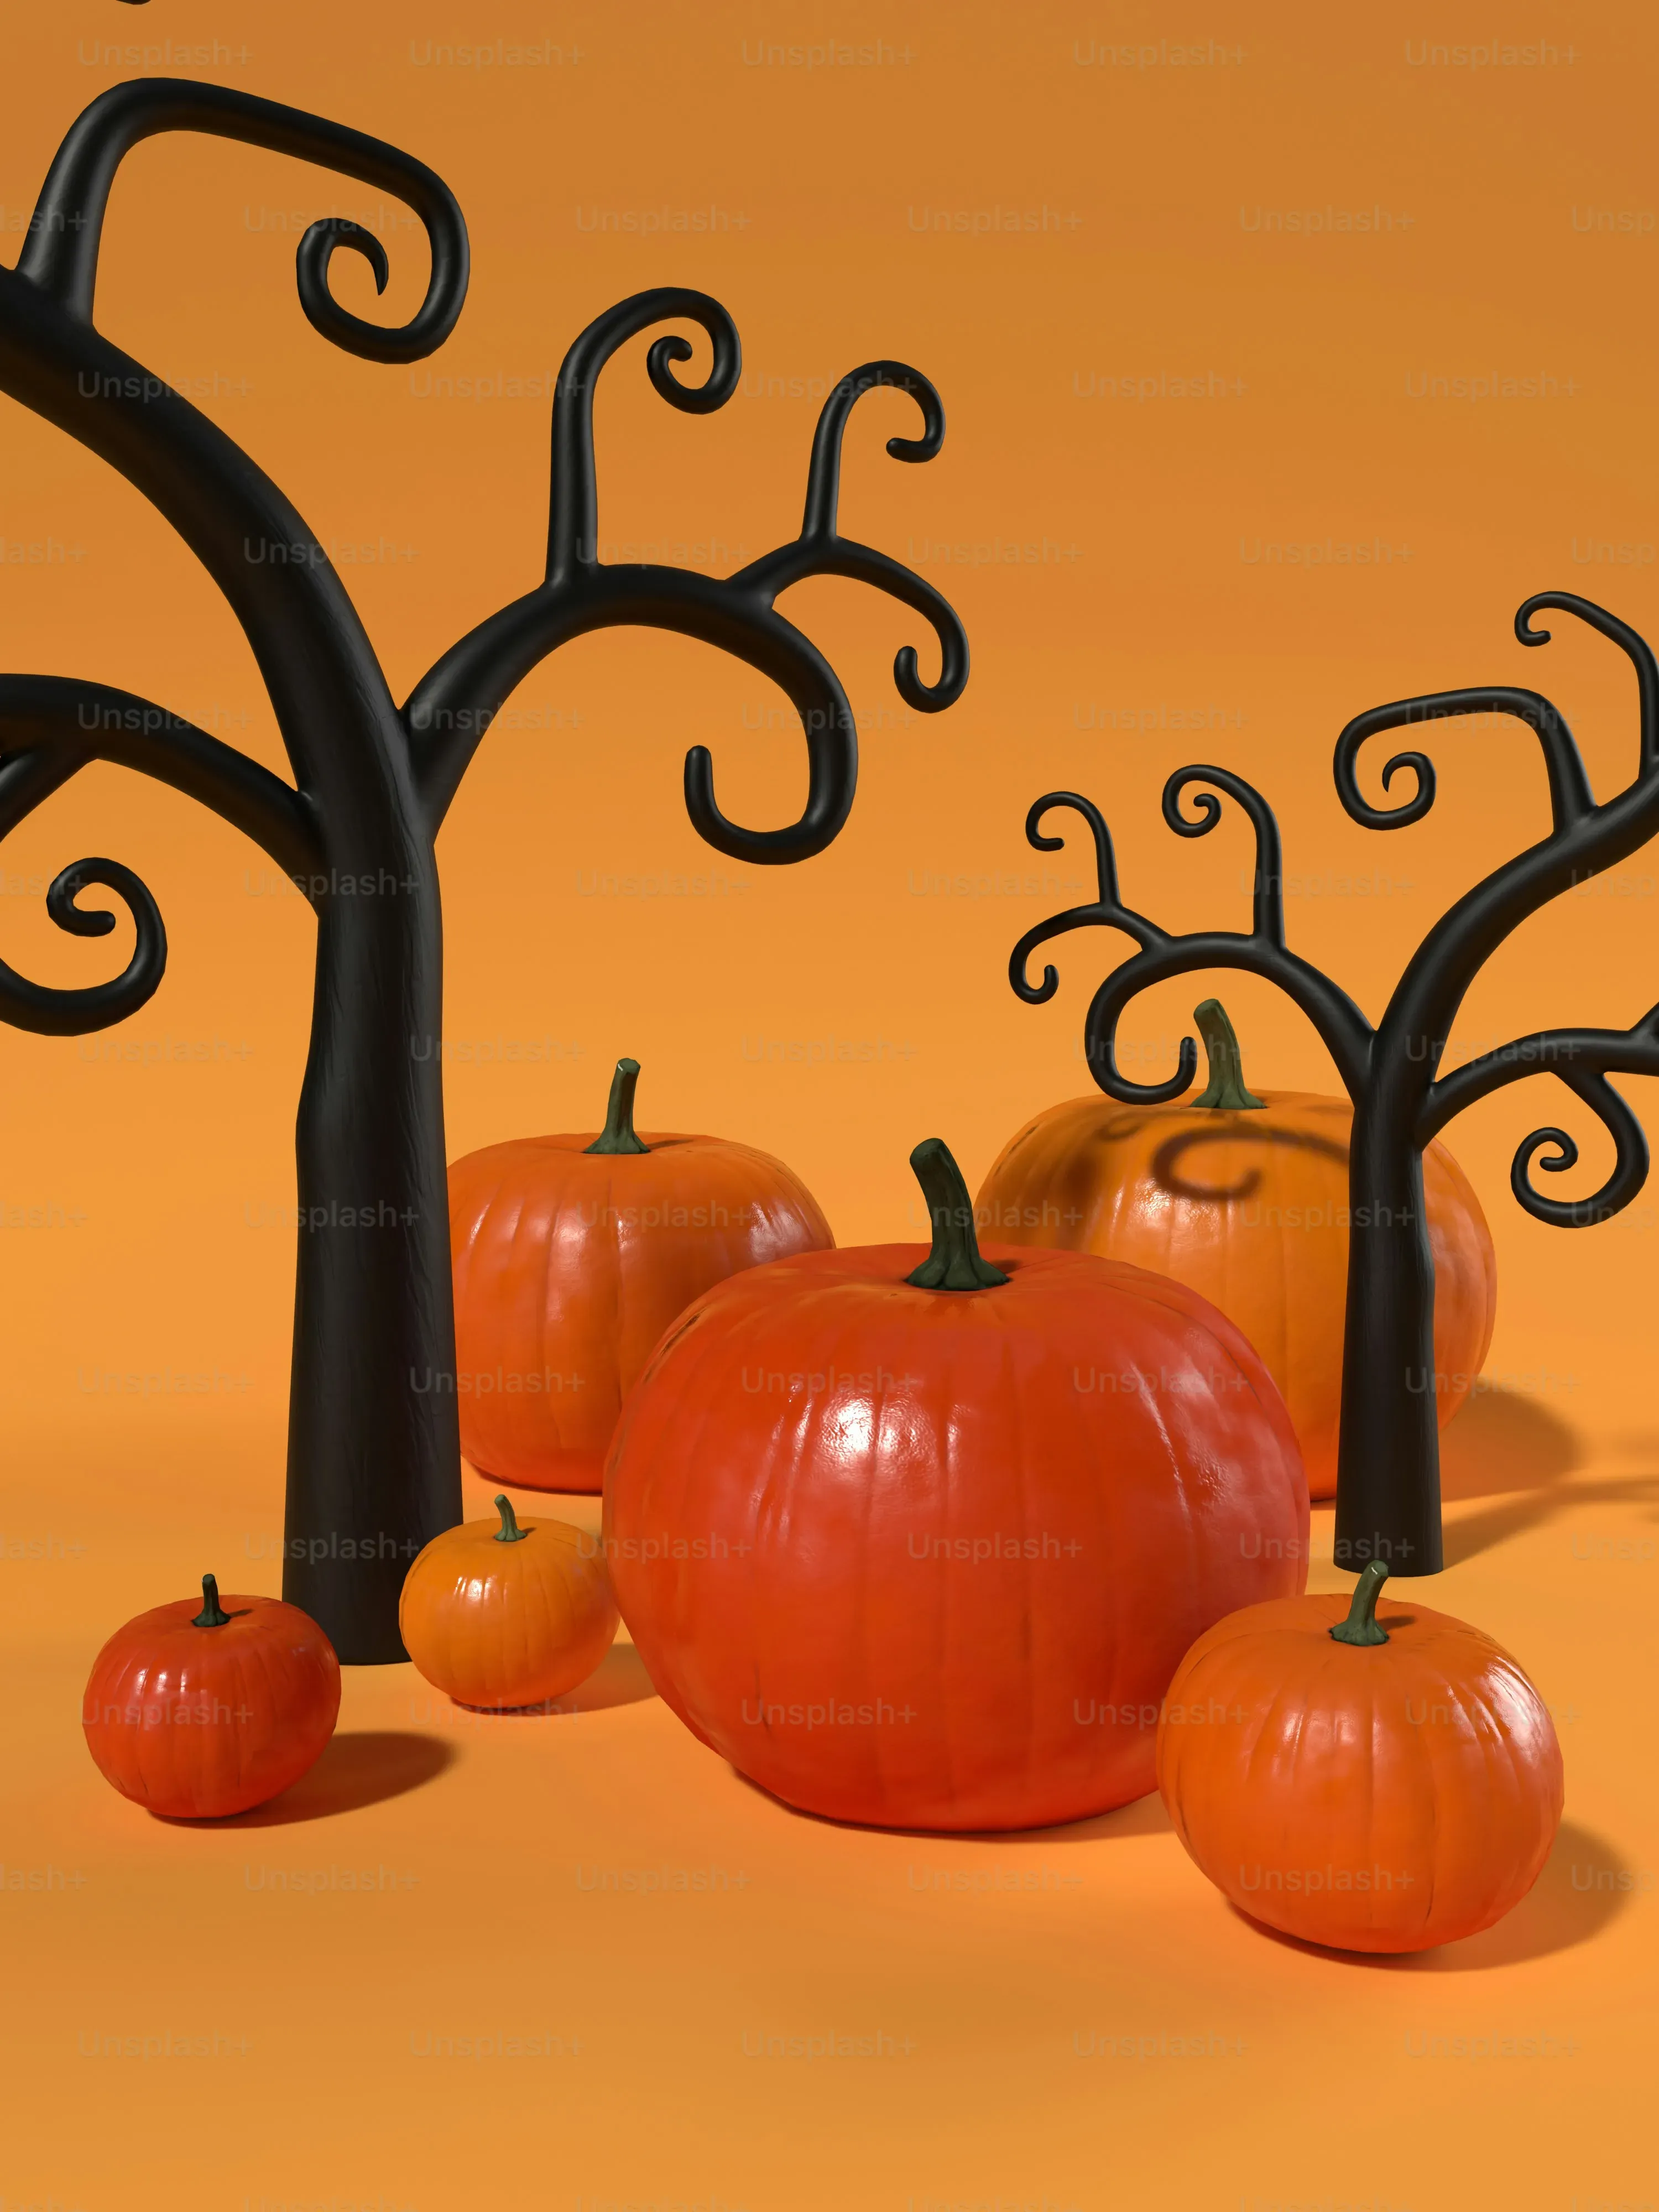
Just because it's carved doesn't mean it just sits there. Think about the context for your display pumpkin carving designs. Where are you putting it? On a porch, by a window, on a table inside? Consider the background. A dark wall or bushes behind it will make the lit-up design pop more than a brightly lit area. Don't be afraid to group pumpkins together if you have more than one. Different sizes and designs create visual interest. Add some props – fake spiderwebs (the kind that actually look like webs, not just cotton balls), dried leaves, corn stalks, maybe even a friendly (or not-so-friendly) scarecrow nearby. Elevate some pumpkins on crates or hay bales to create different levels. This isn't just carving; it's staging a mini-horror show or a charming autumn scene right outside your door.
- Use battery-operated LED lights for safety and brightness.
- Experiment with different light colors.
- Consider the background where the pumpkin will sit.
- Group multiple pumpkins for visual impact.
- Add relevant props like leaves, webs, or corn stalks.
- Use varying heights for dynamic displays.
Keeping Your Carved Pumpkin Looking Its Best
Keeping Your Carved Pumpkin Looking Its Best
Keeping Your Carved Pumpkin Looking Fresh
you've done the hard part: the carving is complete, and your display pumpkin carving designs look fantastic right now. The crushing reality? Carved pumpkins don't last forever. They're literally dying from the moment you slice into them. The enemy is dehydration and mold. To give your masterpiece a fighting chance, you need to keep it moist. A simple trick is to mist the cut edges daily with water from a spray bottle. Some folks swear by coating the cut surfaces with petroleum jelly to seal in moisture. Another method involves soaking the entire carved pumpkin in a tub of cold water for a few hours every couple of days, especially if it starts looking a bit shriveled. Just make sure it dries off a bit before putting the light back in.
Defending Your Gourd from the Elements and Critters
Your beautifully carved pumpkin is also a tasty snack for squirrels and other backyard bandits, not to mention susceptible to the weather. Placing your display pumpkin carving designs in a somewhat sheltered spot – under an awning, on a covered porch – helps protect it from heavy rain and direct sun, both of which accelerate decay. If pests are a major issue, a light coating of hairspray (the cheap stuff works fine) on the surface can deter critters, though you might need to reapply. Some people mix a little cayenne pepper with water and spray it on, but be careful where you spray that stuff if you have kids or pets who might touch it. Nobody wants a spicy pumpkin face.
Problem | Solution |
|---|---|
Wilting/Shrinking | Mist with water or soak periodically |
Mold Growth | Wipe surfaces with diluted bleach or vinegar solution |
Pest Attacks (Squirrels, etc.) | Hairspray or cayenne pepper spray (use cautiously) |
Rapid Decay | Keep out of direct sun and heavy rain |
Reviving a Weary Pumpkin
Even with the best care, your carved pumpkin will eventually start to look a little sad. The edges might curl, and the whole thing might droop. Don't despair immediately! If your pumpkin is just looking a bit tired, that cold water bath trick mentioned earlier can sometimes bring it back to life, at least temporarily. Completely submerge it in a bucket or sink filled with cold water for several hours, or even overnight. The pumpkin flesh absorbs the water, plumping it back up. This won't fix mold or major rot, but it can give a droopy pumpkin a few extra days in the spotlight, ensuring your display pumpkin carving designs look good for Halloween night itself.
Making Your Carve Count
So you’ve put in the work: picked the right pumpkin, wrestled with the tools, and brought a design to life. Leaving that carefully crafted creation to fend for itself on a dark porch is a rookie mistake. Making your display pumpkin carving designs pop is the final, crucial step. It’s about giving your effort the stage it deserves, ensuring it catches eyes and doesn't wither away before the trick-or-treaters arrive. Pay attention to the details – lighting, placement, and a few simple steps to keep it from collapsing into a sad, moldy mess. After all that carving, you want people to see it, right?