Table of Contents
Halloween looms, and the annual pumpkin-carving ritual beckons. Maybe you've scrolled through impossible online galleries of intricate designs, feeling a pang of inadequacy. Forget the hyper-realistic portraits and sprawling spooky scenes that look like they require an engineering degree and a surgeon's steady hand. This year, let's aim for something achievable, something that brings a smile without bringing tears of frustration.
Why Try Easy Disney Pumpkin Carving This Year?
Why Try Easy Disney Pumpkin Carving This Year?
Skip the Stress, Keep the Fun
Let's be honest. We've all seen those elaborate pumpkin carvings online. The ones that look like they belong in a museum, not on your porch. Trying to replicate them often leads to frustration, broken tools, and a deflated sense of holiday spirit. That’s preciselyWhy Try Easy Disney Pumpkin Carving This Year?Simple designs mean you spend less time sweating over intricate details and more time actually enjoying the process. It turns a potential chore into a fun activity, whether you're doing it solo or with family.
Focusing on easy designs drastically reduces the chances of the pumpkin collapsing or you accidentally carving off a vital piece. You get a recognizable, cheerful result without needing the precision of a brain surgeon. It's about achieving a win, a tangible piece of Halloween decor that actually looks like you intended it to, rather than a sad, lopsided mess.
Tap into Instant Recognition and Nostalgia
Disney characters hold a special place for many people, spanning generations. Carving a simple Mickey silhouette or a basic outline of Olaf immediately connects with almost everyone who sees it. There's an instant recognition factor that you don't get with abstract designs or generic spooky faces. This makes your pumpkin display more engaging and relatable.
Bringing beloved characters to life, even in a simple form, taps into a feeling of nostalgia and shared joy. It’s not just a carved pumpkin; it’s a little piece of childhood magic sitting on your doorstep. This approach makes decorating feel more personal and inviting, drawing people in with familiar, friendly faces instead of just generic Halloween spooks.
Why go easy with Disney? Here's the breakdown:
- Less frustration, more enjoyment.
- Achievable results even for beginners.
- Reduced risk of pumpkin carving disasters.
- Instant recognition and appeal across ages.
- Taps into positive nostalgia and shared memories.
- Perfect for involving kids without overwhelming them.
Essential Tools for Simple Disney Pumpkin Carving
Essential Tools for Simple Disney Pumpkin Carving
Stick to the Basics: Kitchen Drawer Heroes
Look, you don't need to drop fifty bucks on a fancy carving kit with tools you'll use once. ForEssential Tools for Simple Disney Pumpkin Carving, your kitchen probably holds most of what you need. A sturdy spoon or a dedicated pumpkin scoop is crucial for gutting that gourd. You want to get all the seeds and stringy bits out, leaving a smooth inner surface. A serrated knife, like a small bread knife or even a steak knife, works wonders for cutting off the top (or bottom, which I prefer for stability). Don't try to use a smooth blade; it just gets stuck and makes a mess.
For the actual carving, a small, sharp paring knife is your best friend for simple shapes and cutting out larger areas. You're not doing surgery here, just cutting through relatively thin pumpkin wall. If you have a steady hand and a sharp edge, you can cut out eyes, mouths, and basic character outlines without needing anything specialized. Just be careful – these knives are sharp, obviously. Always cut away from yourself and keep fingers clear.
Simple Kits and Stencils That Actually Help
while you *can* use just kitchen tools, there are a couple of inexpensive additions that make easy Disney carving even easier. Those cheap pumpkin carving kits you see everywhere? They often have a small, serrated saw-like tool. These are fantastic for following lines on a stencil because they don't get jammed the way a knife can, and they offer more control for curves. They aren't built for speed or thick walls, but for simple outlines, they're perfect.
The other essential? Stencils. You can find tons of free Disney stencils online for easy shapes like Mickey heads, character silhouettes, or simple logos. Print one out, tape it to your pumpkin, and use a poking tool (even a pushpin or a sharp pencil works) to transfer the outline onto the pumpkin surface. Then, you just connect the dots with your carving tool. This takes all the guesswork out of drawing and ensures your character actually looks like, well, your character.
Tools to grab for easy Disney carving:
- Strong spoon or scoop for gutting
- Serrated knife for cutting the lid
- Small, sharp paring knife for basic shapes
- Inexpensive pumpkin carving saw (optional, but helpful)
- Printed stencils
- Pushpin or sharp pencil for transferring designs
Top Easy Disney Pumpkin Carving Ideas for Beginners
Top Easy Disney Pumpkin Carving Ideas for Beginners
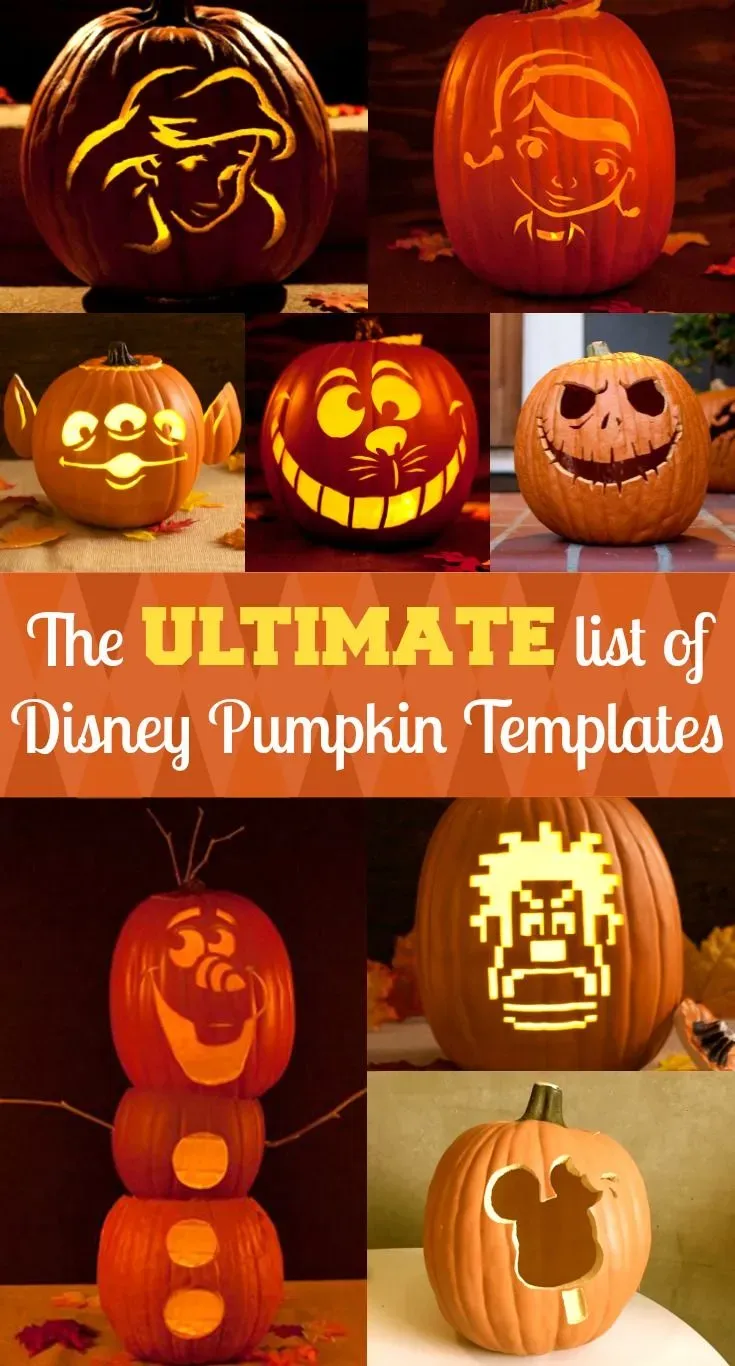
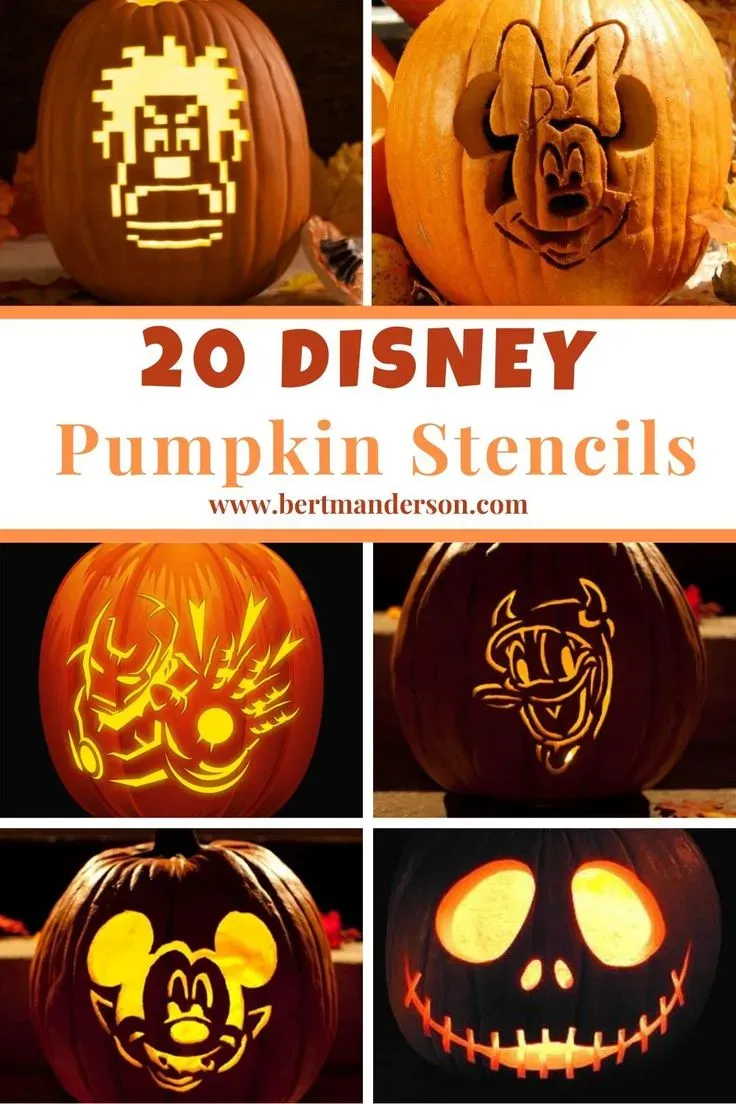
The Undefeated Champion: Mickey & Minnie Silhouettes
Alright, let's kick off theTop Easy Disney Pumpkin Carving Ideas for Beginnerswith the absolute simplest wins. You cannot go wrong with Mickey Mouse or Minnie Mouse. Their iconic heads – a large circle with two smaller circles on top – are practically designed for pumpkin carving. You don't need to worry about eyes, noses, or complex smiles. Just the outline. Find a good stencil online, tape it on, poke the outline, and then saw along the dots. Seriously, that's it. Add a bow for Minnie if you're feeling fancy, which is just a couple of curved shapes.
This is your confidence builder. Nail the Mickey head, and you'll feel ready to tackle slightly more involved designs. It’s instantly recognizable from a block away, looks sharp when lit, and requires minimal precision. It’s the pumpkin carving equivalent of boiling water – basic, but essential, and gets the job done every single time. Don't overthink it; just grab that cheap saw and start cutting those circles.
Beyond the Mouse: Simple Character Outlines
Once you've mastered the mouse ears, you can branch out slightly but still keep it firmly in the "easy" category. Think about characters with distinct, simple profiles. Olaf from Frozen is a great candidate – his body is basically three stacked circles, and his stick arms and hair are just simple lines. Stitch from Lilo & Stitch has a very recognizable head shape and large ears that are easy to translate to a stencil.
Other good options include the simple outline of the Pixar lamp, the Incredibles logo (a simple 'i'), or even the Genie's lamp from Aladdin. The key here is finding characters or symbols where the silhouette alone tells the story. Avoid characters with spiky hair, intricate costumes, or complex facial features. Stick to the basic shapes and bold lines. A good stencil makes all the difference here; don't try to freehand unless you're surprisingly good at drawing on curved, bumpy surfaces.
Easy Disney Characters to Start With:
- Mickey Mouse Head
- Minnie Mouse Head (add a bow)
- Olaf (simple body shape)
- Stitch (head and ear outline)
- Pixar Lamp Silhouette
- Incredibles 'i' Logo
- Genie's Lamp
Using Negative Space for Effect
Here’s a slightly more advanced trick that still keeps things easy: use negative space. Instead of cutting out the character's shape, you cut out the area *around* the character, leaving the character itself as the solid pumpkin. This works great for things like character profiles (think a side view of Elsa or Buzz Lightyear, focusing on their distinct hair or helmet shape) or logos.
For example, you could stencil the profile of Captain Hook and cut out everything *except* his hook and feathered hat. Or stencil the outline of Cinderella's castle and cut out the sky around it. This technique often looks more impressive than simple cutouts but relies on the same basic skill: following a line. Just remember to leave bridges of pumpkin connecting the inner design to the outer wall so it doesn't fall out. It requires a bit more planning with the stencil, but the carving itself is just cutting large areas.
Carving Techniques to Make Disney Pumpkins Easy
Carving Techniques to Make Disney Pumpkins Easy
Simple Cuts and Clean Lines
MasteringCarving Techniques to Make Disney Pumpkins Easyisn't about learning complex maneuvers; it's about making simple cuts cleanly. Once you've got your stencil transferred using the poke method, connect those dots carefully. Use that small serrated saw from the cheap kit – it's designed to follow lines on a curve better than a straight knife. Don't rush. Push and pull the saw gently along the dotted line, letting the tool do the work. If you're using a paring knife, make small, controlled cuts, wiggling the blade slightly to help it through. Cut out inner shapes first, then work your way outwards.
Wrapping Up Your Easy Disney Pumpkin Projects
So there you have it. You don't need to be a professional artist with years of gourd-sculpting experience to bring a little Disney magic to your doorstep this Halloween. We've covered simple tools, straightforward designs, and techniques that cut down on the frustration factor. The goal here wasn't perfection; it was creating something recognizable and fun without wanting to throw the pumpkin across the yard. Hopefully, these easy Disney pumpkin carving ideas give you a starting point and maybe even make the process... dare I say it... enjoyable. Now go forth, carve responsibly, and try not to slice off a finger.