Table of Contents
Ready to transform your pumpkin carving from hobby to masterpiece? This article is your guide to the world of detailed pumpkin carving patterns for professionals. We'll explore advanced techniques that take your carving beyond simple jack-o'-lanterns, delving into the intricate artistry that elevates pumpkins to stunning works of art. Prepare to be amazed as we showcase breathtaking designs and the skills needed to execute them flawlessly. From choosing the right tools to mastering complex patterns, we'll equip you with the knowledge and inspiration to create truly awe-inspiring pumpkins. Discover the secrets behind achieving professional-level detail, ensuring your creations become the envy of every Halloween enthusiast. Learn how to preserve your masterpieces and showcase them proudly, transforming your porch into a captivating Halloween display. Get ready to elevate your pumpkin carving game to the next level—let's begin!
Elevating Your Carving: Advanced Techniques for Detailed Pumpkin Carving Patterns for Professionals
Elevating Your Carving: Advanced Techniques for Detailed Pumpkin Carving Patterns for Professionals
Mastering the Art of Depth
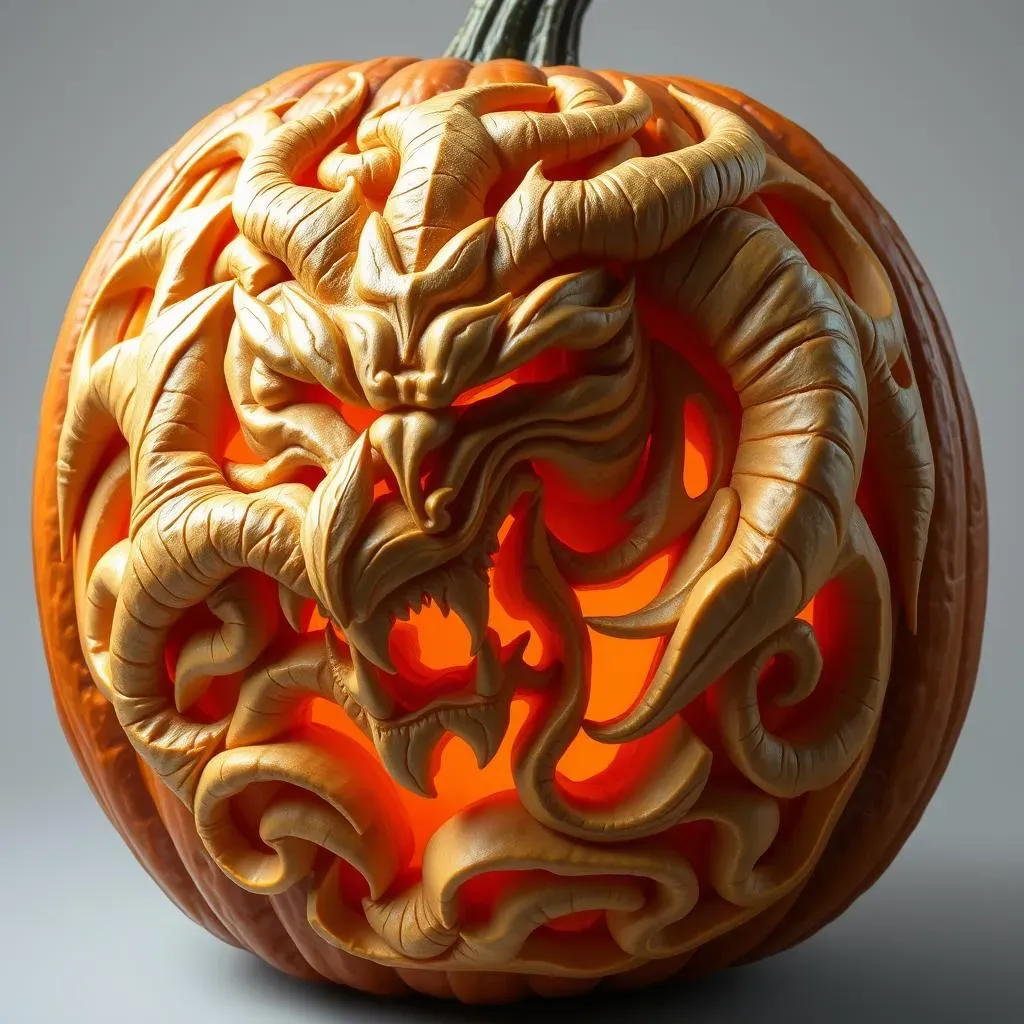
Let's talk about taking your pumpkin carving to the next level. Forget simple triangle eyes and jagged teeth! We're diving into the realm of 3D carving, shading, and intricate detailing. Think sculpted features, realistic textures, and designs so complex they'll leave onlookers speechless. It's about creating pumpkins that aren't just carved; they're works of art.
One key technique is layering. Instead of just carving out a single shape, try creating depth by carving multiple layers. Imagine a spooky skull: you could carve the bone structure first, then add a second layer for the eye sockets, and a third for the detail within the eyes themselves. This adds incredible dimension.
Technique | Description | Example |
|---|---|---|
Layering | Carving multiple depths to create dimension. | A skull with layered bone structure, eye sockets, and detailed eyes. |
Shading | Using etching tools to create shadows and highlights. | Creating fur texture on an animal pumpkin. |
3D Carving | Carving elements that protrude from the pumpkin's surface. | Adding vines or leaves that appear to grow from the pumpkin. |
Another game-changer is shading. This involves using different carving tools and techniques to create shadows and highlights, giving your design a more realistic and three-dimensional look. Think about how light and shadow play on a real-life object; you can replicate that on your pumpkin using etching tools to create subtle variations in texture and depth. Check out these detailed pumpkin carving techniques for more ideas.
And don't forget about 3D carving! This involves creating elements that actually protrude from the surface of the pumpkin. Imagine vines creeping up the side, or a spider crawling across the face. This adds an entirely new level of complexity and visual interest. It requires precision and patience, but the results are absolutely stunning. For some inspiration, browse through these advanced Halloween pumpkin designs.
Finally, remember that practice makes perfect. Start with simpler designs and gradually work your way up to more challenging ones. Don't be afraid to experiment with different tools and techniques, and most importantly, have fun! The more you practice, the better you'll become at creating truly breathtaking works of art. You'll find that even seemingly simple tools can yield incredible results in the right hands. For example, a simple dremel can be used to create incredibly intricate details.
- Practice regularly to improve your skills.
- Experiment with different tools and techniques.
- Start with simpler designs before tackling complex ones.
- Don't be afraid to make mistakes—they're learning opportunities.
Beyond the Basics: Exploring Intricate Designs and Detailed Pumpkin Carving Patterns for Professionals
From Stencils to Freehand: Unleashing Your Creativity
Okay, so you've mastered the basics. You're comfortable with layering, shading, and even a little 3D carving. But now it's time to really push your boundaries. Let's talk about moving beyond pre-made stencils and embracing the freedom of freehand design. This is where the *real* magic happens. Think about your favorite artwork, your favorite movies, or even your favorite video game characters – all of these can translate into stunning pumpkin designs. It's about translating a two-dimensional image into a three-dimensional pumpkin, and that's a challenge worth tackling!
Start by sketching your design directly onto the pumpkin. Use a pencil and lightly sketch your ideas; you can always erase and adjust as needed. Don't be afraid to experiment and play around with different compositions. Once you're happy with your sketch, carefully begin carving. Remember, patience is key, and taking your time will ensure a cleaner, more polished result. For more inspiration, check out these complex pumpkin carving designs for professionals.
- Sketch your design directly onto the pumpkin.
- Use a pencil for easy corrections.
- Experiment with different compositions.
- Take your time and be patient during the carving process.
Remember those amazing, intricate patterns you see online, the ones that look almost impossible to recreate? Well, they’re not! With practice and the right tools, you too can create similar masterpieces. The key is to break down complex designs into smaller, manageable sections. Tackle one area at a time, focusing on precision and clean cuts. And don't be afraid to use different tools – from small carving knives for fine details to rotary tools for larger sections. The variety of tools available will help you achieve different effects. Need some more guidance? Check out these detailed pumpkin carving patterns for more inspiration.
Incorporating Texture and Realism
Taking your pumpkin carving to the next level involves adding texture and realism to your designs. Think about how you can use different carving techniques to create the illusion of fur, scales, or even fabric. For example, to create fur, you can use a variety of small gouges and etching tools to create short, fine lines that mimic the look of animal hair. This requires a steady hand and plenty of patience, but the result is well worth the effort! Check out these intricate pumpkin carving patterns to see how professionals achieve this.
Texture | Technique | Tools |
|---|---|---|
Fur | Short, fine lines | Small gouges, etching tools |
Scales | Overlapping, slightly curved shapes | Small carving knives, V-shaped tools |
Fabric | Varying depths and widths of lines | Larger gouges, saws |
Similarly, creating scales involves carving overlapping, slightly curved shapes. This requires precision and a steady hand, but the effect is stunning. And for fabric, you can use varying depths and widths of lines to create folds and creases. The possibilities are truly endless—it's all about using your creativity and skills to bring your designs to life. For more advanced techniques, you might want to check out professional pumpkin carving tips.
"The beauty of pumpkin carving lies not just in the design itself, but in the ability to bring that design to life through texture and detail. It's about creating a three-dimensional experience, a piece of art that captivates the viewer and leaves a lasting impression." -Anonymous Master Carver
Beyond Halloween: Exploring Thematic Designs
While Halloween is the prime time for pumpkin carving, don't limit yourself to spooky designs! The possibilities are endless. Think about other themes and holidays. Create winter wonderlands with snowflakes and frosty scenes, or celebrate Thanksgiving with intricate autumn designs featuring leaves and harvest motifs. You can even create designs based on your favorite books, movies, or video games! The sky's the limit. For some inspiration, check out these advanced pumpkin carving ideas.
Remember, the more you explore different themes and styles, the more your skills will grow. Don't be afraid to step outside of your comfort zone and experiment with new techniques and designs. Your pumpkin carving journey is a continuous process of learning and improvement. The more you practice, the more confident you will become in your ability to create truly exceptional pieces. For additional inspiration, you might find these complex pumpkin carving stencils helpful.
- Explore themes beyond Halloween.
- Experiment with different styles and techniques.
- Don't be afraid to try new things.
- Embrace your creativity.
Tools of the Trade: Essential Equipment for Achieving ProfessionalLevel Detailed Pumpkin Carving Patterns
Essential Carving Tools
Let's talk tools! Forget flimsy kitchen knives; professional pumpkin carving demands precision instruments. A good set of carving tools is your best friend. You'll need a variety of sizes and shapes to tackle different aspects of your design. Think small detail knives for intricate work, larger gouges for removing bulk material, and saws for making clean cuts through thicker pumpkin flesh. Don't skimp on quality; sharp, well-maintained tools make all the difference. A dull tool can lead to uneven cuts and frustrating experiences. Investing in a good set of tools is an investment in the quality of your work. For a comprehensive guide, see our post on advanced pumpkin carving tools.
Beyond the basics, consider specialized tools like loop tools for creating intricate patterns and V-shaped tools for adding depth and texture. Rotary tools, like a Dremel, are also invaluable for larger sections or for creating smooth, consistent cuts. Remember, the right tool for the job makes the process so much easier and more enjoyable. You can even find specialized kits that contain a wide range of tools. Check out our article on advanced pumpkin carving kits for more options.
- Small detail knives
- Larger gouges
- Saws
- Loop tools
- V-shaped tools
- Rotary tools (e.g., Dremel)
Lighting and Illumination
Once you've carved your masterpiece, it's time to illuminate it! Proper lighting can truly make your pumpkin shine. Forget basic candles; they're messy, dangerous, and don't provide the best illumination. Instead, opt for battery-operated tea lights or LED lights. These offer a safer, cleaner, and more consistent light source, allowing your intricate details to be fully appreciated. Consider the placement of your light source to highlight the best features of your design. Experiment with different lighting options to see what works best for your specific pumpkin and design. For some amazing lighting ideas, check out our article on professional pumpkin carving ideas.
For truly professional displays, consider using fiber optic lights or even projected images. These advanced lighting techniques can add an extra layer of drama and sophistication to your pumpkin carving. Don't be afraid to experiment and find what best suits your artistic vision. The right lighting can transform an already impressive pumpkin into a truly unforgettable spectacle. The combination of precise carving and effective lighting will create the 'wow' factor you're striving for. For example, a strategically placed light can create dramatic shadows that enhance the three-dimensionality of your design.
Lighting Option | Pros | Cons |
|---|---|---|
Battery-operated tea lights | Safe, inexpensive, readily available | Can be dim, short lifespan |
LED lights | Bright, long lifespan, energy-efficient | Can be more expensive |
Fiber optic lights | Bright, customizable, long lifespan | More expensive, require more setup |
Preparation and Preservation
Before you even pick up a knife, proper preparation is crucial. Start with a good quality pumpkin – one that's firm, symmetrical, and free of blemishes. A well-chosen pumpkin makes the carving process much easier and results in a more polished final product. Once you've selected your pumpkin, carefully clean it and remove any excess stems or leaves. This ensures a clean working surface and prevents any unwanted debris from interfering with your carving. For tips on pumpkin selection and preparation, you might find our article on detailed pumpkin carving ideas helpful.
Finally, think about preservation. Your masterpiece deserves to last! After carving, you can extend the life of your pumpkin by using a bleach solution or commercial pumpkin sealant. This helps prevent rot and keeps your pumpkin looking its best for longer. Proper storage in a cool, dry place also helps. With a little care, your intricately carved pumpkin can be enjoyed for weeks, not just days. For more information on preserving your pumpkins, check out our post on professional pumpkin carving tips.
Showcase Your Skills: Tips for Displaying and Preserving Your Masterful Detailed Pumpkin Carving Patterns
Prime Placement: Showcasing Your Pumpkin Masterpieces
So, you've poured your heart and soul (and maybe a few cuts) into creating these incredible, detailed pumpkin carvings. Now it's time to give them the spotlight they deserve! Think beyond just plopping them on the porch. Consider your overall Halloween display. Do you want a spooky, whimsical, or elegant vibe? Your pumpkin placement should complement that aesthetic. A dark corner might emphasize a spooky design, while a well-lit area could showcase intricate details. For some creative display ideas, check out these professional pumpkin carving ideas.
Consider using different heights and levels. Elevate some pumpkins on crates, stacks of books, or even repurposed furniture. This adds visual interest and prevents your display from looking flat. You can also group pumpkins of similar themes together. For example, a collection of spooky faces or a cluster of whimsical designs. Remember, the goal is to create a cohesive and captivating display that showcases your talent. For more advanced display techniques, check out these complex pumpkin carving designs and how they're displayed.
- Choose a location that complements your design's aesthetic.
- Use varied heights and levels for visual interest.
- Group pumpkins of similar themes together.
- Consider lighting to highlight details.
Extending the Life: Preservation Techniques for Your Carvings
All that hard work deserves to last a little longer than a week, right? Preventing rot is key to preserving your pumpkin carvings. One effective method is using a bleach solution. Mix one part bleach with ten parts water and gently wipe down the inside and outside of your pumpkin. This helps kill bacteria and mold spores. However, be careful not to let the bleach sit for too long, as it can damage the pumpkin's surface. You should also avoid getting it on your skin.
Another option is using a commercial pumpkin sealant. These are readily available at craft stores and online. They form a protective barrier that helps prevent moisture loss and inhibits the growth of mold. Always follow the manufacturer's instructions for application. Proper storage is also crucial. Keep your pumpkins in a cool, dry, and well-ventilated area, away from direct sunlight or extreme temperatures. This will help slow down the decomposition process and keep your carvings looking their best for longer. For a more comprehensive guide on preservation, check out this article on professional pumpkin carving tips.
Preservation Method | Pros | Cons |
|---|---|---|
Bleach Solution | Effective, inexpensive | Can damage pumpkin if not used carefully |
Commercial Sealant | Easy to use, provides a protective barrier | Can be more expensive |
Proper Storage | Simple, cost-effective | May not be enough on its own |
Beyond the Porch: Creative Ways to Showcase Your Work
Don't limit yourself to the front porch! There are tons of creative ways to showcase your pumpkin masterpieces. Consider taking photos of your carvings in different settings – against a rustic backdrop, in a spooky graveyard scene, or even with fall foliage. High-quality photos can capture the intricate details and artistic flair of your work. You can share these photos on social media, enter them into competitions, or even create a personal portfolio to showcase your skills. For inspiration, check out these intricate Halloween pumpkin designs.
Think outside the box! You could create a time-lapse video of your carving process, showing the transformation from a plain pumpkin to a detailed masterpiece. Or, you could even use your pumpkins as part of a larger Halloween display or event, incorporating them into haunted houses, pumpkin patches, or even school projects. The possibilities are endless! Remember, your creativity knows no bounds. Don't be afraid to experiment and find unique ways to share your passion for pumpkin carving with the world. For more unique display ideas, you might want to explore these intricate pumpkin carving ideas for adults.