Table of Contents
Tired of the same old pumpkin carving mess? Me too! Let's be honest, scooping out pumpkin guts isn't exactly a highlight of the season. But, who says you need a knife to create awesome Halloween decorations? This year, I'm all about cute pumpkin ideas no carve, and trust me, the possibilities are endless. We're talking way beyond the basic painted pumpkin. We'll explore how to turn your pumpkins into adorable characters, from Disney favorites to bookish buddies. You'll find out how to use all sorts of materials, not just paint, to make your pumpkins truly unique. Plus, we'll look at some fun ways to show off your no-carve creations, because what's the point of making them if nobody sees them? So, ditch the carving tools and get ready to unleash your creativity. This guide is your ticket to a world of easy, fun, and super cute pumpkin decorating.
Painted Pumpkins: A Canvas for Creativity
Painted Pumpkins: A Canvas for Creativity
Getting Started with Paint
Okay, so you're thinking about painting pumpkins, right? It's not just slapping on some orange and calling it a day. Think of your pumpkin as a blank canvas, ready for your masterpiece. First things first, you'll want to grab some acrylic paints. They're the best because they stick well and dry quickly. Don't grab the water colors, they will make a mess. You'll also want to have different sized brushes, from tiny ones for details to bigger ones for covering large areas. And, a little tip from me: use a damp cloth to wipe up any mistakes quickly, before the paint dries. This is my go-to method.
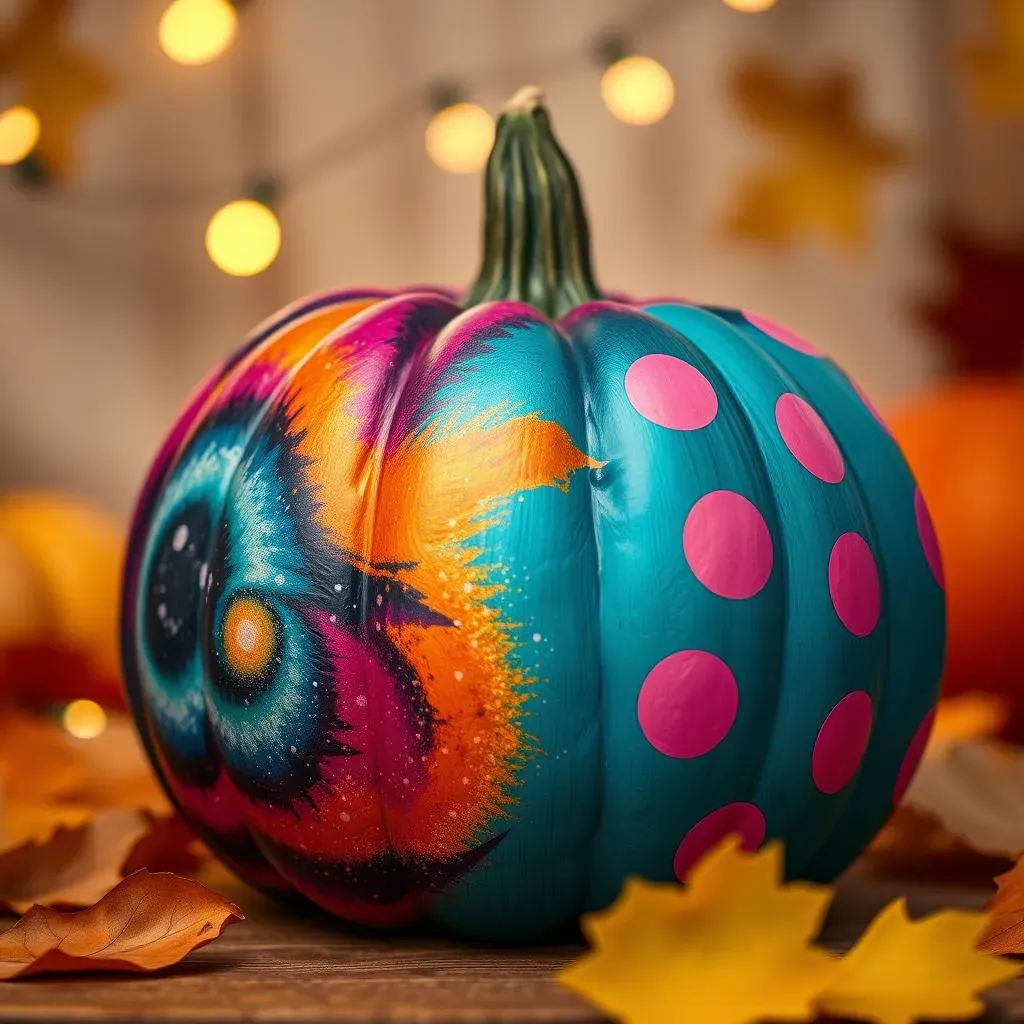
Don’t be afraid to experiment with colors, either. You don't have to stick to traditional Halloween hues. Maybe a teal pumpkin with pink polka dots? Why not? It’s your pumpkin, your rules! I once did a whole galaxy themed pumpkin, complete with glitter. Let me tell you, it was the talk of the neighborhood. The key is to have fun and don’t overthink it.
Techniques and Tips
Now that you have your supplies, let's talk techniques. Base coats are your friend. Start with a solid color all over the pumpkin, and let it dry completely. This will give you a good base for any designs you want to add. For intricate patterns, try using stencils. You can find them online or even make your own with some cardstock. Another fun technique is using sponges to create a textured look. Just dab the paint onto the pumpkin instead of brushing it.
Here's a little secret: if you're not feeling super artistic, try using painter’s tape to create stripes or geometric designs. It’s a foolproof way to get clean lines. And, don’t forget the details! Adding small dots, swirls, or even hand-drawn patterns can really make your painted pumpkin pop. One year, I used a toothpick to make tiny little stars all over my pumpkin, it looked amazing. The best part about painted pumpkins is that you can make them as simple or as elaborate as you want.
Technique | Description | Tips |
|---|---|---|
Base Coat | Solid color all over the pumpkin | Let it dry completely before adding designs |
Stencils | Use for intricate patterns | Secure the stencil with tape for crisp lines |
Sponging | Dab paint for a textured look | Use different sized sponges for varied textures |
Painter's Tape | Create stripes or geometric shapes | Press tape down firmly to prevent paint bleeding |
Adding the Finishing Touches
Once your paint is dry, it's time for the final touches. Consider adding some extra sparkle with glitter glue or metallic accents. You can also use paint pens to add fine details or write fun Halloween messages on your pumpkin. If you're feeling extra crafty, try using Mod Podge to adhere some paper cutouts or fabric scraps to your painted pumpkin. The possibilities are endless!. I remember when I glued some googly eyes on my painted pumpkin and it looked like a funny character.
And, remember, there is no right or wrong way to do it. The goal is to have fun and create something you are proud of. So, grab your paint brushes and let your imagination run wild. Painted pumpkins are a great way to express yourself and make your Halloween decorations truly unique. I have a feeling you’re going to create some amazing things.
Cute Character Pumpkins: From Disney to Books
Cute Character Pumpkins: From Disney to Books
Bringing Characters to Life
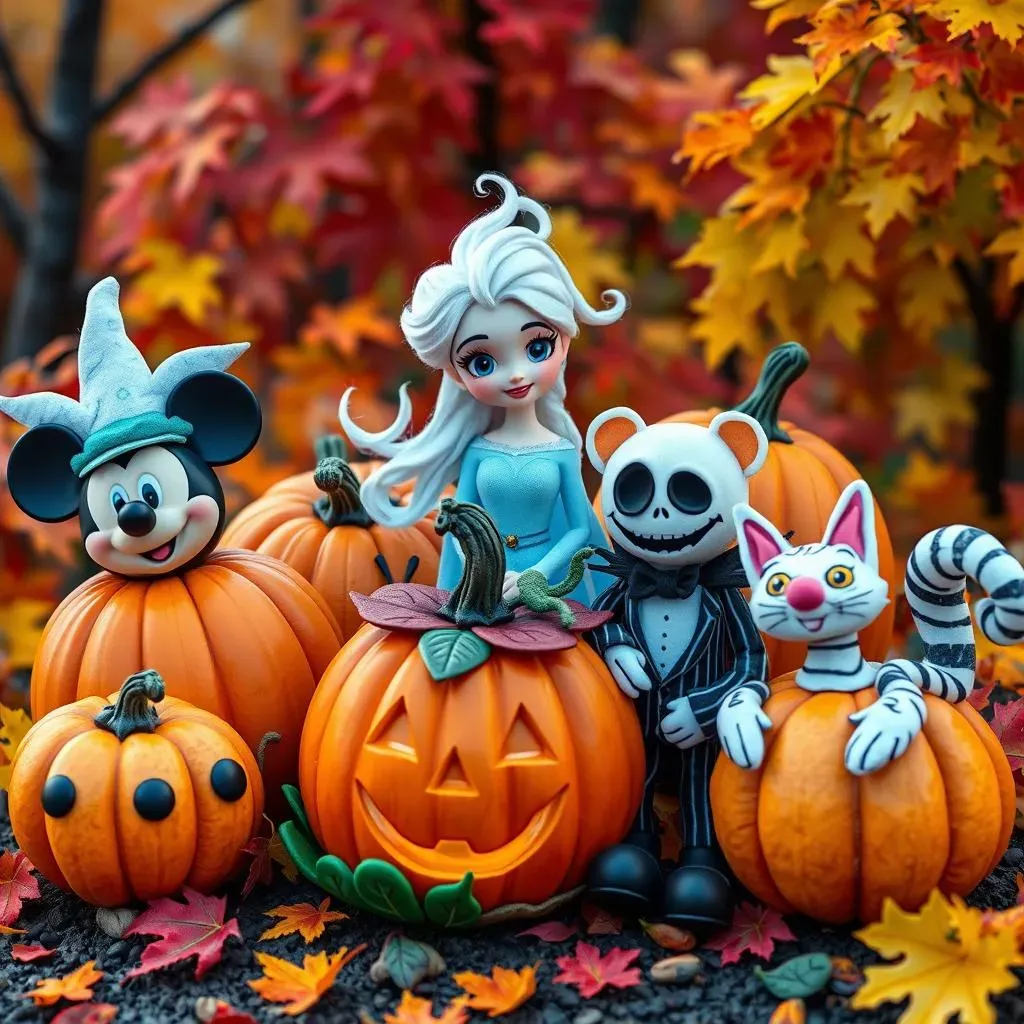
Alright, let's talk about making our pumpkins into characters! This is where things get seriously fun. Think about your favorite Disney movies or those awesome book characters you love. You can totally transform a plain pumpkin into someone like Elsa from Frozen, or maybe even the mischievous Cheshire Cat from Alice in Wonderland. The key here is to really capture the essence of the character. I remember trying to make a Winnie the Pooh pumpkin one year, and I used felt for his ears and a little red shirt. It turned out so cute, it was like he jumped right off the page.
Don't feel like you have to be a professional artist to do this. Start with simple shapes and colors, and then add details as you go. For example, if you're making a Mickey Mouse pumpkin, start with a black base coat and then add the white gloves and red shorts. It's all about breaking down the character into basic elements. And, don't forget the accessories. A little bit of yarn can be perfect for hair, and some felt scraps can make great outfits. I once saw someone use pipe cleaners for a character's antennas, and it was genius!
Tips and Tricks for Character Pumpkins
So you've got your character in mind, now what? Well, let me give you some insider tips. First, consider the shape of your pumpkin. A round pumpkin might be perfect for a character with a round head, like Olaf, while a taller pumpkin could be better for someone like Jack Skellington. And, don’t be afraid to use different materials. You can use construction paper, markers, glitter, or even googly eyes. I found that craft foam is great for making sturdy details that won't fall off easily.
Also, think about the character's colors. If you're making a character with bright colors, make sure you choose paint that is vibrant. And, don't be afraid to mix colors to get the perfect shade. If you're doing a character with lots of small details, try using paint pens or thin markers for those fine lines. I once used a toothpick to make tiny little dots for a ladybug pumpkin, and it looked amazing! The most important thing is to have fun and let your creativity shine. There are no mistakes, just happy accidents.
Character | Pumpkin Shape | Materials |
|---|---|---|
Olaf (Frozen) | Round | White paint, black markers, felt for nose |
Mickey Mouse | Round | Black, red, white paint, felt for ears |
Jack Skellington | Tall | White paint, black markers |
Cheshire Cat | Round | Pink, purple paint, black markers |
Unique Materials, Unique Designs: Beyond Paint
Unique Materials, Unique Designs: Beyond Paint
Okay, so you've mastered the art of painted pumpkins, but what if I told you there's a whole world of materials out there just waiting to be stuck on a pumpkin? We're talking about going beyond the usual paint and brushes, my friend. Think of it like this: your pumpkin is a 3D canvas, and you've got a whole craft store at your disposal. It's time to get inventive! I remember one year, I used a bunch of old buttons and glued them all over a pumpkin, and it looked like a quirky mosaic. It was so different from the usual spooky pumpkins, and that's what we are aiming for here, something unique.
We're not just talking about glue and glitter, either. Consider using yarn to create fun textures or using tissue paper to make vibrant collages. You can even use things you find in nature, like leaves, twigs, or dried flowers. There are no limits here, seriously. I once saw a pumpkin covered in popcorn kernels, and it looked so cool! The key is to think outside the box and see what you can create with everyday materials. It's like a treasure hunt, but for pumpkin decorations.
Material | Design Ideas | Tips |
|---|---|---|
Yarn | Create textured patterns, hair for characters | Use different colors and thicknesses |
Tissue Paper | Make collages, add vibrant colors | Tear or cut into different shapes |
Buttons | Create mosaics, add colorful details | Use different sizes and colors |
Natural Items | Leaves, twigs, dried flowers | Use Mod Podge to secure |
Popcorn Kernels | Cover the entire pumpkin for a unique texture | Glue them on in a pattern or randomly |
Let’s talk about some more specific ideas. How about using washi tape to create geometric designs? It’s super easy to use, and it comes in a ton of cool patterns. Or, if you’re feeling a bit more glam, you can use sequins or rhinestones to add some sparkle. I saw someone use old book pages to cover a pumpkin, and it looked like a vintage masterpiece. Seriously, don't be afraid to experiment! You can also use fabric scraps to create interesting textures. I once wrapped a pumpkin in a piece of lace, and it looked incredibly elegant.
And, let's not forget about the power of glue! Mod Podge is your best friend here. It's perfect for adhering all sorts of materials to your pumpkin and sealing them in for a long-lasting design. The key is to layer the materials and experiment with different combinations. Don’t be afraid to get messy and have fun with it! It’s all about creating something that’s uniquely you. Think of it as less of a crafting project and more of an artistic adventure.
“Creativity is intelligence having fun.” - Albert Einstein
Pumpkin Display Ideas: Showcasing Your NoCarve Creations
Pumpkin Display Ideas: Showcasing Your NoCarve Creations
Creating Eye-Catching Arrangements
Okay, so you've poured your heart and soul into creating these amazing no-carve pumpkins, right? Now, you can't just plop them on the porch and call it a day! We need to think about how to show them off in a way that really makes them shine. Think of it like staging a mini art exhibit. I love to use different heights to make the display more interesting. You can use crates, books, or even overturned flower pots to create different levels. This makes it easier to see all of your pumpkins, and it adds a bit of visual drama. And, don't be afraid to mix and match different sizes and shapes of pumpkins to create a dynamic display. I once arranged a bunch of tiny pumpkins in a circle around a larger one, and it looked like a little pumpkin family.
Another great idea is to think about your backdrop. A simple tablecloth or piece of fabric can really make your pumpkins pop. You can also use things like hay bales or fall leaves to add a bit of seasonal flair. And, don't forget about lighting! String lights or lanterns can create a warm and inviting atmosphere, especially in the evening. I love to put some battery-operated candles inside my pumpkins to make them glow. It's all about creating a scene that tells a story and makes people stop and take notice. It's like you're inviting people into your own little world of pumpkin art.
Using Space Creatively
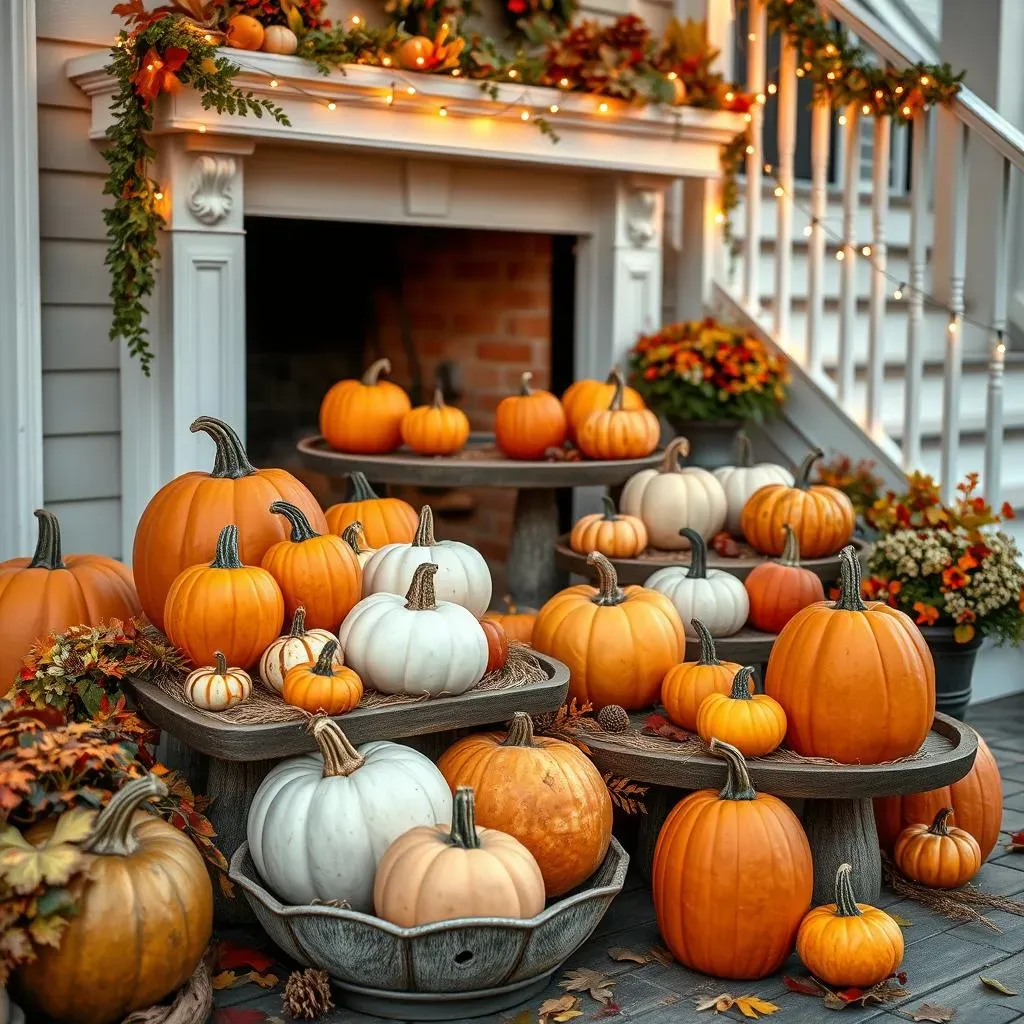
Let's talk about some specific ideas for using your space. If you have a fireplace mantel, that's a perfect spot to display a row of pumpkins. You can arrange them by size or color for a more organized look, or you can create a more whimsical display by mixing different styles. If you have stairs, try placing a pumpkin on every other step, or create a pumpkin pathway leading to your front door. I've even seen people hang small pumpkins from their porch ceilings using fishing line, which creates a super cool floating effect. The key is to be creative and use your space in a way that feels unique to you and your home. Think about your space, the colors, and the overall style you want to create.
If you're short on space, don't worry! You can still create a stunning display. Try using tiered trays to stack your pumpkins, or arrange them in baskets or bowls. You can also use small pumpkins to create a centerpiece for your dining table. I once used a glass jar to display a single, beautifully decorated pumpkin, and it looked so chic. And, don't forget about your windows! You can place pumpkins on your window sills or even create a hanging display using suction cups. The possibilities are endless. It's all about thinking outside the box and using what you have to create something beautiful and unique. Remember, it's not just about the pumpkins, it's about how you present them.
Display Idea | Description | Tips |
|---|---|---|
Tiered Trays | Stack pumpkins for a compact display | Use trays of different sizes for variety |
Mantel Display | Arrange pumpkins along a fireplace mantel | Mix sizes and styles for visual interest |
Stairway Display | Place pumpkins on steps | Use every other step for a balanced look |
Hanging Display | Suspend pumpkins from ceilings or porches | Use fishing line for a floating effect |
Window Sills | Place pumpkins on window sills | Use different sizes and colors |