Table of Contents
Tired of messy pumpkin carving? Yearning for a Halloween that's less about sharp tools and more about creative expression? You've landed in the right pumpkin patch! Forget the knives and stencils because we're diving headfirst into the world of creative pumpkin decorating ideas no carve. This year, ditch the traditional jack-o'-lantern and unleash your inner artist with a collection of fun, easy, and totally unique decorating techniques. Whether you're a seasoned crafter or a Halloween newbie, there's a no-carve pumpkin project here for you. We'll explore everything from simple painted designs perfect for kids, to elegant, sophisticated looks that will wow your neighbors. Get ready to be inspired! We'll cover easy painting techniques, explore using a variety of materials like glitter, fabric, and even googly eyes, and offer tips for making your decorated pumpkins last throughout the spooky season. So, grab your pumpkins, gather your supplies, and let's get decorating! Prepare to transform ordinary pumpkins into extraordinary works of art, all without a single cut.
Get Inspired: Easy No Carve Pumpkin Decorating Ideas
Get Inspired: Easy No Carve Pumpkin Decorating Ideas
Embrace the Simplicity: Painted Pumpkins
Let's kick things off with the easiest and most versatile no-carve method: paint! Seriously, grab some acrylics, tempera, or even spray paint, and let your imagination run wild. You don't need to be Picasso to create something amazing. Think simple geometric patterns, polka dots, stripes, or even a solid color base with contrasting accents. The beauty of paint is that it's forgiving. Mess up? Just paint over it! And the best part? It's super kid-friendly, making it a perfect family activity. I remember one year, my niece painted her pumpkin entirely gold and then added glitter. It was ridiculously simple, but it looked fantastic shimmering on the porch.
Consider the pumpkin's natural shape as your canvas. A tall, slender pumpkin might lend itself to a vertical stripe design, while a round pumpkin could become a giant polka dot. Don't be afraid to experiment with different color combinations and textures. Metallic paints can add a touch of elegance, while neon colors can create a fun and playful vibe. You can even use stencils to create more intricate designs, or try sponge painting for a textured effect. The possibilities are truly endless!
Dazzling Details: Embellishments and Textures
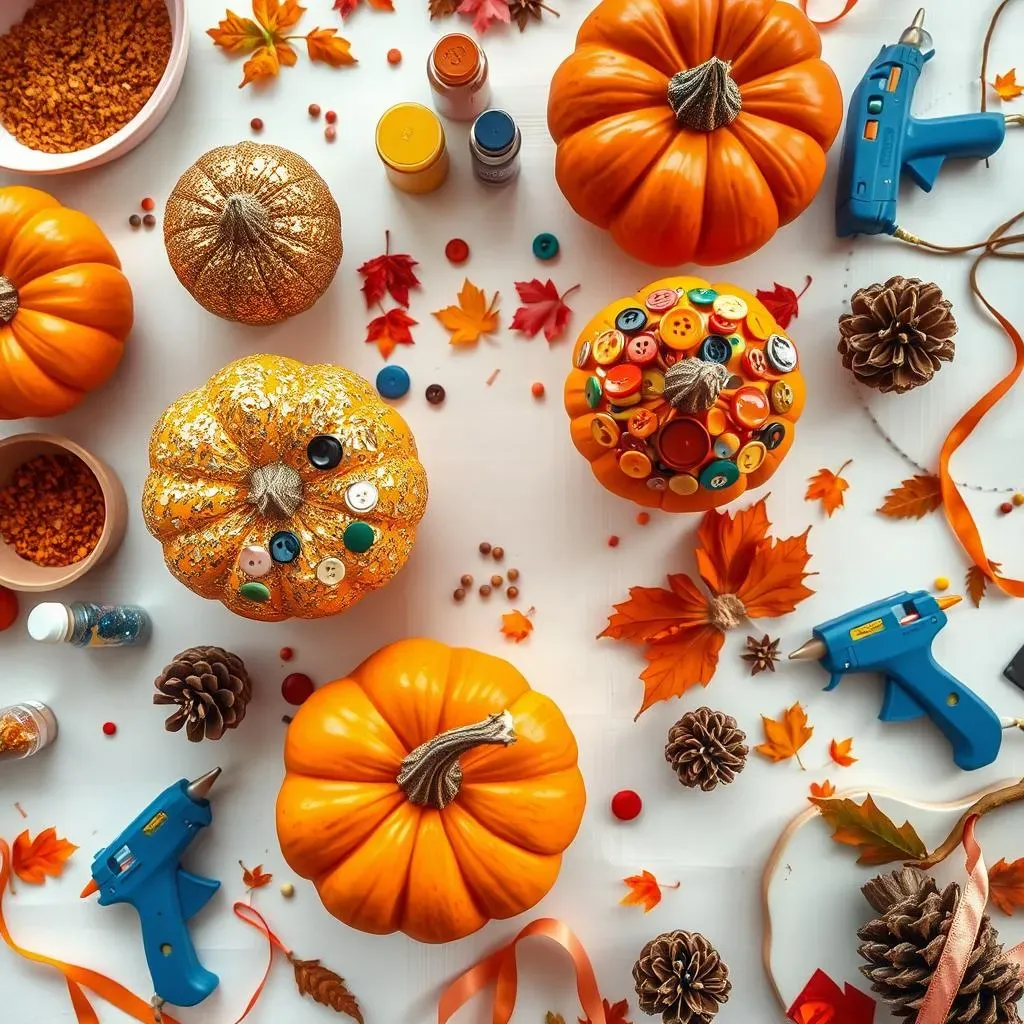
Now, let's take things up a notch by adding some embellishments. This is where you can really get creative and personalize your pumpkin. Think beyond paint and consider using materials like glitter, sequins, buttons, ribbons, yarn, or even felt. Hot glue is your best friend here! A simple pumpkin can be transformed into a glamorous masterpiece with a generous application of glitter. Or, create a cute and quirky character by gluing on googly eyes, felt ears, and a yarn mouth. Have some old costume jewelry lying around? Glue it on for a sparkling, bejeweled pumpkin.
Texture is another great way to add visual interest. Try gluing on dried beans, lentils, or popcorn kernels to create a mosaic effect. Or, use textured paint or modeling paste to create a raised design. You can even wrap your pumpkin in fabric or lace for a soft and romantic look. Don't be afraid to mix and match different materials and textures to create a truly unique and eye-catching design. I once saw a pumpkin covered in seashells – it was absolutely stunning!
Pro Tip: Sealing Your Masterpiece
Once you've finished decorating, consider sealing your pumpkin to protect your design. A clear acrylic sealant will help to prevent the paint from chipping and the embellishments from falling off. This is especially important if you plan to display your pumpkin outdoors. Simply spray a light coat of sealant over the entire pumpkin, and let it dry completely before displaying.
Embellishment | Application | Effect |
|---|---|---|
Glitter | Sprinkle over wet paint or glue | Sparkling, glamorous |
Buttons | Hot glue | Quirky, colorful |
Ribbon | Wrap and glue | Elegant, festive |
Yarn | Glue in patterns | Textured, cozy |
Nature's Touch: Incorporating Natural Elements
For a more organic and rustic look, why not incorporate natural elements into your no-carve pumpkin decorating? Think leaves, twigs, pinecones, acorns, and even dried flowers. These materials can be easily glued onto the pumpkin's surface to create a beautiful and natural design. A simple wreath of autumn leaves glued around the stem can add a touch of fall foliage, while a scattering of pinecones can create a woodsy feel. You can even use twigs to create a miniature forest scene on your pumpkin.
Another idea is to create a "succulent pumpkin" by gluing small succulent cuttings onto the surface. This creates a unique and long-lasting decoration that can be enjoyed long after Halloween is over. Just be sure to mist the succulents with water occasionally to keep them alive. I love the idea of using natural elements because it brings the beauty of the outdoors inside and creates a connection to the season.
Paint Your Pumpkin: No Carve Ideas for Every Skill Level
Paint Your Pumpkin: No Carve Ideas for Every Skill Level
Level Up Your Look: Intermediate Painting Techniques
Ready to move beyond basic shapes? Let's explore some intermediate painting techniques that will take your no-carve pumpkins to the next level. Think about trying your hand at ombre effects, blending colors seamlessly from light to dark. This creates a stunning visual gradient that's surprisingly easy to achieve with a few simple blending techniques. Grab a sponge or a soft brush, and gently blend the colors together while the paint is still wet. You can also experiment with stencils to create more intricate designs, like bats, spiderwebs, or even monograms. There are tons of free stencil templates online, or you can even create your own using cardstock and a craft knife.
Another cool technique is marbling. Fill a container with water, and then add a few drops of different colored acrylic paints. Swirl the paints together with a toothpick, and then gently dip your pumpkin into the water. The paint will adhere to the pumpkin's surface, creating a unique marbled effect. This is a fun and unpredictable technique that always yields interesting results. Remember to wear gloves and protect your workspace, as this can get a little messy!
Tip: Use painter's tape to create clean lines and geometric patterns. Tape off the areas you want to keep a solid color, and then paint the exposed areas with a contrasting color. Once the paint is dry, carefully remove the tape to reveal a crisp, clean design.
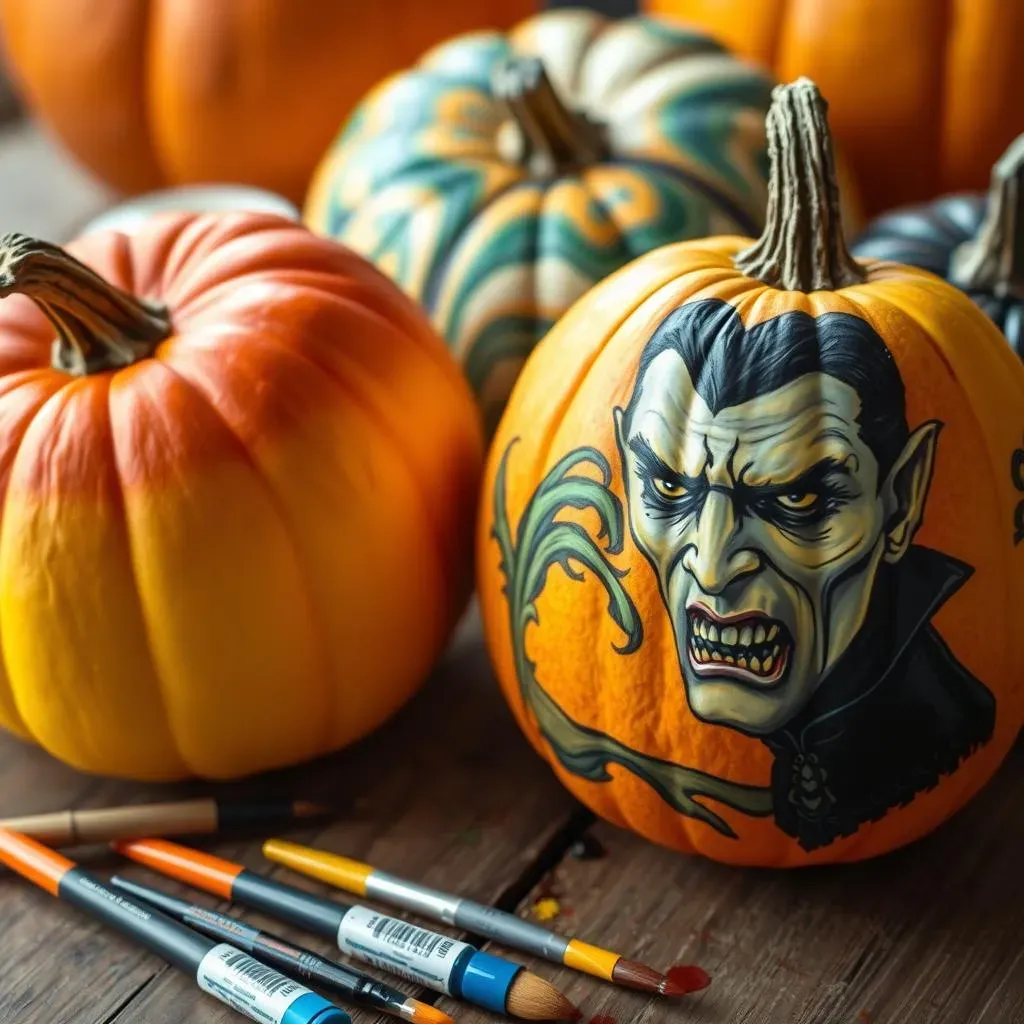
Get Artsy: Advanced Painting and Design Ideas
For those who are feeling truly ambitious, let's dive into some advanced painting and design ideas. Consider creating a realistic portrait of your favorite Halloween character, like Dracula, Frankenstein, or a spooky witch. This requires a steady hand and a good eye for detail, but the results can be truly impressive. Start by sketching out your design on the pumpkin's surface, and then carefully fill in the details with acrylic paints. Use a variety of brush sizes to create different textures and effects. You can also use shading and highlighting to add depth and dimension to your portrait.
If portraits aren't your thing, how about creating a miniature landscape scene on your pumpkin? Paint a background of rolling hills, a starry night sky, or a haunted forest. Then, add details like trees, houses, and even tiny figures to create a complete miniature world. This is a great way to showcase your artistic skills and create a truly unique and eye-catching Halloween decoration. I once saw a pumpkin with a miniature haunted house built on top of it – it was incredible!
Technique | Description | Skill Level |
|---|---|---|
Ombre | Blending colors from light to dark | Intermediate |
Marbling | Dipping pumpkin in swirling paint | Intermediate |
Portrait | Realistic painting of a character | Advanced |
Landscape | Miniature scene on a pumpkin | Advanced |
Beyond Paint: Unique Materials for Creative Pumpkin Decorating

Beyond Paint: Unique Materials for Creative Pumpkin Decorating
Googly Eyes Gone Wild: Creating Character Pumpkins
Alright, let's ditch the brushes for a bit and get into some seriously fun stuff! Beyond paint, there's a whole universe of materials just begging to be glued, stuck, and arranged onto your pumpkins. And I'm talking about googly eyes. Seriously, mountains of them! Turn your pumpkin into a hilarious, wide-eyed monster by covering it in different sized googly eyes. It’s ridiculously simple, but the effect is pure comedic genius. You can even add some felt eyebrows or a construction paper mouth to amp up the character. I swear, every time I see a googly-eyed pumpkin, I can't help but smile. It's just so silly and joyful!
But don't stop there! Think about other craft supplies you might have lying around. Pom-poms make fantastic polka dots or even fuzzy monster fur. Feathers can create a whimsical, feathery friend. Buttons, beads, sequins – the possibilities are endless! The key is to let your imagination run wild and don't be afraid to experiment. A hot glue gun is your best friend for this project. Just be careful not to burn yourself! And remember, there are no rules. If you want to glue a rubber ducky to your pumpkin, go for it! It's all about having fun and creating something unique.
Wrap It Up: Fabric, Lace, and Twine Transformations
Want to add some texture and elegance to your no-carve pumpkins? Try wrapping them in fabric, lace, or twine! This is a great way to create a sophisticated and stylish look. For a rustic vibe, wrap your pumpkin in burlap or twine. Secure the ends with hot glue, and then add some embellishments like dried flowers or wooden beads. For a more glamorous look, try wrapping your pumpkin in velvet or lace. You can even use different colors and patterns to create a patchwork effect. I saw a pumpkin wrapped in vintage lace once, and it was absolutely stunning!
Another idea is to create a "mummy pumpkin" by wrapping it in strips of cheesecloth or gauze. Secure the ends with hot glue, and then add some googly eyes for a spooky touch. You can also use fabric markers to draw designs on the fabric before wrapping it around the pumpkin. This is a great way to personalize your design and add some extra detail. And don't forget about ribbons! Ribbons can be used to create bows, streamers, or even intricate patterns on your pumpkin. The possibilities are endless!
Material | Technique | Effect |
|---|---|---|
Googly Eyes | Glue all over the pumpkin | Hilarious, monstrous |
Fabric | Wrap and glue | Elegant, textured |
Twine | Wrap and glue | Rustic, natural |
Ribbon | Create bows or patterns | Festive, colorful |
Sparkle and Shine: Glitter, Sequins, and Gems
Let's face it, everything is better with a little sparkle! So why not add some glitter, sequins, and gems to your no-carve pumpkins? This is a great way to create a glamorous and eye-catching decoration. You can cover your entire pumpkin in glitter for a dazzling effect, or use glitter to highlight specific areas, like the stem or the ridges. Sequins and gems can be used to create intricate patterns or to add a touch of bling to your design. I once saw a pumpkin covered in iridescent sequins that shimmered in the light – it was absolutely mesmerizing!
To apply glitter, simply brush a layer of glue onto the pumpkin's surface, and then sprinkle glitter over the glue. Let it dry completely, and then shake off the excess glitter. For sequins and gems, use a hot glue gun to attach them to the pumpkin. You can also use craft glue, but it may take longer to dry. And remember, a little goes a long way! You don't need to cover your entire pumpkin in glitter to create a stunning effect. Sometimes, just a few strategically placed sparkles can make all the difference.
KidFriendly Fun: No Carve Pumpkin Decorating Projects
KidFriendly Fun: No Carve Pumpkin Decorating Projects
Pumpkin Faces: Simple and Silly
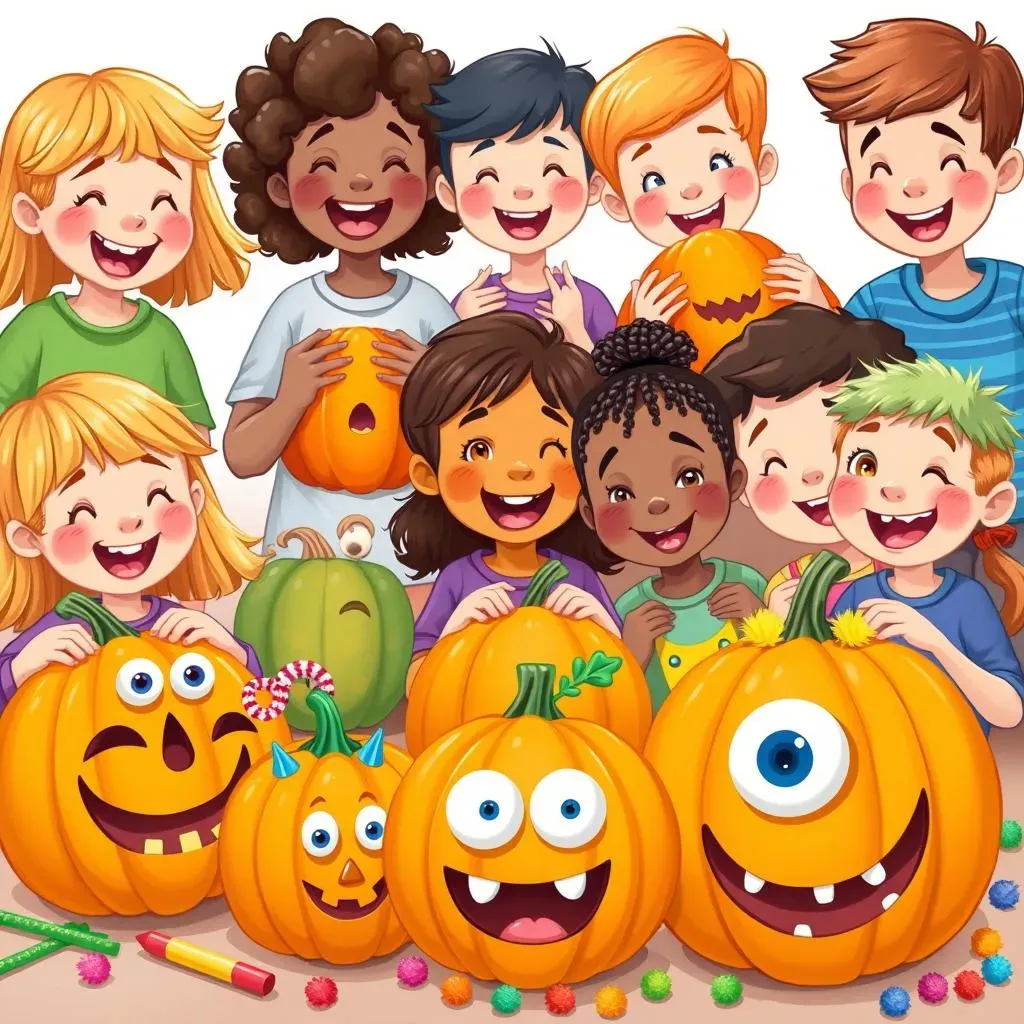
let's talk about getting the little ones involved! Kid-friendly fun is the name of the game, and what's more fun than creating silly pumpkin faces? Forget complicated designs – we're talking simple shapes, big googly eyes, and maybe a wacky tongue sticking out. Construction paper is your best friend here. Cut out triangles for noses, circles for ears, and crazy zigzags for hair. Let the kids choose the colors and shapes, and then let them glue everything onto the pumpkin. It doesn't have to be perfect; in fact, the more imperfect, the better! The goal is to let their creativity shine and have a blast in the process. I remember one year, my little cousin made a pumpkin with a mustache that was bigger than its face. It was hilarious, and he was so proud of it!
Another great idea is to use washable markers to draw faces directly onto the pumpkin. This is a great option for younger kids who might not be ready for glue. Let them draw whatever they want – silly smiles, scary frowns, or even just random doodles. The beauty of washable markers is that you can easily wipe them off if they make a mistake. And don't forget about adding some accessories! A hat made from a paper plate, a scarf made from an old sock, or even a pair of sunglasses can instantly transform your pumpkin into a fun and quirky character.
Project | Materials | Skill Level |
|---|---|---|
Construction Paper Faces | Construction paper, glue, scissors | Easy |
Marker Doodles | Washable markers | Easy |
Accessory Pumpkins | Hats, scarves, sunglasses | Easy |
Monster Mash: Spooky but Sweet
Who says Halloween has to be scary? Let's create some monster pumpkins that are more cute than creepy! Think fluffy pom-poms for fur, pipe cleaners for antennae, and felt for claws and teeth. Use different colors and textures to create a variety of monster personalities. A green pumpkin with big googly eyes and a goofy grin can be a friendly monster, while a purple pumpkin with sharp felt teeth and a menacing stare can be a slightly scarier monster. The key is to balance the spooky elements with some sweetness and humor.
Another fun idea is to create a "monster mash" pumpkin by combining different monster features. Glue on googly eyes, felt horns, pipe cleaner legs, and even some cotton ball "goo" to create a truly unique and bizarre creature. Let the kids come up with their own monster names and backstories. This is a great way to encourage their imagination and creativity. And don't forget about adding some sound effects! A battery-operated sound module that plays monster sounds can add an extra layer of fun to your monster pumpkin.
Display and Care: Making Your No Carve Pumpkins Last
Display and Care: Making Your No Carve Pumpkins Last
Location, Location, Location: Indoor vs. Outdoor Display
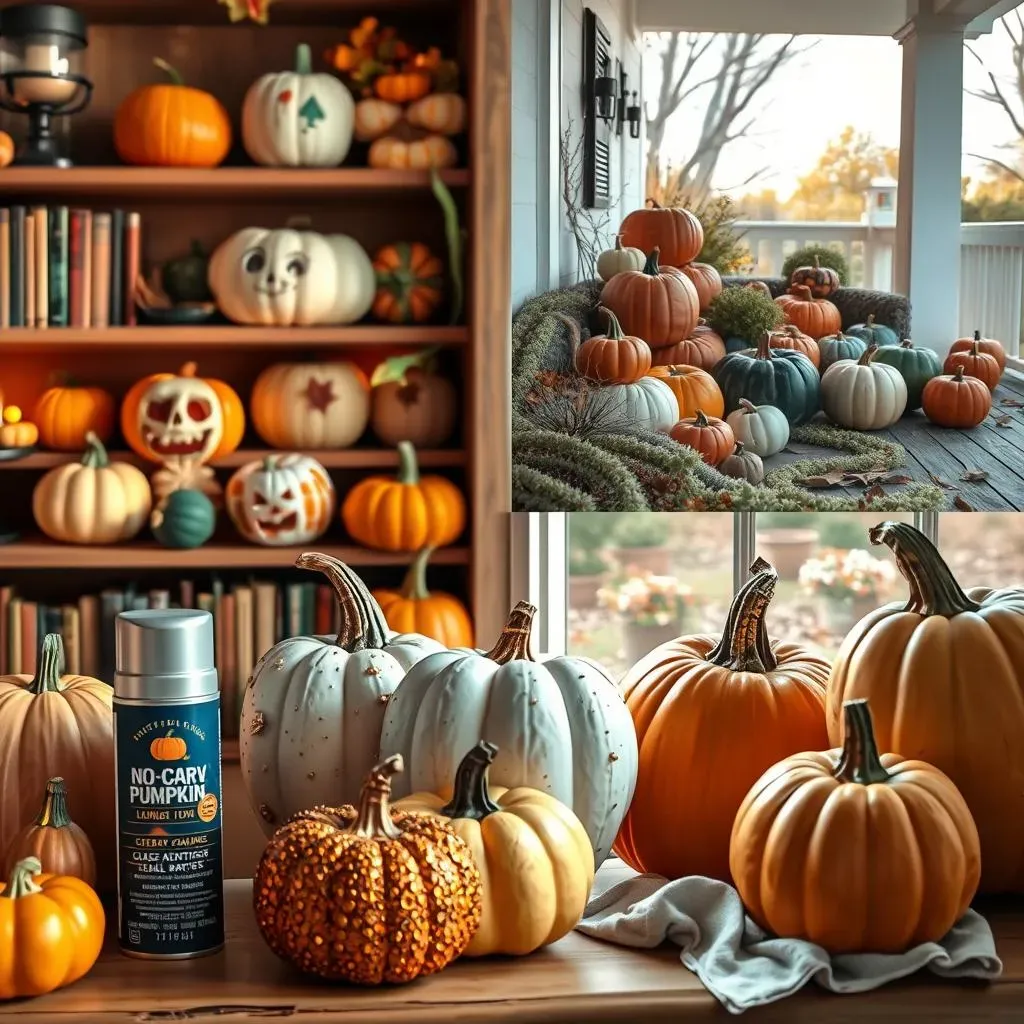
Alright, you've poured your heart and soul into these amazing no-carve pumpkins, now you want to show them off! But before you just plop them down anywhere, let's talk about the best places to display and care for your creations so they last as long as possible. Are they destined for the cozy indoors or the wild outdoors? That makes a big difference. If you're keeping them inside, away from the elements, you're already off to a good start. Just keep them away from direct sunlight and heat sources, which can cause them to dry out and crack. A cool, dry spot is ideal. I like to put mine on a bookshelf or a side table, where they can be admired by all. If your pumpkins are going outside, that's where things get a little trickier.
Outdoor pumpkins are exposed to the elements: sun, rain, wind, and even hungry critters! To help them survive, consider spraying them with a clear acrylic sealant. This will protect the paint and embellishments from the weather. You can also place them in a sheltered spot, like under a covered porch or in a doorway. This will help to keep them out of the direct sun and rain. And be sure to check them regularly for signs of rot or damage. If you see any soft spots or mold, it's time to say goodbye. Unfortunately, even with the best care, outdoor pumpkins won't last forever. But with a little bit of effort, you can extend their lifespan and enjoy them for as long as possible.
The Great Debate: Real vs. Artificial Pumpkins
let's address the elephant in the room: real pumpkins vs. artificial pumpkins. Which one is better for no-carve decorating? Well, it really depends on your priorities. Real pumpkins have that authentic fall vibe and that wonderful pumpkin scent. Plus, they're biodegradable! But they also have a limited lifespan. They're prone to rot, especially if they're exposed to the elements. Artificial pumpkins, on the other hand, can last for years! They're also more durable and less likely to attract pests. And they come in a variety of shapes, sizes, and colors. The downside? They don't have that authentic pumpkin feel, and they're not biodegradable. I personally like to use a combination of both. I use real pumpkins for my outdoor display, and artificial pumpkins for my indoor display. This way, I get the best of both worlds!
If you do choose to use real pumpkins, there are a few things you can do to extend their lifespan. First, choose pumpkins that are firm and free of blemishes. Avoid pumpkins with soft spots or cracks. Second, wash your pumpkins with a mixture of bleach and water. This will help to kill any bacteria that could cause them to rot. Third, apply a coat of petroleum jelly to the cut surfaces of the stem. This will help to prevent them from drying out. And finally, store your pumpkins in a cool, dry place when you're not displaying them. This will help to slow down the rotting process.
Pumpkin Type | Pros | Cons |
|---|---|---|
Real | Authentic, biodegradable | Limited lifespan, prone to rot |
Artificial | Long-lasting, durable | Not authentic, not biodegradable |
Cleaning and Storage: Keeping Your Creations Fresh
So, the Halloween season is over, and it's time to pack away your no-carve pumpkins. But before you just toss them into a box, let's talk about how to properly clean and store them so you can enjoy them again next year. For artificial pumpkins, simply wipe them down with a damp cloth to remove any dust or dirt. If they have any stubborn stains, you can use a mild soap and water solution. Be sure to dry them thoroughly before storing them. For real pumpkins, it's a bit more complicated. If they're still in good condition, you can try to clean them and store them for a few more weeks. However, if they're starting to rot, it's best to just compost them. To clean a real pumpkin, wipe it down with a damp cloth and remove any loose debris. Then, spray it with a disinfectant to kill any bacteria.
Once your pumpkins are clean and dry, it's time to store them. The best place to store them is in a cool, dry, and dark place. A basement, garage, or attic is ideal. Be sure to wrap them in bubble wrap or newspaper to protect them from scratches and dents. And avoid stacking them on top of each other, as this can cause them to get crushed. With proper cleaning and storage, you can keep your no-carve pumpkins looking fresh for years to come!
No Carve, No Limits: Unleash Your Pumpkin Decorating Potential
So, there you have it – a treasure trove of creative pumpkin decorating ideas no carve to ignite your Halloween spirit. From simple painted masterpieces to dazzling displays of glitter and craft supplies, the possibilities are as endless as your imagination. Remember, the best part about no-carve decorating is that it's all about having fun and expressing your unique style. Don't be afraid to experiment with different techniques, materials, and themes to create pumpkins that are truly one-of-a-kind. This Halloween, skip the stress of carving and embrace the joy of creative, mess-free decorating. Your spooktacular pumpkins are sure to be the stars of the season!