Table of Contents
Halloween is creeping closer, and that means it's time to ditch the same old boring jack-o'-lantern routine! Are you tired of the same triangle eyes and toothy grin every year? Ready to unleash your inner artist and create something truly unique? Then you've come to the right place! We're diving headfirst into a cauldron of cool pumpkin decorating ideas that will transform your porch into the spookiest (and most stylish) spot on the block. Forget the messy carving and embrace a world of paint, glitter, googly eyes, and unexpected materials. This isn't your grandma's pumpkin decorating guide – unless your grandma is secretly a crafting genius! In this article, we're going to explore a treasure trove of no-carve options that are perfect for all skill levels, from the creatively challenged to the DIY die-hards. We'll cover everything from simple painted designs to elaborate themed creations, and even show you how to repurpose everyday items into show-stopping pumpkin masterpieces. So, grab your glue gun, unleash your imagination, and get ready to discover some seriously cool pumpkin decorating ideas that will make this Halloween unforgettable!
NoCarve Cool Pumpkin Decorating Ideas: Unleash Your Creativity
NoCarve Cool Pumpkin Decorating Ideas: Unleash Your Creativity
Ditch the Knife, Grab the Glue Gun: No-Carve is the Way to Go
Let's be honest, carving pumpkins can be a pain. It's messy, time-consuming, and potentially dangerous, especially with little ones around. Plus, carved pumpkins tend to rot faster. That's where the beauty of no-carve pumpkin decorating comes in! It's a fantastic alternative that allows you to get super creative without any sharp objects involved. Think paint, glitter, fabric scraps, buttons – the possibilities are endless! No-carve decorating is also a great way to get the kids involved, letting them express their creativity without the risk of a pumpkin-carving mishap.
One of the best things about no-carve decorating is that your pumpkins will last longer. Without any open cuts, the pumpkin is less susceptible to mold and rot. This means your spooky creations will stay fresh and festive for weeks, not just days. So, ditch the knife and embrace the glue gun – your pumpkins (and your fingers) will thank you!
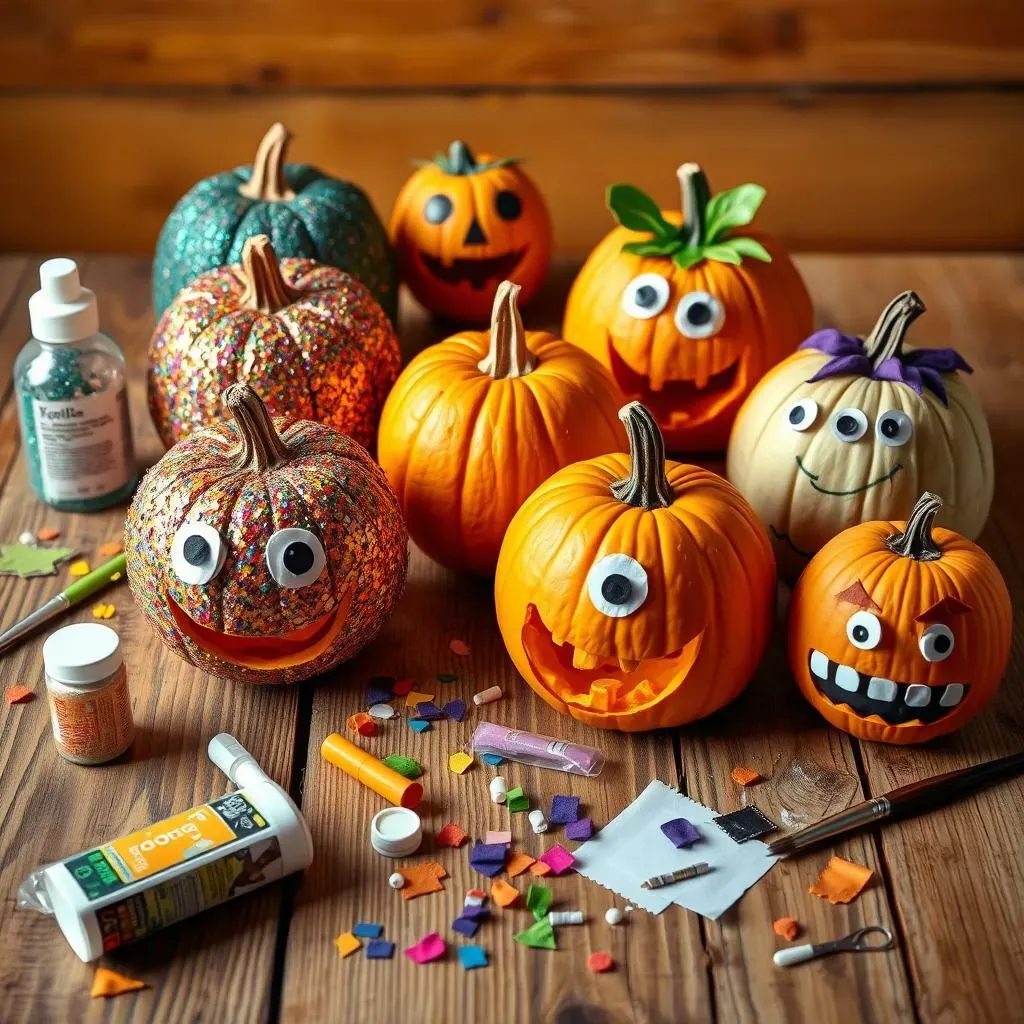
Glitter & Glam: Adding Sparkle to Your Spooky Season
Who says Halloween can't be glamorous? Adding glitter to your pumpkin is an easy way to elevate your decorating game and create a show-stopping centerpiece. You can go all-out with a fully glittered pumpkin, or use glitter to accent specific details, like eyes, mouths, or patterns. For a sophisticated look, try using a single color of glitter, like gold or silver. Or, for a more playful vibe, mix and match different colors and textures.
To apply glitter, simply brush a layer of craft glue onto the areas you want to sparkle, then sprinkle generously with glitter. Let it dry completely before handling. For extra staying power, you can seal the glitter with a clear acrylic spray. Get ready to shine!
Monster Mash-Up: Creating Characters Without Carving
Transform your pumpkin into a friendly monster, a spooky ghost, or your favorite movie character with some clever crafting. Felt, construction paper, and googly eyes are your best friends here! Cut out different shapes to create facial features, accessories, or even entire outfits for your pumpkin. For example, you could turn your pumpkin into a cute little bat by adding felt wings and pointy ears. Or, create a spooky spider by attaching pipe cleaner legs and googly eyes.
Want to create a Minion pumpkin? Paint the pumpkin yellow, add blue felt overalls, and attach large googly eyes. The possibilities are truly endless. The best part is that these decorations are easy to remove, so you can repurpose your pumpkin after Halloween is over. So, let your imagination run wild and create some truly unique and memorable characters!
Decoration Style | Materials Needed | Difficulty Level |
|---|---|---|
Glitter Pumpkin | Pumpkin, glue, glitter, sealant | Easy |
Felt Monster | Pumpkin, felt, glue, googly eyes | Medium |
Character Pumpkin | Pumpkin, paint, construction paper, various craft supplies | Medium to Hard |
Painted Pumpkin Ideas: Artistic Cool Pumpkin Decorating
Painted Pumpkin Ideas: Artistic Cool Pumpkin Decorating
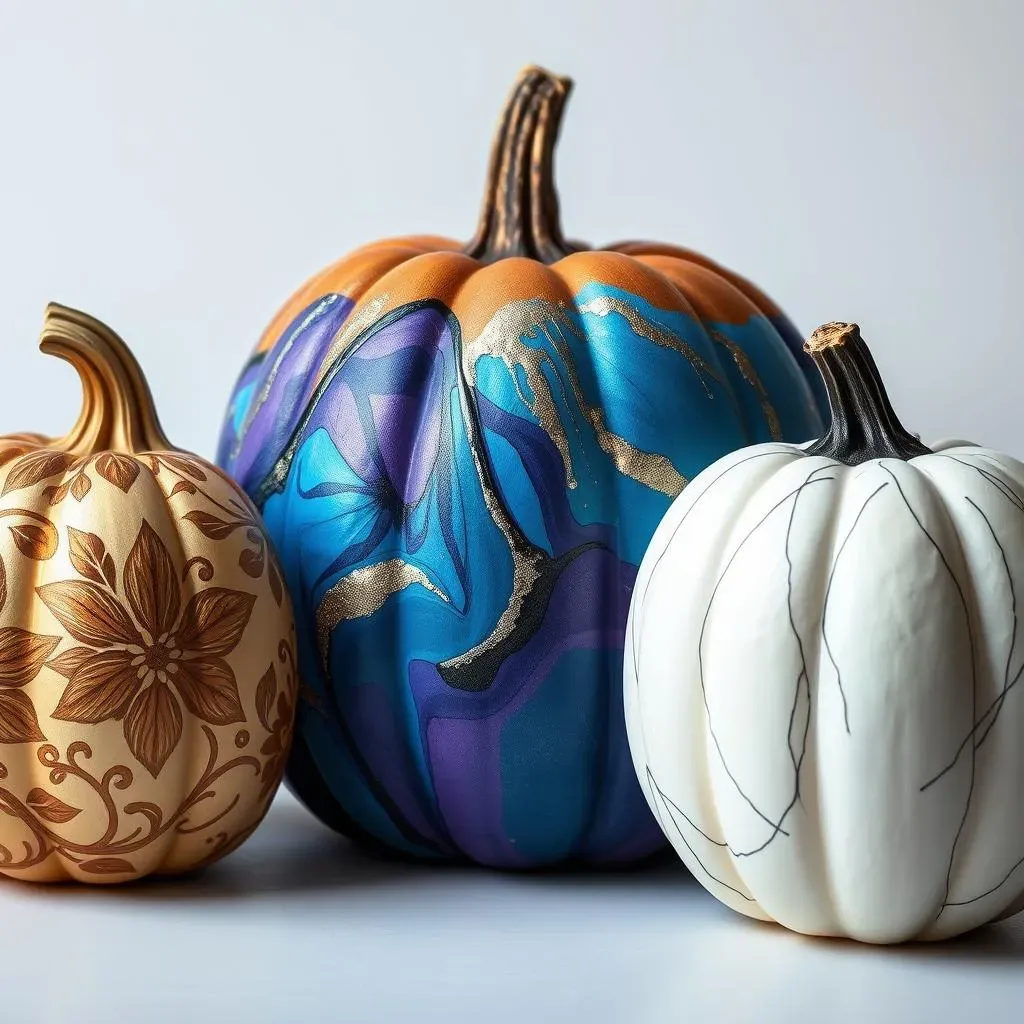
From Basic to Bold: Paint as Your Canvas
Forget the traditional orange! Painting pumpkins opens up a world of artistic possibilities. Start with a base coat in any color you desire – black for a spooky vibe, white for a chic look, or even bright neons for a modern twist. Once the base is dry, you can add intricate designs, patterns, or even portraits using acrylic paints, which are readily available and easy to work with. Don't be afraid to experiment with different brushes, sponges, and techniques to create unique textures and effects.
Consider using stencils for precise patterns or freehanding your own designs for a more organic feel. Whether you're a seasoned artist or a complete beginner, painting pumpkins is a fun and rewarding way to express your creativity and create a one-of-a-kind Halloween decoration.
Dripping in Style: Exploring Paint Pouring Techniques
Want a mesmerizing, modern look? Try paint pouring! This technique involves layering different colors of acrylic paint into a cup and then pouring them over the pumpkin, allowing the colors to mix and swirl in unpredictable ways. The result is a stunning, abstract design that's guaranteed to turn heads. You can tilt the pumpkin to control the flow of the paint and create different patterns.
For best results, use a pouring medium to thin the paint and ensure it flows smoothly. Also, be sure to protect your work surface with a drop cloth, as this technique can get a bit messy. Once the paint has dried completely, you can add embellishments like glitter or metallic accents to enhance the effect.
Inspired by Nature: Floral and Botanical Designs
Bring the beauty of the outdoors inside with floral and botanical painted pumpkin designs. Delicate flowers, swirling vines, and intricate leaf patterns can transform a plain pumpkin into a work of art. Use fine-tipped brushes to create detailed line work and experiment with different color combinations to achieve the desired effect. You can find inspiration in your own garden, in botanical illustrations, or even in your favorite floral fabrics.
Consider using metallic paints to add a touch of shimmer and elegance to your designs. For a more rustic look, try using earthy tones and natural textures, like burlap or twine. Whether you prefer a minimalist design or a lush, overflowing arrangement, floral and botanical painted pumpkins are a beautiful way to celebrate the season.
Paint Technique | Description | Difficulty Level |
|---|---|---|
Base Coat & Designs | Applying a solid base color and then painting designs on top. | Easy to Medium |
Paint Pouring | Layering and pouring different colors of paint for an abstract effect. | Medium |
Floral/Botanical | Painting flowers, leaves, and other plant-inspired designs. | Medium to Hard |
Themed Cool Pumpkin Decorating: Characters, Movies, and More
Themed Cool Pumpkin Decorating: Characters, Movies, and More
Lights, Camera, Pumpkins!: Movie-Inspired Decor
Transform your pumpkins into iconic characters or scenes from your favorite movies. This is where your fandom can truly shine! Imagine a "Star Wars" pumpkin featuring a painted Death Star or a Minion pumpkin army ready to take over your front porch. You could even recreate a classic movie poster using paint and a little artistic flair. The key is to choose characters or scenes that are easily recognizable and translate well onto a pumpkin canvas. Don't be afraid to get creative with your materials – use cardboard for props, fabric scraps for costumes, and even string lights for added ambiance.
For a truly immersive experience, consider creating a themed vignette around your movie-inspired pumpkins. Set up a mini movie theater on your porch, complete with popcorn and a projector, or create a spooky graveyard scene featuring characters from your favorite horror films. The possibilities are endless, so let your imagination run wild and create a movie-themed pumpkin display that will impress even the most discerning film buff.
Cartoon Mania: Bringing Animated Characters to Life
Bring your favorite cartoon characters to life with colorful and whimsical pumpkin decorations. From classic Disney princesses to modern-day superheroes, there's a cartoon character out there for everyone. Paint your pumpkin to resemble a beloved character, adding details like facial features, costumes, and accessories. For a fun twist, try creating a pumpkin version of yourself as a cartoon character! Use felt, construction paper, and other craft supplies to bring your vision to life.
Consider creating a cartoon-themed pumpkin patch in your front yard, featuring a variety of different characters and scenes. You could even set up a mini carnival game, where kids can toss rings onto the pumpkins to win prizes. The goal is to create a fun and interactive experience that celebrates the joy and whimsy of cartoons. Get ready to unleash your inner child and create a cartoon-themed pumpkin display that will delight kids and adults alike!
Theme | Character/Movie | Materials | Difficulty |
|---|---|---|---|
Movie | Star Wars (Death Star) | Paint, cardboard | Medium |
Cartoon | Minions | Paint, felt, googly eyes | Easy |
Cartoon | Disney Princess | Paint, fabric, glitter | Medium to Hard |
DIY Cool Pumpkin Decorating: Using Everyday Items for Unique Designs
DIY Cool Pumpkin Decorating: Using Everyday Items for Unique Designs
Repurpose and Reimagine: Thinking Outside the Craft Store
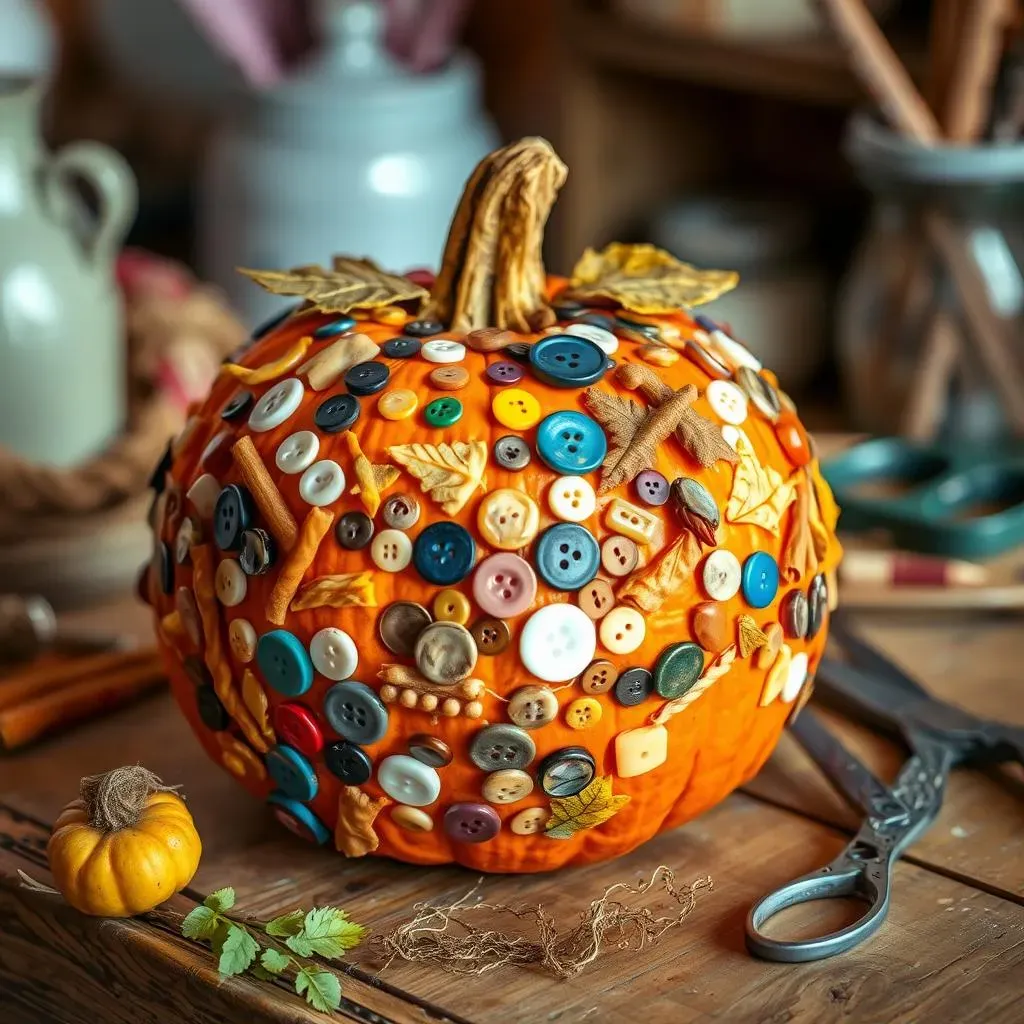
Forget those expensive craft kits! Some of the most creative cool pumpkin decorating ideas come from simply looking around your house with a fresh perspective. Got a junk drawer overflowing with buttons? Glue them onto a pumpkin for a quirky, textured effect. Old lace doilies? Drape them over a painted pumpkin for an elegant, vintage vibe. Even spare yarn can be transformed into a cozy, wrapped pumpkin or a funky, fringed monster.
The key is to see the potential in everyday objects and think about how you can repurpose them into something spooky and stylish. Raid your recycling bin, your garage, and your attic – you might be surprised at the treasures you uncover! Not only is this a budget-friendly approach to decorating, but it's also a sustainable way to reduce waste and give new life to old items.
Nature's Palette: Bringing the Outdoors In
Embrace the natural beauty of the season by incorporating elements from the outdoors into your pumpkin decorations. Gather fallen leaves, twigs, pinecones, and acorns to create rustic and charming designs. Glue leaves onto a painted pumpkin to create a colorful collage, or arrange twigs into a miniature forest scene. You can even use dried flowers to create a delicate and whimsical pumpkin centerpiece.
For a truly unique touch, try carving small holes into your pumpkin and inserting succulents or air plants. This creates a living pumpkin planter that will last long after Halloween is over. Just be sure to mist the plants regularly to keep them hydrated. With a little creativity, you can transform your pumpkin into a stunning tribute to the beauty of nature.
Kitchen Cabinet Creations: Spices, Pasta, and More!
Believe it or not, your kitchen cabinets are a treasure trove of unexpected decorating materials! Dried pasta, for example, can be glued onto a pumpkin to create intricate patterns and textures. Think wagon wheel pasta for a rustic, country-style design, or penne pasta arranged into a geometric mosaic. Spices like cinnamon sticks, star anise, and cloves can be used to add a fragrant and aromatic touch to your pumpkin decorations.
Arrange cinnamon sticks around the stem of your pumpkin to create a mini log cabin, or glue star anise onto a painted pumpkin for a celestial-inspired design. You can even use popcorn kernels to create a textured surface or spell out spooky messages. Just be sure to seal your creations with a clear acrylic spray to protect them from moisture and pests. With a little imagination, you can transform your kitchen staples into stunning and unique pumpkin decorations.
Material | DIY Idea | Style |
|---|---|---|
Buttons | Glue on for texture | Quirky, Textured |
Leaves/Twigs | Create a collage or forest scene | Rustic, Natural |
Pasta/Spices | Geometric mosaic or aromatic accents | Unique, Fragrant |
Tips and Tricks for LongLasting Cool Pumpkin Decorations
Tips and Tricks for LongLasting Cool Pumpkin Decorations
The Great Pumpkin Cleanse: Prep for Longevity
Before you even think about decorating, give your pumpkin a spa day! A clean, dry pumpkin is a happy pumpkin, and a happy pumpkin lasts longer. Wipe down the entire surface with a damp cloth to remove any dirt or debris. For extra protection, you can even give it a bath in a diluted bleach solution (1 part bleach to 10 parts water). This will kill any mold spores that might be lurking on the surface and help prevent rot. Just be sure to rinse it thoroughly and let it dry completely before decorating.
Also, consider the environment where you'll be displaying your pumpkin. Keep it out of direct sunlight and extreme temperatures, as these can accelerate the decomposition process. A cool, shaded spot is ideal. If you live in a particularly humid climate, you might even consider storing your pumpkin in the refrigerator overnight to slow down the rotting process. Think of it as beauty sleep for your gourd!
Seal the Deal: Protecting Your Masterpiece
Once your pumpkin is decorated, protect your hard work with a sealant. A clear acrylic spray is a great option, as it will create a protective barrier against moisture and pests. Apply several light coats, allowing each coat to dry completely before applying the next. You can also use a coat of petroleum jelly to help seal in moisture and prevent the pumpkin from drying out. Just be sure to avoid getting petroleum jelly on any painted areas, as it can cause the paint to smear.
Another option is to use a commercial pumpkin preservative spray, which is specifically designed to extend the life of your decorated pumpkins. These sprays typically contain fungicides and other ingredients that help prevent rot and mold growth. Follow the instructions on the product label carefully, and be sure to apply the spray in a well-ventilated area.
Inside Out: Addressing the Interior Decay
While external protection is important, don't forget about the inside of your pumpkin! Even with no-carve decorations, moisture can still build up inside and accelerate the rotting process. To combat this, consider placing a desiccant packet inside the pumpkin to absorb excess moisture. Silica gel packets, which are commonly found in shoe boxes and electronics packaging, work well for this purpose. You can also use a small container of baking soda, which will help absorb odors and prevent mold growth.
If you do decide to carve your pumpkin, be sure to remove all of the seeds and pulp thoroughly. These materials are highly susceptible to rot and will quickly attract bacteria and pests. Once the pumpkin is clean and dry, you can apply a thin layer of petroleum jelly to the cut edges to help seal them and prevent moisture loss. With a little extra care and attention, you can keep your cool pumpkin decorations looking fresh and festive for weeks to come!
Tip | Description | Benefit |
|---|---|---|
Clean & Dry | Wipe down and dry pumpkin before decorating | Prevents mold and rot |
Sealant | Apply clear acrylic spray or petroleum jelly | Protects against moisture and pests |
Interior Care | Use desiccant packets or baking soda inside | Absorbs moisture and prevents odor |
Conclusion: Embrace the Coolest Pumpkin on the Block
So, there you have it – a whole arsenal of cool pumpkin decorating ideas to make your Halloween the most creative yet! Forget the pressure of perfect carving and embrace the freedom of paint, embellishments, and imagination. Whether you go for a minimalist masterpiece or a full-blown themed extravaganza, the most important thing is to have fun and let your personality shine through. This Halloween, ditch the predictable and dare to be different. Your porch (and your neighbors) will thank you for it! Now go forth and create some seriously cool pumpkin decorating ideas!