Table of Contents
Tired of the same old jack-o'-lantern grin? Yearning to impress the neighborhood with your pumpkin prowess, but convinced you lack the artistic gene? Fear not, fellow Halloween enthusiast! This guide is your passport to a world of cool pumpkin carving ideas easy enough for even the most creatively challenged. We're ditching the complicated designs and embracing innovative techniques that will transform your gourd from drab to fab in no time.
Simple Stencils for Spooktacularly Cool Pumpkin Carvings
Simple Stencils for Spooktacularly Cool Pumpkin Carvings
Free Stencil Bonanza: Your Shortcut to Awesome
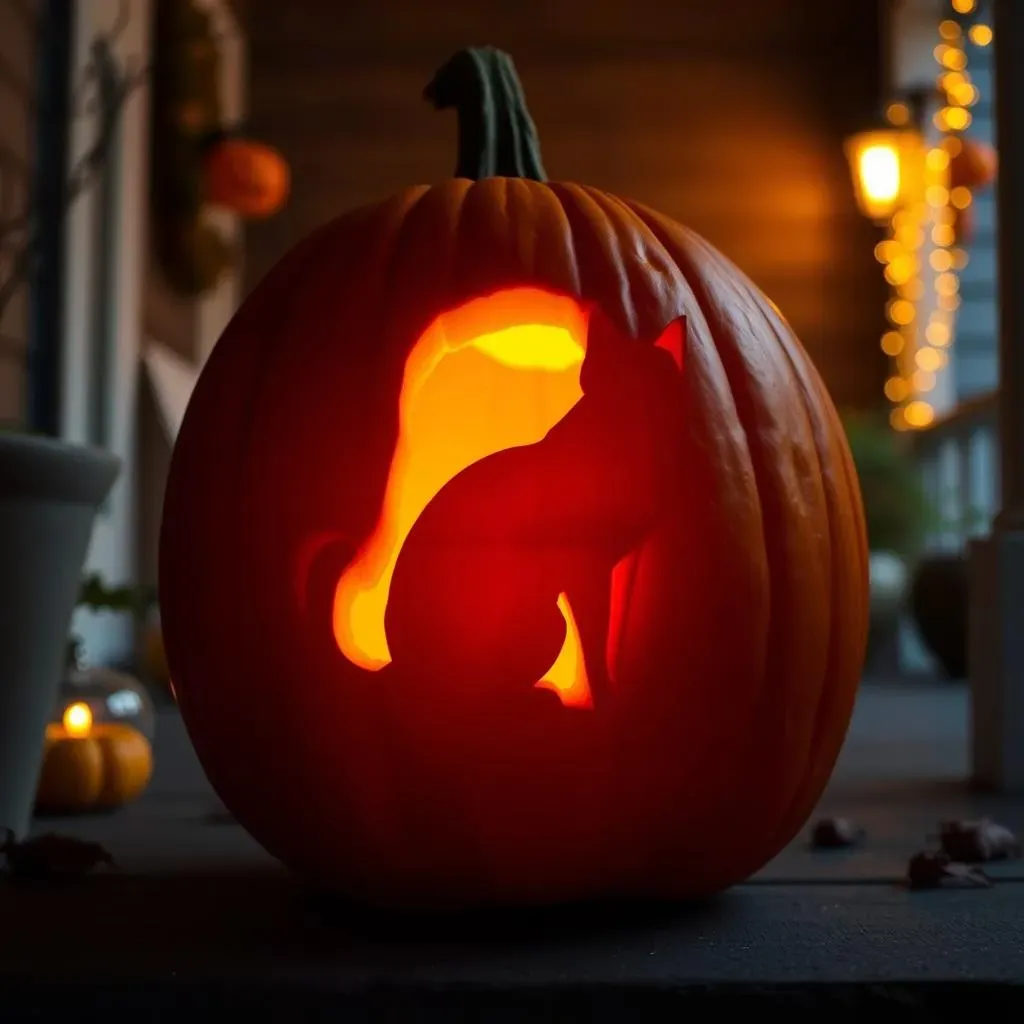
Let's be honest, free is always good, especially when it unlocks instant pumpkin-carving coolness. The internet is overflowing with printable stencils catering to every taste. Whether you're after a classic spooky ghost, a trendy pop culture icon, or an adorable animal design, a quick search will yield a treasure trove of options. Sites like Pinterest, and even some craft blogs offer downloadable stencils in various difficulty levels. Just print, tape to your pumpkin, and trace away!
I remember one year, I was running super late on Halloween prep. I found a free stencil of a minimalist cat silhouette. It was so simple, but looked incredibly chic and modern once carved. Saved me a ton of time and effort!
From Print to Pumpkin: Stencil Application 101
So, you've got your stencil – now what? First, clean and dry your pumpkin's surface. Then, carefully tape the stencil to the pumpkin, ensuring it's smooth and wrinkle-free. Now comes the fun part: transferring the design. You can use a poking tool, or even a ballpoint pen to trace the stencil lines, creating a dotted outline on the pumpkin's surface. Alternatively, you can lightly score the pumpkin along the stencil lines with a craft knife.
Once you've transferred the design, remove the stencil and prepare to carve! Remember to take your time and use smooth, controlled motions for the best results.
Pro Tips for Stencil Success
Want to take your stencil game to the next level? Here are a few insider tips:
- Size Matters: Adjust the stencil size to fit your pumpkin. A stencil that's too large or too small will look awkward.
- Tape is Your Friend: Use plenty of tape to secure the stencil, especially on curved surfaces.
- Light Pressure: When tracing, use light pressure to avoid damaging the pumpkin.
- Consider the Negative Space: Think about what areas you want to carve away versus leave intact. Sometimes, inverting the stencil can create a striking effect.
And a final word of advice: don't be afraid to experiment! Pumpkin carving is all about having fun and expressing your creativity. So, grab a stencil, get carving, and let your imagination run wild!
Level Up Your JackO'Lantern: Creative & Easy Pumpkin Carving Designs
Level Up Your JackO'Lantern: Creative & Easy Pumpkin Carving Designs
Etching Extravaganza: Beyond the Basic Cut-Out
Forget completely removing chunks of pumpkin – etching is where it's at! This technique involves using specialized tools (or even just a linoleum cutter) to scrape away the pumpkin's surface, revealing the lighter flesh underneath. It's like drawing on your pumpkin with light and shadow. You can create intricate patterns, subtle textures, and even portraits with this method. Think delicate floral designs, spooky spiderwebs, or even a minimalist cityscape. The possibilities are endless!
One year, I etched a portrait of my dog onto a pumpkin. It wasn't perfect, but it was definitely a conversation starter. Plus, etching is way less messy than traditional carving, which is always a win in my book.
Pro-Tip: Use a spoon to thin the pumpkin wall from the inside where you plan to etch. This makes the etching process much easier and prevents you from accidentally cutting all the way through.
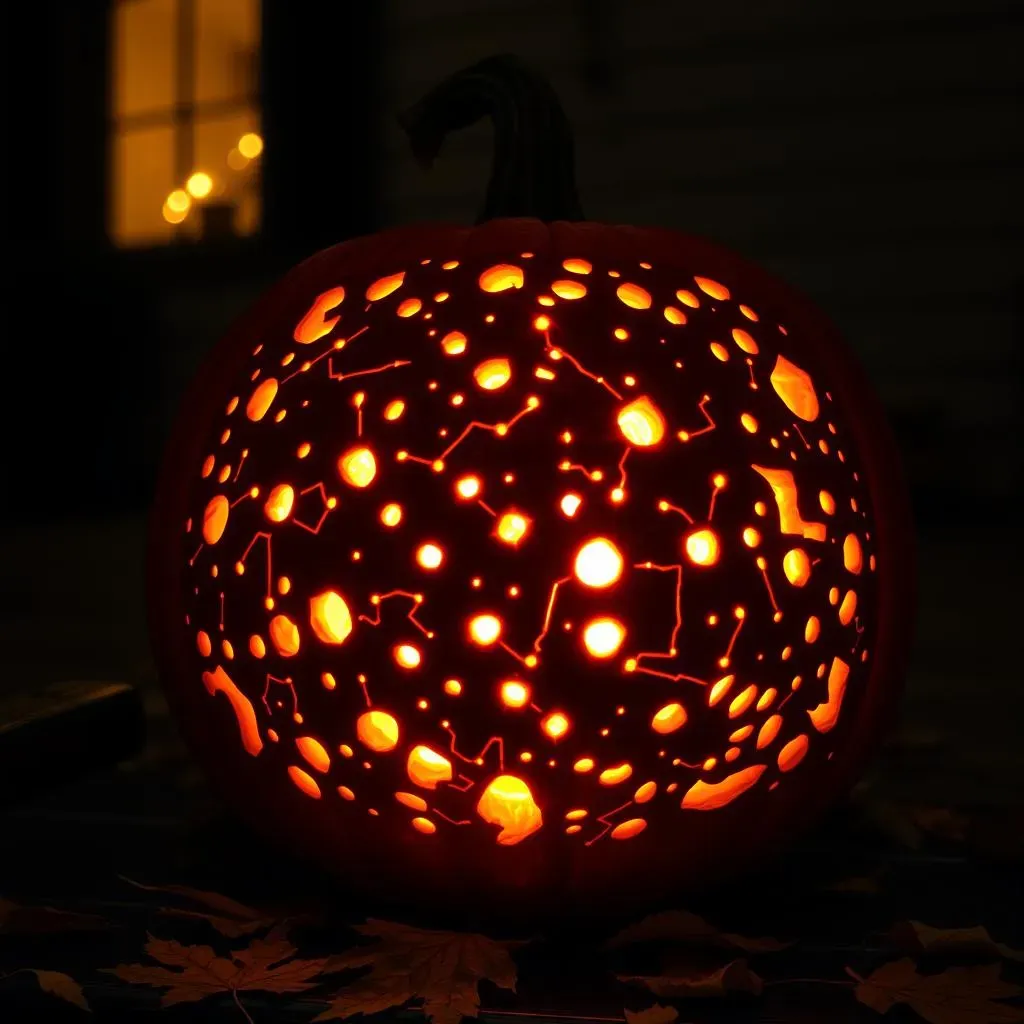
Drill Sergeant Pumpkin: Patterns with Power Tools
this one requires a little more caution, but the results are seriously stunning. Using a drill (cordless is best for maneuverability), you can create intricate patterns of holes in your pumpkin. Vary the drill bit sizes to create different sized holes, adding depth and dimension to your design. Imagine a galaxy of tiny stars twinkling on your front porch, or a complex geometric design that casts mesmerizing shadows. This technique is surprisingly easy once you get the hang of it, and it's a great way to use power tools for something other than home repairs!
Safety first, of course! Always wear safety glasses when drilling, and work in a well-lit area. Start with a low speed and gradually increase it as needed. And remember, less is more – you can always add more holes, but you can't un-drill them!
Drilling Design Ideas:
- Constellations
- Geometric Patterns (think mandalas)
- Lace-like designs
- Abstract art
This is one of those cool pumpkin carving ideas easy to execute but looks incredibly complex.
NoCarve Cool Pumpkin Decor: Easy Ideas for the Crafty (and Lazy)
NoCarve Cool Pumpkin Decor: Easy Ideas for the Crafty (and Lazy)
Paint It Like You Mean It: From Monochromatic to Masterpiece
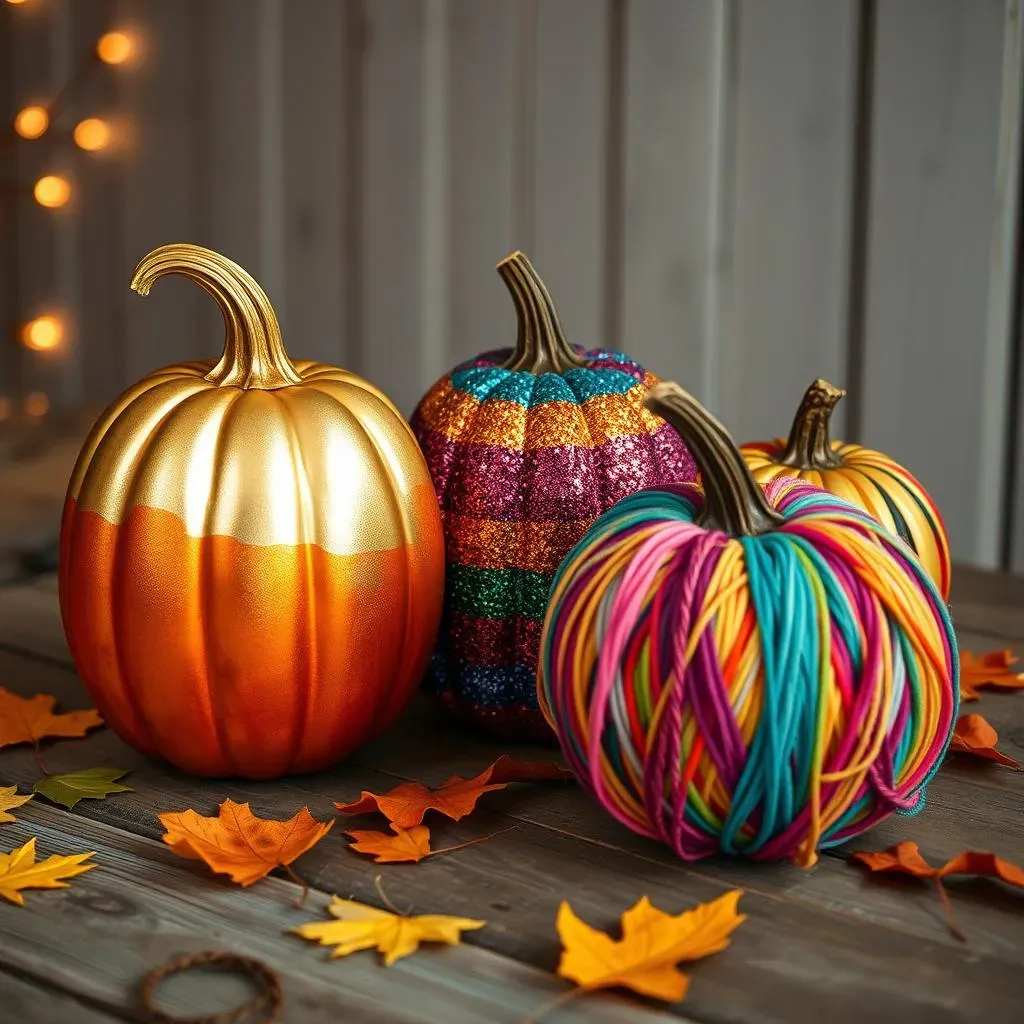
Who needs a knife when you've got a paintbrush? Painting pumpkins is a fantastic way to unleash your creativity without any of the messy carving. Go for a sleek, monochromatic look with metallic gold or silver, or embrace bold, vibrant colors for a more playful vibe. You can paint intricate patterns, abstract designs, or even recreate your favorite works of art on a pumpkin canvas. Acrylic paints work best, and a coat of sealant will protect your masterpiece from the elements.
I'm a big fan of using chalkboard paint on pumpkins. It allows you to change your design as often as you like! Plus, it's a great activity for kids – they can draw and doodle to their heart's content.
Painting Pumpkin Ideas:
- Ombre effect (gradient color)
- Polka dots or stripes
- Floral patterns
- Inspirational quotes
Glitterati Gourds: Sparkle and Shine Without the Grind
who doesn't love a little sparkle? Glitter is your secret weapon for instant pumpkin glam. Simply apply a layer of adhesive (Mod Podge works great) to the areas you want to glitter, then sprinkle generously with your favorite glitter. For a more controlled application, use glitter glue pens to create intricate designs. The result is a dazzling, eye-catching pumpkin that will add a touch of magic to your Halloween decor.
Word to the wise: glitter can be messy. Work over a disposable surface to catch any stray sparkles. And consider using a sealant to prevent the glitter from shedding.
Glitter Pumpkin Design Ideas:
Design | Glitter Color | Adhesive |
|---|---|---|
Stripes | Gold | Mod Podge |
Stars | Silver | Glitter Glue Pen |
Spiderweb | Black | Spray Adhesive |
Wrap Stars: Fabric, Yarn, and Other Fantastic Finishes
Think beyond paint and glitter! There's a whole world of materials you can use to transform your pumpkin into a no-carve masterpiece. Wrap your pumpkin in colorful yarn for a cozy, textured look. Glue on fabric scraps to create a patchwork design. Or use decorative tape (like washi tape) to create geometric patterns. The possibilities are truly endless!
I once saw a pumpkin completely covered in buttons. It was so unique and eye-catching! It took a while to create, but the result was totally worth it. This is a project that can be done over time. Find some old buttons or buy some new ones and just glue them on! Boom you got yourself a button pumpkin.
Material Pumpkin Ideas:
- Yarn-wrapped pumpkins in fall colors
- Fabric scrap pumpkins with a patchwork design
- Washi tape pumpkins with geometric patterns
- Button-covered pumpkins for a quirky look
Light It Up: Making Your Cool Pumpkin Carving Ideas Easy to See
Light It Up: Making Your Cool Pumpkin Carving Ideas Easy to See
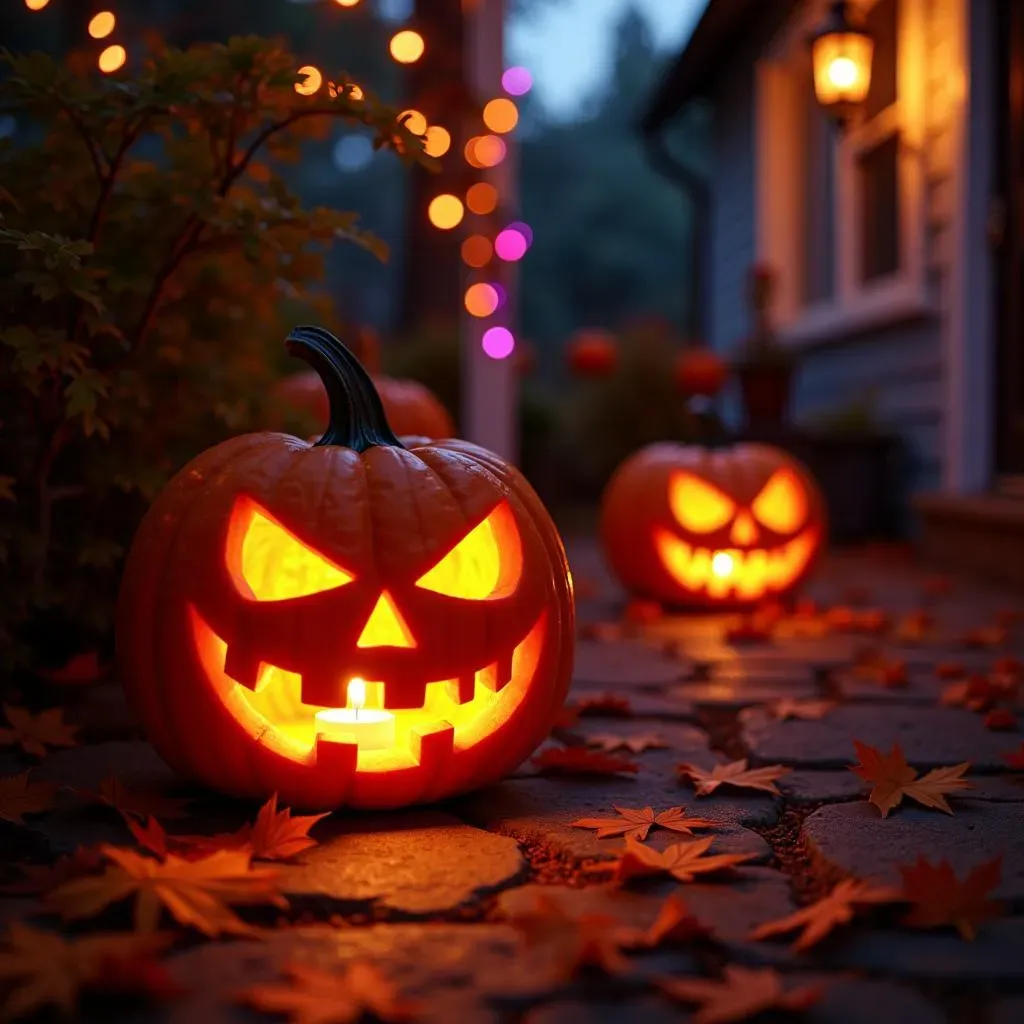
The Classic Candle: Timeless Ambiance, Flickering Charm
Let's start with the OG of pumpkin illumination: the humble candle. There's just something about that flickering flame that screams Halloween. It casts dancing shadows, creates a warm, inviting glow, and adds a touch of old-school spookiness. Plus, it's super easy to do – just pop a tea light or votive candle inside your pumpkin and you're good to go. But, and this is a big but, safety first! Never leave a lit candle unattended, and make sure your pumpkin is placed on a stable surface away from flammable materials.
I remember one Halloween when the power went out. All we had were candles, and our jack-o'-lanterns looked absolutely magical in the candlelight. It was like stepping back in time to a simpler, spookier era.
Candle Considerations:
- Wax Type: Soy candles are cleaner burning than paraffin candles.
- Scent: Choose a festive scent like pumpkin spice or cinnamon.
- Placement: Keep candles away from children and pets.
LED Magic: Safe, Bright, and Battery-Powered Bliss
If you're looking for a safer and more convenient alternative to candles, LEDs are your best bet. These little lights are super bright, energy-efficient, and come in a variety of colors and styles. You can get battery-operated tea lights, string lights, or even submersible LEDs that you can place in water inside your pumpkin. LEDs are perfect for families with young children or anyone who wants to avoid the fire hazard of candles. Plus, they last way longer, so you can enjoy your illuminated pumpkin for days on end.
I'm a huge fan of using color-changing LEDs in my pumpkins. They create a really cool, otherworldly effect. You can even get LEDs that flicker like real candles, but without the risk of a fire. Also LED's are very easy to find online, or in your local supermarkets.
Your Coolest Pumpkin Awaits: Carve On!
So, there you have it – a mountain of cool pumpkin carving ideas easy enough to tackle this Halloween. Whether you opt for a classic stencil, a quirky no-carve design, or a creatively carved masterpiece, the most important thing is to have fun and let your personality shine. Grab your tools, gather your gourds, and get ready to transform your doorstep into a spooktacular showcase of pumpkin artistry. Happy carving!