Table of Contents
Halloween is creeping closer, and that means it's time to think about pumpkins! But forget those same old triangle eyes and toothy grins. Are you ready to ditch the predictable and dive into a world of cool pumpkin carving designs easy enough for anyone to try? This year, we're not just carving pumpkins; we're creating masterpieces. Whether you're a complete beginner or have a few jack-o'-lanterns under your belt, we've got ideas to spark your imagination. This guide is your one-stop shop for taking your pumpkin game to the next level. We'll explore simple designs that pack a visual punch, delve into intermediate patterns for those ready to level up, and even break down the essential tools that make carving a breeze. From spooky silhouettes to intricate patterns, prepare to be inspired by a gallery of creative ideas. Plus, we'll share our top tips for preserving your artwork, so your cool pumpkin carving designs stay fresh and festive throughout the Halloween season. So, grab your carving kit and let's get started!
Simple Yet Stunning: Cool Pumpkin Carving Designs for Beginners
Simple Yet Stunning: Cool Pumpkin Carving Designs for Beginners
So, you want to carve a pumpkin that's the envy of the neighborhood, but you're not exactly Michelangelo with a knife? No problem! The beauty of cool pumpkin carving designs easy for beginners is that they can be incredibly striking without requiring hours of intricate work. Think bold silhouettes, simple geometric shapes, and clever use of light and shadow. You don't need to be an artist to create something awesome; you just need a little imagination and a steady hand.
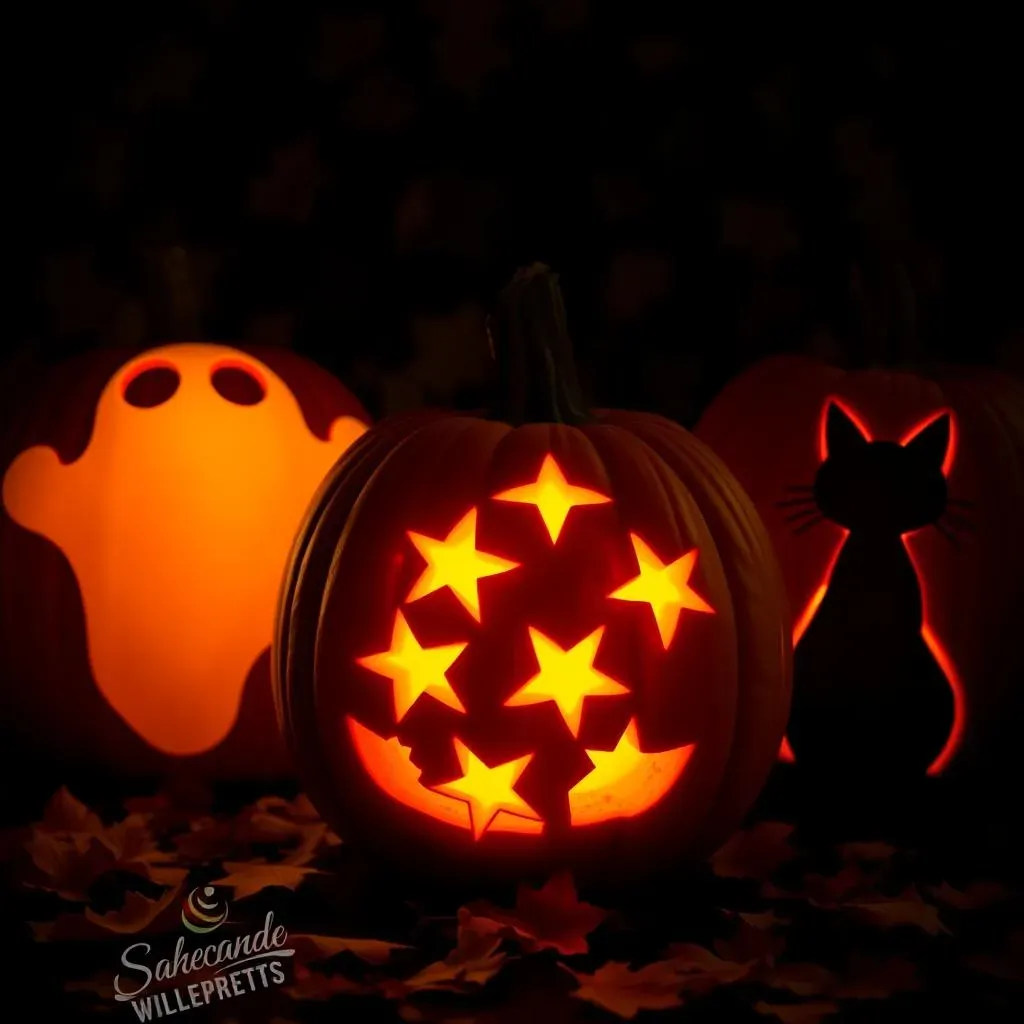
One of my favorite beginner-friendly techniques is using stencils. You can find tons of free templates online, from spooky bats and ghosts to cute cats and owls. Just print out your chosen design, tape it to your pumpkin, and use a poking tool to transfer the outline. Then, carefully carve along the dotted lines. It's like paint-by-numbers, but with a pumpkin and a knife! Plus, stencils are a great way to get consistent results, especially if you're carving multiple pumpkins for a party or display.
Design Idea | Difficulty | Tips |
|---|---|---|
Simple Ghost | Easy | Use a large cookie cutter as a stencil for a perfectly round ghost. |
Starry Night | Easy | Drill different sized holes instead of carving for a twinkling effect. |
Cat Silhouette | Easy | Find a simple cat outline online and trace it onto your pumpkin. |
Another fantastic idea for beginners is to focus on shapes rather than detailed images. Think circles, squares, triangles, and diamonds. You can create a modern, abstract design by arranging these shapes in a random pattern or go for a more structured look by creating a geometric grid. The key is to keep the shapes clean and simple. You can also experiment with different depths of carving to create interesting textures and shadows. For example, carve some shapes all the way through the pumpkin and leave others partially carved to let the light shine through in varying degrees. It's a simple technique that can add a lot of depth and visual interest to your design.
Beyond the Basic Triangle: Intermediate Cool Pumpkin Carving Designs
Beyond the Basic Triangle: Intermediate Cool Pumpkin Carving Designs
Stepping Up Your Game: Adding Depth and Dimension
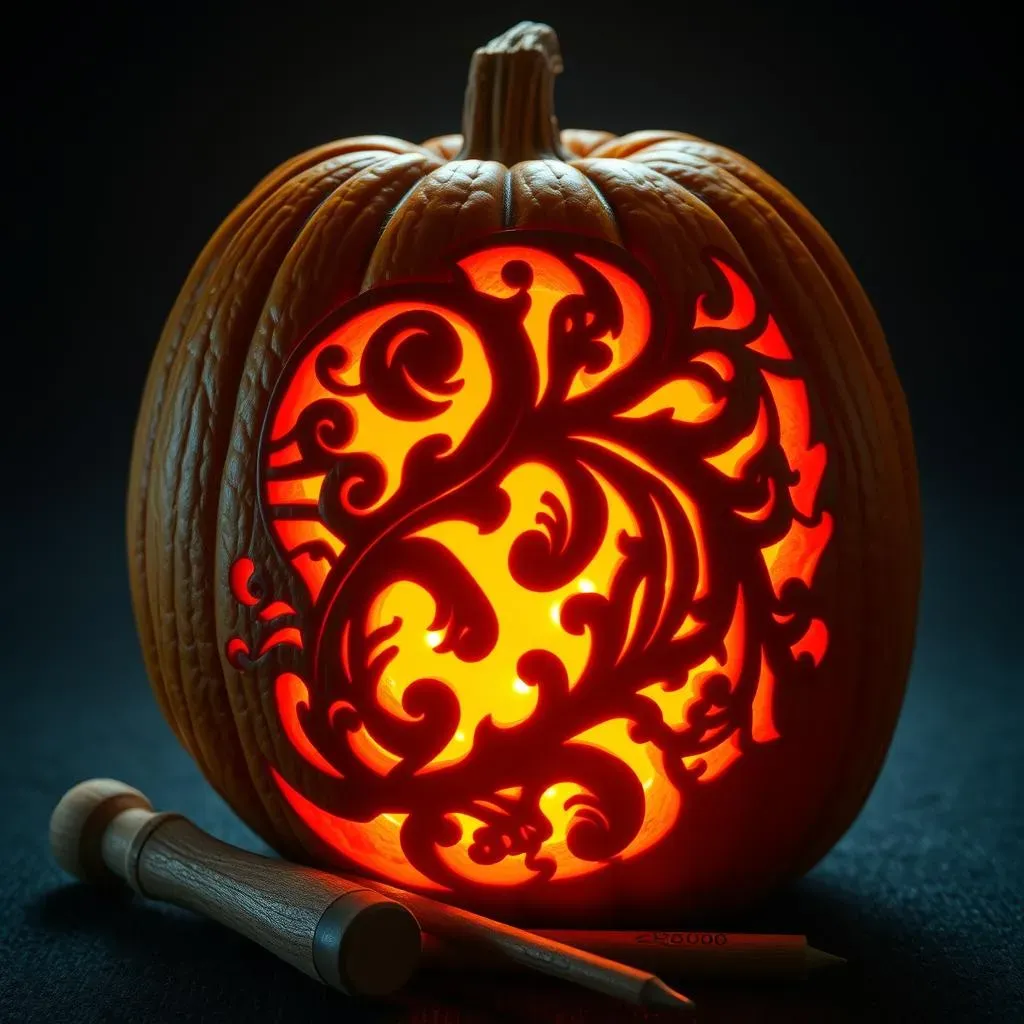
Ready to move beyond the basic triangle and create truly eye-catching pumpkins? Intermediate cool pumpkin carving designs are all about adding depth and dimension to your creations. This means thinking about layering, undercutting, and using different carving tools to achieve varied textures and effects. Don't be intimidated! With a little practice, you can transform a simple pumpkin into a stunning work of art.
One technique that can really elevate your carving is undercutting. This involves carving away the pumpkin flesh beneath the surface layer to create shadows and highlights. For example, if you're carving a leaf design, you can undercut the veins to make them appear more prominent. Or, if you're carving a face, you can undercut the cheekbones to add definition. Undercutting takes a bit of patience, but the results are well worth the effort. It's like sculpting with light and shadow!
Intricate Patterns: From Paisley to Portraits
Once you're comfortable with undercutting, you can start experimenting with more intricate patterns. Think paisley designs, floral motifs, or even portraits! The key to success with these more complex cool pumpkin carving designs is to break them down into smaller, manageable sections. Don't try to tackle the entire design at once. Instead, focus on one small area at a time, and gradually work your way around the pumpkin. It's also helpful to use a variety of carving tools to achieve different effects. A small, pointed tool is great for fine details, while a larger, serrated tool is better for removing larger chunks of pumpkin flesh.
Using specialized tools can also make a world of difference. Consider investing in a small set of wood carving tools, as they offer incredible precision and control. They can be especially useful for creating intricate details in your cool pumpkin carving designs. Additionally, don't underestimate the power of a good reference image. Find a high-resolution photo of the design you want to create and keep it handy as you carve. This will help you stay on track and ensure that your final result is as close to the original as possible.
Light It Up: Creative Illumination Techniques
Finally, don't forget about lighting! The way you illuminate your pumpkin can have a huge impact on its overall look. While a traditional candle is always a classic choice, there are plenty of other creative options to explore. Consider using battery-operated LED lights, which come in a variety of colors and can be set to flicker or pulse. You can also experiment with colored cellophane or tissue paper to create interesting light effects. Simply tape the colored paper to the inside of your pumpkin, behind the carved areas, to cast a colorful glow.
Another fun idea is to use a spotlight to highlight specific areas of your cool pumpkin carving designs. This can be especially effective if you've incorporated undercutting or other textural elements. By shining a light from different angles, you can create dramatic shadows and highlights that really bring your carving to life. Ultimately, the best way to find the perfect lighting technique is to experiment and see what works best for your particular design. Don't be afraid to try new things and get creative!
Tools of the Trade: Making Cool Pumpkin Carving Designs Easy
Tools of the Trade: Making Cool Pumpkin Carving Designs Easy
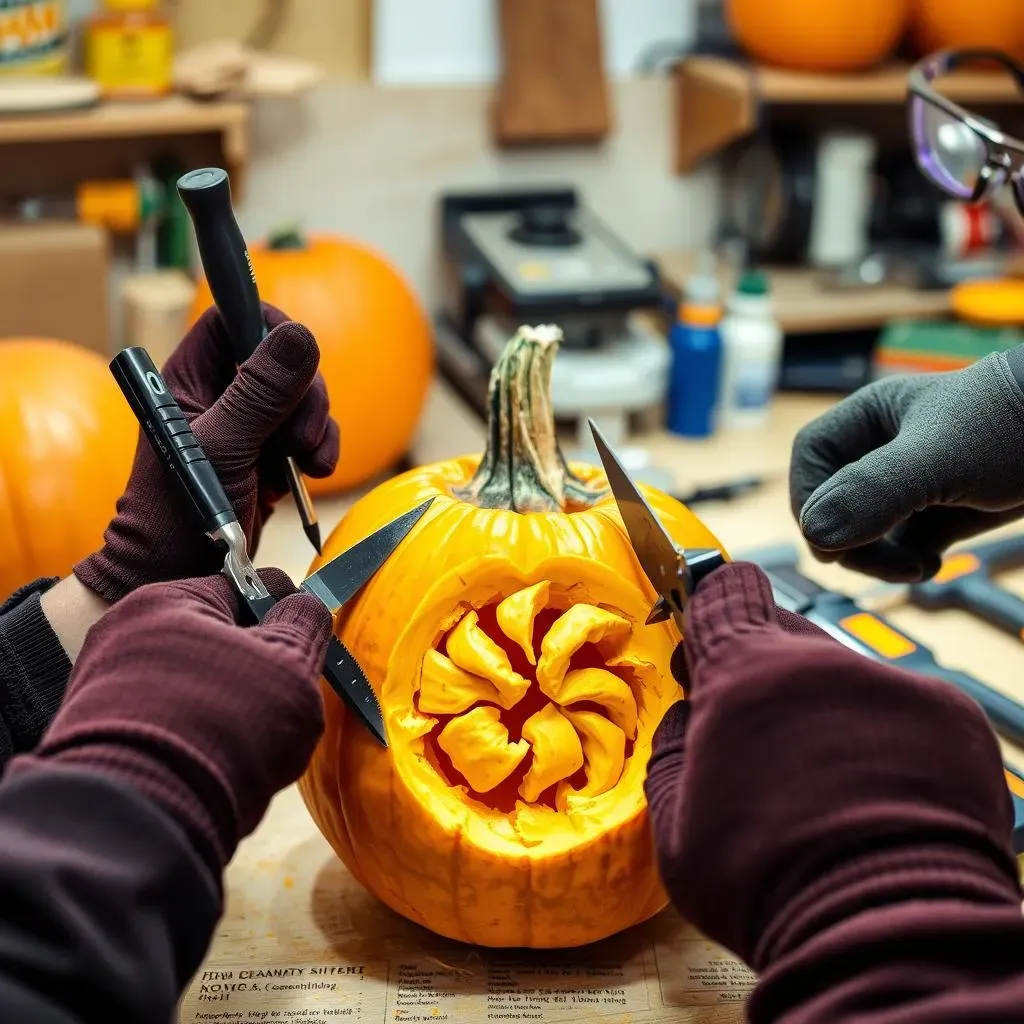
The Essential Carving Kit: Knives, Scoops, and More
Alright, let's talk tools! You can't create cool pumpkin carving designs easy without the right gear. A basic carving kit is a great place to start. These kits usually include a variety of small saws, knives, and scoops designed specifically for pumpkin carving. The small saws are perfect for cutting out larger sections of the pumpkin, while the knives are ideal for finer details. And don't forget the scoop! You'll need that to remove all the pumpkin guts and seeds. Trust me, that part can get messy!
But don't feel limited to just a basic kit. You can also raid your kitchen for some useful tools. A sturdy spoon works well for scraping the inside of the pumpkin, and a vegetable peeler can be used to thin out the pumpkin skin for a cool translucent effect. I've even used a melon baller to create perfectly round holes for a polka-dot design! The key is to experiment and see what works best for you. Just be sure to use tools that are sharp and easy to grip, and always carve in a well-lit area.
Beyond the Basics: Power Tools and Precision
For those who are serious about their cool pumpkin carving designs easy, power tools can be a game-changer. A rotary tool, like a Dremel, with various attachments can make quick work of intricate designs. You can use it to carve fine details, smooth out rough edges, and even create 3D effects. Just be sure to wear safety glasses and a dust mask when using power tools, as pumpkin carving can get quite dusty.
Another handy tool to have is a wood-burning tool. This can be used to create permanent designs on your pumpkin, without actually cutting through the flesh. It's a great way to add details that would be difficult to carve with a knife, such as lettering or intricate patterns. Plus, the heat from the wood-burning tool can help to seal the pumpkin, which can prolong its lifespan. Just be sure to use it in a well-ventilated area, as it can produce some fumes.
Tool | Use | Pros | Cons |
|---|---|---|---|
Small Saw | Cutting out large sections | Easy to use, good for beginners | Can be difficult to control for intricate designs |
Detail Knife | Carving fine details | Precise, allows for intricate work | Requires more skill and patience |
Rotary Tool | Carving, smoothing, creating 3D effects | Fast, versatile, can create a variety of effects | Requires practice, can be messy |
Safety First: Tips for a Smooth Carving Experience
No matter what tools you're using, safety should always be your top priority. Pumpkin carving can be dangerous if you're not careful, so it's important to take precautions. First and foremost, always carve in a well-lit area. This will help you see what you're doing and avoid accidents. Also, be sure to use a sturdy cutting surface that won't slip or slide. I like to use a large cutting board or a non-slip mat.
When carving, always cut away from yourself. This will help prevent you from accidentally cutting yourself. And if you're using a sharp knife, be sure to keep your fingers out of the way. It's also a good idea to wear gloves to protect your hands from cuts and scrapes. Finally, never let children carve pumpkins unsupervised. Always supervise them closely and make sure they're using age-appropriate tools. With a little caution, you can have a safe and fun pumpkin carving experience.
Get Spooky: Inspiration for Cool Pumpkin Carving Designs
Get Spooky: Inspiration for Cool Pumpkin Carving Designs
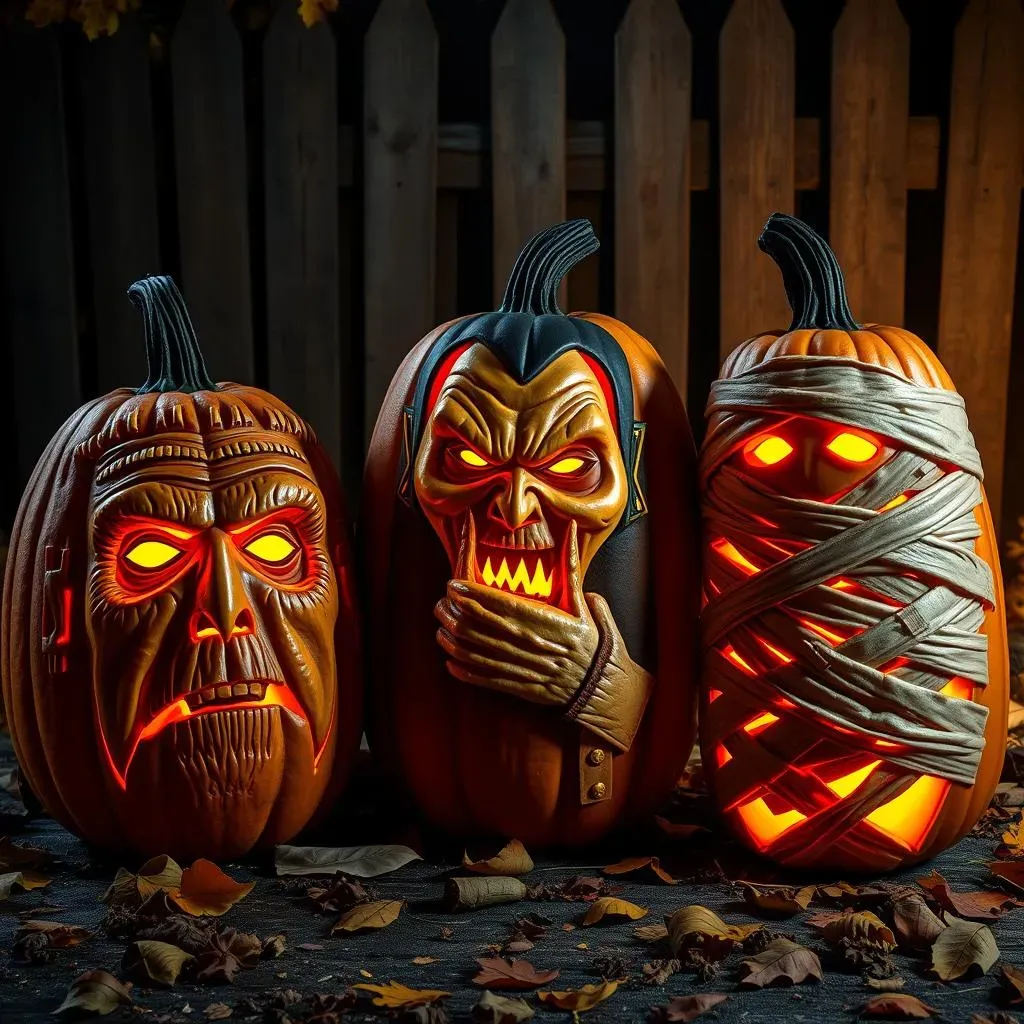
Classic Horror Movie Monsters
Let's face it, nothing screams Halloween like a good old-fashioned horror movie monster! Think Frankenstein's monster, Dracula, or even the Mummy. These iconic characters are instantly recognizable and can be surprisingly easy to adapt into cool pumpkin carving designs. For Frankenstein, focus on the square head, bolts, and stitched-up scars. Dracula can be depicted with sharp fangs, a widow's peak, and a menacing glare. And the Mummy? Think wrappings, sunken eyes, and a general air of ancient mystery. The key is to simplify the designs and focus on the most recognizable features.
You can find plenty of inspiration online, from vintage movie posters to modern fan art. Look for images that are high-contrast and easy to translate into a stencil. And don't be afraid to add your own personal touch! Maybe give Frankenstein a goofy grin or add a bat flying out of Dracula's cape. The goal is to create a design that's both spooky and fun. Plus, carving a classic monster is a great way to pay homage to the horror movies that scared us all as kids!
Eerie Silhouettes and Shadow Play
Sometimes, the most effective cool pumpkin carving designs are the simplest. Eerie silhouettes can be incredibly striking, especially when combined with creative lighting. Think of a spooky haunted house on a hill, a black cat perched on a fence, or a flock of bats flying across the moon. These designs are easy to carve and can create a dramatic effect with just a few well-placed cuts. The key is to focus on the overall shape and create a strong sense of contrast between the light and shadow.
To create a silhouette design, start by finding a suitable image online or drawing your own. Then, transfer the image to your pumpkin using a stencil or freehand drawing. Carefully carve out the silhouette, making sure to remove all the pumpkin flesh within the outline. When you light the pumpkin, the silhouette will be projected onto the surrounding area, creating a spooky and atmospheric effect. You can also experiment with different lighting techniques to enhance the effect. For example, try using a colored light bulb or placing the pumpkin in front of a dark background to create a more dramatic shadow.
Ghoulish Faces and Grotesque Expressions
Of course, no Halloween pumpkin carving is complete without a ghoulish face! But forget the same old toothy grin and triangle eyes. This year, try getting creative with your facial expressions. Think grotesque smiles, bulging eyes, and twisted features. The more exaggerated and over-the-top, the better! You can find inspiration in classic horror movie masks, comic book villains, or even your own imagination. The key is to create a face that's both scary and funny.
To carve a ghoulish face, start by sketching out your design on the pumpkin. Pay close attention to the proportions and make sure the features are exaggerated and distorted. Then, carefully carve out the details, using a variety of carving tools to create different textures and effects. For example, you can use a small, pointed tool to create wrinkles and creases, or a larger, serrated tool to carve out deep gouges and scars. Don't be afraid to experiment and get messy! The goal is to create a face that's truly terrifying... or at least amusingly grotesque.
Design Element | Inspiration | Carving Technique |
|---|---|---|
Bulging Eyes | Classic Horror Movies | Use a melon baller to scoop out large, round holes. |
Grotesque Smile | Comic Book Villains | Carve a wide, jagged smile with sharp, pointed teeth. |
Twisted Features | Your Imagination | Experiment with different carving tools to create distorted shapes and textures. |
Preserving Your Masterpiece: Tips for Keeping Cool Pumpkin Carving Designs Fresh
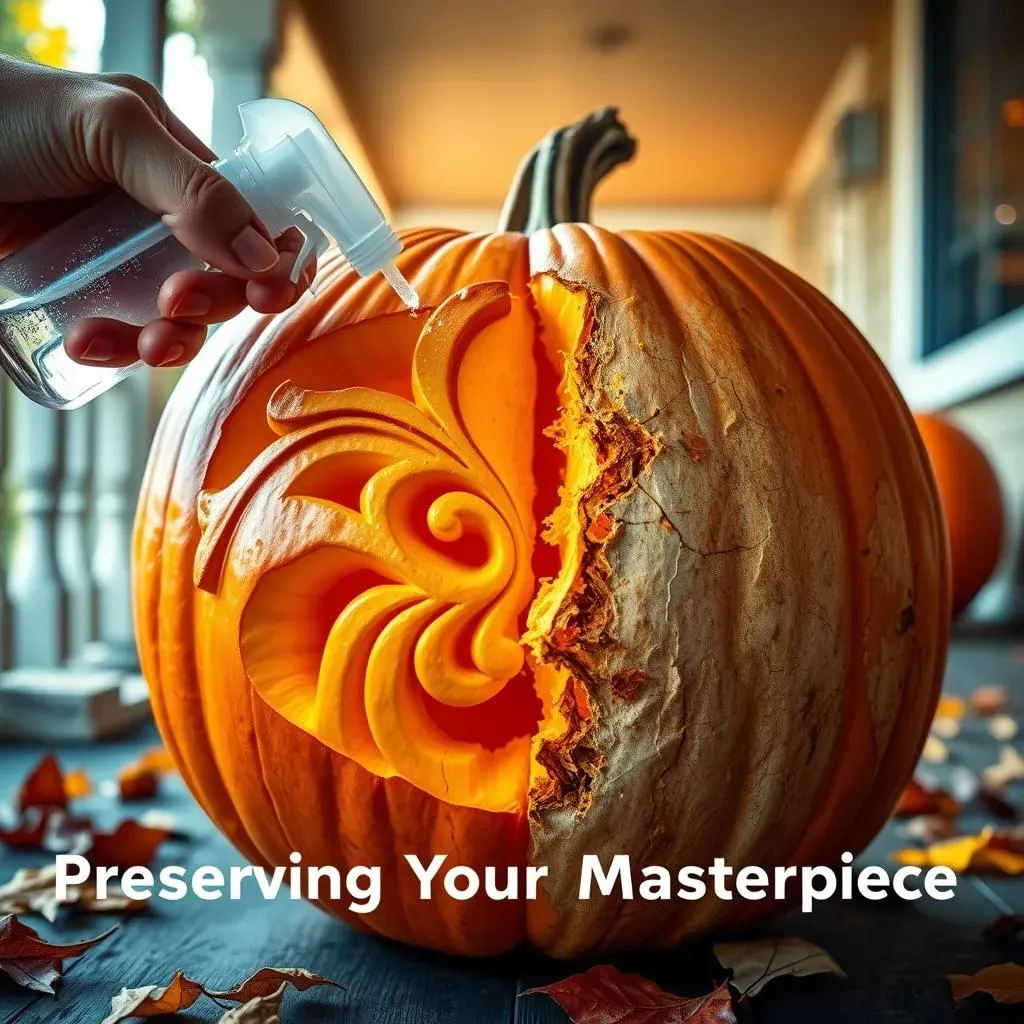
Preserving Your Masterpiece: Tips for Keeping Cool Pumpkin Carving Designs Fresh
Warding Off the Wilt: Hydration is Key
so you've spent hours crafting your amazing cool pumpkin carving designs fresh, and you want to make sure it lasts longer than a day or two, right? The biggest enemy of a carved pumpkin is dehydration. Once you cut into that pumpkin, it starts losing moisture, which leads to wilting, shriveling, and eventually, collapse. So, how do you keep your pumpkin hydrated? The answer is simple: water!
One of the easiest methods is to soak your carved pumpkin in a tub of cold water overnight. This will help to rehydrate the pumpkin flesh and keep it looking fresh for longer. You can also use a spray bottle to mist your pumpkin with water every day. Just be sure to spray it evenly, both inside and out. Another trick is to apply a thin layer of petroleum jelly to the carved areas. This will help to seal in moisture and prevent the pumpkin from drying out too quickly. Think of it like giving your pumpkin a moisturizing treatment!
Battling the Bacteria: Cleanliness Counts
Besides dehydration, bacteria is another major threat to your cool pumpkin carving designs fresh. Bacteria can cause your pumpkin to rot and decay, which will shorten its lifespan considerably. So, it's important to keep your pumpkin clean and free of bacteria. One way to do this is to wash your pumpkin thoroughly before you start carving. Use a mild soap and water to remove any dirt or debris from the surface. You can also add a tablespoon of bleach to the water to kill any bacteria that may be present.
After you've carved your pumpkin, you can further protect it from bacteria by spraying it with a bleach solution. Mix one tablespoon of bleach with one quart of water and spray the solution liberally over the carved areas. This will help to kill any bacteria that may have gotten into the pumpkin during carving. Just be sure to wear gloves and eye protection when working with bleach, and avoid spraying it on any painted or decorated areas. Another option is to use a commercial pumpkin preservative, which is specifically designed to kill bacteria and prolong the lifespan of your carved pumpkin.
Preservation Method | How to Use | Pros | Cons |
|---|---|---|---|
Soaking in Water | Submerge carved pumpkin in cold water overnight. | Simple, effective, rehydrates the pumpkin. | Requires a large container, can be messy. |
Bleach Solution | Spray carved areas with a mixture of 1 tbsp bleach per quart of water. | Kills bacteria, prevents rot. | Requires caution when handling bleach, can damage painted areas. |
Petroleum Jelly | Apply a thin layer to carved areas. | Seals in moisture, prevents drying. | Can attract dirt, may not be effective in humid climates. |
Location, Location, Location: Choosing the Right Spot
Where you display your cool pumpkin carving designs fresh can also have a big impact on its lifespan. Avoid placing your pumpkin in direct sunlight or near heat sources, as this will cause it to dry out more quickly. A cool, shady spot is ideal. If you're displaying your pumpkin outdoors, try to place it in a sheltered area where it won't be exposed to rain or wind. Rain can cause the pumpkin to rot, while wind can dry it out.
Another tip is to elevate your pumpkin off the ground. This will help to improve air circulation and prevent moisture from accumulating underneath the pumpkin. You can use a small stand or even just a few pieces of wood to create a platform. And if you're really serious about preserving your pumpkin, you can even store it in the refrigerator overnight. Just be sure to wrap it in plastic wrap to prevent it from drying out. With a little care and attention, you can keep your cool pumpkin carving designs fresh and festive throughout the Halloween season!
Your Cool Pumpkin Carving Designs Await!
So, there you have it – a treasure trove of cool pumpkin carving designs easy enough for anyone to tackle. From the simplest silhouettes to more intricate patterns, the only limit is your imagination. Remember, the key is to have fun and let your creativity shine. Don't be afraid to experiment, embrace mistakes, and most importantly, enjoy the process of transforming a humble pumpkin into a spooky or spectacular work of art. With the right tools, a dash of inspiration, and a little bit of patience, you'll be the envy of the neighborhood this Halloween. Now go forth and carve some unforgettable memories!