Table of Contents
Halloween is creeping closer, and what better way to celebrate than by unleashing your inner artist with some epic pumpkin designs? Forget the same old triangle eyes and toothy grin; we're diving headfirst into a world of carving cool pumpkin ideas that will make your jack-o'-lantern the envy of the neighborhood. Whether you're a seasoned pro with a Dremel or a newbie armed with a spoon, there's a design here for you. From spooky silhouettes and adorable animals to pop culture icons and intricate patterns, we've got 110 creative concepts to spark your imagination.
Setting Up Your Pumpkin Carving Station for Success
Setting Up Your Pumpkin Carving Station for Success
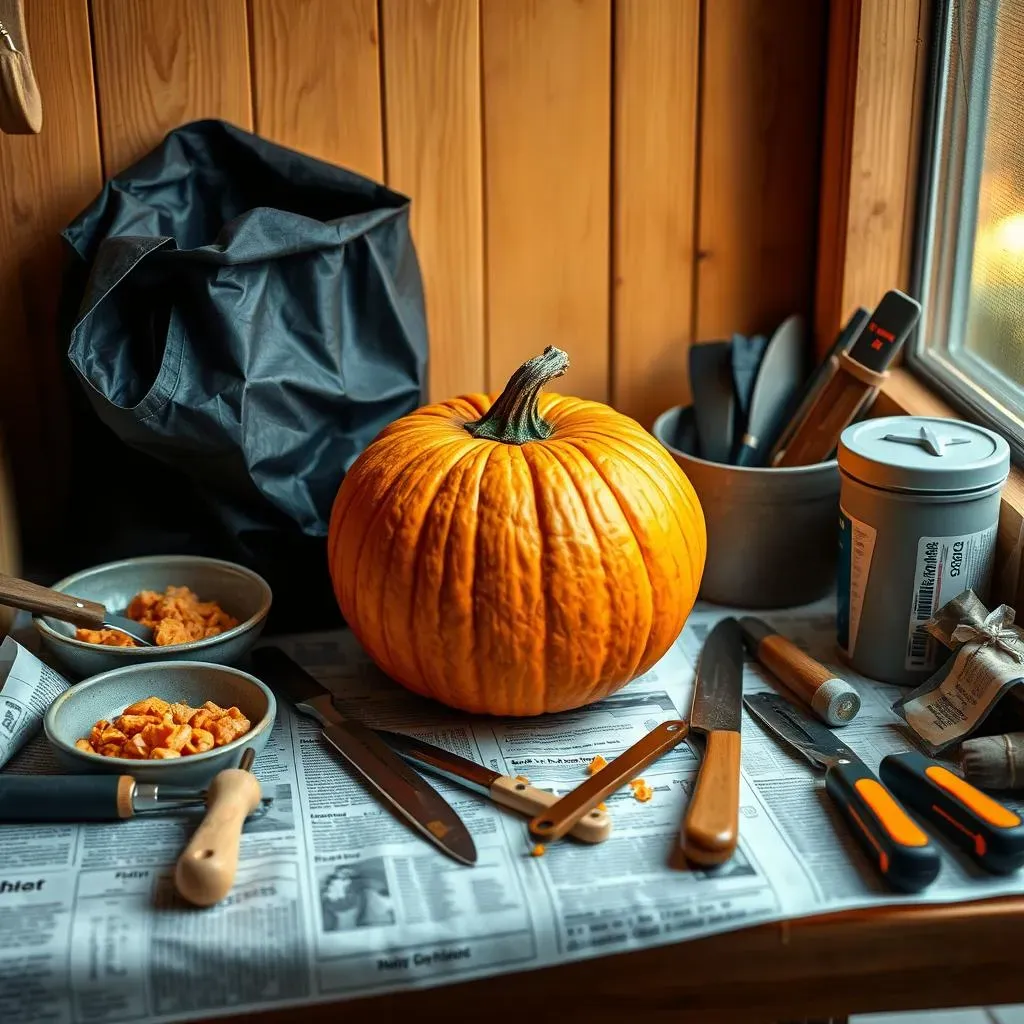
Alright, let's talk pumpkin prep! Before you even think about sticking a knife into that orange orb, you gotta get your workspace sorted. Trust me, a little organization goes a long way in preventing a sticky, pumpkin-guts-everywhere situation. First things first, cover your surface. Newspaper, a plastic tablecloth, even an old sheet will do. Pumpkin carving is messy, embrace it, but contain it!
Next, gather your tools. You don't need fancy kits (though they can be fun!). A good serrated knife, a sturdy spoon or scoop, and some smaller detail tools are your essentials. I personally love using a linoleum cutter for fine details, but a simple paring knife works too. Don't forget a bowl for the pumpkin guts and seeds (we're roasting those later, right?) and a trash bag for the scraps. Good lighting is key – a bright overhead light or a desk lamp will help you see what you're doing, especially when you get to those intricate designs.
Essential Tool | Why You Need It |
|---|---|
Serrated Knife | For cutting the lid and larger shapes. |
Sturdy Spoon/Scoop | For removing the pumpkin guts. |
Detail Tools (Paring Knife, Linoleum Cutter) | For fine details and intricate designs. |
Bowl | For collecting pumpkin guts and seeds. |
Trash Bag | For easy cleanup of scraps. |
Now, let's talk pumpkin selection. Look for a pumpkin that's relatively smooth, with a sturdy stem and no soft spots. Give it a thump – it should sound hollow. The shape is up to you, depending on your design ideas. Once you've got your perfect pumpkin, wash it off and pat it dry. Now you're ready to cut a hole! Most people cut a circle around the stem, but I prefer cutting a hole in the bottom. It makes it easier to place over a candle or light later, and it keeps the stem intact for a more classic look. Whichever you choose, make sure the hole is big enough to easily reach inside and scoop out all the goop.
Cool Pumpkin Carving Ideas: From Spooky to Spectacular
Cool Pumpkin Carving Ideas: From Spooky to Spectacular
Classic Spooky Faces with a Twist
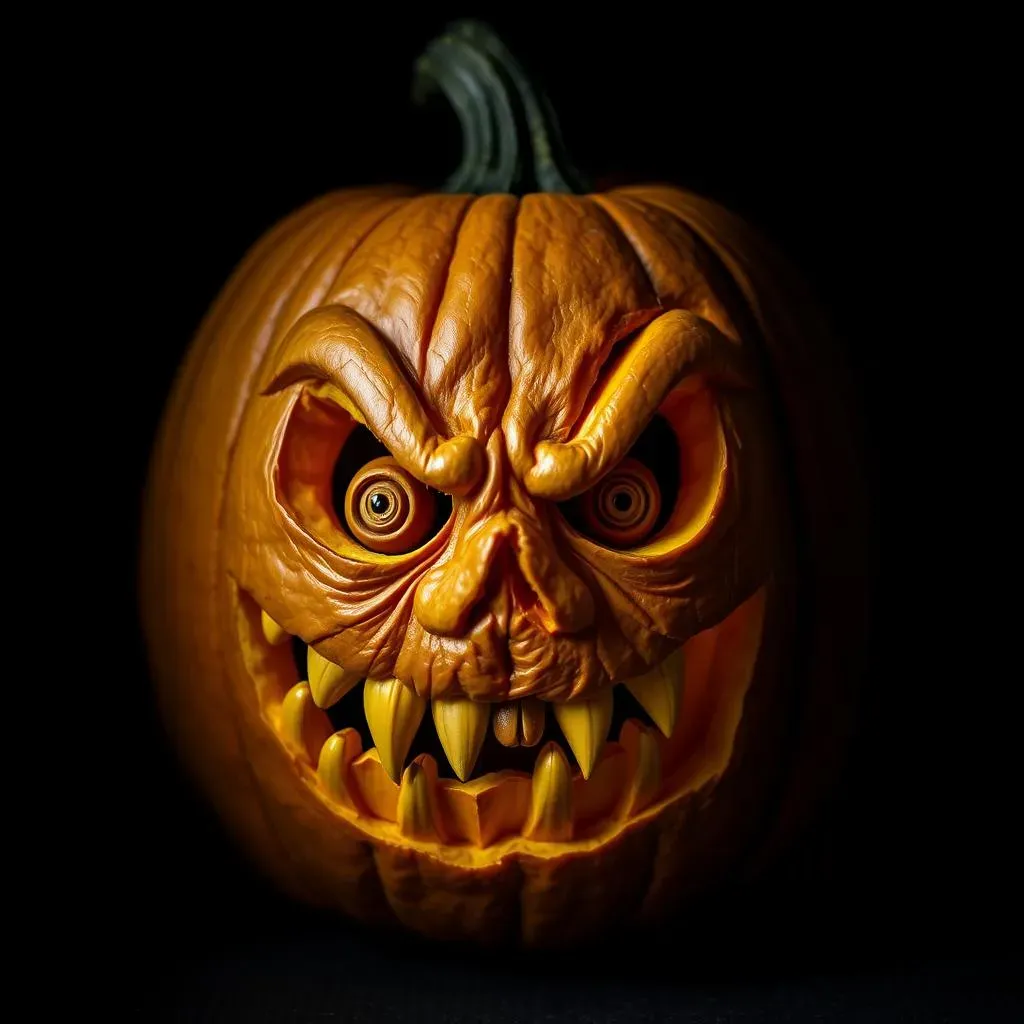
You can't go wrong with a classic jack-o'-lantern, but let's amp it up! Think beyond the basic triangle eyes and snaggle-toothed grin. Experiment with different shapes and sizes for the eyes – maybe one is a circle and the other a crescent moon? For the mouth, try jagged teeth, a wide, maniacal smile, or even a gaping scream. The key is asymmetry and exaggeration. A little bit of detail goes a long way in making your spooky face stand out from the crowd. Consider adding eyebrows to convey different emotions – angry, surprised, or even a little mischievous. And don't be afraid to get creative with the nose! A simple triangle works, but you could also try a crooked, bulbous nose or even a pair of nostrils.
To really nail that spooky vibe, think about adding some depth to your carving. Instead of cutting straight through the pumpkin, try shaving away layers of the skin to create shadows and highlights. This technique works especially well around the eyes and mouth, giving your jack-o'-lantern a more three-dimensional and menacing look. You can also use different tools to create different textures. A small saw can be used to create jagged edges, while a linoleum cutter is perfect for etching fine lines and details. Remember, the goal is to create a face that's both spooky and unique.
Want to take it to the next level? Use a stencil! You can find tons of free spooky face stencils online, from classic ghosts and goblins to more modern horror movie characters. Simply print out the stencil, tape it to your pumpkin, and use a poking tool to transfer the design onto the surface. Then, carefully carve away the areas indicated by the stencil. This is a great way to achieve a more complex and detailed design without having to freehand it. Just remember to take your time and be careful not to slip!
Cute and Creative Critters
Who says pumpkins have to be scary? Why not carve an adorable animal instead? From playful kittens and mischievous mice to wise owls and cuddly bears, the possibilities are endless. When carving animals, think about using the natural shape of the pumpkin to your advantage. A round pumpkin is perfect for a chubby cat or a fluffy sheep, while a taller pumpkin is ideal for a giraffe or a bunny.
Start by sketching out your design on the pumpkin. Pay attention to the proportions and try to capture the essence of the animal you're carving. For example, a cat should have pointy ears and almond-shaped eyes, while a dog should have floppy ears and a wet nose. Use different carving techniques to create different textures. Shave away layers of the skin to create fur or feathers, and use a small saw to create whiskers or claws. You can also use paint or markers to add details like stripes, spots, or even rosy cheeks.
For a truly unique touch, consider incorporating the pumpkin stem into your design. The stem can become a nose, an ear, or even a hat! For example, you could carve a pig with the stem as its snout, or a witch with the stem as the tip of her hat. Get creative and have fun with it! And don't forget to give your animal a name. After all, every jack-o'-lantern deserves a good name!
Pop Culture Pumpkins: Carve Your Fandom
Show off your love for your favorite movies, TV shows, and video games by carving a pop culture pumpkin! This is a great way to impress your friends and neighbors and let your geek flag fly. The key to a successful pop culture pumpkin is choosing a design that's recognizable and iconic. Think about characters, logos, or symbols that are instantly associated with your fandom. For example, you could carve the Batman logo, a Star Wars character, or even the Netflix logo.
Once you've chosen your design, find a good reference image online. The clearer the image, the easier it will be to transfer it onto your pumpkin. You can either freehand the design or use a stencil. If you're using a stencil, make sure it's the right size for your pumpkin. You don't want a tiny stencil on a giant pumpkin, or vice versa. When carving your pop culture pumpkin, pay attention to the details. The more accurate you are, the more recognizable your design will be. Use different carving techniques to create different effects. For example, you can use a small saw to create jagged edges for a more edgy look, or a linoleum cutter to create fine lines for a more detailed look.
To really make your pop culture pumpkin stand out, consider adding some extra flair. You could paint it, add glitter, or even attach props. For example, you could paint a Star Wars pumpkin silver and add some LED lights to make it look like a droid. Or you could attach a plastic sword to a Game of Thrones pumpkin. The possibilities are endless! Just remember to have fun and let your creativity shine.
Advanced Carving Techniques for the Ultimate Pumpkin Masterpiece
Advanced Carving Techniques for the Ultimate Pumpkin Masterpiece
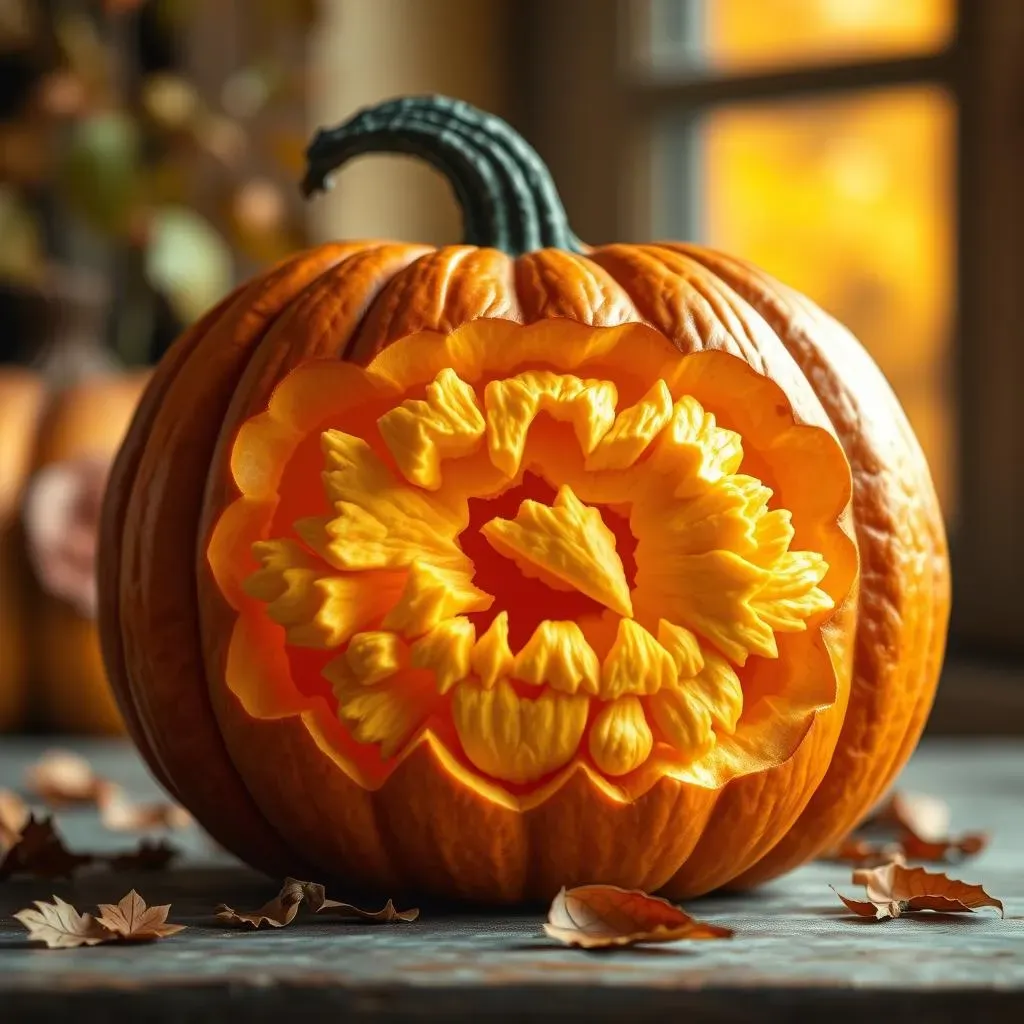
Layered Carving: Depth and Dimension
Alright, ready to ditch the basic cut-outs and dive into some serious pumpkin artistry? Layered carving is where it's at! Instead of just cutting straight through the pumpkin's skin, you're going to carefully shave away layers to create depth and dimension. Think of it like sculpting. This technique is perfect for adding realism to portraits, creating intricate patterns, or even just making those spooky faces look extra menacing. The key is to use a variety of tools and to take your time. A sharp paring knife, a wood carving tool, or even a clay sculpting tool can work wonders. Start by sketching your design onto the pumpkin, then carefully begin removing thin layers of the skin, working from the shallowest areas to the deepest. Remember, you can always remove more, but you can't put it back!
To master layered carving, practice on a scrap pumpkin first. Get a feel for how much pressure to apply and how different tools affect the pumpkin's surface. Pay attention to the light and shadows – the more layers you create, the more dramatic the effect will be. You can also use stencils to guide your carving, but don't be afraid to improvise and add your own personal touch. Layered carving is all about experimentation and pushing the boundaries of what's possible with a pumpkin.
One of my favorite layered carving projects is a portrait of a famous monster. I start by sketching the monster's face onto the pumpkin, paying close attention to the shadows and highlights. Then, I carefully begin removing layers of the skin, starting with the forehead and working my way down to the chin. I use a variety of tools to create different textures, from smooth, rounded surfaces to rough, jagged edges. The end result is a stunningly realistic portrait that's sure to impress.
Using Power Tools: Dremels and Beyond
listen up, power tool enthusiasts! If you're serious about taking your pumpkin carving to the next level, it's time to break out the big guns. Dremels, rotary tools, and even power saws can be used to create incredibly detailed and intricate designs that would be impossible to achieve with hand tools alone. But before you go all chainsaw massacre on your pumpkin, a word of caution: power tools can be dangerous, so always wear safety glasses and gloves, and work in a well-ventilated area. Start with a low speed and gradually increase it as you get more comfortable. And remember, less is more – it's always better to make small, controlled cuts than to try to hog out large chunks of pumpkin all at once.
Dremels are particularly useful for creating fine details, such as intricate patterns, lettering, or even realistic textures. You can use a variety of different bits to achieve different effects, from grinding and sanding to cutting and engraving. Rotary tools are great for removing larger areas of pumpkin quickly and efficiently. And power saws can be used to create dramatic silhouettes or even to carve the pumpkin into completely different shapes. Just be sure to use a blade that's designed for cutting soft materials, such as wood or plastic.
Using power tools opens up a whole new world of possibilities for pumpkin carving. You can create designs that are more complex, more detailed, and more visually stunning than ever before. But it also requires a lot of practice and patience. Start with simple designs and gradually work your way up to more complex projects. And don't be afraid to experiment and try new things. The only limit is your imagination!
Power Tool | Best Use | Safety Tips |
|---|---|---|
Dremel | Fine details, intricate patterns, textures | Wear safety glasses, use low speed, practice on scrap pumpkin |
Rotary Tool | Removing large areas quickly | Wear safety glasses and gloves, use appropriate bit, keep a firm grip |
Power Saw | Silhouettes, reshaping the pumpkin | Wear safety glasses and gloves, use a blade for soft materials, work slowly and carefully |
Stencils and Templates: Precision Carving
Let's face it, not everyone is born with the artistic talent of Michelangelo. But that doesn't mean you can't create a stunning pumpkin masterpiece! Stencils and templates are your secret weapon for achieving precision carving, even if you're a complete beginner. You can find tons of free stencils online, or you can create your own using a photo editing program or even just a pencil and paper. Once you've got your stencil, simply print it out, tape it to your pumpkin, and use a poking tool to transfer the design onto the surface. Then, carefully carve away the areas indicated by the stencil. It's like paint-by-numbers, but with pumpkins!
When choosing a stencil, consider your skill level and the complexity of the design. Start with simple stencils and gradually work your way up to more intricate patterns. Pay attention to the size of the stencil – you don't want a stencil that's too small or too large for your pumpkin. And be sure to choose a stencil that's appropriate for the type of carving you're doing. For example, a stencil with lots of fine details is best suited for layered carving, while a stencil with bold, simple shapes is perfect for traditional cut-out carving.
Using stencils and templates is a great way to achieve professional-looking results, even if you're not a professional artist. But don't be afraid to add your own personal touch. You can customize the stencil by adding extra details, changing the shapes, or even combining multiple stencils to create a unique design. The key is to have fun and let your creativity shine!
Beyond the Carve: Creative Ways to Decorate Your Cool Pumpkins
Beyond the Carve: Creative Ways to Decorate Your Cool Pumpkins
Paint it Up: Acrylics, Watercolors, and More
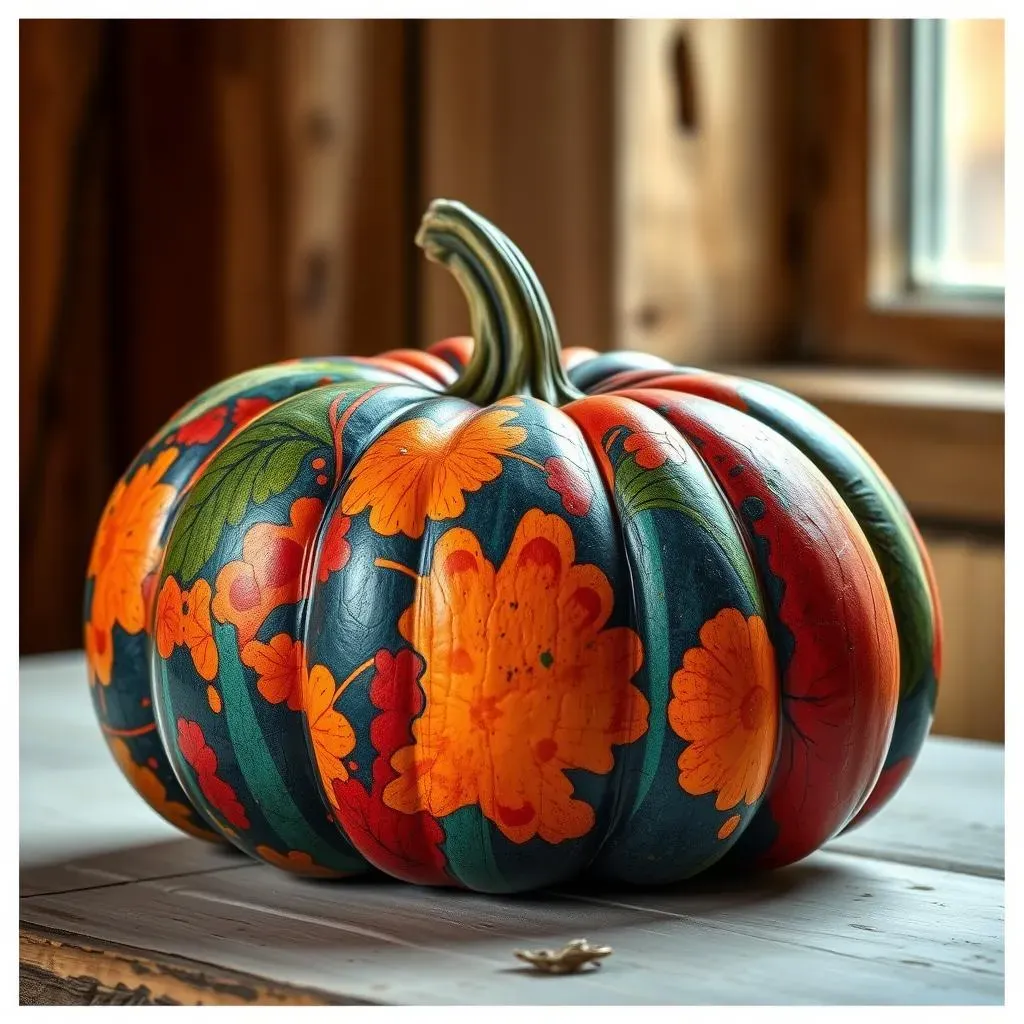
so you've carved your pumpkin, now what? It's time to unleash your inner artist with some paint! Acrylics are a fantastic choice for bold, vibrant colors that really pop. They dry quickly and are super durable, meaning your pumpkin will look amazing for longer. Watercolors, on the other hand, are perfect for creating softer, more ethereal designs. Think delicate floral patterns, dreamy landscapes, or even just a subtle wash of color to enhance the natural texture of the pumpkin. You can even use spray paint for a quick and easy base coat or to create cool ombre effects. Just make sure you're working in a well-ventilated area and wearing a mask.
Before you start painting, it's a good idea to wipe down your pumpkin with a damp cloth to remove any dirt or debris. Then, lightly sketch out your design with a pencil. This will help you stay on track and prevent any major mishaps. When painting, use a variety of different brushes to achieve different effects. A small, fine-tipped brush is perfect for detail work, while a larger, flat brush is great for covering large areas. And don't be afraid to experiment with different techniques, like stippling, dry brushing, or even sponge painting. The goal is to have fun and create a unique and eye-catching design.
Paint Type | Best For | Tips |
|---|---|---|
Acrylics | Bold colors, durable designs | Use a variety of brushes, apply in thin layers |
Watercolors | Soft, ethereal designs | Use a wet-on-wet technique for blending, seal with a clear coat |
Spray Paint | Base coats, ombre effects | Work in a well-ventilated area, wear a mask |
Glitter, Glam, and Googly Eyes: Embellishments Galore
Want to add a little sparkle and shine to your pumpkin? Then it's time to break out the glitter! Glitter is a fun and easy way to add some pizzazz to any design. You can use it to highlight certain areas, create intricate patterns, or even just cover the entire pumpkin in a shimmering coat. Just be warned, glitter can be messy, so be sure to work in a designated area and have a vacuum cleaner handy. For a more whimsical touch, add some googly eyes! Googly eyes come in all shapes and sizes, and they're a great way to bring your pumpkin to life. You can use them to create silly faces, add personality to animal carvings, or even just give your pumpkin a little bit of extra character.
Other fun embellishments include sequins, beads, ribbons, and even fake flowers. Sequins and beads can be used to create intricate patterns or add texture to your design. Ribbons can be tied around the stem or used to create bows and other decorative accents. And fake flowers can be glued onto the pumpkin to create a beautiful and festive display. When using embellishments, be sure to use a strong adhesive, like hot glue or craft glue, to ensure that they stay in place. And don't be afraid to mix and match different embellishments to create a truly unique and personalized pumpkin.
Happy Carving: Your Cool Pumpkin Awaits!
So, there you have it – a treasure trove of carving cool pumpkin ideas to make this Halloween unforgettable. From the simplest spooky faces to the most intricate works of art, remember that the most important ingredient is your creativity. Don't be afraid to experiment, make mistakes, and most importantly, have fun! Light up your creations, share them with the world, and get ready to bask in the glow of your awesome jack-o'-lanterns. Happy Halloween, and happy carving!