Table of Contents
Alright, let's be honest. Halloween rolls around, and suddenly everyone expects you to be Michelangelo with a gourd. The pressure to create some elaborate, spooky masterpiece can feel overwhelming, especially when you're short on time or convinced your artistic talents peaked with stick figures. Forget those intimidating, multi-hour projects you see online. This year, we're focusing on getting you festive results without the frustration.
Tools You Actually Need (Hint: Not Many)
Tools You Actually Need (Hint: Not Many)
Forget the Fancy Kits
let's cut through the marketing noise. You see those elaborate pumpkin carving kits with 30 different tiny saws and scoops? Most of that stuff is overkill, especially when you're aiming forcarved pumpkin ideas easy. You don't need a surgical suite for this. What you actually need are a few reliable basics. Think of it like cooking – you don't need every gadget in the store to make a decent meal. A sharp, sturdy knife is key, but not your best kitchen paring knife, because pumpkin guts are messy and potentially damaging. A dedicated pumpkin carving knife, often found in those basic kits, works well because it's short and serrated, giving you more control and less chance of slipping. A large spoon or scoop is essential for gutting the thing, obviously. That's really it for the absolute must-haves to get started.
Beyond the Bare Minimum
While you can manage with just a knife and a spoon, a couple of other items make the process smoother and open up morecarved pumpkin ideas easypossibilities. A small, poking tool – like an awl or even a sturdy skewer – is great for transferring patterns or starting pilot holes. A detail knife or a small, sharp craft knife (like an X-Acto) can help clean up edges or add smaller elements, but again, don't feel pressured to get super intricate. Wax paper or a dry-erase marker is useful for drawing your design onto the pumpkin before you commit. And for goodness sake, lay down some newspaper or a drop cloth. Pumpkin guts are surprisingly adhesive.
- Essential: Short, serrated pumpkin carving knife
- Essential: Large, sturdy spoon or scoop
- Helpful: Awl or skewer for poking holes
- Helpful: Small craft knife for details
- Helpful: Wax paper or dry-erase marker for design transfer
- Highly Recommended: Newspaper or drop cloth
Geometric Shapes: The Easiest Starting Point
Geometric Shapes: The Easiest Starting Point
Why Simple Shapes Work Wonders
let's ditch the idea that you need to carve eyeballs with intricate pupils or teeth that look like a dental chart. When you're aiming forcarved pumpkin ideas easy, geometry is your best friend. Seriously. Think about it – straight lines, circles, triangles, squares. These are shapes you learned in kindergarten, not art school. They are predictable, require fewer tricky turns with your knife, and forgiving if your line isn't perfectly straight. A slightly wobbly circle still looks like a circle on a pumpkin. A complex face with a crooked smile just looks... unsettling in the wrong way.
Starting with basic shapes builds confidence. You get a feel for how the knife moves through the pumpkin wall, how much pressure you need, and how to manage the curves (or lack thereof). Master a simple triangle eye or a jagged mouth, and you're already halfway to a classic jack-o'-lantern. It's about achieving a recognizable, effective design with minimal effort and maximum impact, especially when viewed from a distance on a dark porch.
Putting Basic Shapes to Work
So, what simple geometric shapes should you tackle first? Triangles for eyes are a no-brainer – quick, easy, and instantly convey mischief or menace depending on their angle. A simple, wide rectangle or a few spaced-out squares make for a straightforward mouth. Circles are slightly trickier because you have to follow a curve, but cutting out a basic circle for an eye or a round mouth is still far simpler than attempting a complex, toothy grin. You can even combine shapes; two small triangles above a larger triangle make a decent angry eyebrow/eye combo.
Consider cutting out a simple star or moon shape. These are iconic Halloween symbols, and while they involve a few straight lines and angles (for a star) or a single curve (for a crescent moon), they are very manageable. Trace the shape, poke guiding holes along the outline, and connect the dots with your knife. It's less about artistic flair and more about following a clear path. These shapes are your foundation for genuinely easy carved pumpkin ideas.
- Try classic triangle eyes.
- Cut out a simple square or rectangle mouth.
- Attempt a basic circle for an eye or mouth.
- Combine triangles for eyebrows.
- Tackle simple stars or crescent moons.
Cookie Cutter Magic: Cheating (Smartly) Your Way to Cool Designs
Cookie Cutter Magic: Cheating (Smartly) Your Way to Cool Designs
Embrace the Shortcut
Look, nobody's judging you for wanting to take the path of least resistance, especially when it comes tocarved pumpkin ideas easy. And honestly, cookie cutters are the ultimate secret weapon for achieving clean, recognizable shapes without the freehand stress. Think of it as pre-fabrication for your gourd. Instead of trying to carve a perfect bat or star by hand, you're using a rigid template. It's not cheating; it's strategic efficiency. This method is particularly good if you're carving with kids or just have zero patience for precision work after a long day.
Using cookie cutters bypasses a lot of the tricky knife control needed for curves and points. You get consistent results every time, provided your pumpkin wall isn't ridiculously thick. It opens up a whole world of simple shapes – animals, holiday symbols, basic geometric forms – that look way more impressive than the effort involved. It's the pumpkin carving equivalent of using a cake mix; less work, still get dessert.
The Press and Carve Method
So, how does this cookie cutter magic actually work? It's surprisingly simple. You'll need metal cookie cutters; plastic ones usually aren't sturdy enough. Press the sharp edge of the cookie cutter firmly into the pumpkin wall. You want to apply enough pressure to make a clear indentation, ideally pressing it most of the way through the rind. For tougher pumpkins, a rubber mallet can help gently tap the back of the cutter to drive it in further. Don't go full Thor on it, though; you don't want to crack the pumpkin.
Once the cutter is embedded, use your small carving knife or craft knife to trace along the inner edge of the cookie cutter. Cut carefully, keeping the knife blade right against the metal. The cutter acts as your guide, ensuring you follow the shape perfectly. Work your way around the entire shape. Once you've cut all the way through, gently push the carved piece out from the inside. If it sticks, a little wiggle or a careful push with a skewer should pop it free. You're left with a clean, sharp cutout.
Tips for Cookie Cutter Success:
- Use metal cutters, not plastic.
- Choose cutters with simple, open shapes. Intricate details won't work well.
- Select an area of the pumpkin that is relatively flat.
- Press or gently mallet the cutter firmly into the rind.
- Cut *inside* the cutter edge for a clean shape.
- Push the piece out from the inside.
Best Shapes for the Job
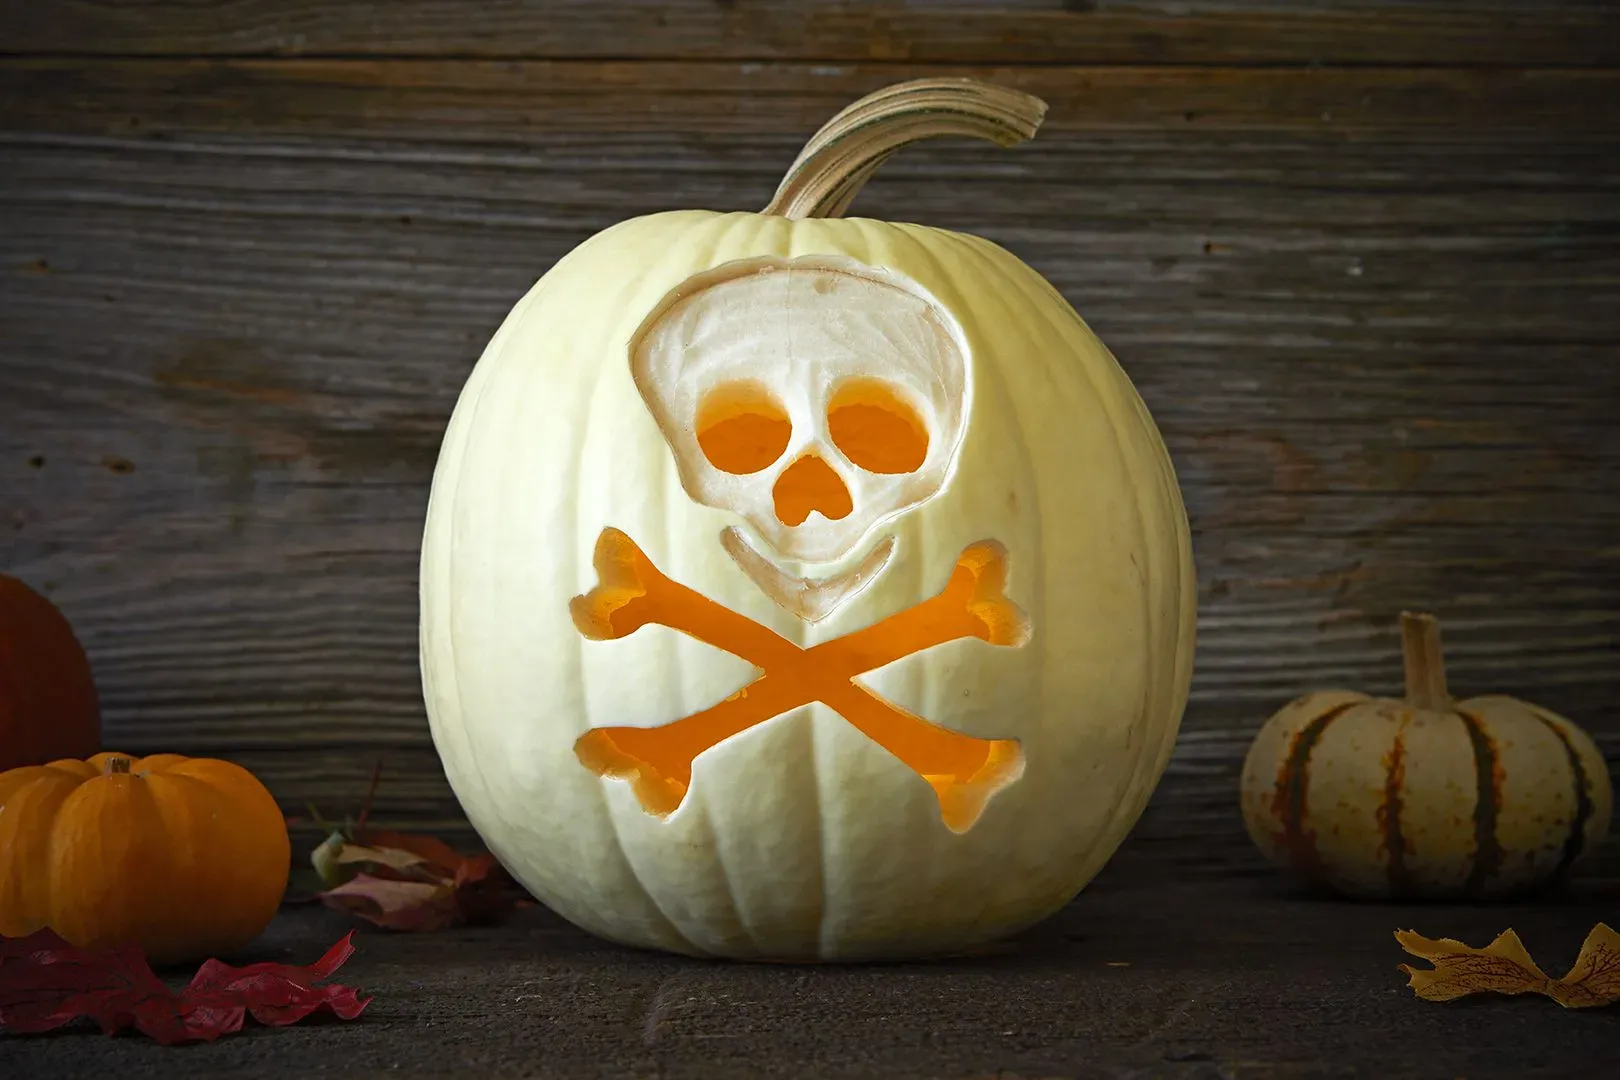
Not all cookie cutters are created equal when it comes to pumpkins. Avoid anything with super fine points or delicate internal cutouts; they'll just tear or get stuck. Simple, solid shapes are your best bet forcarved pumpkin ideas easyusing this technique. Stars, moons, basic circles, hearts, simple ghosts, or even just different sized dots (using round cutters) work wonderfully. Animal silhouettes like cats or bats are also great, provided they don't have tiny legs or tails that will break off.
I remember trying a detailed snowflake cutter once. It was a disaster. Half the points broke off, and the internal bits just crumbled. Stick to shapes where the knife path is clear and the resulting cutout is sturdy. You can use multiple different cutters on one pumpkin to create a pattern – a constellation of stars, a swarm of bats, or just random polka dots of various sizes. It's a foolproof way to get impressive results with minimal skill required.
Simple Faces: Classic Grins and Surprised Looks
Simple Faces: Classic Grins and Surprised Looks
Simple Faces: Classic Grins and Surprised Looks
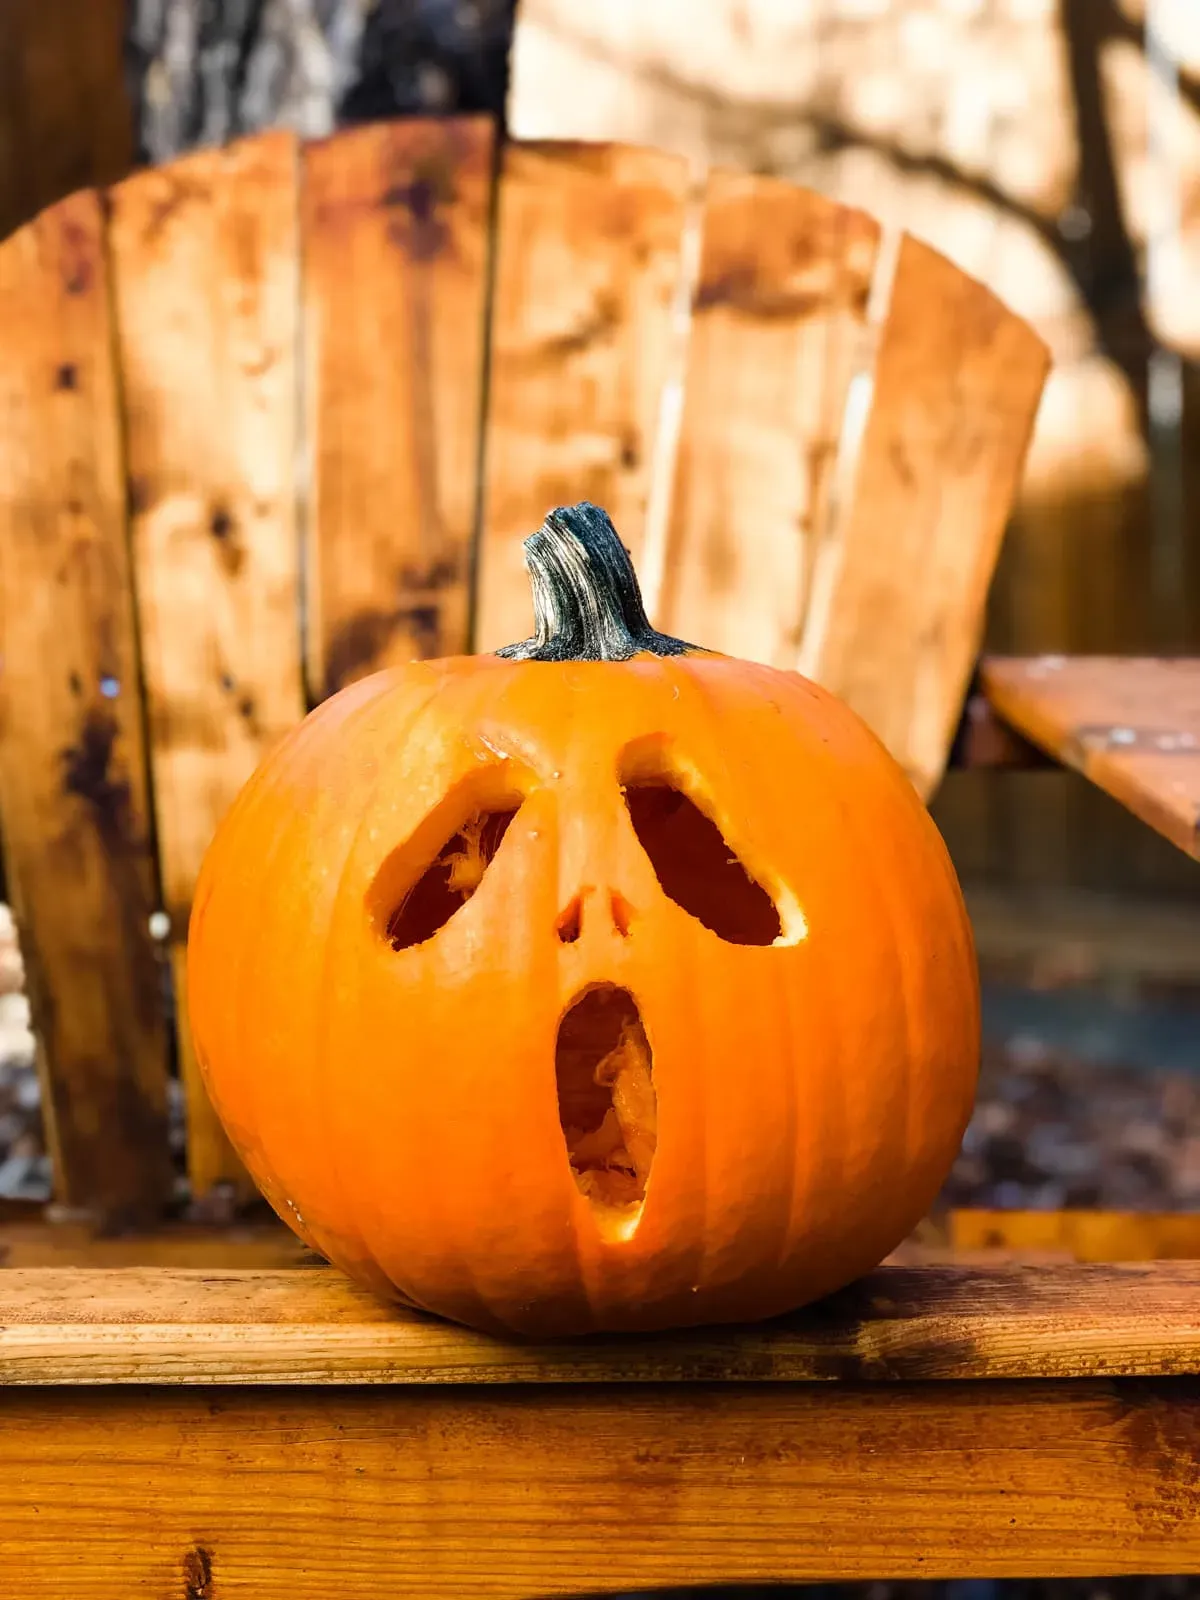
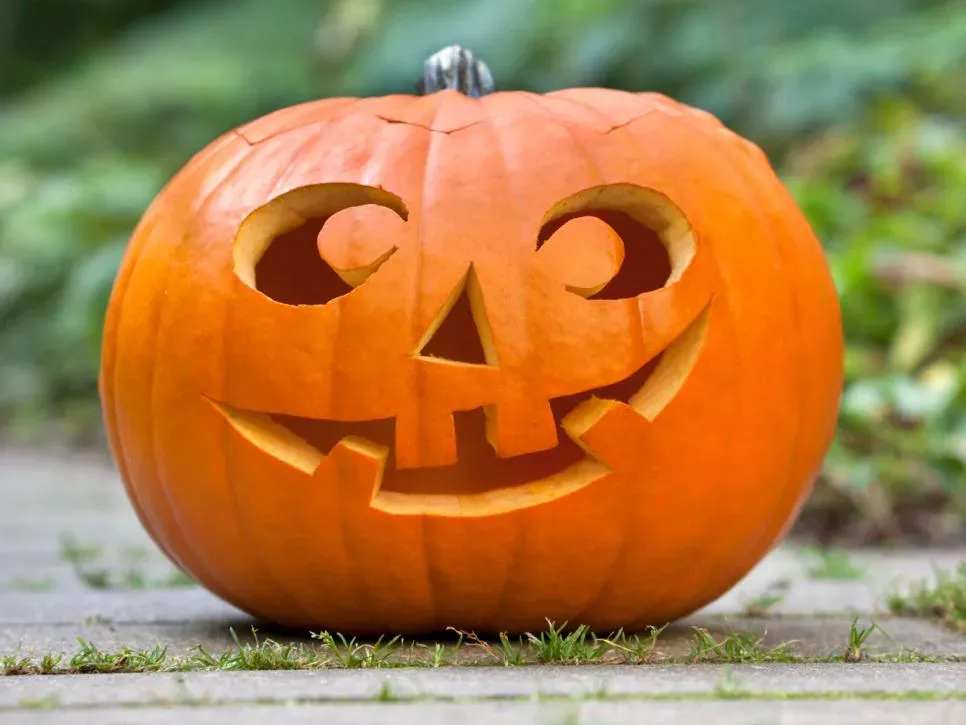
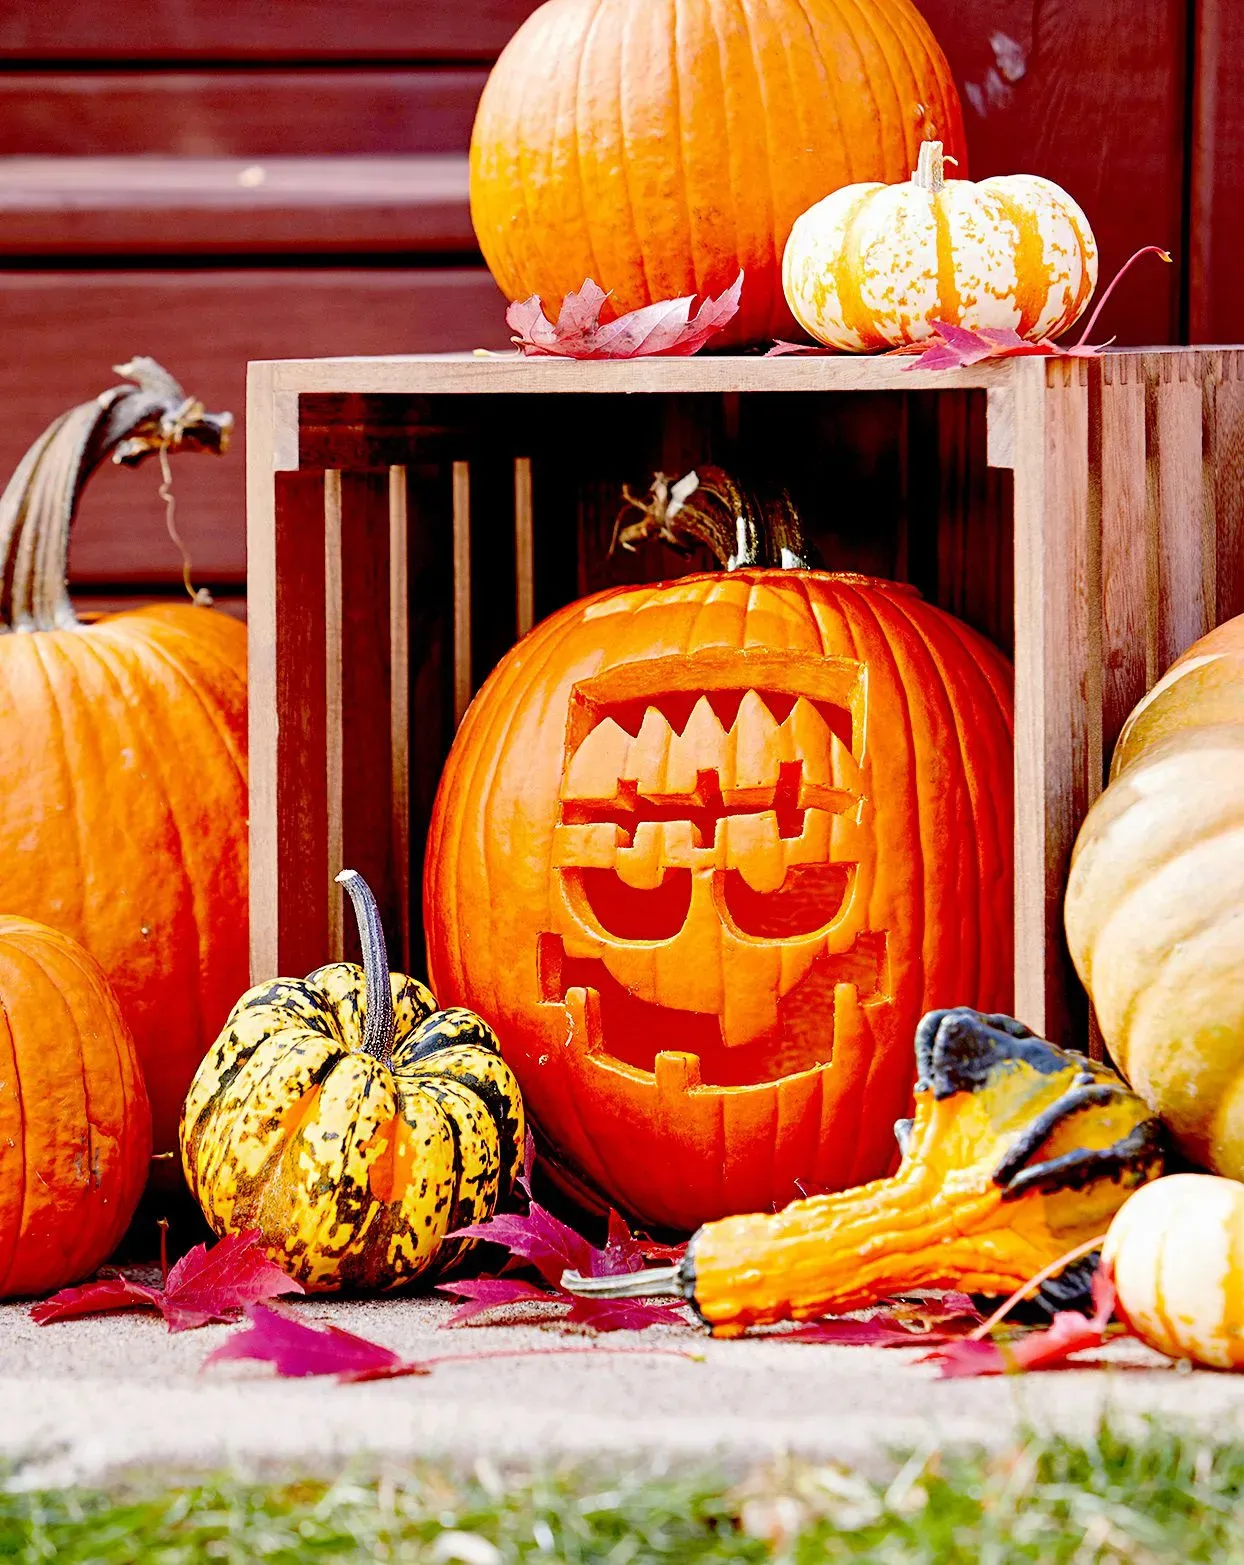
Alright, let's talk faces. This is probably what most people picture when they think of a jack-o'-lantern, but you don't need to be a portrait artist. For genuinelycarved pumpkin ideas easy, stick to the basics. Think simple triangle eyes (point up for spooky, point down for goofy), a classic jagged smile, or even just a few spaced-out squares or circles for a surprised or goofy look. The key here is symmetry isn't required, and imperfection often adds character. A slightly off-kilter eye or a crooked grin looks charming, not like a mistake. You're aiming for recognizable emotion, not anatomical accuracy. These simple expressions are quick to mark out, easy to cut, and instantly transform a plain pumpkin into a Halloween icon visible from the street.
Beyond Faces: Stars, Moons, and Basic Silhouettes
Beyond Faces: Stars, Moons, and Basic Silhouettes
Beyond Faces: Simple Symbols and Silhouettes
you've mastered the basic triangle eye and maybe even a jagged grin. But what if you're tired of faces? Or maybe you just want something a little different on your porch? This is where thinking "beyond the face" comes in handy for findingcarved pumpkin ideas easy. Simple symbols and basic silhouettes are often just as effective, sometimes more so, and require less fuss than trying to get a recognizable human (or monster) expression. Think clean lines and bold shapes that read well from a distance. A single, well-carved star or a crescent moon looks classic and requires carving only a few straight lines or one smooth curve. Much less stressful than attempting, say, a realistic nose.
Adding Detail Without Full Carving: Etching and Scraping
Adding Detail Without Full Carving: Etching and Scraping
Why Etch Instead of Carve?
Sometimes you want a little more than just a cutout shape, but you're not ready to commit to carving all the way through the pumpkin wall. That's where etching and scraping come in. This technique is fantastic for creating designs that glow differently than the carved areas, adding depth and texture without the risk of structural collapse that comes with intricate full cuts. It's a less intimidating way to add detail and is absolutely perfect for genuinelycarved pumpkin ideas easy. Instead of removing a piece of pumpkin entirely, you're just scraping away the tough outer skin (the rind) to expose the lighter flesh underneath. This exposed flesh is translucent, allowing light from inside the pumpkin to shine through softly. It's like drawing with light, and it's much more forgiving than trying to make a perfect cut.
How to Get Started with Scraping
Getting started with etching or scraping is straightforward. You don't need specialized tools, though there are some scraping tools available in pumpkin carving kits that can be helpful. A simple linoleum cutter, a sturdy metal spoon with a sharp edge, or even a clay sculpting tool can work. First, draw your design onto the pumpkin skin. Then, carefully scrape away the outer layer of skin within your design lines. You don't need to go deep, just deep enough to remove the green or orange rind and reveal the lighter layer below. Experiment with scraping different depths – shallower scrapes will glow less brightly, deeper scrapes will be more intense. This allows for shading and varying levels of light, adding a surprising amount of sophistication to your easy design. Clean up the edges with a smaller tool if needed.
Here are some tools you can use for etching:
- Linoleum cutter
- Metal spoon with a sharp edge
- Clay sculpting tools
- Dedicated pumpkin scraping tools (often found in kits)
- Even a sturdy screwdriver or awl can work for basic lines
Keeping Your Creation from Collapsing: Preservation Tips
Keeping Your Creation from Collapsing: Preservation Tips
Keeping Your Creation from Collapsing: Preservation Tips
You've done the hard work, scraped out the guts, maybe even pulled off one of thesecarved pumpkin ideas easy. Now you want it to last longer than 48 hours before it starts looking like a sad, deflated head. Carved pumpkins are essentially dying organic matter exposed to the elements, so they *will* eventually rot. There's no magic bullet, but you can slow down the inevitable decay. The key is keeping the exposed flesh from drying out too fast or getting moldy. Think of it like trying to keep cut fruit fresh – you're fighting against nature. A common trick is to spray the carved edges with a solution of water and a splash of bleach or vinegar. This helps kill off some of the mold and bacteria trying to move in. Some folks swear by rubbing petroleum jelly on the cut surfaces to seal in moisture, although that can make it look a bit greasy. Bringing it inside overnight, especially if it's freezing or pouring rain, definitely buys you some time.
Troubleshooting Common Pumpkin Problems
Troubleshooting Common Pumpkin Problems
The Sagging, Moldy Mess
you spent an hour or two (or maybe just twenty minutes, if you stuck tocarved pumpkin ideas easy) on your pumpkin, and now, just a couple of days later, it's starting to look less like a festive decoration and more like a science experiment gone wrong. The edges are shriveling, maybe there's some suspicious fuzzy stuff growing, and the whole thing just looks... tired. This is the most common heartbreak of pumpkin carving. It happens because once you cut into the pumpkin, you break down its natural defenses. Bacteria and mold spores, which are pretty much everywhere, see it as an open invitation to a buffet. Drying out is also a major enemy, especially in dry climates.
Dealing with Carving Catastrophes
Look, unless you're a robot, you're going to make a mistake. Maybe your knife slipped, you cut too far, or a delicate piece broke off. It happens to the best of us, even when attempting the mostcarved pumpkin ideas easy. Don't panic and immediately toss the pumpkin. Sometimes a mistake can be incorporated into the design – maybe that slip becomes a scar or a wrinkle. If a piece broke off, you can try to reattach it with toothpicks. Just poke a few toothpicks into the main pumpkin body around the break, line up the broken piece, and gently push it back on. It might not be perfect, but it beats having a gaping, unintended hole. You can also use black paint or a permanent marker to fill in small nicks or clean up messy edges discreetly.
Quick Fixes for Pumpkin Problems:
- For sagging edges: Spray with water and a little bleach/vinegar solution.
- For mold: Wipe gently with a cloth dipped in bleach/vinegar.
- For broken pieces: Reattach with toothpicks.
- For messy cuts: Use black paint or marker to clean edges.
- To prevent drying: Rub petroleum jelly on cut surfaces (can look greasy).
- Bring inside during harsh weather.
Candles That Just Won't Stay Lit
You've got your beautifully carved pumpkin, your light source ready, and then... poof. The candle flickers and dies. This is usually an airflow problem. A pumpkin isn't designed to be a perfect lantern. If you just have a small hole at the top and maybe a few cutouts, there often isn't enough oxygen getting in, or the smoke isn't escaping properly. To fix this, make sure the hole you cut in the top (or bottom, if you carve that way) is large enough. Sometimes adding a few small, strategically placed ventilation holes near the top can create a better draft. You can also try using a different type of candle or even switch to battery-operated LED lights, which are safer, last longer, and don't require any airflow at all – solving your problem instantly.
Frequently Asked Questions About Easy Pumpkin Carving

Frequently Asked Questions About Easy Pumpkin Carving
What's the Absolute Easiest Design to Start With?
Alright, if you're looking for the absolute rock-bottom easiest way to get a cool effect withcarved pumpkin ideas easy, forget faces for a second. The simplest approach is often just cutting out a series of different-sized circles or dots using drill bits (carefully!) or even just poking holes with a sturdy skewer in a pattern. Think constellations, random polka dots, or even spelling out simple words letter by letter. This requires minimal knife control and still looks fantastic when lit up, creating a starry or bubbly effect. If you want something more graphic, go back to those geometric shapes we talked about – a single large triangle or square is about as simple as it gets and still makes a strong visual statement from the curb. Don't overthink it; sometimes less is way, way more.
How Do I Get My Design Onto the Pumpkin Without Messing It Up?
Transferring a design is where many people get tripped up, especially if they're not confident drawing freehand directly onto the pumpkin. A super simple trick forcarved pumpkin ideas easyis to use wax paper. Draw or print your design onto a sheet of wax paper. Tape the wax paper firmly onto the pumpkin where you want the design to go. Then, use a poking tool – like an awl, a sturdy skewer, or even a sharp pencil – to poke small holes through the paper and into the pumpkin skin, following the lines of your design. Space the holes fairly close together so you create a clear dotted outline. Once you remove the wax paper, you'll have a series of dots on the pumpkin that you can connect with your carving knife. It's like a connect-the-dots game, but spookier. For really basic shapes, you can even just draw directly on the pumpkin with a dry-erase marker; if you mess up, just wipe it off.
Easy Design Transfer Methods:
- Use wax paper and a poking tool to create a dotted outline.
- Draw directly on the pumpkin with a dry-erase marker.
- Tape a printed stencil to the pumpkin and trace it with a poking tool.
- For geometric shapes, use tape to create straight lines as guides before cutting.
Is There Any Way to *Really* Make My Carved Pumpkin Last?
Ah, the million-dollar question. As we touched on, there's no magic way to stop a carved pumpkin from eventually decomposing. It's organic matter, it's exposed to air and creepy crawlies, it's going to break down. However, you can definitely extend its life beyond a couple of sad, shriveled days. Keeping it hydrated is key, but not soaking wet. Giving it a light misting of water daily can help prevent drying, especially on the cut edges. The bleach or vinegar spray we mentioned earlier is probably your best bet for fighting off mold and bacteria – a quick spritz on all cut surfaces after carving and maybe every day or two. Some people also swear by giving the whole pumpkin an ice bath for a few hours after carving to rehydrate it, or smearing petroleum jelly on the cut edges to seal in moisture. And seriously, if it's going to rain or freeze overnight, bring the poor thing inside. A little common sense goes a long way in preserving yourcarved pumpkin ideas easymasterpiece for a few extra nights of spooky glory.
Wrapping Up Your Easy Carving Project
So, you've navigated the guts, made some strategic cuts, and hopefully avoided losing a finger. The goal wasn't to win a national carving competition, but to get a decent-looking jack-o'-lantern on your porch without a breakdown. Thesecarved pumpkin ideas easyare about making the process accessible, not about achieving perfection. If it lights up and doesn't immediately collapse, consider it a win. Grab a handful of candy corn (or something better), admire your work, and maybe start thinking about next year's minimal-effort masterpiece.