Table of Contents
let's be real. Pumpkin carving sounds fun until you're elbow-deep in goo, staring at a lopsided hole where a majestic jack-o'-lantern face was supposed to be. Maybe you tried the intricate stencil last year and ended up with something that looked less like a spooky ghost and more like... well, a disaster. It doesn't have to be a battle against gourd guts and dull knives.
Why Easy Animal Pumpkin Carving Ideas Are a Hit

Why Easy Animal Pumpkin Carving Ideas Are a Hit
Ditching the Drama, Embracing the Cute
Let's be honest. Not everyone wants their porch to look like a scene from a horror movie. While spooky faces have their place, they can be tricky to execute without looking unintentionally comical or just plain messy. This is precisely where easy animal pumpkin carving ideas swoop in to save the day. They offer a refreshing alternative, bringing charm and a touch of whimsy to your Halloween decor instead of jump scares.
Think about it: a slightly goofy cat face is way more forgiving than trying to carve perfect, menacing fangs. These designs resonate with a broader audience, from tiny trick-or-treaters who might be scared of traditional ghouls to adults who appreciate a bit of lighthearted fun. It's less about technical precision and more about capturing a recognizable, often adorable, form.
Open to All Skill Levels (Seriously)
One major reason why easy animal pumpkin carving ideas gain traction every year is their sheer accessibility. You don't need years of carving experience or a steady hand worthy of a surgeon to pull them off. Many designs rely on simple shapes, basic cutouts, or even just scratching the surface layer of the pumpkin skin.
Compare this to attempting, say, a detailed portrait or a complex haunted house scene. Those require specific tools, advanced techniques, and a tolerance for failure. Easy animal designs, however, are perfect for beginners, kids, or anyone who just wants to get a decent-looking pumpkin done without spending hours hunched over a waxy mess. My neighbor, a self-proclaimed "carving klutz," managed a surprisingly convincing (and cute!) owl last year using nothing but a basic kit and a printout.
- Less stress, more fun
- Accessible for all ages
- Forgiving designs
- Great for beginners
- Appeals to a wider audience
Charm That Lasts Beyond October 31st
Unlike super scary or overly specific designs that might feel dated the moment Halloween passes, many easy animal pumpkin carving ideas have a timeless appeal. A friendly fox or a sleepy bear face feels less like a temporary prop and more like a genuinely cute decoration. They can even blend into fall decor themes beyond just the single night of trick-or-treating.
Furthermore, there's a narrative quality to animal designs that traditional faces often lack. You can imagine little stories around your carved creatures. Are they woodland critters getting ready for winter? Are they pets joining the Halloween fun? This adds a layer of engagement that goes beyond just a simple carved expression. They bring personality to your pumpkin patch without demanding expert-level execution.
Simple Animal Pumpkin Carving Ideas Anyone Can Try

Simple Animal Pumpkin Carving Ideas Anyone Can Try
Starting with the Basics: Cats and Dogs
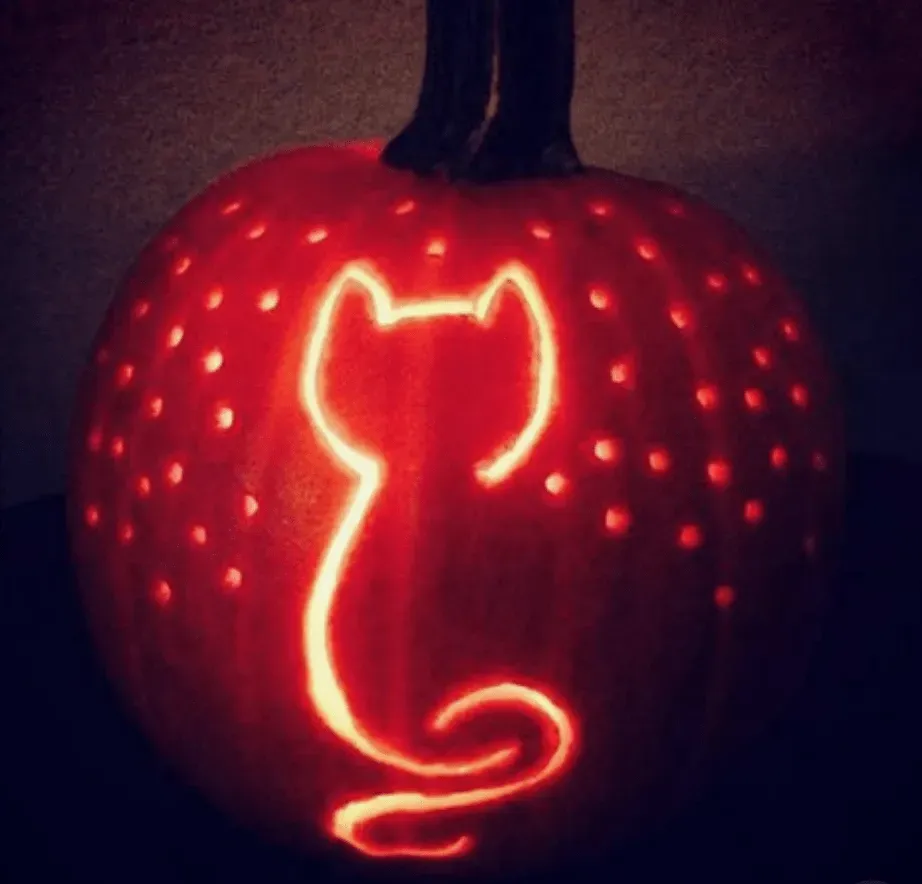
Look, you don't need to attempt a photorealistic badger to get started. Some of the easiest animal pumpkin carving ideas revolve around our most common companions: cats and dogs. Think simple shapes for ears – triangles or rounded bumps work perfectly. Eyes can be classic circles, ovals, or even just slashes for a slightly more cartoonish look. A simple upside-down triangle for the nose and a curved line for the mouth, maybe add a couple of dots for whiskers (you can even just poke holes or scratch the surface), and bam – you've got a recognizable pet face.
It's about capturing the essence, not replicating every single hair. A friend of mine, convinced she had zero artistic talent, managed a whole row of goofy-looking dog faces last year. They weren't perfect, but they were unmistakably dogs, and they made everyone smile. That's the goal here – approachable, recognizable, and charming.
Branching Out: Owls and Bunnies
Once you've mastered the basic pet faces, you can easily move to other simple animal pumpkin carving ideas. Owls are surprisingly easy. Large, round eyes are the key. You can carve circles or use cookie cutters if you have them. A small triangle for a beak, and maybe some simple feather shapes scratched onto the pumpkin surface around the eyes. For bunnies, think big ears that stand up or flop down. Simple oval eyes and a small nose/mouth combo are all you need. You can even leave the bottom of the pumpkin intact and just carve the face and ears higher up.
These designs rely on a few key features that instantly signal the animal. You don't need intricate details. A few strategic cuts or scrapes are often enough to bring these creatures to life on your porch. It’s proof you don’t need to be Picasso with a paring knife.
- Goofy Cat Face
- Friendly Dog Face
- Wide-Eyed Owl
- Floppy-Eared Bunny
- Simple Bat Silhouette
Tools and Tricks to Make Animal Pumpkin Carving Easy
Tools and Tricks to Make Animal Pumpkin Carving Easy
Gearing Up Without Going Broke
let’s talk tools. Forget those flimsy little saws that come in the dollar store kits; they're basically useless unless you enjoy hand cramps and jagged edges. To make animal pumpkin carving ideas easy, you need a few basics that actually work. A sturdy, serrated knife (a small one from your kitchen drawer works fine for cutting the top or bottom hole) is essential. For the actual detail work on faces and features, a small, sharp paring knife is your best friend. Don't underestimate a good scoop, either – getting all that stringy gunk out smoothly makes carving way less frustrating. Trust me, trying to scrape out a pumpkin with a spoon you'd use for ice cream is a one-way ticket to regret city.
- Small Serrated Knife: For cutting the lid/base.
- Sharp Paring Knife: For detailed cuts and features.
- Pumpkin Scoop: To efficiently remove seeds and pulp.
- Poker Tool or Skewer: For transferring stencil patterns or making small holes.
- Dry Erase Marker: To draw designs directly on the pumpkin.
Finishing Your Easy Animal Pumpkin Carving Masterpiece
Finishing Your Easy Animal Pumpkin Carving Masterpiece
Cleaning Up Your Cute Creation
Alright, you've carved your adorable animal face. Great job! Now comes the slightly messy but crucial part: cleanup. You'll have little bits of pumpkin flesh and seeds clinging to the edges of your cuts. Don't just leave them there; they'll start to rot faster and look sloppy. Grab a damp cloth or even a slightly wet paper towel and gently wipe away any debris around your carved features. A soft brush, like an old paintbrush you don't need anymore, can work wonders for getting into smaller crevices.
Make sure the inside is scraped out as thoroughly as possible, especially near the carved areas. Any leftover guts are just an invitation for mold. It sounds basic, but a clean pumpkin is a happy pumpkin, and it makes all your hard work look much better. Think of it as giving your little creature a fresh face before its big debut on the porch.
- Wipe carved edges with a damp cloth.
- Use a soft brush for small areas.
- Scrape the inside clean, especially near cuts.
- Remove all seeds and stringy bits.
Keeping Your Animal Friend Fresh
You put in the effort to create these easy animal pumpkin carving ideas, so you want them to last longer than a day, right? Pumpkins start to deteriorate pretty quickly once their protective skin is broken. There are a few simple tricks to slow down the inevitable decay. One common method is spraying the carved areas with a mixture of water and a little white vinegar. This helps prevent mold growth.
Some folks swear by giving the whole pumpkin a quick bath in a bleach solution (like one teaspoon of bleach per gallon of water) for a few minutes. Just make sure to rinse it well afterward. Petroleum jelly or vegetable oil rubbed onto the cut edges can also help seal in moisture and keep the pumpkin looking fresh longer. Pick a method that works for you, but do something; neglecting this step means your cute critter might look a bit sad and droopy sooner than you'd like.
Method | How it Works | Pros | Cons |
|---|---|---|---|
Vinegar Spray | Inhibits mold growth | Easy, uses common household item | Might need reapplication |
Bleach Soak | Kills bacteria and mold spores | Effective | Requires handling bleach, needs rinsing |
Petroleum Jelly/Oil | Seals in moisture | Keeps edges from drying out | Can look greasy, attracts dust |
Your Easy Animal Carving Adventure Ends Here (For Now)
So there you have it. Proof that you don't need to be Michelangelo with a paring knife to create some seriously cute, or at least recognizable, animal faces on your pumpkins. We've covered the simple shapes, the forgiving techniques, and hopefully, given you a few laughs along the way. No more staring blankly at an orange orb, wondering where to even begin. Grab your tools, pick your favorite not-too-complicated critter, and give it a shot. Worst case? You make pumpkin soup. Best case? You have the most charmingly carved creatures on the block. Happy carving, and may your animal pumpkin carving ideas easy dreams come true!